
Categorie popolari
State cercando un filato?


Commenti / Domande (8)
![]() Mercedes Cuadra ha scritto:
Mercedes Cuadra ha scritto:
Hola, buen día! Respecto a mi pregunta reciente, ya he logrado entender mejor al grafico y concluido correctamente la estrella. Gracias y saludos, Mercedes
28.06.2023 - 19:48
![]() Mercedes Cuadra ha scritto:
Mercedes Cuadra ha scritto:
Hola, buen día. Acabo de comprar el hilo recomendado de Drops. Estoy confundida con cómo hacer los arcos de la "V invertida" ="3 chain stitches". Donde comienzan y como se unen un arco con el otro. Es igual con los tres picot. Si primero tengo que hacer la cuatro treble como comienzo haciendo los picots? Debo cortar hilo y volver a comenzar? Gracias, Mercedes
27.06.2023 - 21:27DROPS Design ha risposto:
Hola Mercedes, en la vuelta con arcos trabajar como sigue: 3 cad (= 1 punto alto), 3 cad (= arco), *1 punto alto, 1 punto alto, 3 cad, 1 punto alto*. Repetir de * a *, terminar con 1 punto alto y 1 punto enano en el 3º cad del inicio. La vuelta con picot se trabaja como sigue: 3 cad (= 1 punto alto), 2 puntos altos en el arco de 3 cad, 2 puntos altos dobles en el mismo arco y ahora comenzar a trabajar los picot: 3 cad y punto enano en el 1º cad; repetir 2 veces más y en el último picot asegurar con 1 punto enano en el último punto alto doble trabajado. Ahora seguir con 2 puntos altos dobles y 3 puntos altos y pasar al siguiente arco.
30.06.2023 - 21:07
![]() Mia ha scritto:
Mia ha scritto:
Thank you for the fast reply and explanation. Now my little presents can be ready for X'mas. All the best and Merry Christmas !
29.11.2022 - 12:05
![]() Mia ha scritto:
Mia ha scritto:
Hi, the pattern is lovely but I'm lost with the picot stitches - at which moment do we start with 3 chain? In the diagram picot stitches sit at the top of trebles. But how are they attached? I do 3 dc and 2 treble and ..... .? Please help, I must hurry before Christmas :)
28.11.2022 - 19:27DROPS Design ha risposto:
Dear Mia, you start each round with 3 chains (see 2nd symbol + beg of rounds 1, 2 and 3); you work 3 dc, 2 tr (US-English), then 3 picots (= 3 ch, 1 slip st in the first of these 3 ch), but finish the last picot with 1 slip st in the top of the last treble worked (so that the 3 picots are attached to the last treble). Happy crocheting!
29.11.2022 - 09:53
![]() Roselyne ha scritto:
Roselyne ha scritto:
Bonjour. J’ai du mail à comprendre les diagrammes. Je bloque à la fin du 2ème rang. Avez vous une explication écrite ? Merci par avance
05.10.2022 - 22:40DROPS Design ha risposto:
Bonjour Roselyne, le 2ème rang se termine comme le 1er, par 1 maille coulée dans la 3ème maille en l'air du début du tour, pour commencer le 3ème rang, crochetez 1 maille coulée dans le 1er arceau du 2ème tour, puis 3 mailles en l'air (=1bride)+2 brides+2double-brides+3 picots + 2 double-brides +3 brides dans l'arceau de 3 mailles en l'air du 2ème tour - terminez le 3ème tour par 1 maille coulée dans la 3ème maille en l'air du début du tour. Bon crochet!
06.10.2022 - 08:23
![]() Helen ha scritto:
Helen ha scritto:
Thank you for these wonderful Christmas Calendar treats. I\'ve enjoyed knitting them. I\'m going to learn how to crochet for next year so I can give crochet Christmas tree decorations to my friends!
26.12.2021 - 09:40
![]() Monika ha scritto:
Monika ha scritto:
Letošní kalendář je moc pěkný, děkuji za něj.
24.12.2021 - 11:11
![]() Lilly Brun Kristensen ha scritto:
Lilly Brun Kristensen ha scritto:
Jatak
24.12.2021 - 09:33
|
||||||||||||||||||||||
Cheers!#cheerscoasters |
||||||||||||||||||||||
 |
 |
|||||||||||||||||||||
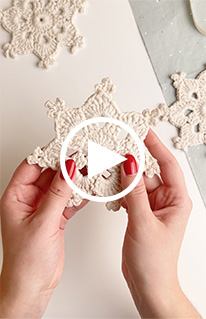
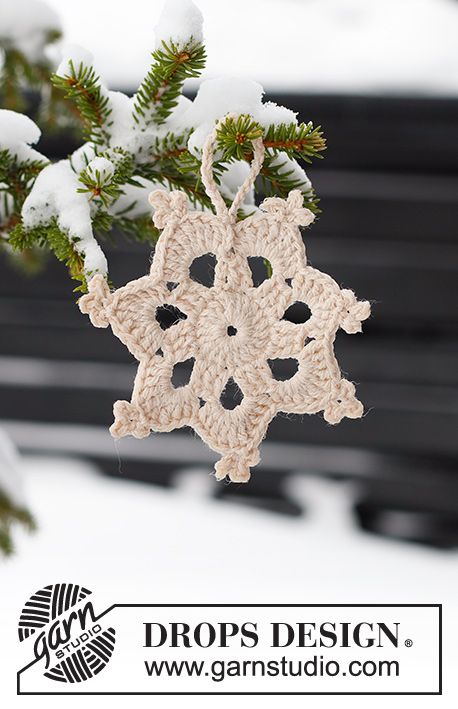
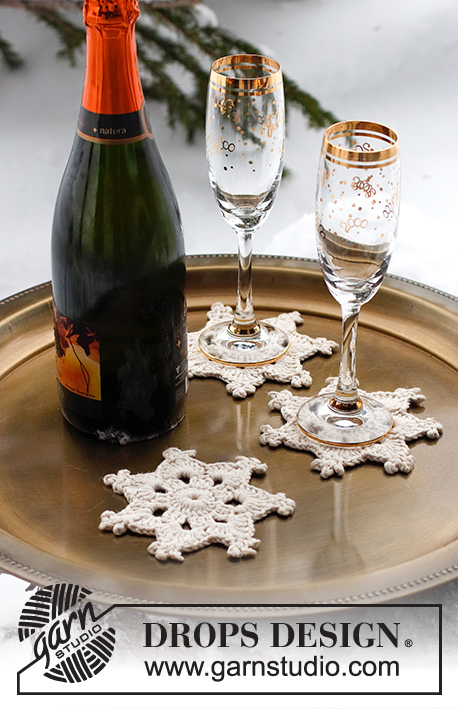
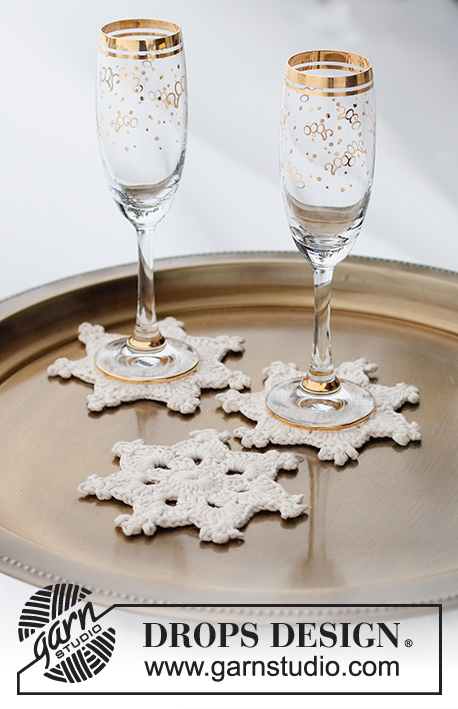
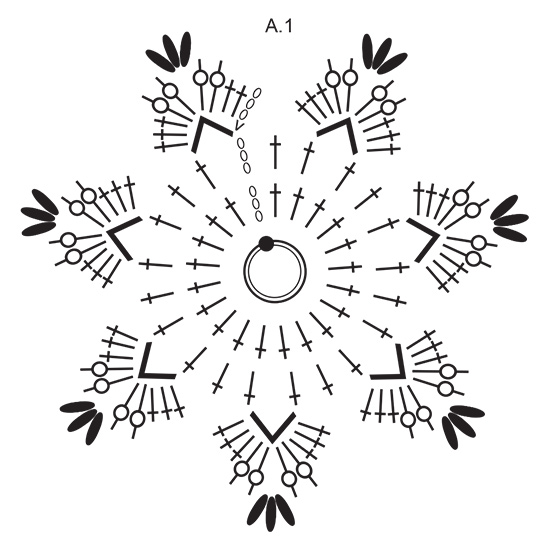
Sottobicchiere lavorato all’uncinetto in DROPS Paris. Tema: Natale.
DROPS Extra 0-1566 |
||||||||||||||||||||||
|
---------------------------------------------------------- TECNICHE IMPIEGATE: ---------------------------------------------------------- SUGGERIMENTO PER LE CATENELLE: Se lavorate all’altezza della punta dell’uncinetto la catenella risulterà spesso troppo tirata. 1 catenella dev’essere lunga come la larghezza di 1 maglia alta/maglia bassa. MOTIVO: Vedere il diagramma A.1. ---------------------------------------------------------- INIZIO DEL LAVORO: ---------------------------------------------------------- SOTTOBICCHIERE – BREVE RIASSUNTO DEL LAVORO: Lavorato in tondo dal centro verso l’esterno. SOTTOBICCHIERE: Iniziare con l’uncinetto n° 4 mm e DROPS Paris. Leggere il SUGGERIMENTO PER LE CATENELLE, avviare 7 catenelle e unirle ad anello con 1 maglia bassissima nella 1° catenella. Poi lavorare il diagramma A.1. FARE ATTENZIONE ALLA TENSIONE DEL LAVORO! Alla fine di A.1, chiudere e affrancare. IRRIGIDIMENTO: Per irrigidire la stella, immergerla in acqua zuccherata o soda senza colore e lasciarla asciugare in piano. |
||||||||||||||||||||||
Spiegazioni del diagramma |
||||||||||||||||||||||
|
||||||||||||||||||||||
 |
||||||||||||||||||||||
Avete terminato questo modello?Allora taggate le vostre foto con #dropspattern #cheerscoasters o inviatele alla #dropsfan gallery. Avete bisogno di aiuto con questo modello?Troverete 8 video tutorial, una sezione per i commenti/domande e molto altro guardando il modello su www.garnstudio.com © 1982-2026 DROPS Design A/S. Ci riserviamo tutti i diritti. Questo documento, compreso tutte le sue sotto-sezioni, è protetto dalle leggi sul copyright. Potete leggere quello che potete fare con i nostri modelli alla fine di ogni modello sul nostro sito. |
||||||||||||||||||||||


Con oltre 40 anni di esperienza nel design di modelli di maglia e uncinetto, DROPS Design offre la più estesa collezione di modelli gratuiti su internet - tradotti in 17 lingue. Ad oggi vi possiamo fornire 324 cataloghi e 12290 modelli - 9561 dei quali sono tradotti in Italiano.
Ci stiamo impegnando molto per darvi il meglio che vi possiamo offrire in termini di maglia e uncinetto, ispirazioni e consigli così come filati di grande qualità ad un prezzo incredibile! Volete utilizzare i nostri modelli per qualcosa d'altro oltre al vostro uso personale? Potete leggere tutto ciò che è consentito nel testo sul Copyright in basso su tutte le pagine dei nostri modelli. Buon lavoro!
Lasciare un commento sul modello DROPS Extra 0-1566
Noi saremmo felici di ricevere i tuoi commenti e opinioni su questo modello!
Se vuoi fare una domanda, fai per favore attenzione a selezionare la categoria corretta nella casella qui sotto per velocizzare il processo di risposta. I campi richiesti sono indicati da *.