
Oblíbené kategorie
Hledáte přízi?


Komentáře / Otázky (23)
![]() Leeanne napsala:
Leeanne napsala:
Addtnl. info for my last comments: I was confused by the first sentence in the short rows instructions stating to do 6 rows over all stitches. I thought that was part of the directions and the piece started with 6 rows before starting the short row repeat cycle but that is incorrect. This sentence is just telling you that there are 6 rows included in the short row instruction cycle that are not, in fact, short rows – 6 full rows and 2 short rows (not in that order) are listed in the row cycle.
06.09.2025 - 15:15
![]() Leeanne napsala:
Leeanne napsala:
(Cont. from previous two comments) next row starts with R3 and finishes with L3 and last row starts with L4 and finishes with R4. Then you start the cycle again with the first short row. So yes, the short row cycle is short row, full row, short row, full row, full row, full row, full row, full row as the pattern states (1 SR followed by 1 full row followed by 1 SR followed by 5 full rows). There are no edges in which you are not doing a picot edge instruction which allows for an even 8 row cycle
06.09.2025 - 15:08
![]() Leeanne napsala:
Leeanne napsala:
(continued from my previous comment) work the L2 row to the first marker and turn to work back to the “beginning” of the left side row, ending with L3, turn and start a new row with L4, working all the way across, ending with R4, (all the remaining rows in the cycle go all the way across – no more short rows) next row begins with R1 and goes all the way across to the last 4 stitches, ending in L1, turn and start with L2 and go all the way across to finish with R2, (cont. in next comment)
06.09.2025 - 15:03
![]() Leeanne napsala:
Leeanne napsala:
For anyone that needs it, here is the cycle of rows, combining picot edge with short rows instructions (it helps to draw this out on paper): start with right side 1 (R1) and work a short row (to first marker only, not all the way across), turn and work back to the beginning and knit the last four with R2, turn to start next row beginning with R3 and knit all the way across, ending this row with L1, then start the second short row with L2, (continued in next comment)
06.09.2025 - 14:58
![]() Leeanne napsala:
Leeanne napsala:
I figured it out! It is definitely not too complicated but they could have written this pattern differently so it wouldn’t take weeks or trial and error to figure out how to work the short rows in with the picot edge. Maybe we were just making it too complicated. I don’t have enough room to write the pattern in this comment so I’ll start a new one. It is easier to draw your lines and mark each end with the picot line number but I’ll try to write it here in my next comment.
06.09.2025 - 14:55
![]() Leeanne napsala:
Leeanne napsala:
I think I get it! I will test it in the morning and comment again trying to explain it for others if I have it right. My last two comments are wrong for sure. It helps to draw the rows as a picture on paper and mark the ends with the line number.
06.09.2025 - 05:10
![]() Leeanne napsala:
Leeanne napsala:
Revising my last comment: I now have it written as: short row, R1 &L1 on the same row, short row, R2 & L2, short row, R3 & L3, short row, R4 & L4. But this adds up to 8 rows on the sides and only 4 rows in the middle, not 6. Also not sure why the short rows directions refers to the middle stitches as being 70 (for the second size) when it’s only 30 (if excluding 25 on each end) or 72 (if excluding only the outermost 4 on each end).
06.09.2025 - 04:26
![]() Leanne napsala:
Leanne napsala:
The directions for the short rows are difficult to figure out. I’ve been working at this for a few weeks with my MIL, have restarted my project 7 times and we still don’t have it right. So we are alternating between right and left rows 1, 2, etc. when doing full rows? We are not doing any picot edge instructions when doing short rows, correct? To incoorporate the short rows, does it go: left row 1, right row 1, short row, left row 2, right row 2, short row, etc. through all four edge rows?
06.09.2025 - 02:40
![]() Leeanne napsala:
Leeanne napsala:
In addition to my last comment, I’m also confused because it says for garter stitch to knit two rows. The main directions says start with the right Picot edge, then knit the directions for garter stitch for the rest of the row, except for the last four and then knit the directions for the left edge on the last four. How do you knit two rows for the garter stitch directions in between doing the right and left edges?
14.07.2025 - 19:22Odpověď DROPS Design :
Dear Leeanne, the garter stitch structure is 2 knit rows. So whenever most of the stitches in the row are knitted, both from the right side and the wrong side, the resulting texture will be garter stitch. In the picot edges we are already using garter stitch, since all other stitches except for the 4 stitches on each side for the picot are knitted from the right side and the wrong side. So you just need to work as indicated; the edges will have the picot texture while the remaining stitches are knitted. Happy knitting!
19.07.2025 - 17:47
![]() Leeanne napsala:
Leeanne napsala:
A video of the actual pattern, please! This is so confusing. I’ve now learned how to do picot edges and short rows, but I can’t understand how to do both at the same time. How do you know which row of the picot edge you’re on if you’ve turned around and gone the other direction halfway through a row? And then when you start the next row do you count as if half the row is row 5 and half is row 6 or just continue with the next direction for that edge in sequence, ignoring row numbers?
14.07.2025 - 19:18Odpověď DROPS Design :
Dear Leeanne, please remember to mark your comments as questions so that we can see them and answer sooner. When you are combining the short rows and the picot edges, count only the rows where you reach the edges; those rows where you turn before reaching the edges are not taken into account for the picot edges on that side. Happy knitting!
19.07.2025 - 17:48
|
|
Berry Kiss#berrykissvest |
|
 |
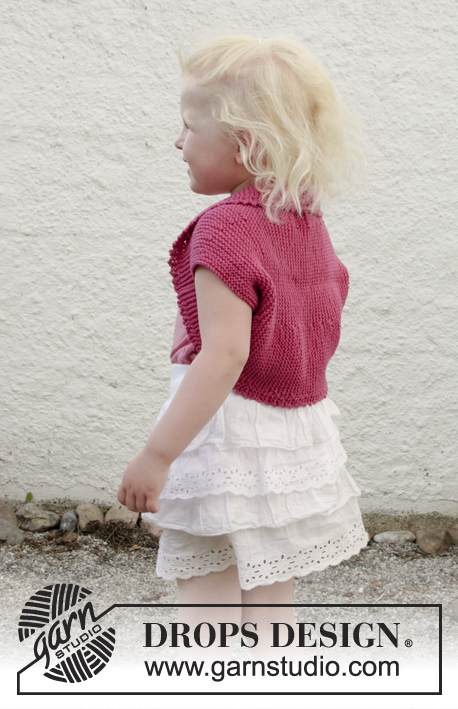 |
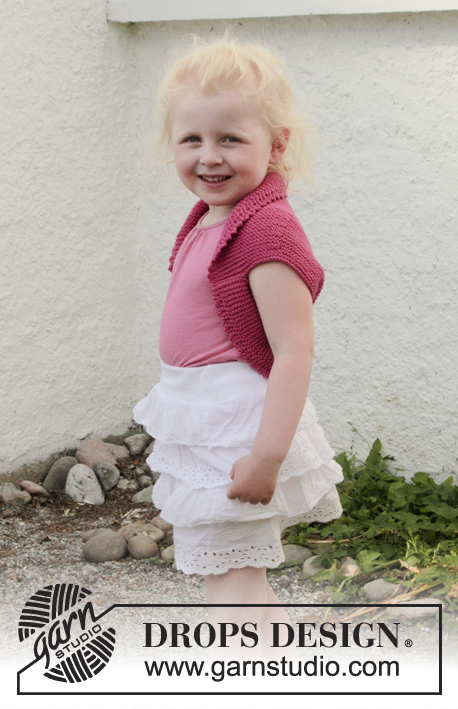
Dětské bolerko s pikotkovým lemem pletené zkrácenými řadami vroubkovým vzorem z příze DROPS Cotton Merino. Velikost 3 - 12 let.
DROPS Children 28-7 |
|
|
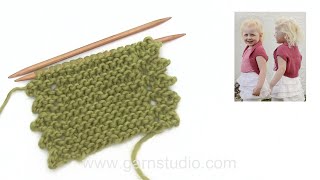
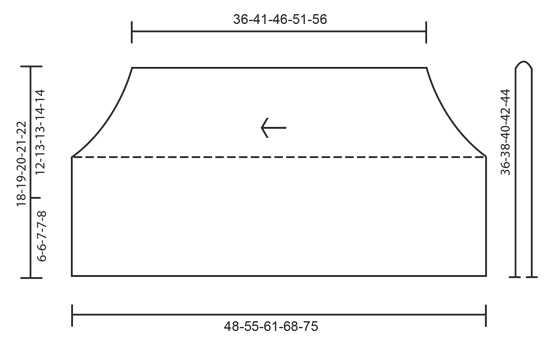
VROUBKOVÝ VZOR: 1 vroubek = 2 řady hladce. Pleteme stále hladce, lícové i rubové řady. PIKOTKOVÝ LEM: PRAVÁ STRANA: 1. ŘADA (= lícová): hladce. 2. ŘADA (= rubová): pleteme po poslední 4 oka, ta upleteme takto: 2 oka spleteme hladce, 1x nahodíme, každé z posledních 2 ok rozpleteme na dvě = na jehlici máme 2 nová oka. 3. ŘADA (= lícová): 1. oko sejmeme hladce, 1 upleteme hladce a sejmuté přes ně přetáhneme, 1 oko upleteme hladce a přetáhneme přes ně oko předchozí (na pravé jehlici) = 2 oka jsme ujmuli – zbytek řady dopleteme hladce. 4. ŘADA (= rubová): hladce. 1.- 4.řadu stále opakujeme. LEVÁ STRANA: 1. ŘADA (= lícová): pleteme po poslední 4 oka, ta upleteme takto: 2 oka spleteme hladce, 1x nahodíme, každé z posledních 2 ok rozpleteme na dvě = na jehlici máme 2 nová oka. 2. ŘADA (= rubová): 1. oko sejmeme hladce, 1 upleteme hladce a sejmuté přes ně přetáhneme, 1 oko upleteme hladce a přetáhneme přes ně oko předchozí (na pravé jehlici) = 2 oka jsme ujmuli – zbytek řady dopleteme hladce. 3. ŘADA (= lícová): hladce. 4. ŘADA (= rubová): hladce. 1.- 4.řadu stále opakujeme. ZKRÁCENÉ ŘADY: Upleteme 6 řad nad všemi oky, pak *upleteme 24-25-26-27-28 ok (až k 1. značce), práci otočíme, přízi utáhneme a řadu dopleteme. Pleteme 1 řadu nad všemi oky, pak práci otočíme, upleteme 24-25-26-27-28 ok (k 1. značce), práci otočíme, přízi utáhneme a řadu dopleteme. Upleteme 5 řad nad všemi oky*, *-* opakujeme. Celkem tedy upleteme v jedné sekvenci zkrácených řad 6 řad vroubkovým vzorem (= 3 vroubky) nad prostředními 66-70-72-80-86 oky a 8 řad vroubkovým vzorem (= 4 vroubky) nad oky na obou stranách. -------------------------------------------------------- BOLERKO: Pleteme kolmo, napříč, v řadách na kruhové jehlici od průramku k průramku. Pak bolerko přeložíme napolovic a sešijeme postranní šev. Na kruhovou jehlici č.4 nahodíme přízí Cotton Merino 76-80-84-88-92 ok a na obou stranách vložíme za 24.-25.-26.-27.-28. oko od okraje značku (= mezi značkami leží 28-30-32-34-36 ok). Následující lícovou řadu pleteme takto: první 4 oka = PIKOTKOVÝ LEM – PRAVÁ STRANA, pak 68-72-76-80-84 ok VROUBKOVÝM VZOREM – viz výše, poslední 4 oka = PIKOTKOVÝ LEM – LEVÁ STRANA. V tomto rozvržení pokračujeme a SOUČASNĚ pleteme ZKRÁCENÉ ŘADY – viz výše! Ve výši asi 36-41-46-51-56 cm (měřeno v nejkratším místě) všechna oka volně uzavřeme. DOKONČENÍ: Bolerko přeložíme napolovic – viz nákres. Sešijeme dolních 6-6-7-7-8 cm na každé straně (= 12-13-13-14-14 cm zůstává pro průramek). |
|
 |
|
Dokončili jste tento model?Pak označte své fotky tagem #dropspattern #berrykissvest nebo je pošlete do galerie #dropsfan. Potřebujete s tímto návodem poradit?Otevřete-li si návod na stránce garnstudio.com, najdete tam 15 výukových video-ukázek, Komentáře/Dotazy a další užitečné informace. © 1982-2026 DROPS Design A/S. Vyhrazujeme si veškerá práva. Tento dokument, včetně všech jeho dílčích částí, podléhá autorským právům. Podrobnější komentář k možnostem užití našich návodů najdete dole pod každým návodem na našich stránkách. |
|


V oblasti pletené a háčkované módy působí DROPS Design více než 40 let. Díky tomu vám můžeme nabídnout jednu z nejrozsáhlejších kolekcí modelů s bezplatnými návody dostupnými na internetu - navíc v 17 jazycích. K dnešnímu dni máme na 324 katalogů a 12290 návodů celkem - z nich je už 7603 dostupných v [češtině].
We work hard to bring you the best knitting and crochet have to offer, inspiration and advice as well as great quality yarns at incredible prices! Would you like to use our patterns for other than personal use? You can read what you are allowed to do in the Copyright text at the bottom of all our patterns. Happy crafting!
Přidejte komentář k návodu DROPS Children 28-7
Rádi bychom věděli, co si o tomto modelu myslíte!
Pokud se chcete na něco zeptat, dbejte prosím na to, abyste ve formuláři níže vybrali správnou kategorii - díky tomu se dříve dozvíte, co potřebujete vědět. Povinná pole jsou označena *.