
Oblíbené kategorie
Hledáte přízi?


Komentáře / Otázky (35)
![]() TERESA CARMONA MÉNDEZ napsala:
TERESA CARMONA MÉNDEZ napsala:
Buenos dias, cuando dice el patron "Colocar 4-5-5-5-6-6 puntos en un gancho auxiliar 3 veces después los 5-4-5-6-4-6 puntos restantes." ¿Se refiere a las vueltas acortadas?
09.02.2023 - 07:14Odpověď DROPS Design :
Hola Teresa, sí, se trabaja similar a las vueltas acortadas.
13.02.2023 - 00:40
![]() Susana napsala:
Susana napsala:
In response to your comment today at 16.01.2023 kl. 10:27. If I am starting to shape the right armhole (right side to left) and I start the row casting off 3 sts, when I finally then start the other row from left to the right side (left armhole) I will inevitably casting off 3 sts on the row above to the other. Therefore, the armholes will start at different times. One below the other. Or am I missing something?
16.01.2023 - 11:24Odpověď DROPS Design :
Dear Susanna, you will cast off 3 sts at the beginning of the next 2 rows (= 3 sts at the beginning of the next row from RS + 3 sts at the beginning of the next row from WS) = 3 sts on each side 1 time, then cast off 2 stitches at the beginning of next 2 rows (= 2 sts from RS + 2 sts at the beg of next row from WS), etc.. The cast off are indeed worked with 1 row difference on each side, but this is not visible afterwards. Happy knitting!
16.01.2023 - 16:25
![]() Susana Araujo napsala:
Susana Araujo napsala:
Dear drops, have a question about this: “begin to cast off for the armholes on both sides: 3-3-3-4-4-4 stitches 1 time, 2 stitches 1 time and 1 stitch 1-3-4-6-9-12 times”. If we cast off this number of times from both sides WS and RS won't the sleeves inevitable be one row above the other? And therefore one of the armholes slightly higher?
15.01.2023 - 23:53Odpověď DROPS Design :
Dear Mrs Araujo, you should cast off the same number of stitches on each side, ie at the beginning of every row, both from RS and from WS so that the armholes are the same. Happy knitting!
16.01.2023 - 10:27
![]() Susana napsala:
Susana napsala:
On “Neck” section after “Assembly” when it says “knit up 80 to 100 stitches” is this to be picked-up from the neck randomly or cast on from our yarn?
06.01.2023 - 15:54Odpověď DROPS Design :
Hi Susana! Knit up means to pick up around the neck. Please look at videos and tutorials on how to do it! Happy knitting!
06.01.2023 - 22:36
![]() Susana napsala:
Susana napsala:
While on the “Neck” after “Front Piece” we have to cast off a number of stitches. Is this done with the stitches that we left on hold? Or on the next row?
06.01.2023 - 15:53Odpověď DROPS Design :
Hi Susana! Cast off stitches on the needle as it says in the pattern. Happy knitting!
06.01.2023 - 22:34
![]() Susana napsala:
Susana napsala:
Reading the pattern I am trying to see the maths and I can’t still figure it out what happen to some stitches. So, when we are still working the back, almost at the end we have “62 stitches”. Then we shall cast off 26 which would give us a total of 36. Then, on the Neck we cast off 1 stitch therefore, 35 total. And then, when we start working the diagonal shoulder, I will place 17 stitches on hold on a thread. What happen to the remaining 18? Shall they be cast off? This is not indicated
06.01.2023 - 15:53
![]() Susana napsala:
Susana napsala:
When working on the Diagonal Shoulder: “Place 4-5-5-5-6-6 stitches on the thread 3 times then the remaining 5-4-5-6-4-6 stitches.” Again, what does this mean with 3 times? Shall I place 17 stitches on hold on a thread (assuming that I am doing the smallest size)? Does this have to be done sparely and that is why is written “3 times”?
06.01.2023 - 15:53Odpověď DROPS Design :
Dear Susana, you need to do it separately. Work and place the first 4 stitches, work until the end of the row and then work back, then work and place the next 4 stitches, work until the end of the row and then work back again, then work and place the next 4 stitches, work until the end of the row and then work back. Now you work and place the remaining 5 stitches in the thread. Happy knitting!
07.01.2023 - 18:56
![]() Susana napsala:
Susana napsala:
On back piece instructions, it is written: “begin to cast off for the armholes on both sides: 3-3-3-4-4-4 stitches 1 time, 2 stitches 1 time and 1 stitch 1-3-4-6-9-12 times”. I am confused to what this means. Shall I cast off X number of stitches X times in a row at different times during the same row? Or is this mean to be cast off one after the other but then that wouldn’t invalidate the X number of times?
06.01.2023 - 15:52Odpověď DROPS Design :
Dear Susana, you need to cast off in different rows, once on each side of the row. So, cast off at the beginning of the row (from both the right and wrong sides). For example, in the smallest size, cast off 3 stitches at the beginning of the next row from the right and wrong sides. Then, cast off 2 stitches at the beginning of the next row from the right and wrong sides. Finally cast off 1 stitch at the beginning of the next row from the right and wrong sides. Happy knitting!
07.01.2023 - 19:01
![]() Susana napsala:
Susana napsala:
Would this be ok for beginners? I have only finished 1 sweater before, done some scarves and hats. Reading the pattern, the stitches seem simple, only confusion would be with some of the construction.
06.01.2023 - 15:52Odpověď DROPS Design :
Hi Susana! Please look at the videos and step-by-step tutorials at the end of the pattern. These will help you to overcome any questions you might have! Reading pattern might be very confusing but when you start making it everything becomes clear! Happy knitting!
06.01.2023 - 22:32
![]() Susana napsala:
Susana napsala:
I have a whole paragraph with questions and this comment box does not have enough space. How can I be helped?
06.01.2023 - 11:01Odpověď DROPS Design :
Dear Susana, maybe try to ask one or 2 questions each time using this box - remember to tell us the size you are working on, so that we can check especially this size if needed. Thanks for your comprehension.
06.01.2023 - 11:44
|
|
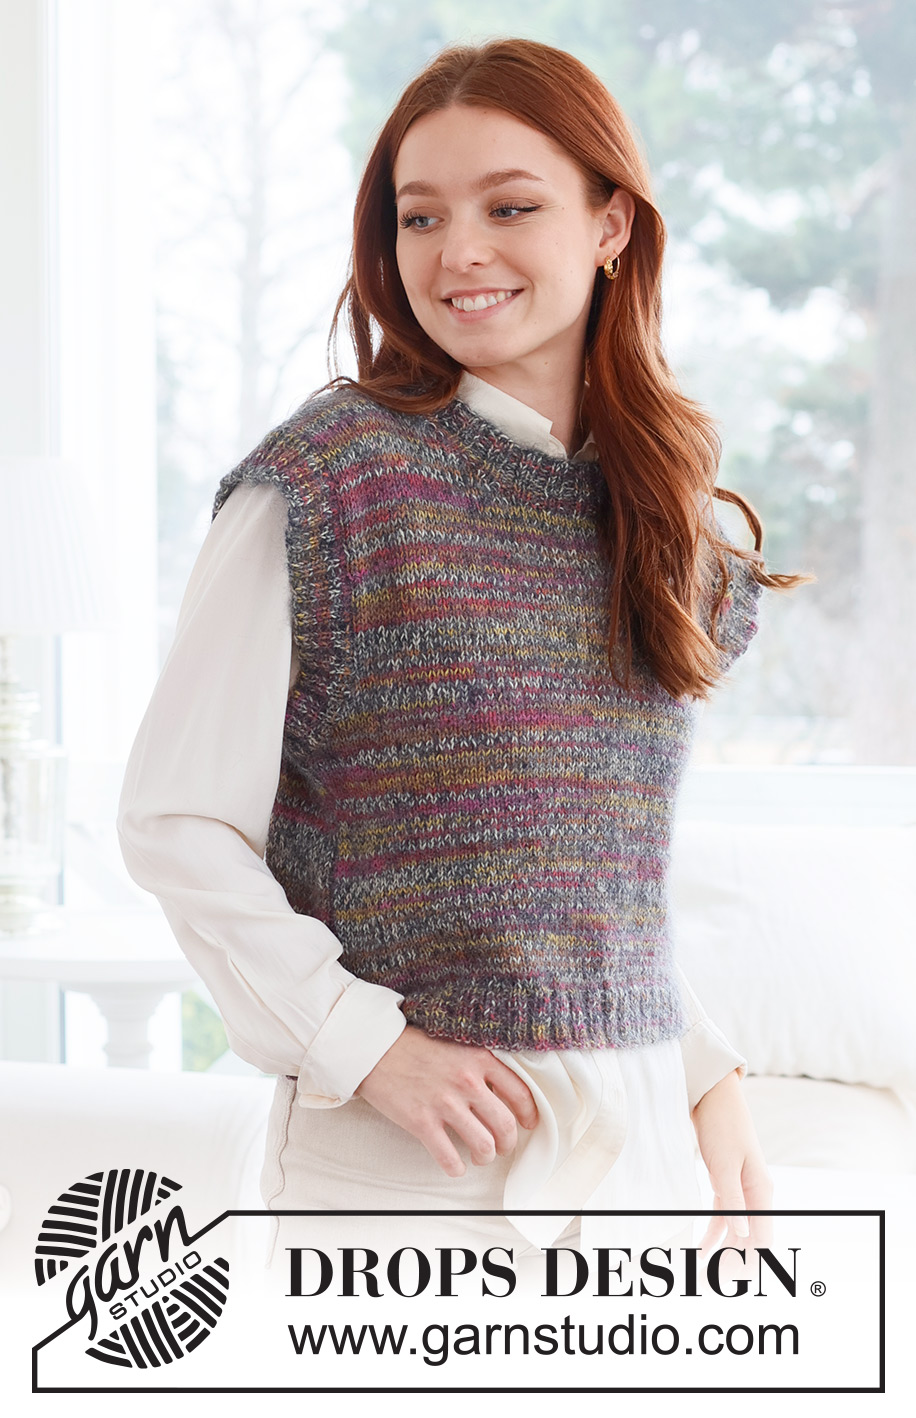
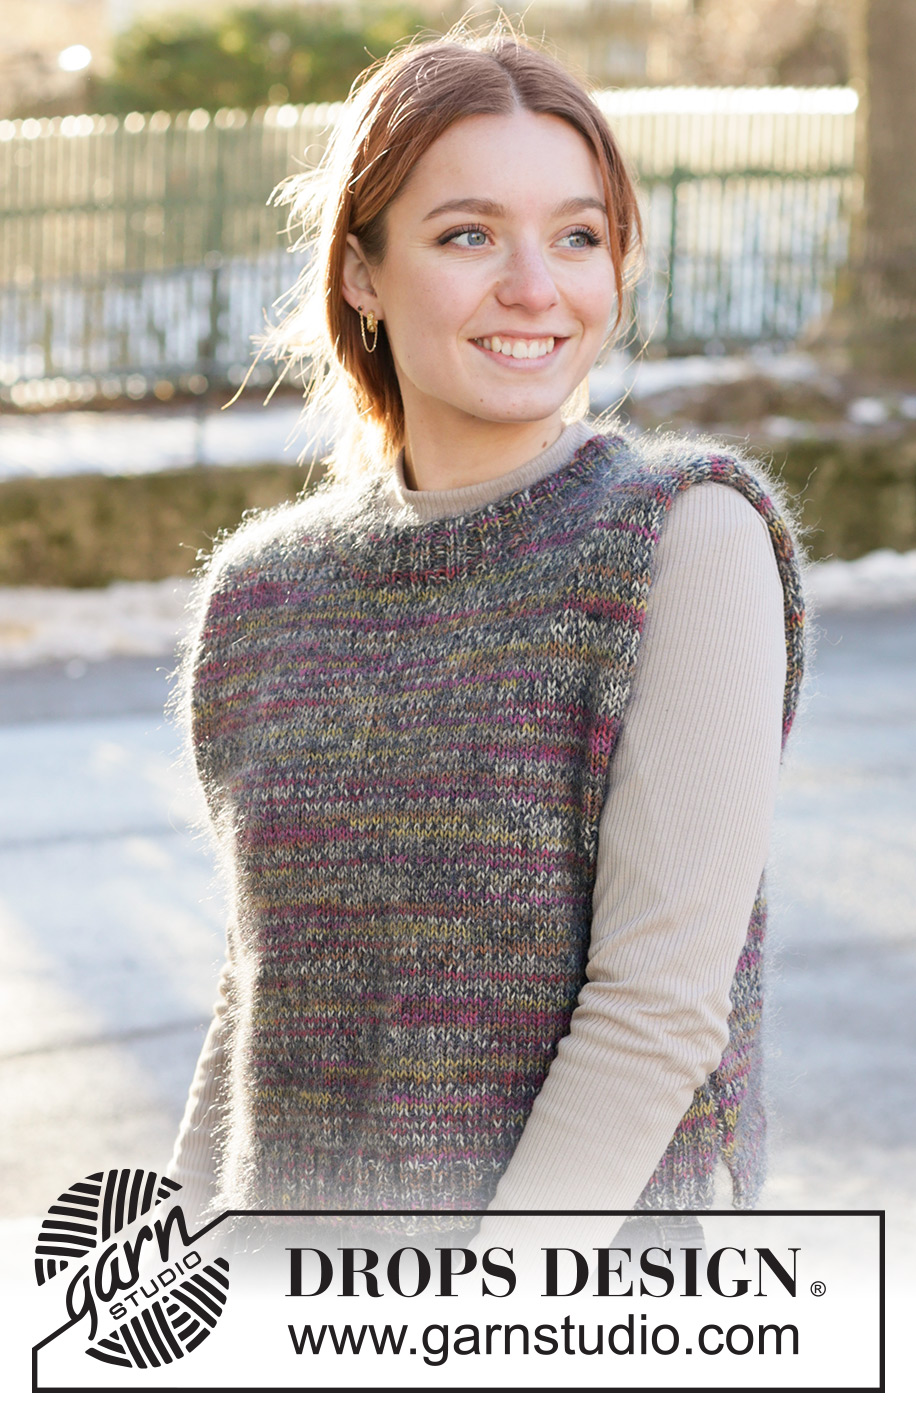
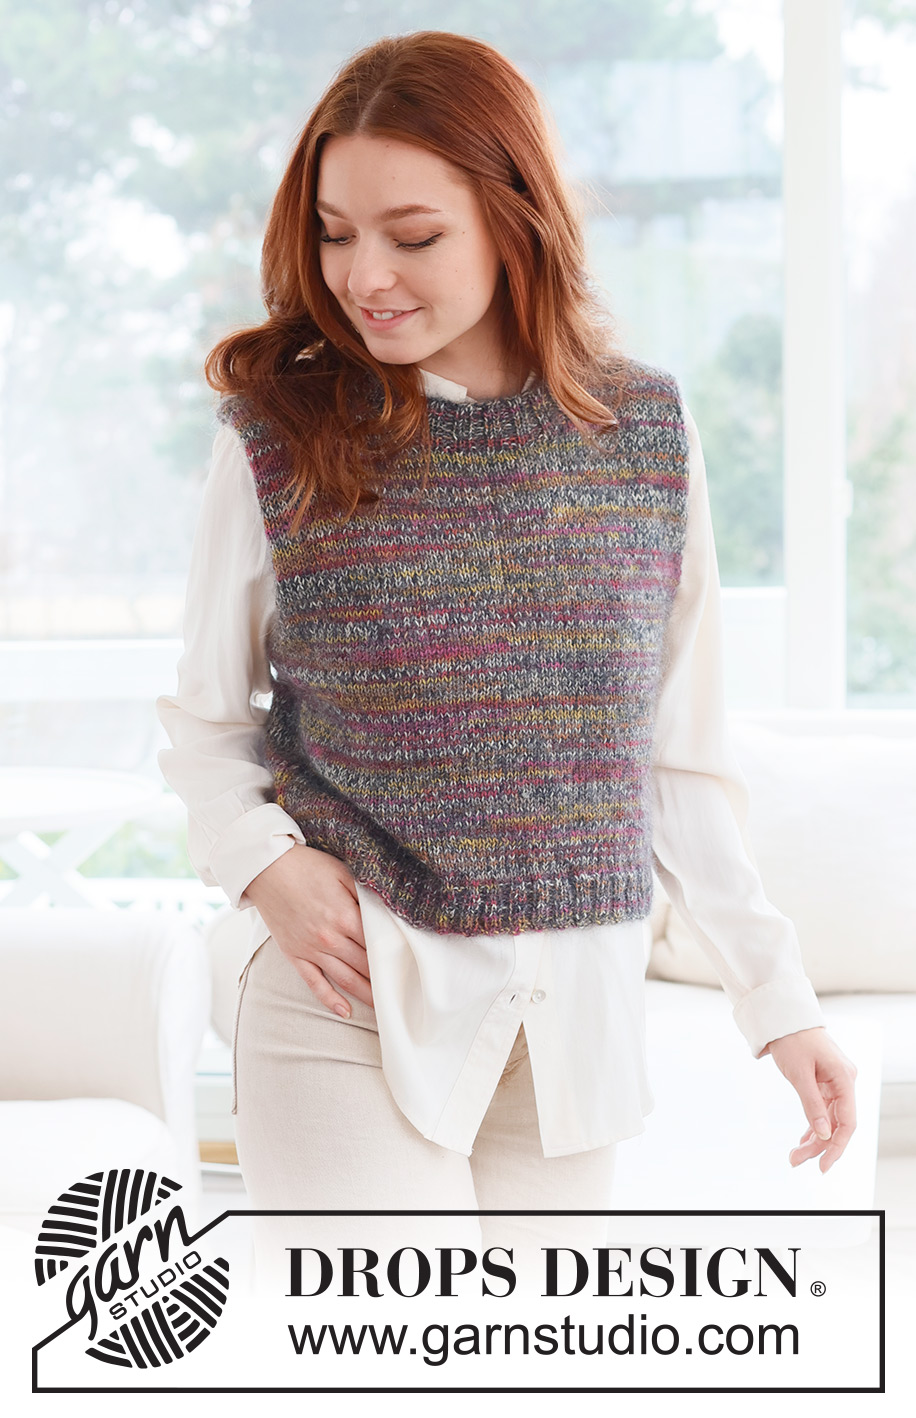
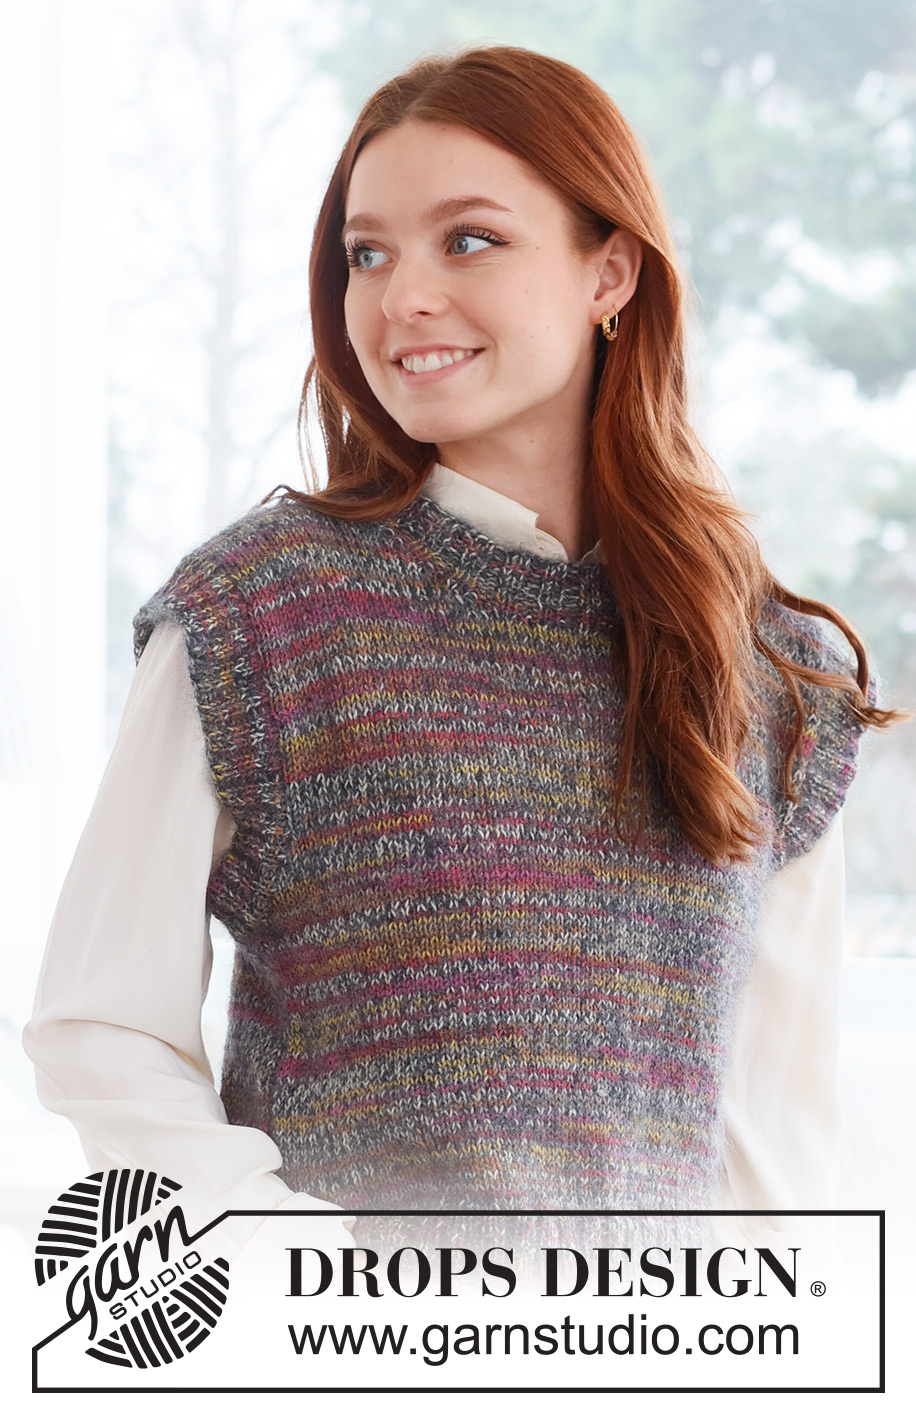
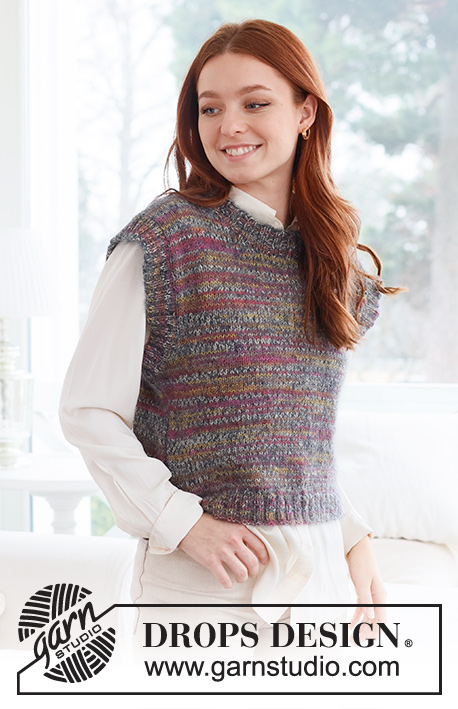
Fairytale#fairytalevest |
|
 |
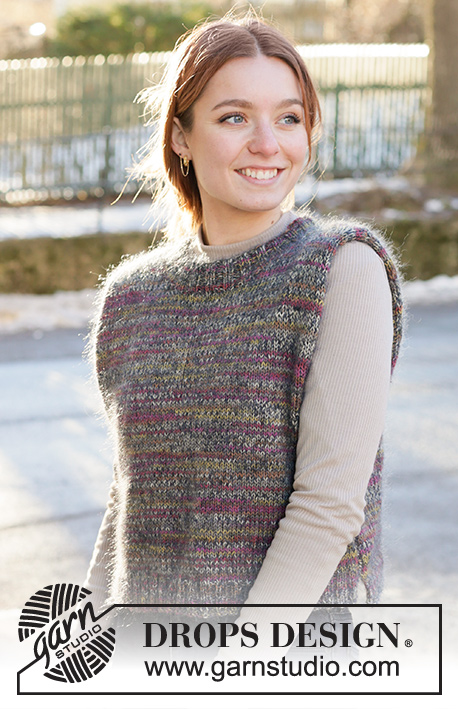 |
Vesta pletená zdola nahoru dvojitou přízí DROPS Fabel a Kid-Silk. Velikost S - XXXL.
DROPS 237-42 |
|
|
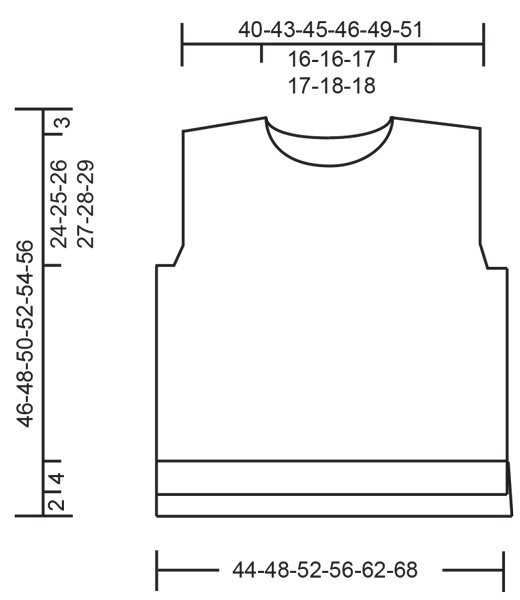
------------------------------------------------------- VYSVĚTLIVKY K NÁVODU: ------------------------------------------------------- VROUBKOVÝ VZOR: Pleteme stále hladce, lícové i rubové řady. 1 vroubek = 2 řady hladce. ------------------------------------------------------- PRÁCE ZAČÍNÁ ZDE: ------------------------------------------------------- VESTA – JAK BUDEME POSTUPOVAT: Přední a zadní díl upleteme odděleně v řadách zdola nahoru. Zadní díl je o 2 cm delší než přední díl. Nakonec dopleteme lemy průramků a průkrčníku. ZADNÍ DÍL: Na kruhovou jehlici č. 4 nahodíme 1 vláknem příze DROPS Fabel a 1 vláknem příze DROPS Kid-Silk (= dvojitou přízí) 88-96-104-112-120-132 ok a upleteme 1 rubovou řadu obrace. Pak pleteme pružný lem, začínáme lícovou řadou: 1 oko VROUBKOVÝM VZOREM – viz popis výše, pružným vzorem 2/2 (tj. střídáme 2 oka hladce, 2 oka obrace) po poslední 3 oka, upleteme 2 oka hladce a 1 krajové oko vroubkovým vzorem. V tomto rozvržení pleteme lem do výšky 4 cm. Převedeme práci na kruhovou jehlici č. 5. Pokračujeme lícovým žerzejem; v první řadě rovnoměrně ujmeme 14-14-16-16-14-16 ok = 74-82-88-96-106-116 ok. Pleteme až do výšky 19-20-21-22-23-24 cm. V následující řadě začneme na obou stranách uzavírat oka pro průramky takto: 3-3-3-4-4-4 oka 1x, 2 oka 1x a 1 oko 1-3-4-6-9-12x = 62-66-70-72-76-80 ok. Pleteme až do výše 42-44-46-48-50-52 cm (do konce nám zbývá asi 4 cm). V další řadě uzavřeme prostředních 26-26-28-28-30-30 ok pro průkrčník a každou náramenici dokončíme odděleně. POPIS DALŠÍHO POSTUPU: Teď budeme ujímat oka pro průkrčník a také odložíme oka na pomocnou jehlici pro zešikmené náramenice. Před pokračováním si proto nejdříve přečtěte postup pro PRŮKRČNÍK a ZEŠIKMENÉ NÁRAMENICE. PRŮKRČNÍK: Na začátku následující řady u průkrčníku uzavřeme ještě 1 oko. ZEŠIKMENÉ NÁRAMENICE: Odložíme krajní oka u průramku na pomocnou jehlici pro náramenice, abychom nemuseli stříhat přízi, oka nejdříve upleteme a pak je odložíme. Na pomocné jehlice odložíme 3x 4-5-5-5-6-6 ok a potom odložíme zbývajících 5-4-5-6-4-6 ok. Všechna oka jsou nyní buď uzavřená, nebo odložená na pomocnou jehlici. Odložených 17-19-20-21-22-24 ok vrátíme z pomocné jehlice zpět na kruhovou jehlici č. 5 a upleteme 1 rubovou řadu obrace, přičemž v místě uprostřed pleteniny, kde jsme práci otočili, nabereme přízi mezi 2 oky a upleteme ji obrace za zadní nit společně s prvním okem na levé jehlici - tím zamezíme vzniku dírky. V další lícové řadě oka hladce uzavřeme. Díl měří asi 46-48-50-52-54-56 cm od od vrcholku náramenice. Stejným způsobem upleteme i druhou náramenici. PŘEDNÍ DÍL: Nahodíme a pleteme stejně jako zadní díl do výše 17-18-19-20-21-22 cm. V následující řadě začneme na obou stranách uzavírat oka pro průramky: 3-3-3-4-4-4 oka 1x, 2 oka 1x a 1 oko 1-3-4-6-9-12x = 62-66-70-72-76-80 ok. Pleteme až do výše 34-36-36-38-38-40 cm (do konce nám zbývá asi 10-10-12-12-14-14 cm). V další řadě na lícově straně odložíme prostředních 12-12-14-14-16-16 ok na pomocnou jehlici (= průkrčník) a každou náramenici dokončíme odděleně. POPIS DALŠÍHO POSTUPU: Teď budeme ujímat oka pro průkrčník a také odložíme oka na pomocnou jehlici pro zešikmené náramenice. Před pokračováním si proto nejdříve přečtěte postup pro PRŮKRČNÍK a ZEŠIKMENÉ NÁRAMENICE. PRŮKRČNÍK: U průkrčníku uzavřeme 2x 2 oka a 4x 1 oko. ZEŠIKMENÉ NÁRAMENICE: SOUČASNĚ ve výši 41-43-45-47-49-51 cm odložíme krajní oka u průramku na pomocnou jehlici stejným způsobem, jako u zadního dílu. Jakmile máme všechna oka uzavřená nebo odložená, vrátíme 17-19-20-21-22-24 ok z pomocné jehlice zpět na kruhovou jehlici č. 5. Upleteme 1 rubovou řadu obrace stejným způsobem jako u zadního dílu a potom práci z lícové strany hladce uzavřeme. Díl měří asi 44-46-48-50-52-54 cm od od vrcholku náramenice. Stejným způsobem upleteme i druhou náramenici. DOKONČENÍ: Sešijeme náramenice. Sešijeme postranní švy, začínáme u průramků a postupujeme až po asi 1 cm k pružného lemu - odtud začíná postranní rozparek - zadní díl je delší než přední díl. LEM PRŮKRČNÍKU: Začínáme na lícové straně u jedné náramenice. Krátkou kruhovou jehlicí č.4 a 1 vláknem příze Fabel a 1 vláknem příze Kid-Silk (= dvojitou přízí) nabereme z okraje průkrčníku 80 až 100 ok (včetně odložených ok z pomocné jehlice) - počet ok musí být dělitelný 4. Pleteme v kruhových řadách pružným vzorem (2 oka hladce, 2 oka obrace). Když je lem vysoký 4 cm, všechna oka dle vzoru uzavřeme. LEM PRŮRAMKU: Začínáme na lícové straně ve spodní části jednoho průramku. Krátkou kruhovou jehlicí č.4 a 1 vláknem příze Fabel a 1 vláknem příze Kid-Silk (= dvojitou přízí) nabereme kolem průramku 112 až 136 ok - počet ok musí být dělitelný 4. Pleteme v kruhových řadách pružným vzorem (2 oka hladce, 2 oka obrace). Když je lem vysoký 4 cm, všechna oka dle vzoru uzavřeme. Stejným způsobem upleteme i lem druhého průramku. Lem průramku můžeme přeložit do rubu a přišít, tím vznikne užší, ale silnější lem průramku. |
|
 |
|
Dokončili jste tento model?Pak označte své fotky tagem #dropspattern #fairytalevest nebo je pošlete do galerie #dropsfan. Potřebujete s tímto návodem poradit?Otevřete-li si návod na stránce garnstudio.com, najdete tam 22 výukových video-ukázek, Komentáře/Dotazy a další užitečné informace. © 1982-2026 DROPS Design A/S. Vyhrazujeme si veškerá práva. Tento dokument, včetně všech jeho dílčích částí, podléhá autorským právům. Podrobnější komentář k možnostem užití našich návodů najdete dole pod každým návodem na našich stránkách. |
|


V oblasti pletené a háčkované módy působí DROPS Design více než 40 let. Díky tomu vám můžeme nabídnout jednu z nejrozsáhlejších kolekcí modelů s bezplatnými návody dostupnými na internetu - navíc v 17 jazycích. K dnešnímu dni máme na 324 katalogů a 12290 návodů celkem - z nich je už 7602 dostupných v [češtině].
We work hard to bring you the best knitting and crochet have to offer, inspiration and advice as well as great quality yarns at incredible prices! Would you like to use our patterns for other than personal use? You can read what you are allowed to do in the Copyright text at the bottom of all our patterns. Happy crafting!
Přidejte komentář k návodu DROPS 237-42
Rádi bychom věděli, co si o tomto modelu myslíte!
Pokud se chcete na něco zeptat, dbejte prosím na to, abyste ve formuláři níže vybrali správnou kategorii - díky tomu se dříve dozvíte, co potřebujete vědět. Povinná pole jsou označena *.