
Oblíbené kategorie
Hledáte přízi?


Komentáře / Otázky (126)
![]() Caroline napsala:
Caroline napsala:
Hej! I sista rapporten på A2 står det att omslaget ska stickas brödet på nästa varv så det inte blir hål. Men ska det inte blå hål? Tycker det ser ut som det på fotot.
25.07.2021 - 10:07Odpověď DROPS Design :
Hej Caroline, det vill bli ett litet hål. Vill du har det större så går det bra att inte sticka det vridet :)
06.08.2021 - 14:28
![]() Pirkko Karjalainen napsala:
Pirkko Karjalainen napsala:
En saa näkyviin mallineuleen piirroksia. Norjankielisessä ohjeessa ne näkyvät, mutta kääntäminen olisi työlästä. Mikä neuvoksi?
07.07.2021 - 09:01Odpověď DROPS Design :
Nyt piirrokset avautuvat taas.
09.07.2021 - 14:16
![]() Susanne Bang Hansen napsala:
Susanne Bang Hansen napsala:
Strikker str xl. Efter mønstret har jeg 351 masker( som jeg skal have), når jeg så deler i forstyk, ærmer og ryg, så har jeg 13 masker for meget????
03.07.2021 - 23:52Odpověď DROPS Design :
Hei Susanne. Litt usikker på hvor det blir feil hos deg, men du skal strikke 50 masker rett (= ½ bakstykket), sett de neste 76 maskene på en tråd til erme, legg opp 12 nye masker på pinnen (= i siden under ermet), strikk 99 masker rett (= forstykke), sett de neste 76 maskene på en tråd til erme, legg opp 12 nye masker på pinnen (= i siden under ermet), strikk de siste 50 masker rett (= ½ bakstykket). Om man ser bort fra de 24 ny maskene stemmer maskeantallet. 50+76+99+76+50= 351 masker. Kankje du har blandet noen størrelser? mvh DROPS design
05.07.2021 - 14:54
![]() Astrid napsala:
Astrid napsala:
Det står ingen plass i mønstret at kastene skal strikkes vridd,dette bør stå hvis det erslik det skal være
03.07.2021 - 15:31
![]() Bodil napsala:
Bodil napsala:
Så hvis jeg forstår det riktig da, skal omgang 6 strikkes bare rettmasker.
29.06.2021 - 10:56Odpověď DROPS Design :
Hej Bodil. Ja det stämmer. Mvh DROPS Design
29.06.2021 - 11:15
![]() Bodil napsala:
Bodil napsala:
Hei. Jeg har kommet til omgang 6 hvor den mørke trekant-symbolet er. Er det over 2 omganger, eller er det på omgang 7? Skjønner ikke helt dette.
29.06.2021 - 07:07Odpověď DROPS Design :
Hej Bodil. Det er på omgang 7. Mvh DROPS Design
29.06.2021 - 08:01
![]() Lene napsala:
Lene napsala:
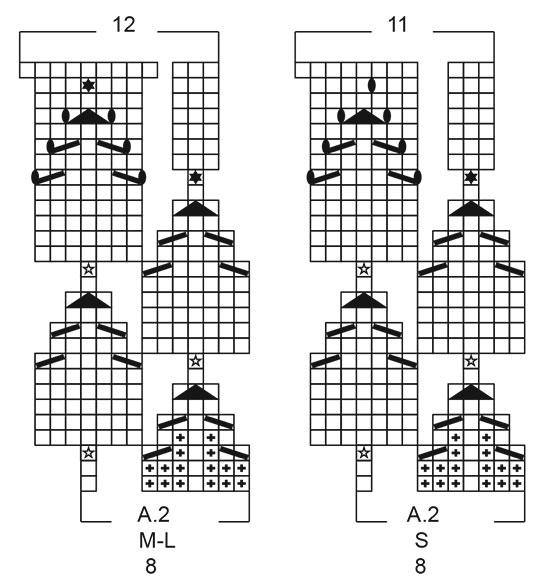
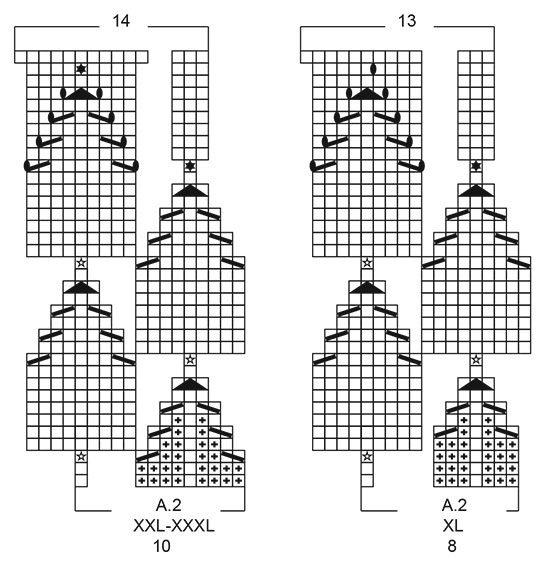
A2, etter siste stjerne(som skal være 7m) viser diagrammet 3m på linjene over. Hvordan? Jeg sitter med altfor mye masker!!! Ser ut som dette er et problem som gjentar seg, er det noen som ser på dette?
27.06.2021 - 11:37Odpověď DROPS Design :
Hei Lene, Stjerne symbol betyr at du skal strikke 7-7-7-9-9-9 masker i samme masken, som gir deg de økte maskene på linjen over (se symbolforklaring over diagrammene). Håper dette hjelper og god fornøyelse!
28.06.2021 - 09:07
![]() Bodil napsala:
Bodil napsala:
Jeg lurer på om kastene skal strikkes vridd vrang eller vridd rett?
27.06.2021 - 01:22Odpověď DROPS Design :
Hei Bodil, Hvis du har en åpen rute i linje over kastet skal det strikkes vridd rett, hvis det er en rute med kors, skal det strikkes vridd vrang. God fornøyelse!
28.06.2021 - 09:10
![]() Ida Eline Sørensen napsala:
Ida Eline Sørensen napsala:
Hei. Jeg forstår ikke hvordan jeg skal lese diagram A2. Skal en og en av rapportene strikkes? Hvordan henger de sammen? Skal det være noen masker med kun rett, strikkes ett og ett diagram eller flere samtidig? Dette var en forvirrende oppskrift. Takk for svar på forhånd. Strikker forresten str.s.
17.06.2021 - 21:48Odpověď DROPS Design :
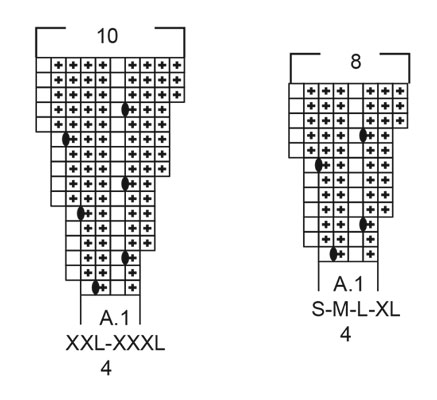
Hei Ida Eline, Du strikker A.2 i ett, så første omgang: 3 vrang, 1 rett, 3 vrang og 1 rett. Gjenta dette på omgangen. Når du er på omgang 3, skal du strikke 3 masker i stjernemasken (som forklart rett over diagrammene) slik at du kan strikke alle maskene i omgang 4. Håper dette hjelper og god fornøyelse!
18.06.2021 - 07:17
![]() Roswitha Zu Dritten napsala:
Roswitha Zu Dritten napsala:
Die letzte Frage habe ich mir selbst bewntworten können. Hab zu schnell aufgegeben. Jetzt läuft es. Aber trotzdem herzlichen Dank für die schnelle Hilfe. Habt einen schönen Freitag
11.06.2021 - 15:22
|
|||||||||||||||||||||||||
Swing by Spring Top#swingbyspringtop |
|||||||||||||||||||||||||
 |
 |
||||||||||||||||||||||||
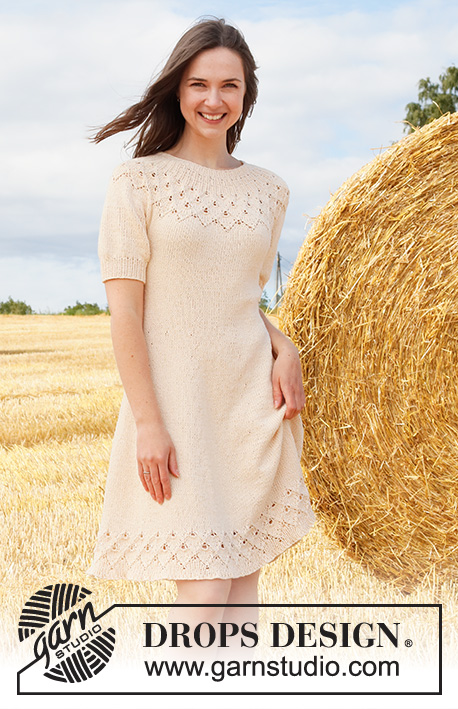
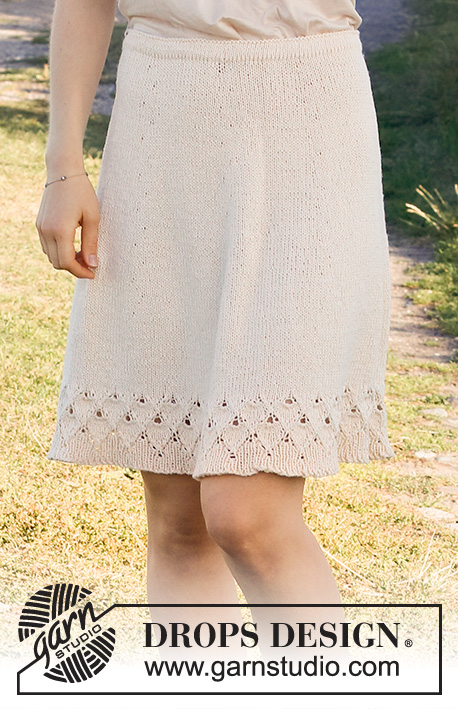
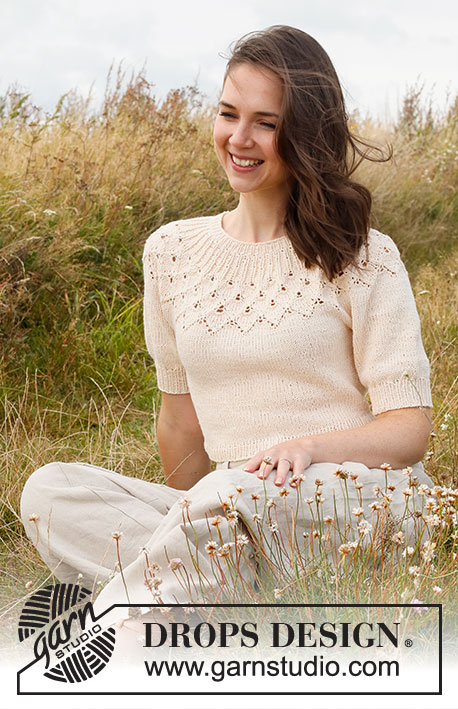
Pulovr s kruhovým sedlem, listovým ažurovým vzorem a krátkými balonovými rukávy pletený shora dolů z příze DROPS Belle. Velikost: S - XXXL
DROPS 222-32 |
|||||||||||||||||||||||||
|
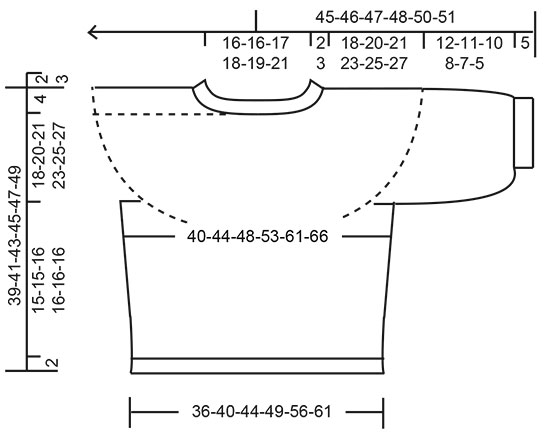
------------------------------------------------------- VYSVĚTLIVKY: ------------------------------------------------------- VZOR: Viz schéma A.1 a A.2. Zvolte si schéma pro požadovanou velikost. TIP - UJÍMÁNÍ (boky trupu): Ujímáme 1 oko na každé straně značky, takto: pleteme po poslední 3 oka před značkou, 2 oka spleteme hladce, 2 oka upleteme hladce (značka leží mezi těmito oky), 1 oko sejmeme hladce, 1 upleteme hladce a sejmuté přes ně přetáhneme. TIP - UZAVÍRÁNÍ: Abychom neměli uzavřený okraj moc stažený, můžeme na uzavírání ok použít silnější jehlici. Pokud ani to nestačí, pak 1x nahodíme za každým zhruba 4. okem – toto nahození hned uzavřeme jako běžné oko. ------------------------------------------------------- POPIS PRÁCE: ------------------------------------------------------- PULOVR - JAK BUDEME POSTUPOVAT: Lem průkrčníku a sedlo pleteme v kruhových řadách na kruhové jehlici, od středu zadního průkrčníku a shora dolů. Od sedla pak oddělíme rukávy a trup dokončíme v kruhových řadách. Rukávy dopleteme v kruhových řadách na krátké kruhové jehlici/ponožkových jehlicích, shora dolů. LEM PRŮKRČNÍKU: Na kruhovou jehlici č.3 nahodíme přízí Belle 100-100-104-108-112-120 ok a upleteme 1 kruhovou řadu hladce. Pak pleteme lem pružným vzorem 1/1 (tj. střídáme 1 oko hladce, 1 obrace). Ve výši 2-2-3-3-3-3 cm převedeme pleteninu na kruhovou jehlici č.4. Označíme si začátek kruhové řady (= střed zadní strany) - SEDLO NYNÍ MĚŘÍME OD TOHOTO MÍSTA! SEDLO: Pleteme v kruhových řadách vzor A.1 (= 25-25-26-27-28-30 sekvencí po 4 okách). Po dokončení celé sekvence vzoru A.1 (na výšku) máme na jehlici 200-200-208-216-280-300 ok. Díl měří 4-4-4-4-6-6 cm od značky. Pak pleteme v kruhových řadách vzor A.2 (= 25-25-26-27-28-30 sekvencí po 8-8-8-8-10-10 okách). Po dokončení celé sekvence vzoru A.2 (na výšku) máme na jehlici 275-300-312-351-392-420 ok. Díl měří asi 14-14-14-17-19-19 cm od značky (tj. 16-16-17-20-22-22 cm od počáteční, nahozené řady). Pleteme hladce až do výše 18-20-21-23-25-27 cm od značky. Nyní rozdělíme pleteninu na trup a rukávy, tj. následující kruhovou řadu pleteme takto: 38-42-44-50-58-63 ok hladce (= ½ zadního dílu), následujících 62-66-68-76-80-84 ok odložíme na pomocnou jehlici (= rukáv), nahodíme 8-8-12-12-12-12 nových ok (= podpaží), 75-84-88-99-116-126 ok upleteme hladce (= přední díl), dalších 62-66-68-76-80-84 ok odložíme na pomocnou jehlici (= rukáv), nahodíme 8-8-12-12-12-12 nových ok (= podpaží) a zbylých 38-42-44-50-58-63 ok upleteme hladce (= ½ zadního dílu). Trup a rukávy dokončíme odděleně. NYNÍ MĚŘÍME DÍL OD TOHOTO MÍSTA! TRUP: = 167-184-200-223-256-276 ok. Označíme si boky – doprostřed 8-8-12-12-12-12 nových ok v podpaží na každé straně dílu vložíme značku = mezi značkami leží 83-92-100-111-128-138 ok předního dílu a 84-92-100-112-128-138 ok zadního dílu. Značky během pletení snímáme vždy do aktuálně pletené kruhové řady; využijeme je při ujímání. Pleteme v kruhových řadách hladce. Ve výši 3 cm od podpaží ujmeme na obou stranách obou značek 1 oko – viz TIP – UJÍMÁNÍ (= ujmeme 4 oka). Toto ujímání opakujeme vždy po 2 cm výšky, celkem 4-4-4-4-5-5x = 151-168-184-207-236-256 ok. Pleteme až do výše 15-15-16-16-16-16 cm od podpaží – ppř. do libovolné výšky (do ukončení práce nám zbývá doplést asi 2 cm výšky, svetr si teď můžete vyzkoušet a míry upravit). Pak pleteme 1 kruhovou řadu hladce a SOUČASNĚ přidáme rovnoměrně 23-26-28-31-36-38 ok = 174-194-212-238-272-294 ok. Pleteninu převedeme na kruhovou jehlici č.3 a pleteme v kruhových řadách lem pružným vzorem 1/1 (tj. střídáme 1 oko hladce, 1 obrace). Když je lem vysoký 2 cm, všechna oka volně dle vzoru uzavřeme – viz TIP – UZAVÍRÁNÍ. Pulovr měří asi 39-41-43-45-47-49 cm (od ramene). RUKÁV: Odložených 62-66-68-76-80-84 ok jednoho rukávu převedeme z pomocné jehlice zpět na krátkou kruhovou jehlici/ponožkové jehlice č.4 a navíc k nim nabereme po 1 oku z každého z 8-8-12-12-12-12 nově nahozených ok v podpaží = 70-74-80-88-92-96 ok. Pleteme v kruhových řadách hladce až do výše 12-11-10-8-7-5 cm od podpaží (do ukončení práce nám zbývá doplést asi 5 cm výšky, svetr si teď můžete vyzkoušet a míry upravit). Pak pleteme 1 kruhovou řadu hladce a SOUČASNĚ ujmeme rovnoměrně 16-16-14-14-14-14 ok = 54-58-66-74-78-82 ok. Pleteninu převedeme na ponožkové jehlice č.3 a pleteme v kruhových řadách lem pružným vzorem 1/1 (tj. střídáme 1 oko hladce, 1 obrace). Když je lem vysoký 5 cm, všechna oka volně dle vzoru uzavřeme – viz TIP – UZAVÍRÁNÍ. Rukáv měří asi 17-16-15-13-12-10 cm (od podpaží). Stejným způsobem upleteme i druhý rukáv. |
|||||||||||||||||||||||||
Vysvětlivky ke schématu |
|||||||||||||||||||||||||
|
|||||||||||||||||||||||||
 |
|||||||||||||||||||||||||
 |
|||||||||||||||||||||||||
 |
|||||||||||||||||||||||||
 |
|||||||||||||||||||||||||
Dokončili jste tento model?Pak označte své fotky tagem #dropspattern #swingbyspringtop nebo je pošlete do galerie #dropsfan. Potřebujete s tímto návodem poradit?Otevřete-li si návod na stránce garnstudio.com, najdete tam 31 výukových video-ukázek, Komentáře/Dotazy a další užitečné informace. © 1982-2026 DROPS Design A/S. Vyhrazujeme si veškerá práva. Tento dokument, včetně všech jeho dílčích částí, podléhá autorským právům. Podrobnější komentář k možnostem užití našich návodů najdete dole pod každým návodem na našich stránkách. |
|||||||||||||||||||||||||


V oblasti pletené a háčkované módy působí DROPS Design více než 40 let. Díky tomu vám můžeme nabídnout jednu z nejrozsáhlejších kolekcí modelů s bezplatnými návody dostupnými na internetu - navíc v 17 jazycích. K dnešnímu dni máme na 324 katalogů a 12291 návodů celkem - z nich je už 7611 dostupných v [češtině].
We work hard to bring you the best knitting and crochet have to offer, inspiration and advice as well as great quality yarns at incredible prices! Would you like to use our patterns for other than personal use? You can read what you are allowed to do in the Copyright text at the bottom of all our patterns. Happy crafting!
Přidejte komentář k návodu DROPS 222-32
Rádi bychom věděli, co si o tomto modelu myslíte!
Pokud se chcete na něco zeptat, dbejte prosím na to, abyste ve formuláři níže vybrali správnou kategorii - díky tomu se dříve dozvíte, co potřebujete vědět. Povinná pole jsou označena *.