
Populaarsed kategooriad
Otsid lõnga?


Kommentaarid / Küsimused (26)
![]() Amanda kirjutas:
Amanda kirjutas:
Hej, i början av arbetet ska det sitta två stick markörer i början av arbetet, 3 maskor in. När man sen ska göra omslag ska man göra ett omslag på vardera sida om markörerna, eller vart ska de två ökningarna som beskrivs som att de ska sitta i mitten av arbetet göras?
28.02.2025 - 15:14DROPS Design vastas:
Hej Amanda, du ökar 2 maskor på varje sida om de mittersta 55 maskorna. Yttersta omslaget är alltid innanför 2 rätstickade maskor i varje sida - och de 2 andra omslagen är alltid på varje sida om de mittersta maskorna :)
06.03.2025 - 13:35
![]() Marie kirjutas:
Marie kirjutas:
Bonjour. Est-ce normal qu’il n’y ai qu’une seule augmentation à gauche dans le A2b la 3ème fois. Merci pour votre réponse
01.04.2024 - 23:36DROPS Design vastas:
Bonjour Marie, tout à fait, on n'augmente ici qu'une seule maille. Bon tricot!
02.04.2024 - 16:00
![]() Morel kirjutas:
Morel kirjutas:
Bonjour Je voudrais savoir si ce magnifique châle peut être transformé en cape ( fermé autour du cou ) Merci beaucoup et bravo pour votre travail 🥰
07.02.2024 - 08:22DROPS Design vastas:
Bonjour Mme Morel, probablement, il vous faudrait juste faire les ajustements nécessaires. Bon tricot!
08.02.2024 - 08:05
![]() Amanda Karlsson kirjutas:
Amanda Karlsson kirjutas:
If I am supposed to increase 2 every other row, and knit 62 rows. How does that become 62 increased stitches, wouldn't it be double the amount of rows?
04.03.2023 - 13:48DROPS Design vastas:
Dear Amanda, since you increase 2 stitches every other row you only increase on every 2 rows (for example, on even rows - work 1 row with no increases, work 1 row with increases, work 1 row with no increase, 1 row with increases...). So you increase 2 stitches on 31 rows = 62 stitches increased. Happy knitting!
05.03.2023 - 19:18
![]() Anna kirjutas:
Anna kirjutas:
Hei, eg har lagt opp til sjalet, men e usikker på hvordan man øker etter pinne 1 og 2. Skal man strikke 2 masker kast, så strikke 3 masker eller skal man øke 2 masker, kast, strikk 1 og så et kast
26.04.2022 - 20:57DROPS Design vastas:
Hei Anna, Du gjentar pinner 1 og 2. Så pinne 3: 2 masker rille, 1 kast, strikke riller fram til 1. merket, 1 kast, riller fram til 2. merke, 1 kast, riller til det gjenstår 2 masker og 2 masker rille. God fornøyelse!
27.04.2022 - 07:06
![]() Uschi kirjutas:
Uschi kirjutas:
Hallo, sind im Diagranm die Hin- und Rückreihen gezeigt, oder stricke ich die Rückreise wie sie auf der Nadel erscheint? Viele Grüße Uschi
25.02.2021 - 23:21DROPS Design vastas:
Liebe Uschi, die Hin- sowie die Rückreihen sind im Diagram gezeichnet, Rückreihen lesen Sie links nach rechts. Viel Spaß beim stricken!
26.02.2021 - 08:24
![]() Brenda kirjutas:
Brenda kirjutas:
The graph is wrong. I had to work the pattern to prove it to some one else. Never mind.
06.01.2021 - 19:01
![]() Brenda kirjutas:
Brenda kirjutas:
Ok to follow up. When you look at the pattern of adding and decreases the stitches it looks right but with actual knitting the increase is on the inside between the middle SKP and YO. Thus stitches get moved over one and then the YO misses a stitch. Gee this is hard to explain. When I added the extra row. The holes now flowed continuously across the shawl. Maybe you have to do a trial run to figure out what I mean. I repeated mine 3 times. We can zoom?
05.01.2021 - 17:29DROPS Design vastas:
Dear Brenda, the diagrams just should be worked as follows, ie the yarn overs should be worked as shown in the diagram - on which row do you have this kind of worry? To get any individual assistance please feel free to contact your yarn store - even per mail or telephone, showing them your work so that it might be easier for them to see what you did. Happy knitting!
06.01.2021 - 08:13
![]() Brenda kirjutas:
Brenda kirjutas:
Hi. I rewrote... You need an extra row so that the YO’s all follow in a row. When you did the extra stitches the yo is ok. The next row after adding the stitches you miss a stitch with the yarn over. Therefore you have to repeat the last row over once more . Ok look at it this way. What I did to get it....Forget the pattern. Just do the YO to follow that pattern to hold the line. The line after the yarn over and on the pattern you miss the continuing the YO holes. You m
05.01.2021 - 15:14
![]() Brenda kirjutas:
Brenda kirjutas:
I do have every pattern sectioned off with markers. When you add a stitch there’s a yarn over missing. I can send a picture. There’s a spot where there’s a stitch and no yarn over. The pattern has to be adjusted I think. Unless the yarn over flow shows a separation? Is that it? I know I commented on this before and I’m trying once more to get it to work. I can not
05.01.2021 - 13:39DROPS Design vastas:
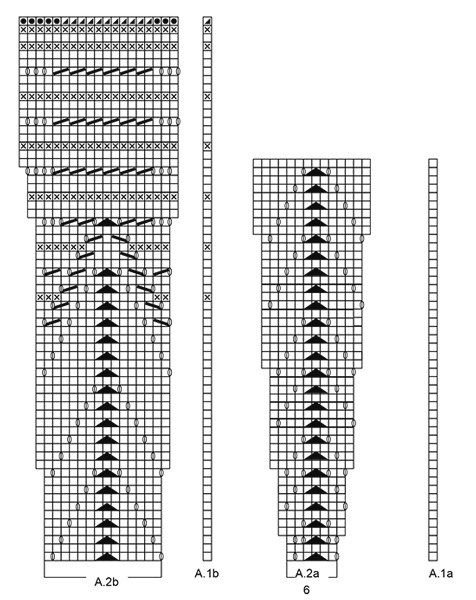
Dear Brenda, I'm sorry, I'm not following you - as examples showing the increases: you will increase 2 sts on row 3 in A.2a (= there are 4 yarn overs but only 2 sts are decreased); you will increase 2 sts on row 11 in A.2b working a total of 4 yarn overs but decreasing also only 2 sts. Hope this can help. Happy knitting!
05.01.2021 - 14:43
|
|||||||||||||||||||||||||
Majesty#majestyshawl |
|||||||||||||||||||||||||
 |
 |
||||||||||||||||||||||||
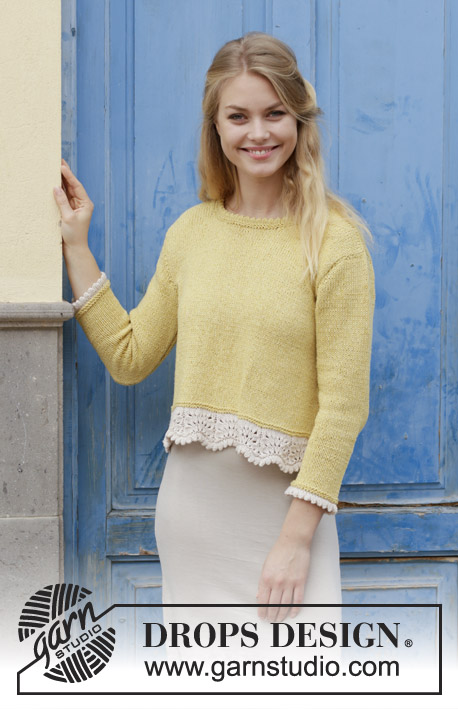
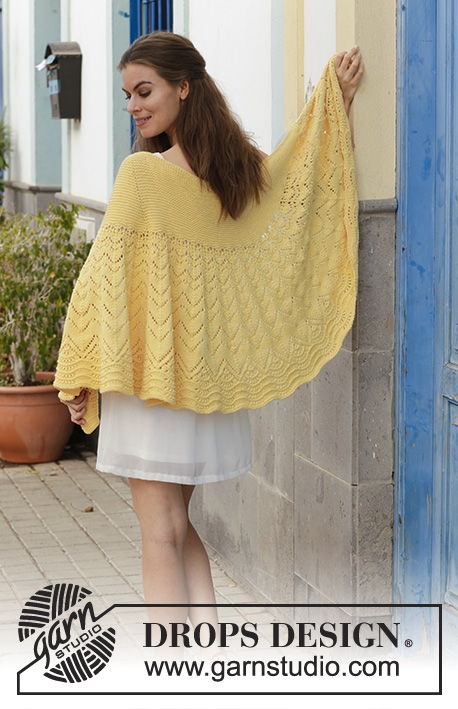
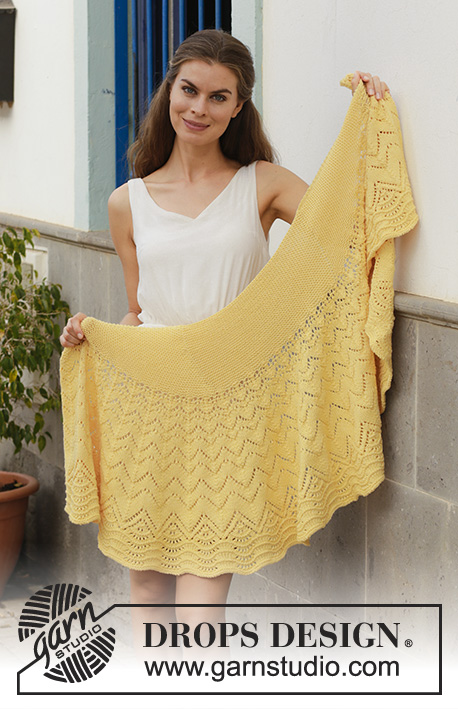
DROPS Merino Extra Fine lõngast kootud ripskoes, pitsmustriga, lainelise mustriga õlasall
DROPS 187-23 |
|||||||||||||||||||||||||
|
JUHEND RIPSKUDE (edasi-tagasi kududes) 1 ripsivall = koo 2 rida parempidi silmuseid. MUSTER Vaata skeeme A.1 ja A.2. Muster on vaadatuna töö paremalt poolt ja näitab iga rida. ---------------------------------------------------------- ÕLARÄTIK Kootakse edasi-tagasi ringvarrastega. Loo 61 silmust 4 mm ringvarrastele Merino Extra Fine lõngaga. Paigalda 1 silmusemärkija 3 silmuse kaugusele mõlemal küljel (= 55 silmust silmusemärkijate vahel). Siis koo järgmiselt: 1. RIDA (= töö paremal pool): koo 2 silmust RIPSKOES - vaata ülevalt, 1 õhksilmus (= 1 silmus kasvatatud), koo ripskoes kuni 1. silmusemärkijani, tee 1 õhksilmus enne silmusemärkijat (= 1 silmus kasvatatud), koo 55 silmust ripskoes (2. silmusemärkija), tee 1 õhksilmus pärast silmusemärkijat (= 1 silmus kasvatatud), koo ripskoes kuni jääb 2 silmust, 1 õhksilmus (= 1 silmus kasvatatud), koo 2 silmust ripskoes (= kokku on kasvatud 4 silmust real). 2. RIDA (= töö pahemal pool): koo kõik silmused ripskoes, aga koo esimene ja viimane õhksilmus läbi, et jääks auk, ning koo 2 keskmist õhksilmust keerdsilmustena, et ei jääks auke. st. 2 ripskoes ääresilmuse kõrval mõlemal küljel on auguread. Korda rida 1 ja 2. JÄLGI KOETIHEDUST! Koo kokku 31 ripsivalli (= kokku 62 rida ripskoes), st. 62 silmust on kasvatatud mõlemal pool 55 keskmist silmust = 185 silmust on real. Töö pikkus on umbes 15 cm, mõõtes kudumise suunas. Siis koo töö paremal pool järgmiselt: tee 2 ääresilmust ripskoes, koo skeemi A.1a järgmisel silmusel, koo skeemi A.2a (= 6 silmust) kuni jääb 2 silmust reale (= 30 mustrikordust real) ja lõpus tee 2 ääresilmus ripskoes. Jätka niimoodi mustriga. Kui skeemid A.1a ja A.2a on tehtud vertikaalselt, koo skeemi A.1b skeemi A.1 a kohale ning skeemi A.2b skeemi A.2a kohale. Kui kõik silmused on kasvatatud, on vardal 575 silmust. Koo silmused maha nagu näidatud skeemil, kasuta vajadusel suuremaid vardaid, et serv ei jääks kiskuma. |
|||||||||||||||||||||||||
Skeemi seletused |
|||||||||||||||||||||||||
|
|||||||||||||||||||||||||
 |
|||||||||||||||||||||||||
Kas oled teinud seda mustrit?Lisa oma piltidele viide #dropspattern #majestyshawl või saada link projektile meie #dropsfan galeriisse. Vajad abi selle mustriga?Garnstudio.com kodulehel on 19 õppevideot, küsimuste/vastuste osa ja muudki. © 1982-2026 DROPS Design A/S. Kõik õigused kaitstud. See dokument, ning selle alajaotused on kaitsud autoriõigustega. Loe rohkem, mida meie mustritega võib teha, iga mustrilehe alt meie kodulehel. |
|||||||||||||||||||||||||


Tegeledes üle 40 aasta kudumise ja heegeldamise disainidega, pakub DROPS Design ühte suurimat tasuta mustrite kollektsiooni internetis - tõlgituna 17 keelde. Tänaseks on meil 325 kataloogi ja 12298 mustrit - millest 9439 on tõlgitud Eesti keelde.
Me anname endast parima, et tuua teieni kõike mida kudumine ja heegeldamine võib pakkuda - inspiratsiooni, nõuandeid ning ka kvaliteetseid lõngu parima hinnaga! Soovid kasutada mustreid muukski, kui ainult oma tarbeks? Loe infot meie Copyright osas iga lehekülje all. Rõõmsat loomist!
Jäta kommentaar mustrile DROPS 187-23
Ootame kommentaare selle mustri kohta!
Kui soovid midagi küsida, siis kiiremaks vastuse saamiseks veendu, et valid õige kategooria alloleval formil. Vajaliku väljad *.