
Populaarsed kategooriad
Otsid lõnga?


Kommentaarid / Küsimused (27)
![]() María Gonzalez kirjutas:
María Gonzalez kirjutas:
"Comenzar en el 4º punto bajo y trabajar a partir de la 3ª vuelta de los diagramas de la manera siguiente: Trabajar A.2a en el punto bajo..." me quedé aauí porque no se como identificar ese 4to punto bajo, desde donde se empieza a contar? con el video me fue muy bien y entiendo basicamente el gráfico pero esto no lo entendí, gracias por su ayuda
25.10.2020 - 20:45DROPS Design vastas:
Hola Maria! Debes contar el 4º punto bajo antes de la esquina (hay 3 arcos de cadenas antes de la esquina) y comenzar aqui. Buen trabajo!
19.11.2020 - 09:16
![]() Sharon Beck kirjutas:
Sharon Beck kirjutas:
I have written out the instructions for this pattern. Would you be willing to publish them on your website? I see that several people have requested them.
05.06.2020 - 00:40DROPS Design vastas:
Dear Mrs Beck, thanks for your feedback, there are already 2 videos to this pattern so that it is very easy to follow them. Happy crocheting!
05.06.2020 - 12:01
![]() Deborah Baxter kirjutas:
Deborah Baxter kirjutas:
Is there a written pattern somewhere? I don’t understand diagrams. It’s a beautiful blanket and I would love to crochet this but unfortunately diagrams aren’t my thing. I think there’s probably a lot of people who don’t understand diagrams.
28.06.2019 - 18:10DROPS Design vastas:
Dear Deborah, unfortunately we cannot accomondate every wish about pattern writing. Our patterns are available in many languages, and we found the best way to give the pattern to everyone in chart forms. Charts do have their advantages, you can see not only a row (and what comes right after a stitch), but you can also see the relations of stitches to each other, and how rows should follow one another. It is not that difficult to memorize the explanation of the stitches (after a few repeats the mind remembers almost automatically). If you are still stuck, remember, you can always ask for help in person in the store where you bought your DROPS yarn from. Happy Crafting!
28.06.2019 - 21:25
![]() Sarah kirjutas:
Sarah kirjutas:
Het derde symbool werd verkeerd vertaald vanuit het Engels: " 1 double crochet around chain stitch space/between 2 trebles". Dit werd vertaald naar halve vaste, maar moet een vaste zijn rond de lossenlus. Ook in het filmpje is te zien dat de persoon een vaste haakt....
30.04.2019 - 14:09
![]() Olga Jaén Pareja kirjutas:
Olga Jaén Pareja kirjutas:
Ustedes dicen que la lana que hay que utilizar es una del grupo C, pero luego indican utilizar una aguja del 3,5mm. ¿Es correcto esto?
30.03.2019 - 12:55DROPS Design vastas:
Hola Olga. Lo importante es la tensión del tejido, en este caso 18 puntos altos x 10.5 filas = 10 cm x 10 cm. El tamaño de la aguja es orientativo.
02.04.2019 - 14:56
![]() Diane kirjutas:
Diane kirjutas:
I've been crocheting for several decades, and I have no issues reading standard charts, but the instructions here are about as incomprehensible as they come and very confusing. As far as I can tell, round 1 ring is 4 chains, but then what? What stitches and how many in the ring?? If I can't even get it started, then I may just have to find another pattern, this is a Christmas project, I don't have a lot of time to waste deciphering this :-/ Thanks
08.10.2017 - 22:26DROPS Design vastas:
Dear Diane, after the initial circle made from 4 chain stitch, and closed with a slip stitch, you do 3 treble (UK)/ double (US) (this is ahown in A.1a). [*Then two treble (UK) / double (US) crocheted together, 2 chain stitch.* Repeat *-* one more time (this is A.1b)]. Then repeat [-] 4 times, then close the round with a lip stitch. And so on. A.1 only shows the stitches that are used in order to raise the row to the next level. A1.b is repeated 4 times in the round. I hope this helps. Happy Crocheting!
08.10.2017 - 23:09
![]() Kathleen kirjutas:
Kathleen kirjutas:
The diagrams are fine as far as they go, however they don't go nearly far enough. In fact, after following the first snippet of diagram shown, it's nearly impossible to figure out where you are. Those who are having problems with the diagrams (and I've followed diagrams for years), it's not you, it's the creator of the diagram.
26.03.2017 - 17:00DROPS Design vastas:
Dear kathleen, in A.1 you just repeat 4 times A.1b in the round, in A.2a-A.2c work A.2b along the sides and A.2c in the corner, A.2a is only showing how to start/finish the round. Happy crocheting!
27.03.2017 - 10:17
![]() Michelle Achee kirjutas:
Michelle Achee kirjutas:
Is there a written pattern for this? I bought the wool thinking it would have a regular written pattern, but all I see is a diagram which I cannot understand. Very frustrated.
22.02.2017 - 20:32DROPS Design vastas:
Dear Mrs Achee, there is only diagram to this pattern, each symbol is matching a st/group of sts and is explaining under diagram text. For any further personnal assistance you are welcome to contact the DROPS store where you bought your yarn, they would be able to assist you, even per mail or telephone. Happy crocheting!
23.02.2017 - 09:51
![]() Naty Gagnon kirjutas:
Naty Gagnon kirjutas:
Merci, pas nécessairement en vidéo mais comme le tutoriel de drops children 24-6, tour par tour par écrit pas en diagramme. Merci.
30.01.2017 - 19:54
![]() Naty Gagnon kirjutas:
Naty Gagnon kirjutas:
Bonjour, je viens de commencer ce modèle et j'ai un peu de difficulté avec les diagrammes, auriez-vous les explications tour après tour comme pour le patron DROPS children 24-6 (Lovely Lily) que j'ai réussi avec succès. En passant votre site est merveilleux.
30.01.2017 - 03:46DROPS Design vastas:
Bonjour Mme Gagnon, votre demande a bien été enregistrée, en attendant la vidéo, vous pouvez suivre le diagramme en vérifiant bien la légende de chaque symbole: A.1a = début/fin de chaque tour, A.1b = à répéter pour former le carré. Bon crochet!
30.01.2017 - 12:08
|
|||||||||||||||||||||||||||||||||||||||||||||||||
Orient Dream#orientdreamblanket |
|||||||||||||||||||||||||||||||||||||||||||||||||
 |
 |
||||||||||||||||||||||||||||||||||||||||||||||||
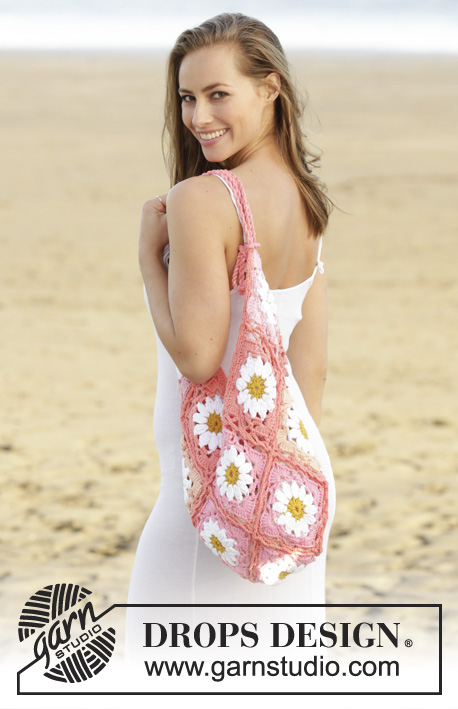
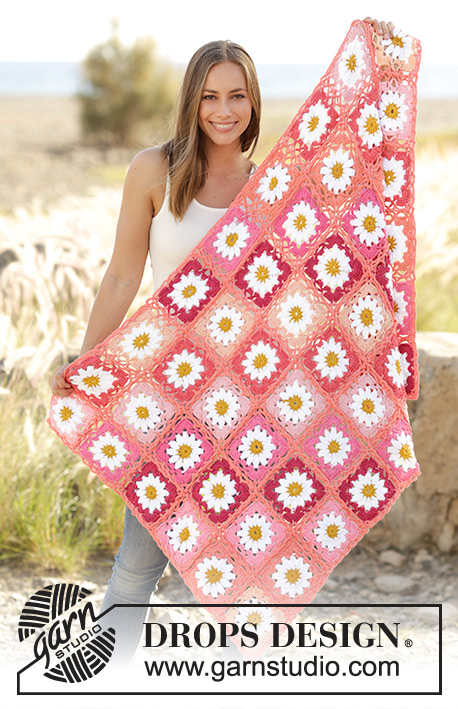
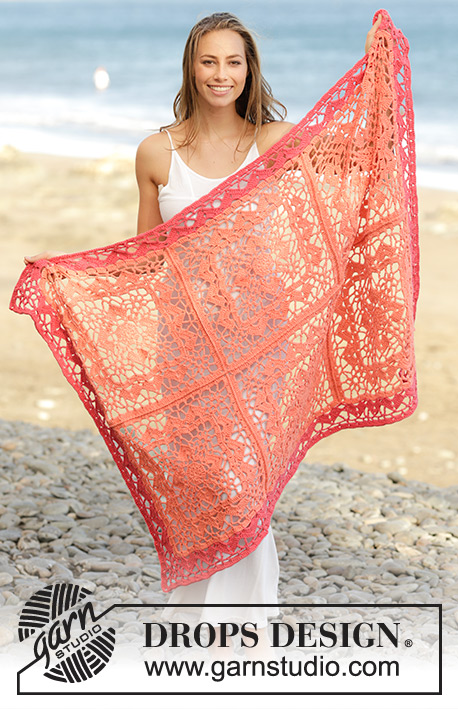
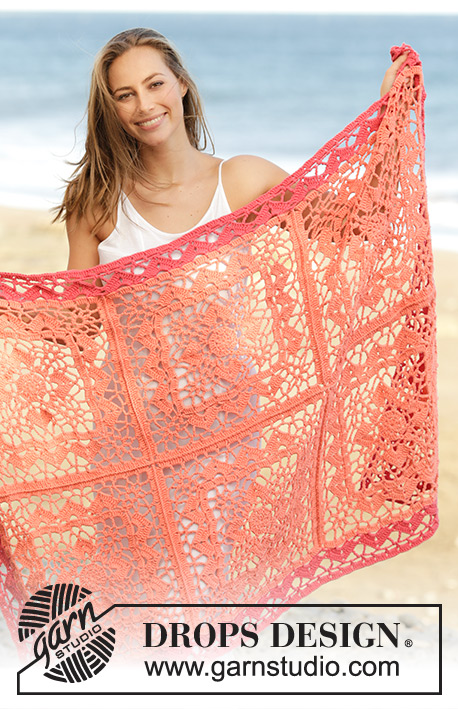
DROPS Paris lõngast heegeldatud ruutudega, pitsmustriga tekk
DROPS 175-10 |
|||||||||||||||||||||||||||||||||||||||||||||||||
|
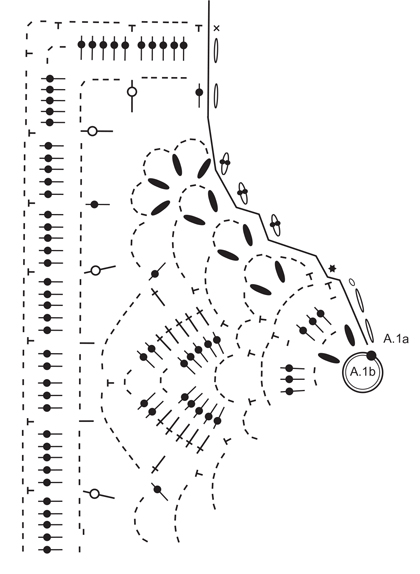
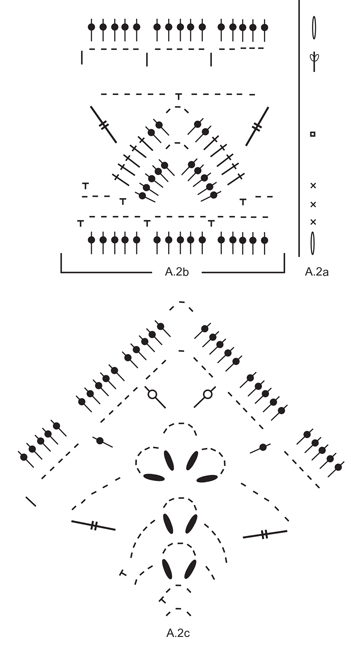
MUSTER Vaata skeeme A.1 ja A.2. ---------------------------------------------------------- TEKK Heegelda 6 ruutu, heegelda need kokku ja siis tee ääris ümber terve teki. HEEGELDATUD MOTIIV Heegelda 3,5 mm heegelnõelaga ja aprikoosi värvi lõngaga skeemi A.1b kokku 4 korda ringil - skeem A.1a näitab kuidas ring algab ja lõppeb ja tehakse lisaks skeemile A1b. JÄLGI HEEGELDAMISE TUGEVUST! Kui skeem A.1a ja A.1b on tehtud vertikaalselt, on ruudu suurus umbes 24 x 24 cm. Katkesta lõng. Alusta neljandast kinnissilmusest enne nurka ja alusta 3. ringist skeemil järgmiselt: tee skeemi A.2a kinnissilmusesse (skeem A.2a näitab ringi algust ja lõppu), tee skeemi A.2b esimese 3 ahelsilmustest kaare ümber, * tee skeemi A.2c (= nurk), tee skeemi A.2b ümber järgmise 9 ahelsilmustest kaare (= 3 mustrikordust), korda * kuni * veel 2 korda, tee skeemi A.2c nurka ja lõpus tee skeemi A.2b viimase 6 ahelsilmustest kaare ümber (= 2 mustrikordust). Kui viimane rida skeemil A.2a kuni A.2c on tehtud, katkesta ja kinnita lõng. Ruudu mõõdud on umbes 39 x 39 cm. Heegelda niimoodi veel 5 ruutu = kokku on 6 ruutu. VIIMISTLUS Nüüd heegelda ruudud kokku läbi mõlema kihi aprikoosi värvi lõngaga järgmiselt: pane 2 ruutu kokku töö pahemad pooled vastamisi, kinnita lõng 1 kinnissilmusega ümber nurga ahelsilmustest kaare, * tee 1 kinnissilmus läbi mõlema kihi järgmisesse ühekordsesse sambasse, 2 ahelsilmust, jäta vahele 1 sammas *, korda * kuni *, kuni terve külg on tehtud, tee 1 ühekordne sammas ümber ahelsilmustest kaare. Korda teistel ruutudel, nii et on 2 riba 3 ruuduga. Siis heegelda 2 riba kokku, nii et on 2 ruutu laiuses ja 3 ruutu pikkuses. Vaata joonist. ÄÄRIS Heegelda ääris ümber terve teki koralli värvi lõngaga. Alusta, tehes 1 kinnissilmus ümber nurga ahelsilmustest kaare ja heegelda skeemi 2. rida järgmiselt - NB! Skeemi 2. real tee 1 kinnissilmus kahe ruudu vahele (st. kus need on kokku heegeldatud, mitte ei tee 1 kinnissilmuse ümber mõlema nurga ahelsilmustest kaarte. Iga ruudu küljel on 15 ahelsilmustest kaart): heegelda skeemi A.2a (näitab ringi algust ja lõppu), * tee skeemi A.2b kuni järgmise nurgani tekil, skeemi A.2c (= nurk) *, korda * kuni* veel 3 korda. Kui skeemid A.2a - A.2c on tehtud vertikaalselt, katkesta ja kinnita lõng. |
|||||||||||||||||||||||||||||||||||||||||||||||||
Skeemi seletused |
|||||||||||||||||||||||||||||||||||||||||||||||||
|
|||||||||||||||||||||||||||||||||||||||||||||||||
 |
|||||||||||||||||||||||||||||||||||||||||||||||||
 |
|||||||||||||||||||||||||||||||||||||||||||||||||
 |
|||||||||||||||||||||||||||||||||||||||||||||||||
Kas oled teinud seda mustrit?Lisa oma piltidele viide #dropspattern #orientdreamblanket või saada link projektile meie #dropsfan galeriisse. Vajad abi selle mustriga?Garnstudio.com kodulehel on 12 õppevideot, küsimuste/vastuste osa ja muudki. © 1982-2026 DROPS Design A/S. Kõik õigused kaitstud. See dokument, ning selle alajaotused on kaitsud autoriõigustega. Loe rohkem, mida meie mustritega võib teha, iga mustrilehe alt meie kodulehel. |
|||||||||||||||||||||||||||||||||||||||||||||||||


Tegeledes üle 40 aasta kudumise ja heegeldamise disainidega, pakub DROPS Design ühte suurimat tasuta mustrite kollektsiooni internetis - tõlgituna 17 keelde. Tänaseks on meil 324 kataloogi ja 12154 mustrit - millest 9305 on tõlgitud Eesti keelde.
Me anname endast parima, et tuua teieni kõike mida kudumine ja heegeldamine võib pakkuda - inspiratsiooni, nõuandeid ning ka kvaliteetseid lõngu parima hinnaga! Soovid kasutada mustreid muukski, kui ainult oma tarbeks? Loe infot meie Copyright osas iga lehekülje all. Rõõmsat loomist!
Jäta kommentaar mustrile DROPS 175-10
Ootame kommentaare selle mustri kohta!
Kui soovid midagi küsida, siis kiiremaks vastuse saamiseks veendu, et valid õige kategooria alloleval formil. Vajaliku väljad *.