
Populaarsed kategooriad
Otsid lõnga?


Kommentaarid / Küsimused (107)
![]() Susanne Altenburg kirjutas:
Susanne Altenburg kirjutas:
Hallo hab mal eine Frage. Ich muss ja bei meiner Größe 74 lm für die Ärmel nehmen.aber die 12 luft maschen für die Verbindung zählen die dann später zu den 74 luftmachen ? Dann hätte ich ja wenn ich alles ein mal rum häkel dann ins gesamt 86 Stäbchen für die ärmel were es richtig? Gruß Frau Altenburg
22.02.2021 - 17:49DROPS Design vastas:
Liebe Frau Altenburg, ja so stimmt es, und dann bei der 1. Runde bei den Ärmeln häkeln Sie noch 2 Stäbchen dazu und zwar jet 1 Stäbchen um das Stäbchen der Stäbchen Reihe an der Stelle, wo die Luftmaschen unter den Arm gehäkelt werden (-= also beidseitig, vor den 12 und nach den 12) = 86 + 2 = 88 Stäbchen. Viel Spaß beim häkeln!
23.02.2021 - 09:34
![]() Cloudy kirjutas:
Cloudy kirjutas:
Hi there I’m up to the finishing touch on the sleeve edge. It says for size L to do the A2 diagram 11 times but then it says to do it once vertically. Can you please explain which it is.
16.12.2020 - 05:11DROPS Design vastas:
Dear Cloudy, you have 88 sts around sleeve edge and can repeat a total of 11 times the 8 stitches in A.2. After you have worked the 2 rows of A.2, diagram is finished (and has been worked one time in height = vertically). Edge is finished. Cut and fasten the yarn. Happy crocheting!
16.12.2020 - 07:10
![]() Erin kirjutas:
Erin kirjutas:
Hello! I am working on this in XXL and I am confused on the marker placement portion. I have (23+4+4+20+4+4+46+4+4+23+4+4=144) with each + being a marker, but I need 164 stitches? Any clarification provided would be much appreciated. Thank you!
15.10.2020 - 18:31DROPS Design vastas:
Dear Erin, it looks like you have forgotten 20 one time after the 46+4+4, ie: 23+4+4+20 +4+4+ 46 + 4+4+20+4+4+23=164. Happy crocheting!
16.10.2020 - 08:54
![]() Cloudy kirjutas:
Cloudy kirjutas:
The garment on the model looks fitted coming in at the waist and flaring out towards the hem. Another reader said hers looks like a dress and so does mine. Very disappointed in this pattern.
09.10.2020 - 03:16DROPS Design vastas:
Dear Cloudy, did you check and kept correct tension as explained in the pattern? remember to check your size with the measurement chart - read more about charts here. Happy crocheting!
09.10.2020 - 08:08
![]() Moira kirjutas:
Moira kirjutas:
One more thing that’s confusing. It says in A1 to work 1st-3rd rounds 40 times (XL) size and then 3rd round until work measures 33cm. It looks like the 1st round is only done once like a set up row, is that correct? If it is and the 3rd is repeated then why are there two instructions, to repeat 40 times and to repeat until work measures 33cm? One would assume that 1st and 3rd rounds are repeated 40 times just by the way it’s written.i must admit these patterns are not easy to work out.
08.10.2020 - 19:28DROPS Design vastas:
Dear Moira, you repeat 40 times A.1 in the round in size XL (= the row with the arrow 1 to the row with the 3. on the right side) - then after these 3 rows have been worked, you repeat row 3 until piece measures 33 cm, then work row/repeat 4. in A.1 until piece measures 45 cm. Happy crocheting!
09.10.2020 - 07:39
![]() Moira kirjutas:
Moira kirjutas:
Hi there, the A1 diagram does not make any sense in your explanation to a previous knitter. According to your abbreviations, the first row is a sc, then skip 2 and 4 ch, but the next sc is not in any particular dc from the previous row, it is in the middle of two dc. I don’t understand that. Then row 2 (which doesn’t say it’s row 2) starts off with a dc in the chain space. Can you please clarify as your diagram and abbreviations are very confusing.
08.10.2020 - 17:44DROPS Design vastas:
Dear Moira, you repeat the diagram in widht, ie (1 sc in next dc, 4 chains, skip 2 dc, 1 sc in next dc, 4 chains, skip 2 dc) and repeat from (to). Row 2 just starts wit 3 ch (see CROCHET INFO-1) ie crochet: 3 chains (= 1st dc), 3 dc+2ch+3dc in next ch-space, and repeat with 1 dc in next ch-space. If you like the first dc of 2nd row being in the middle of the first ch-space, you can crochet some sl st in the first ch-space. Happy crocheting!
09.10.2020 - 07:27
![]() Johanna kirjutas:
Johanna kirjutas:
Erg mooi patroon! Ik heb een vraag over de markeerders. Ik ben nu bij de toer gekomen waar ik aan elke kant van de markeerders moet meerderen, maar wat moet ik met de markeerders doen wanneer ik naar de volgende toer ga? Moet ik ze laten zitten en dan op dezelfde hoogte in de volgende goede kant weer meerderen, of neem ik ze steeds mee naar de volgende toer? ( het is de eerste keer dat ik een ronde pas haak...😅) Alvast bedankt!
29.09.2020 - 01:23DROPS Design vastas:
Dag Johanna,
Je kunt de markeerders inderdaad laten zitten en meenemen in de hoogte, zodat je weet waar je de volgende keer moet meerderen.
21.10.2020 - 12:20
![]() Debbie Zaayman kirjutas:
Debbie Zaayman kirjutas:
I have started with this pattern and have started the first four rows of the fan pattern. Can i please give you my email address and then you can forward me your email address. I want to send you a picture so you can see if looks right before i continue. Currently it looks like a dress and dont know if it is suppose to look like that.\r
24.08.2020 - 16:44
![]() Debbie Zaayman kirjutas:
Debbie Zaayman kirjutas:
Can you please clarify for me with regrds to the first fan patter row..... do i understand it correctly: A1 the first row, is it three trebles in one chain, two chains(skip 2 chains) three treble in next chain and one treble in next chain
16.08.2020 - 16:46DROPS Design vastas:
Dear Mrs Zaayman, start A.1 with 1 double crochet (= UK Engish), then 4 chains, skip 2 stitches, then repeat (1 dc in next st, 4 chains, skip 2 sts) around. on 2nd row work 3 ch (at the beg of round only to replace 1st treble), then crochet around next ch-space: 3 tr, 2 ch, 3 tr, and repeat (1 tr around next ch-space, 3tr +2 ch+3 tr around next ch-space). Happy crocheting!
17.08.2020 - 08:51
![]() Anna kirjutas:
Anna kirjutas:
Bei den Zunahmen vor und nach, bzw. dann nur noch vor dem Markier steht, dass diese in den Hinreihen gearbeitet werden. Ist hiermit tatsächlich nur jede zweite Reihe gemeint und die Rückreihen finden ohne Zunahmen statt?
20.07.2020 - 09:19DROPS Design vastas:
Liebe Anna, wenn Sie in jede Hinreihe zunehmen sollen, dann nehmen Sie in jeder 2. Reihe, dh nur bei den Hinreihen, bei den Rückreihen werden Sie nicht zunehmen. Viel Spaß beim häkeln!
20.07.2020 - 10:01
|
||||||||||||||||||||||||||||
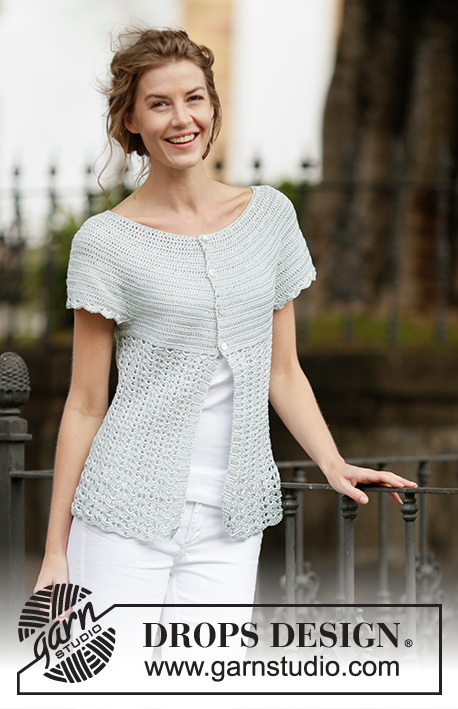
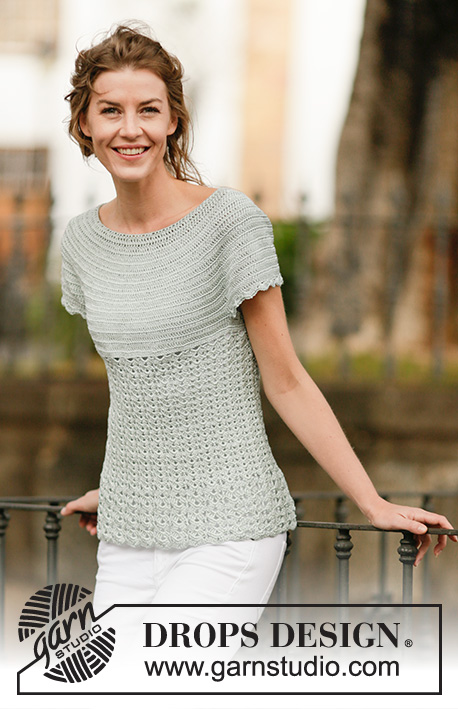
Lady Ascot#ladyascottop |
||||||||||||||||||||||||||||
 |
 |
|||||||||||||||||||||||||||
DROPS Cotton Viscose lõngast ülevalt alla heegeldatud lehvikumustriga, ümara passeosaga topp suurustele S kuni XXXL
DROPS 162-26 |
||||||||||||||||||||||||||||
|
MUSTER Vaata skeeme A.1-A.2. HEEGELDAMISE INFO 1 Asenda iga sammaste rea esimene ühekordne sammas (sm) 3 ahelsilmusega (ahels), lõpus tee 1 aassilmus (aass) kolmandasse ahels-sse. HEEGELDAMISE INFO 2 Iga ringi alguses tee 3 ahels, ringi lõpus tee 1 aass 3-ndasse ahels-sse. KASVATAMISE NIPP Kasvata 1 sm, heegeldades 2 sm ühte sambasse. ------------------------------ TOPP Heegeldatakse ülevalt alla, alustades seljaosa keskelt. Tee 133-137-142-147-152-157 ahels 3,5 mm heegelnõelaga Cotton Viscose lõngaga ja ühenda 1 aass-ga ringiks. Heegelda järgmist ringi nii: 3 ahels (= 1 sm), 1 sm esimesse ahels-sse ahels-ringil, *jäta vahele 1 ahels, 1 sm igasse järgmisesse 5 ahels-sse*, korda *kuni*, kuni jääb 0-4-3-2-1-0 ahels, 1 sm igasse viimasesse 0-4-3-2-1-0 ahels-sse = 112-116-120-124-128-132 sm. Siis heegelda edasi-tagasi. Heegelda iga rida kokku rea lõpus, tehes 1 aass esimesse ahels-sse real – loe HEEGELDAMISE INFOT 1. Pööra tööd. Heegelda 1 rida, tehes 1 sm igasse sm-sse, SAMAL AJAL kasvata 28 sm ühtlaste vahedega (st. kasvata 1 sm umbes pärast igat 4-ndat sammast) – loe KASVATAMISE NIPPI = 140-144-148-152-156-160 sm. Paigalda 12 silmusemärkijat (SM) nii: heegelda 17-18-19-20-21-22 sm (= pool seljaosa), SAMAL AJAL kasvata 1-0-0-2-2-1 sm ühtlaste vahedega, paigalda 1. SM, *tee 4 sm, paigalda järgmine SM*, korda *kuni* veel 1 kord, tee 20 sm, paigalda järgmine SM, *tee 4 sm, paigalda järgmine SM*, korda *kuni* veel 1 kord, tee 34-36-38-40-42-44 sm (= esiosa), SAMAL AJAL kasvata 2-0-0-4-4-2 sm ühtlaste vahedega, paigalda järgmine SM, *tee 4 sm, paigalda järgmine SM*, korda *kuni* veel 1 kord, tee 20 sm, paigalda järgmine SM, *tee 4 sm, paigalda järgmine SM*, korda *kuni* veel 1 kord, tee 17-18-19-20-21-22 sm (= pool seljaosa), SAMAL AJAL kasvata 1-0-0-2-2-1 sm ühtlaste vahedega = 144-144-148-160-164-164 sm. JÄLGI KOETIHEDUST! Järgmisel real, töö PP, kasvata nii: kasvata 1 sammas mõlemal pool kõiki SM-e (= 24 kasvatatud sammast). Korda kasvatamist igal töö PP real kokku 1-4-5-7-8-10 korda, siis kasvata enne igat SM-i (= 12 kasvatatud sammast). Korda kasvatamist igal töö PP real kokku 9-6-6-4-4-3 korda = 276-312-340-376-404-440 sm. Töö pikkus on umbes 18-18-20-20-22-23 cm. Heegelda järgmist rida nii: 36-43-48-54-59-66 sm (= pool seljaosa), heegelda 12 ahels (paigalda SM nende uute silmuste keskele = varruka sisekülg), jäta vahele 66-70-74-80-84-88 sm eelmisel real (= varrukas), tee 72-86-96-108-118-132 sm (= esiosa), tee 12 ahels (paigalda SM nende uute silmuste keskele = varruka sisekülg), jäta vahele 66-70-74-80-84-88 sm eelmisel real ja tee 36-43-48-54-59-66 sm (= pool seljaosa) = 168-196-216-240-260-288 sm/ahels (= 84-98-108-120-130-144 sm/ahels on selja- ja esiosal). Paigalda 1 SM. EDASI MÕÕDA SIIT! Heegelda 1 rida, tehes 1 sm igasse sm-sse ja igasse ahels-sse varruka siseküljel, SAMAL AJAL kasvata 18-8-6-0-10-6 sm ühtlaste vahedega = 186-204-222-240-270-294 sm. Heegelda 1 rida, tehes 1 sm igasse sm-sse. Edasi heegelda ringselt, pööramata. LEHVIKUMUSTER Heegelda 1. kuni 3. ringi skeemil A.1 31-34-37-40-45-49 korda – loe HEEGELDAMISE INFOT 2. Siis korda 3-ndat ringi, kuni töö pikkus on umbes 29-31-31-33-31-31 cm. Nüüd heegelda 4-ndat ringi, kuni töö pikkus on umbes 40-42-43-45-45-45 cm. Kinnita lõngaots. VARRUKA ÄÄRIS Alusta heegeldamist varruka siseküljelt (kaenla alt) nii: tee 1 ks 6-ndasse ahels-sse 12-st ahels-ketil käeaugul. Tee 3 ahels (= 1 sm). Siis heegelda 1 sm igasse järgmisesse 6 ahels-sse, tee 1 sm sammaste reale, kus ahels-kett sai tehtud, 1 sm järgmisesse 66-70-74-80-84-88 sm-sse (= varrukas), SAMAL AJAL kasvata 0-4-0-2-6-2 sm ühtlaste vahedega, tee 1 sm sammaste reale, kus ahels-kett sai tehtud, tee 1 sm igasse ülejäänud 5 ahels-sse varruka siseküljel = 80-88-88-96-104-104 sm. Siis tee skeemi A.2 kokku 10-11-11-12-13-13 korda. Kui on kootud 1 vertikaalne skeemi A.2 mustrikordus, katkesta lõng ja kinnita lõngaots. Heegelda teine varrukaääris samamoodi. |
||||||||||||||||||||||||||||
Skeemi seletused |
||||||||||||||||||||||||||||
|
||||||||||||||||||||||||||||
 |
||||||||||||||||||||||||||||
 |
||||||||||||||||||||||||||||
Kas oled teinud seda mustrit?Lisa oma piltidele viide #dropspattern #ladyascottop või saada link projektile meie #dropsfan galeriisse. Vajad abi selle mustriga?Garnstudio.com kodulehel on 13 õppevideot, küsimuste/vastuste osa ja muudki. © 1982-2026 DROPS Design A/S. Kõik õigused kaitstud. See dokument, ning selle alajaotused on kaitsud autoriõigustega. Loe rohkem, mida meie mustritega võib teha, iga mustrilehe alt meie kodulehel. |
||||||||||||||||||||||||||||


Tegeledes üle 40 aasta kudumise ja heegeldamise disainidega, pakub DROPS Design ühte suurimat tasuta mustrite kollektsiooni internetis - tõlgituna 17 keelde. Tänaseks on meil 324 kataloogi ja 12290 mustrit - millest 9431 on tõlgitud Eesti keelde.
Me anname endast parima, et tuua teieni kõike mida kudumine ja heegeldamine võib pakkuda - inspiratsiooni, nõuandeid ning ka kvaliteetseid lõngu parima hinnaga! Soovid kasutada mustreid muukski, kui ainult oma tarbeks? Loe infot meie Copyright osas iga lehekülje all. Rõõmsat loomist!
Jäta kommentaar mustrile DROPS 162-26
Ootame kommentaare selle mustri kohta!
Kui soovid midagi küsida, siis kiiremaks vastuse saamiseks veendu, et valid õige kategooria alloleval formil. Vajaliku väljad *.