
Populaarsed kategooriad
Otsid lõnga?


Kommentaarid / Küsimused (50)
![]() Niva kirjutas:
Niva kirjutas:
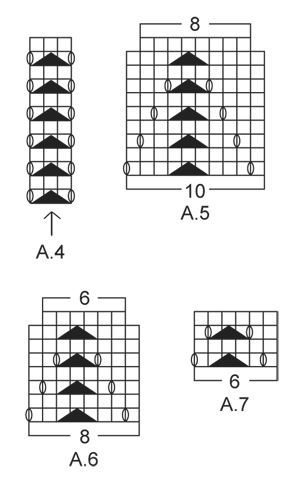
Must admit this is the most confusing pattern I’ve ever tried and I’m an accomplished knitter. I’ve read it so many times to work it out and I’m almost there. Does the A4 pattern stop after the 12 rows in the graph?
08.04.2021 - 04:33DROPS Design vastas:
Dear Niva, A.4 will be repeated in height until all decreases for raglan are done. Happy knitting!
08.04.2021 - 07:51
![]() Nova kirjutas:
Nova kirjutas:
At the beginning of the A4 graph is the YO between the last stitch on the body and the first stitch on the sleeve?
07.04.2021 - 13:43DROPS Design vastas:
Dear Nova, the stitch with the arrow in A.4 should be the one with the marker at the transitions, so that you will have 1 yarn over, the double decrease with marker in the middle stitch, 1 yarn over; this means there will be one hole (yarn over) on body and on sleeve. Happy knitting!
07.04.2021 - 14:26
![]() Nova kirjutas:
Nova kirjutas:
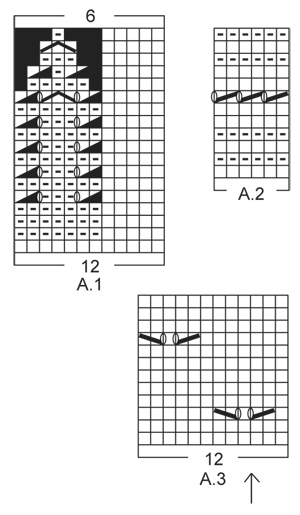
After attaching the sleeves for size L and beginning middle back for the first round, it says to start on the same row for the sleeve as for the body. Does this mean if I’m on row 4 on the body (A1) that I start on row 4 for the sleeves (A3)? Also A1 the arrow designates the middle of the sleeve but the graph starts with A4 which is 3 stitches and A3 is another 3 sts total 6 sts wouldn't the middle be half of 68 sts which is 34 sts?
06.04.2021 - 14:03DROPS Design vastas:
Dear Nova, you should finish the sleeves 8adjust its length) so you will end up in the same row if the pattern as on the body, so you can continue the pattern without disrupting it. The arrow should match the middle of the sleeves, the upper middle line, put the stitch marked there, and count outwards to find out where you should start. Happy Knitting!
06.04.2021 - 14:26
![]() Nova kirjutas:
Nova kirjutas:
This is becoming a real challenge but I’m not going to give up! I am attaching the sleeves to the body but notice you don’t mention double pointed needles in your materials needed for this project. How are you supposed to knit these sleeves together with the body without them? It won’t work.
25.03.2021 - 01:52DROPS Design vastas:
Dear Nova, when you have knitted the sleeves, you put all the stitches on one curcular needle, (back, sleeve, fron, sleeve), and knot the circular needle on the round. You don't knit "together" as a three needle bind off, but along with the body, in one big circle, that is getting decreased as you get to the neckline. Happy Knitting!
25.03.2021 - 02:26
![]() Nova kirjutas:
Nova kirjutas:
Hi again. I’m up to the yoke and I’m really confused about this section of the pattern. The fact that there are 3 graphs to be worked is a challenge in itself. The confusion is in the A4 graph between the body and the sleeves, does this have to do with the shaping of the raglan?
09.03.2021 - 13:31DROPS Design vastas:
Dear Nova, pattern A.4 is between each body and sleeve, right at the raglan line. Shaping happens before and after this pattern. Happy Knitting!
09.03.2021 - 13:57
![]() Nova kirjutas:
Nova kirjutas:
When you get to the side where the first increases have been worked you have two extra stitches so to keep the eyelet pattern uniform, the space between the next eyelet is 9 stitches and that throws the whole eyelet pattern out. I don’t know how you can keep the eyelet pattern 7 stitches between with these increases on the side. The new repeat would make more sense at the beginning of the round.
26.02.2021 - 23:15DROPS Design vastas:
See answer below - if you can't work a part of decrease (K2 tog, YO), over the new stitches, just work these stitches in stocking stitch without the lace pattern. You shoulud have the correct number of sts between each eyelet in width. Hope this will help. Happy knitting!
01.03.2021 - 08:00
![]() Nova kirjutas:
Nova kirjutas:
The beginning of the round the increases can be worked out but it’s the increases halfway on the side marker those stitches throw the whole eyelet pattern out. You can’t do 7 stitches between the pattern it doesn’t work out I’ve tried it
26.02.2021 - 22:52DROPS Design vastas:
Dear Nova, if you don't have enough stitches to work the whole lace pattern on the side, this means there are not enough stitches yet, just work these stitches in stocking stitch. Work the lace pattern over the new stitches only if you have enough stitches to work them. This means each lace pattern should be worked with 7 knit stitches in between. Happy knitting!
01.03.2021 - 07:58
![]() Nova kirjutas:
Nova kirjutas:
Are you saying to read the graph from left to right and then right to left alternately and the added stitches will work out with the eyelet pattern?
26.02.2021 - 16:33DROPS Design vastas:
Hi Nova, when working in the round all rounds are worked from the right side, and the diagram is read solely from right to left. When starting a new round, simply start working the first symbol on the next row in diagram. Happy knitting!
28.02.2021 - 21:14
![]() Nova kirjutas:
Nova kirjutas:
For example on the 3rd round after the first increases there are 4 stitches left at the end of the round and I’m not sure whether to knit those stitches as normal or do the pattern.
26.02.2021 - 15:19DROPS Design vastas:
Dear Nova, see previous answer, make always sure that the eyelet pattern fit in height, it shouldn't be displaced. Happy knitting!
26.02.2021 - 16:17
![]() Nova kirjutas:
Nova kirjutas:
When doing the body and the A3 and making the increases on either side of the markers I notice that those extra stitches will throw the alternate pattern out where the holes should be. Is that how it’s supposed to be?
26.02.2021 - 15:08DROPS Design vastas:
Dear Nova, the increased stitches should be worked in A.3, this means at the beg of A.3 work the new stitches as a new repeat reading diagram from the left towards the right (= there should be always 7 sts before the next K2 tog, YO in the lace pattern. And at the end of A.3, work the new stitches as a new repeat of A.3 (reading from the right towards the left). Hope this will help. Happy knitting!
26.02.2021 - 16:16
|
||||||||||||||||||||||||||||
White Romance#whiteromancetop |
||||||||||||||||||||||||||||
 |
 |
|||||||||||||||||||||||||||
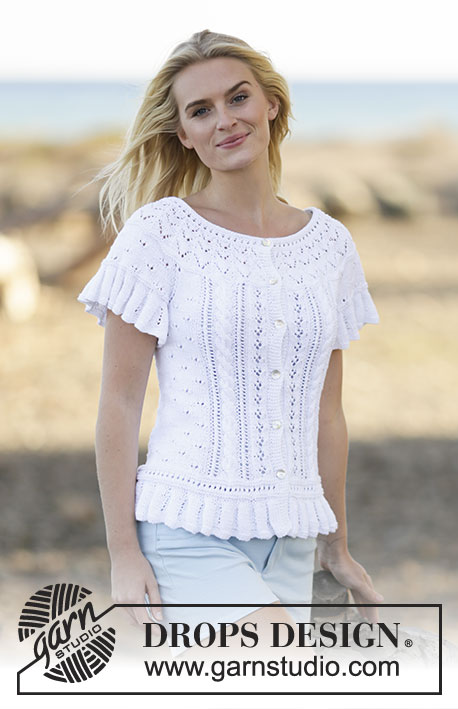
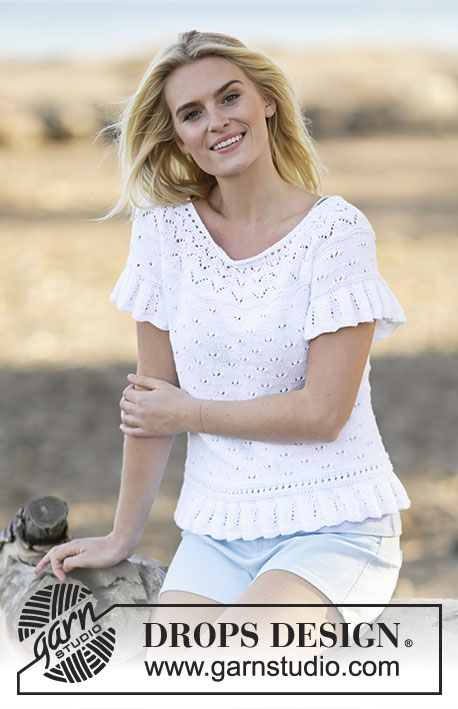
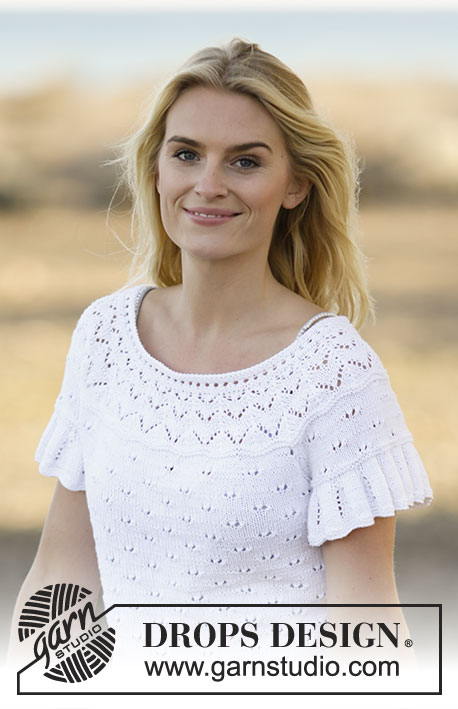
DROPS Safran lõngast kootud pitsmustriga, ümara passeosaga ja lühikeste varrukatega topp suurustele S kuni XXXL
DROPS 159-12 |
||||||||||||||||||||||||||||
|
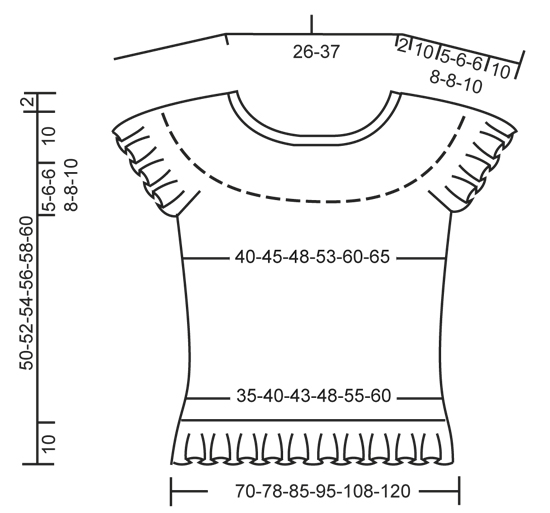
RIPSKUDE (ringselt kududes): koo 1 ring parempidi ja 1 ring pahempidi, korda neid kahte ringi. 1 ripsivall = 2 ringi ripskoes. MUSTER Vaata skeeme A.1 kuni A.7. Muster on vaadatuna töö paremalt poolt (töö PP) ja näitab iga rida. KASVATAMISE NIPP Kasvata 1 s, tehes 1 õhksilmuse. Järgmisel ringil koo õs keerdsilmusena, et ei tekiks auku. Koo kasvatatud silmused parempidises koes. RAGLAAN Tee raglaani kahandused mõlemal pool skeemi A.4, igal varrukate ja kehaosa ühenduskohal. Kahanda pärast skeemi A.4: tõsta 1 s pr võttega kudumata, 1 pr, tõsta kudumata silmus üle kootud silmuse. Kahanda 2 s enne skeemi A.4: 2 pr kokku. ----------------------------- KEHAOSA Kootakse ringselt ringvarrastega. Loo 336-372-408-456-516-576 silmust 2,5 mm Safran lõngaga. Koo 4 ringi ripskoes - vaata ülevalt. Võta 3 mm ringvardad ja koo mustrit vastavalt skeemile A.1. Kui skeem A.1 on tehtud 1 mustrikordus vertikaalselt, on vardal 168-186-204-228-258-288 silmust. Siis jätka skeemiga A.2. Pärast skeemi A.2 koo 2 ring parempidi, SAMAL AJAL kasvata viimasel ringil 0-6-0-0-6-0 s ühtlaste vahedega = 168-192-204-228-264-288 s. Paigalda silmusemärkija (SM) ringi algusesse ja teine pärast 84-96-102-114-132-144 s (= küljed). Siis jätka skeemiga A.3. JÄLGI KOETIHEDUST! SAMAL AJAL, kui töö kõrgus on 12 cm, kasvata 1 s mõlemal pool mõlemat SM-i - loe kasvatamise nippi - (= 4 s kasvatatud). Korda kasvatamist iga 4-4-4-5-5-5 cm järel kokku 6 korda mõlemal küljel = 192-216-228-252-288-312 s - NB! Koo kasvatatud silmused parempidises koes. Jätka nii, kuni töö pikkus on 35-36-38-38-40-40 cm. Järgmine ring: koo maha 5-5-5-6-6-6 s käeaugu jaoks, koo 86-98-104-114-132-144 s (= esiosa), koo maha 10-10-10-12-12-12 s käeaugu jaoks (st. 5-5-5-6-6-6 s mõlemal pool SM-i), koo 86-98-104-114-132-144 s (= seljaosa) ja koo maha ülejäänud 5-5-5-6-6-6 s. Pane töö kõrvale ja koo varrukad. VARRUKAD Kootakse ringselt ringvarrastega. Loo üles 144-156-156-168-168-180 silmust 2,5 mm Safran lõngaga. Koo 4 ringi ripskoes - vaata ülevalt. Võta 3 mm ringvardad ja koo mustrit vastavalt skeemile A.1. Kui skeem A.1 on tehtud, on varrastel 72-78-78-84-84-90 silmust. Koo 4 ringi ripskoes. SAMAL AJAL koo maha viimasel ringil keskmised 10-10-10-12-12-12 s varruka siseküljel = 62-68-68-72-72-78 s jääb vardale. Pane töö kõrvale ja koo teine varrukas. PASSE Tõsta varrukad kehaosaga samale ringvardale, kohtadesse, kus kudusid maha käeaukude jaoks (ilma neid läbi kudumata) = 296-332-344-372-408-444 s. SAMAL AJAL paigalda 1 SM esimesse silmusesse ja 1 SM viimasesse silmusesse mõlemal varrukal (= 4 SM). Alusta seljaosa keskelt ja jätka mustriga nagu enne kehaosal, SAMAL AJAL koo skeemi A.3 varrukatel (nool skeemil näitab varruka pealset keskkohta, alusta sama skeemireaga nagu kehaosal). Koo lisamustrikordus A.4 iga varrukate ja kehaosa ühenduskohtadel (nool skeemil näitab SM kohta). Kui kõigil silmustel on kootud 2 ringi, alusta RAGLAANI kahandusi - vaata ülevalt (= 8 s kahandatud). Korda kahandamist igal 4. ringil kokku 4-5-5-7-7-8 korda = 264-292-304-316-352-380 s. Koo 4 ringi kõigil silmustel, SAMAL AJAL kahanda 4-12-4-6-12-10 s ühtlaste vahedega esimesel ringil = 260-280-300-310-340-370 s. Koo 2 ringi parempidi. Nüüd alusta kahandamisi passeosal ja koo mustrit skeemil A.5 (= 26-28-30-31-34-37 kordust ringil – NB! Võta vajadusel lühemad ringvardad. Kui skeem A.5 on tehtud 1 kord vertikaalselt, koo skeem A.6 skeemi A.5. Kui skeem A.6 on tehtud 1 mustrikordus vertikaalselt, on vardal 156-168-180-186-204-222 silmust. Nüüd koo skeemi A.7 skeemi A.6. Kui skeem A.7 on tehtud 1 kord vertikaalselt, koo seljaosal kõrgendus nii: paiguta esiosa keskele 1 silmusemärkija (SM) (teisele poole ringi algust). Alusta seljaosa keskelt ja koo pr kuni 14-14-16-16-18-20 s jääb enne SM-i. Pööra tööd, koo parempidi tagasi kuni jääb 14-14-16-16-18-20 s enne SM-i teisel pool. Pööra, koo parempidi kuni jääb 30-30-34-34-38-42 s enne SM-i. Pööra tööd, koo parempidi tagasi kuni jääb 30-30-34-34-38-42 s enne SM-i teisel pool. Pööra, koo parempidi kuni jääb 46-46-52-52-58-64 s enne SM-i. Pööra tööd, koo parempidi tagasi kuni jääb 46-46-52-52-58-64 s enne SM-i teisel pool. Pööra, koo parempidi kuni jääb 62-62-70-70-76-86 s enne SM-i. Pööra tööd, koo parempidi tagasi kuni jääb 62-62-70-70-76-86 s enne SM-i teisel pool. Pööra, koo parempidi tagasi ringi algusesse. KAELUS Võta 2,5 mm ringvardad ja koo ringselt mustrit kõigil silmustel skeemi A.2. SAMAL AJAL kahanda esimesel ringil 22-24-24-26-30-32 s ühtlaste vahedega = 134-144-156-160-174-190 s. Pärast skeemi A.2 koo silmused lõdvalt maha töö paremalt poolt. Töö pikkus on u. 52-54-56-58-60-62 cm mõõtes õlast alla. VIIMISTLUS Õmble kinni kaenlaalused avad. |
||||||||||||||||||||||||||||
Skeemi seletused |
||||||||||||||||||||||||||||
|
||||||||||||||||||||||||||||
 |
||||||||||||||||||||||||||||
 |
||||||||||||||||||||||||||||
 |
||||||||||||||||||||||||||||
Kas oled teinud seda mustrit?Lisa oma piltidele viide #dropspattern #whiteromancetop või saada link projektile meie #dropsfan galeriisse. Vajad abi selle mustriga?Garnstudio.com kodulehel on 30 õppevideot, küsimuste/vastuste osa ja muudki. © 1982-2026 DROPS Design A/S. Kõik õigused kaitstud. See dokument, ning selle alajaotused on kaitsud autoriõigustega. Loe rohkem, mida meie mustritega võib teha, iga mustrilehe alt meie kodulehel. |
||||||||||||||||||||||||||||


Tegeledes üle 40 aasta kudumise ja heegeldamise disainidega, pakub DROPS Design ühte suurimat tasuta mustrite kollektsiooni internetis - tõlgituna 17 keelde. Tänaseks on meil 324 kataloogi ja 12290 mustrit - millest 9431 on tõlgitud Eesti keelde.
Me anname endast parima, et tuua teieni kõike mida kudumine ja heegeldamine võib pakkuda - inspiratsiooni, nõuandeid ning ka kvaliteetseid lõngu parima hinnaga! Soovid kasutada mustreid muukski, kui ainult oma tarbeks? Loe infot meie Copyright osas iga lehekülje all. Rõõmsat loomist!
Jäta kommentaar mustrile DROPS 159-12
Ootame kommentaare selle mustri kohta!
Kui soovid midagi küsida, siis kiiremaks vastuse saamiseks veendu, et valid õige kategooria alloleval formil. Vajaliku väljad *.