
Populaarsed kategooriad
Otsid lõnga?


Kommentaarid / Küsimused (42)
![]() Senecal kirjutas:
Senecal kirjutas:
Bonsoir j aimerais savoir si le dos se tricote de la même façon que le devant
12.09.2018 - 19:15DROPS Design vastas:
Bonjour Mme Senecal, le dos se tricote comme pour le devant jusqu'à ce que l'encolure mesure 12 cm, puis on va continuer à diminuer et on va rabattre en même temps 1 m au début de chaque rang (pas d'encolure V dans le dos). Bon tricot!
13.09.2018 - 08:27
![]() Senecal kirjutas:
Senecal kirjutas:
Bonsoir après avoir séparé en deux parti de quel côté je dois augmente s il vous plais et pour le dos je dois faire exactement pareil que le devant ou pas
11.09.2018 - 20:42DROPS Design vastas:
Bonjour Mme Senecal, pour le devant droit, on augmente côté B (comme avant côté encolure) puis on diminue du même côté. En même temps, 2 cm après la fin des augmentations, vous diminuez de chaque côté du marqueur. Il reste 21-49 m (cf taille). Diminuez ensuite côté encolure (= B) et augmentez côté A (sur le côté). Suivez bien les indications pour votre taille pour bien faire les bonnes augmentations/diminutions au bon moment. Bon tricot!
12.09.2018 - 07:51
![]() Luz kirjutas:
Luz kirjutas:
Estoy intentando hacer este patrón pero me he liado a la hora de saber cuál es el lado B y el A para hacer las disminuciones. Por favor ruego me ayuden
13.02.2018 - 15:36DROPS Design vastas:
Hola Luz. Mirando con el lado derecho hacia tí, el inicio de la fila = lado-A (hacia el centro de la espalda), final de la fila = lado-B (hacia el lado).
17.02.2018 - 17:16
![]() Sara kirjutas:
Sara kirjutas:
When measuring neckline to the 12cm mark do you measure from centre of v where the decreases are or from sides where the 25 stitches are cast on because they have different measurements.
30.05.2016 - 01:43DROPS Design vastas:
Dear Sara, measure along the new sts cast on (the 12 cm = strap/shoulder - see measurement chart). Happy knitting!
30.05.2016 - 10:22
![]() Sally kirjutas:
Sally kirjutas:
I'm really keen on this top but surely the instructions could be written in a clearer way? So many complicated increases and decreases on different numbered rows all at once! I'm not surprised people are struggling here! It's a gorgeous pattern and very on-trend. Please consider a way to present the pattern in an easier form!
20.05.2016 - 16:32DROPS Design vastas:
Dear Sally, you can write all dec/inc you are making to not miss any "at the same time" and be sure you will get correct number of sts. Happy knitting!
20.05.2016 - 16:41
![]() Sara kirjutas:
Sara kirjutas:
I understand the directions and when to place markers and when and where to increase/ decrease....what I am saying is there are not enough stitches in my size 21 stitches to do the increases before the b side decreases are past the marker! Thanks
17.05.2016 - 19:34DROPS Design vastas:
Dear Sara, as previously answered on Cindy, you will pass marker when continuing the dec towards B side, the dec at marker are then already done. In first size, there are 58 sts - 33 dec towards B - 4 sts at marker = 21 sts remaining. Happy knitting!
18.05.2016 - 10:12
![]() Sara kirjutas:
Sara kirjutas:
I agree with question asked by Cindy ....there are 10 stitches on each side of marker at this point....I need at least 6 rows to get 2 cm all while decreasing on b side 10-3 4 stitches.... Increase 1 on b side 5 stitches on b side.... Decrease another 9 stitches before another increase on b side if increasing every 8 rows???????? Help please
16.05.2016 - 20:34DROPS Design vastas:
Dear Sara, inc first towards B, then insert a marker. Then dec 1 st towards B and 2 cm after marker dec at the same time 1 st at the marker. You should have 21-49 sts (see size) when all dec have been done. Then insert a new marker in the middle and continue dec towards B, at the same time, inc 1 st towards A and inc 1 st at the marker (first before the marker, then after the marker). Happy knitting!
17.05.2016 - 11:20
![]() Lyn Johnson kirjutas:
Lyn Johnson kirjutas:
Love the look of this top. I started the front and everything was fine until I started the directions for the right front. I was unable to follow all the directions "at the same time" so put my project in time out. I would love to try again but even after studying the directions further, I can't understand how all the directions work together. Can you give me any suggestions?
07.06.2015 - 06:32DROPS Design vastas:
Dear Mrs Johnson, on right front piece inc 1-11 times (see size) as before first towards B - then insert a marker after 29-43 sts and inc 33 times towards B and 2 cm after marker dec 4 times 1 st at marker. You should have 21-49 sts. Insert then a marker in the mid st and dec towards B + inc towards A + 2 cm after marker inc at the marker. Then bind off sts towards B while continuing inc towards A. Happy knitting!
08.06.2015 - 08:34
![]() Tone Gustavsen kirjutas:
Tone Gustavsen kirjutas:
Det var den tunikaen jeg lette etter! Ivrig etter å komme i gang, men oppdager at garnet er merket 'utgått'. Er det noe alternativ i flammegarn?
13.02.2015 - 17:55
![]() Cindy kirjutas:
Cindy kirjutas:
Pattern drops #112-13. I am having trouble understanding the directions for right front after completing decreases to 25 sts (medium size) I've inserted the marker on the thirteenth st. Decreasing 24 times will put me way past 2 cm from marker. Can someone clarify the remaining directions for the right front? Thanks so much
25.02.2013 - 04:15DROPS Design vastas:
Yes, you will pass marker in some point, and continue dec on the side B. Middle inc's should be done already for that time.
25.02.2013 - 15:43
|
|
Grape Valley#grapevalleytunic |
|
|
|
|
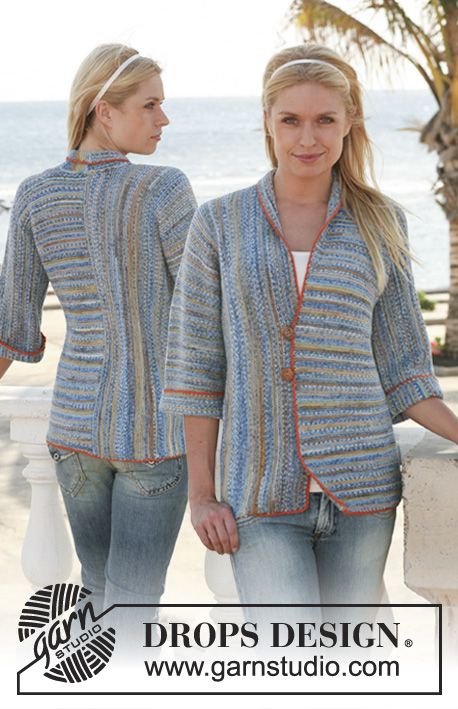
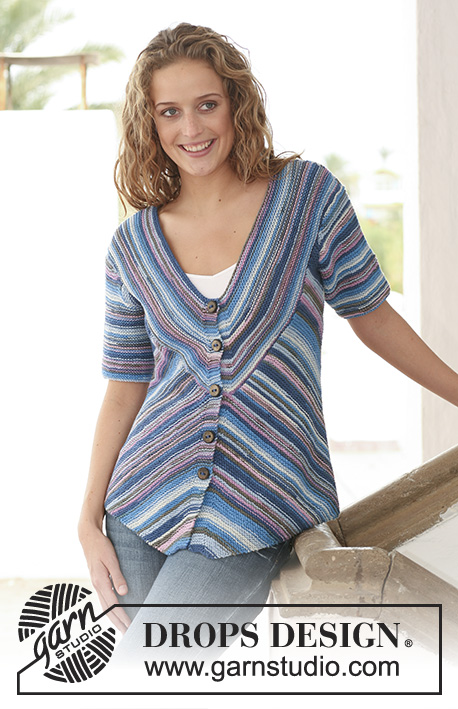
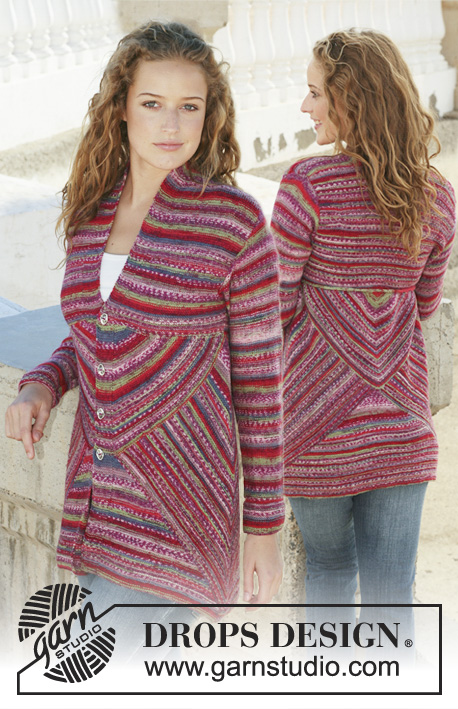
DROPSi ripskoes topp lõngast ”Muskat Soft”. Suurused S - XXXL.
DROPS 112-13 |
|
|
ESIOSA Kootakse ripskoes, st. koo kõik read parempidi. Loo üles 6 silmust 4 mm varrastele Muskat Soft lõngaga. Paigalda silmusemärkija (SM) rea keskele = 3 silmust on mõlemal pool SM-i. SM tähistab esiosa keskkohta. Koo järgmiselt: 1. RIDA (= töö PP): 1 pr, 1 õs, koo, kuni enne SM-i jääb kududa 1 silmus, 1 õs, 2 pr (SM on nende kahe silmuse vahel), 1 õs, koo, kuni kududa jääb 1 silmus, 1 õs ja 1 pr. 2. RIDA (= töö PH): koo kõik silmused pr, õs koo pr keerdsilmusena. 3. RIDA: koo nagu 1. rida. 4. RIDA: koo nagu 2. rida. 5. RIDA: koo kõik silmused pr. 6. RIDA: koo nagu 5. rida. Korda read 1 kuni 6, kuni real on 114-118-122-130-142-150 silmust. Nüüd jaota töö kaheks ja tõsta esimesed 57-59-61-65-71-75 silmust silmusehoidjale. Lõpeta pooled eraldi. PAREM ESIOSA = 57-59-61-65-71-75 silmust. Töö PP: rea algus = A-pool (esiserv), rea lõpp = B-pool (külg). LOE JÄRGNEV LÄBI ENNE JÄTKAMIST! Koo ripskoes kõikide silmustega, SAMAL AJAL kasvata 1 silmus B-poolel nagu enne kokku 1-3-5-7-9-11 korda = 58-62-66-72-80-86 silmust. Pärast kõiki kasvatamisi paigalda SM pärast 29-31-33-36-40-43-ndat silmust. Nüüd kahanda 1 silmus igal teisel real B-poolel kokku 33 korda. SAMAL AJAL, kui töö pikkus SM-st on umbes 2 cm, kahanda 1 silmus igal 10 real kokku 4 korda, kududes pr kokku vaheldumisi 2 silmust enne ja 2 silmust pärast SM-i. Pärast kõiki kahandamisi on real 21-25-29-35-43-49 silmust. Paigalda SM rea keskmisesse silmusesse. Jätka, kahandades 1 silmus igal teisel real B-poolel kokku 21-24-24-27-28-28 korda, SAMAL AJAL kasvata 1 silmus igal 6-8-8-8-10-10-ndal real A-poolel kokku 6 korda. SAMAL AJAL, kui töö pikkus SM-st on 2 cm, kasvata 1 silmus igal 8-ndal real kokku 4 korda, kududes 2 silmust 1 silmusest vaheldumisi enne ja pärast SM-i. Pärast kõiki kasvatamisi ja kahandamisi on vardal 10-11-15-18-25-31 silmust. Koo maha 4-3-7-10-17-23 silmust B-poolel = 6-8-8-8-8-8 silmust. Nüüd koo maha käeaugu kujundamiseks B-poolel igal teisel real: 2 silmust 3-4-4-4-4-4 korda ja 1 silmus 2 korda, SAMAL AJAL kasvata 1 silmus igal 6-ndal real A-poolel kokku 2 korda. Pärast kõiki kahandamisi ei jää ühtegi silmust. VASAK ESIOSA Tõsta silmusehoidjal olevad silmused tagasi vardale = 57-59-61-65-71-75 silmust. Koo nagu parem esiosa, ainult peegelpildis. ESIOSA PASSE Loo üles 25-24-23-22-21-20 silmust, korja üles 67-70-73-76-81-88 silmust mööda vasaku esiosa ülaserva, korja üles 1 silmus esiosa keskelt, töö jaotamise kohast, siis korja üles 67-70-73-76-81-88 simlust mööda parema esiosa ülemist serva ja nüüd loo üles 25-24-23-22-21-20 silmust rea lõpus = 185-189-193-197-205-217 silmust. Koo 1 rida pr töö PH. Paigalda SM rea keskmisesse silmusesse ja koo järgmiselt: 1. RIDA (= töö PP): koo, kuni enne SM-i jääb kududa 1 silmus, tõsta 1 silmus pr kudumata, 2 pr kokku, tõsta kudumata silmus üle, koo rea lõpuni. 2. RIDA (= töö PH): koo, nagu 1. rida. 3. RIDA: koo, nagu 1. rida. 4. RIDA: koo kõik silmused pr. 5., 6. ja 7. RIDA: koo nagu 1. rida. 8. RIDA: koo nagu 4. rida. 9. ja 10. RIDA: koo nagu 1. rida. Korda 1. kuni 10. rida, kuni passeosa pikkus on umbes 12 cm = 105-109-113-117-125-137 silmust. Nüüd tee kahandamised nagu enne, SAMAL AJAL koo maha 4 silmust iga rea alguses, kuni vardale jääb 5 silmust. Koo silmused maha. SELJAOSA Loo üles ja koo nagu esiosa, kuni passeosa pikkus on umbes 12 cm = 105-109-113-117-125-137 silmust. Jätka kahandamist, SAMAL AJAL koo maha 1 silmus iga rea alguses, kuni vardale jääb 5 silmust. Koo silmused maha. ÜHENDAMINE Õmble õlaõmblused. Õmble kokku küljeõmblused. HEEGELDATUD ÄÄRIS Heegelda ääris kaelakaare, käeaukude ja allääre ümber järgmiselt: 1 kinnissilmus (ks) esimesse silmusesse, * 2 ahelsilmust (ahels), jäta vahele umbes 1 –1,5 cm, 1 ks *, korda alates *-*, lõpetuseks tee 1 aassilmus (aass) esimesse ks-i ringi algul. Katkesta ja kinnita lõngaots. |
|
 |
|
Kas oled teinud seda mustrit?Lisa oma piltidele viide #dropspattern #grapevalleytunic või saada link projektile meie #dropsfan galeriisse. Vajad abi selle mustriga?Garnstudio.com kodulehel on 22 õppevideot, küsimuste/vastuste osa ja muudki. © 1982-2026 DROPS Design A/S. Kõik õigused kaitstud. See dokument, ning selle alajaotused on kaitsud autoriõigustega. Loe rohkem, mida meie mustritega võib teha, iga mustrilehe alt meie kodulehel. |


Tegeledes üle 40 aasta kudumise ja heegeldamise disainidega, pakub DROPS Design ühte suurimat tasuta mustrite kollektsiooni internetis - tõlgituna 17 keelde. Tänaseks on meil 324 kataloogi ja 12290 mustrit - millest 9431 on tõlgitud Eesti keelde.
Me anname endast parima, et tuua teieni kõike mida kudumine ja heegeldamine võib pakkuda - inspiratsiooni, nõuandeid ning ka kvaliteetseid lõngu parima hinnaga! Soovid kasutada mustreid muukski, kui ainult oma tarbeks? Loe infot meie Copyright osas iga lehekülje all. Rõõmsat loomist!
Jäta kommentaar mustrile DROPS 112-13
Ootame kommentaare selle mustri kohta!
Kui soovid midagi küsida, siis kiiremaks vastuse saamiseks veendu, et valid õige kategooria alloleval formil. Vajaliku väljad *.