
Populaarsed kategooriad
Otsid lõnga?


Kommentaarid / Küsimused (4)
![]() Hetty Stok kirjutas:
Hetty Stok kirjutas:
Thanks for the help. Now I have another question. Please explain the instruction for thumb, specifically “knit up stitches at the same time as you increase behind and on each side of the thumb where the 3 stitches were cast on.” It is confusing. “Knit up, make 1 yarn over…” ?? Where are these 3 stitches??
05.10.2024 - 09:17DROPS Design vastas:
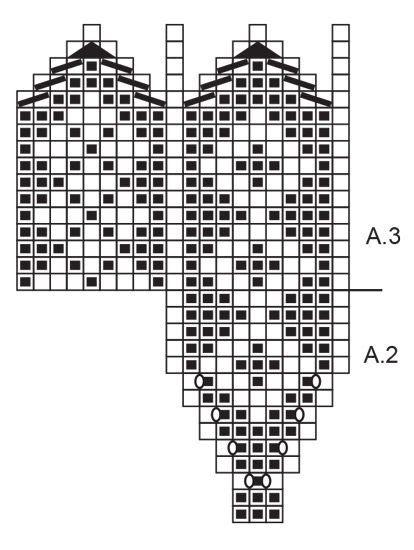
Dear Hetty, the 3 stitches that were cast on were used to continue working over the thumb and not interrupt pattern A.1. So you already worked over these 3 stitches. Now you have the stitches of A.2, that were on a thread, and you pick up the other end of these 3 stitches and pick up 1 stitch on each side of these 3 cast-on stitches, so that the thumb will be fully connected to the rest of the piece, and you will have no holes. So first work over the 11 stitches in the thread, with A.3 over A.2 as shown. Then, you knit up around the little hole for the thumb and work yarn overs in between the knitted up stitches, to get the correct number of stitches. Happy knitting!
06.10.2024 - 13:49
![]() Hetty Stok kirjutas:
Hetty Stok kirjutas:
Could you please clarify the instruction to increase at the base of the thumb? The colours do not remain as in the diagram. The instruction is to make a yarn over with the dark colour however the diagram indicates that the next stitch must be white. I’m aware that our English technique for “yarn over” is to bring the yarn to be knitted in the next stitch should be brought to the front (ie as for knitting a purl stitch) and that you may have a different technique. Please explain. Hetty
04.10.2024 - 14:30DROPS Design vastas:
Dear Mrs Stock, in this video we show how to increase for a thumb gusset (without pattern, but with the technique of the yarn overs); for these mittens we work the yarn over in the dark colour, but feel free to work it with the light colour if you rather like the result like this. Happy knitting!
04.10.2024 - 15:59
![]() Lorýa Björk Jónsson kirjutas:
Lorýa Björk Jónsson kirjutas:
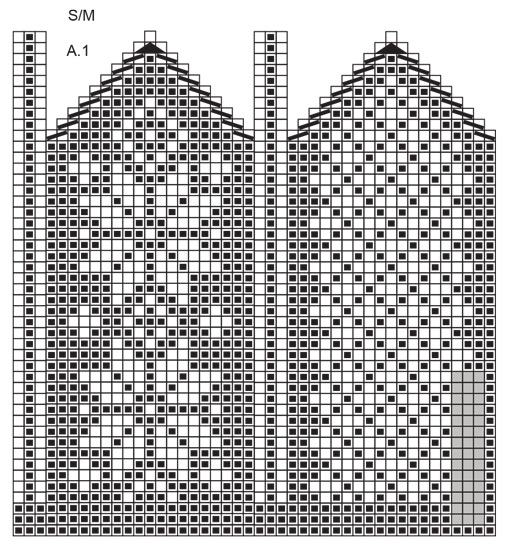
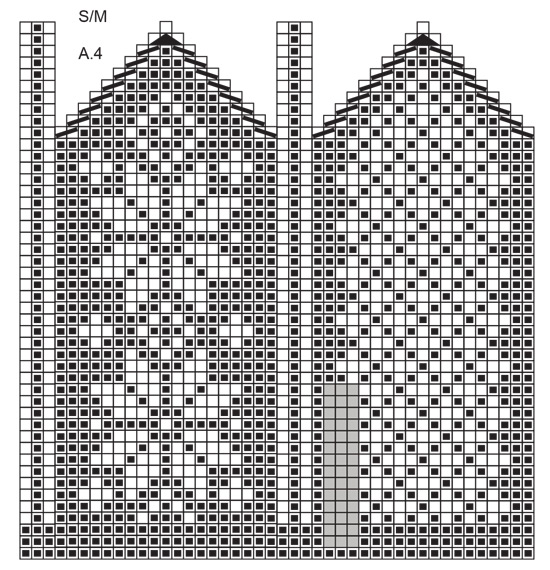
Fehler in muster a4 grösse s/m, linie 7 11 und 15 und fehler in muster a1 grösse l/xl, linie 16
04.12.2023 - 23:41
![]() Mette kirjutas:
Mette kirjutas:
Hej, Jag har lagt märke till att era vantar för herrar är väldigt små i storleken. Flera gånger har jag stickat olika modeller i största storlek och de är oftast passliga på en luten kvinnohand ändå. Här också är ju mönstret för storlek S/M lika långt som L/XL, vilket känns lite konstigt.
01.12.2023 - 11:44
|
||||||||||||||||||||||
Snow Flake Mittens#snowflakemittens |
||||||||||||||||||||||
 |
 |
|||||||||||||||||||||
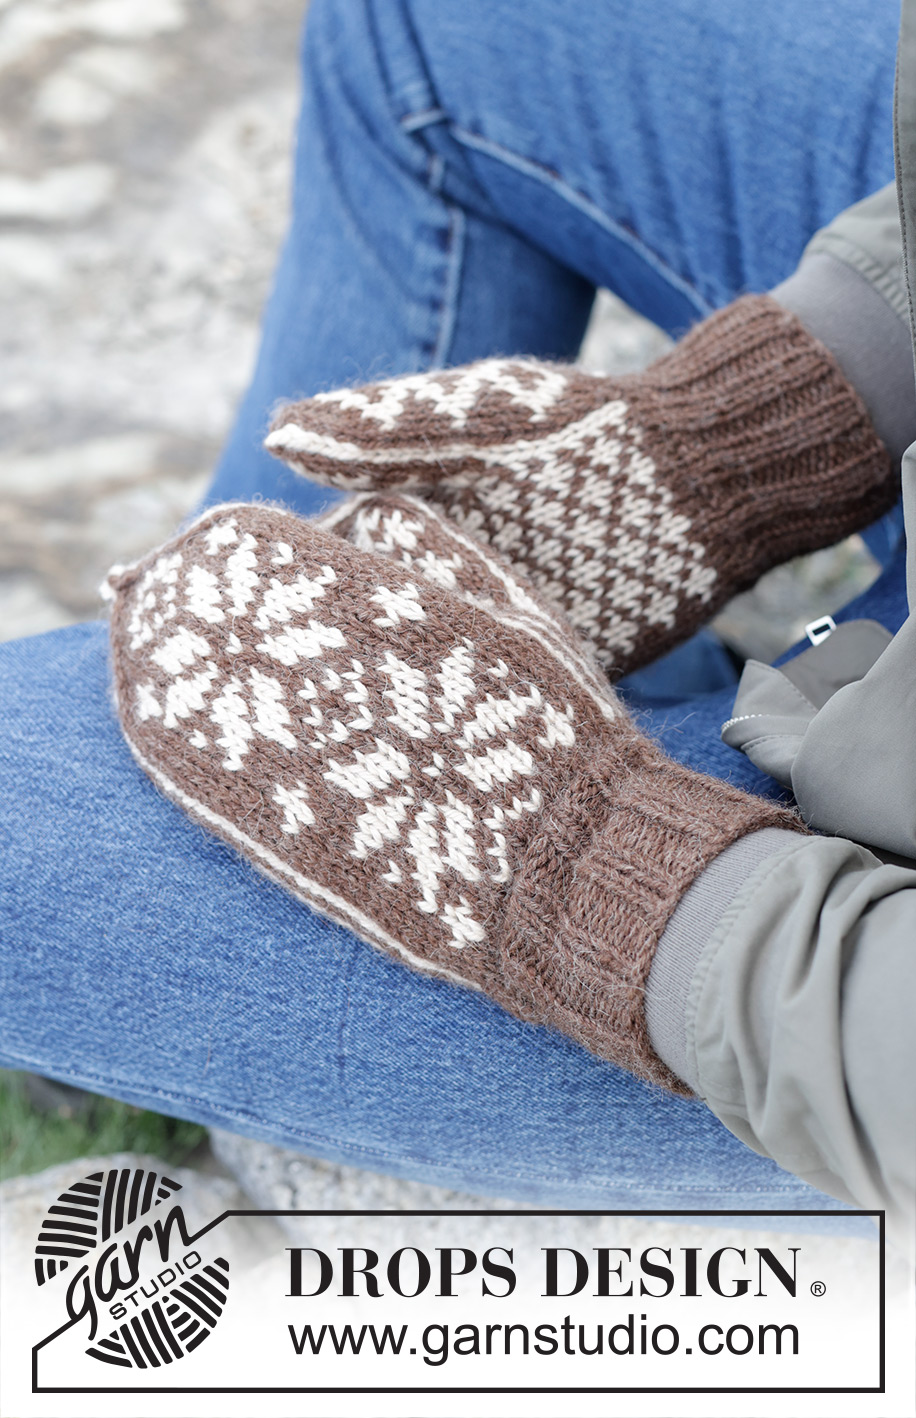
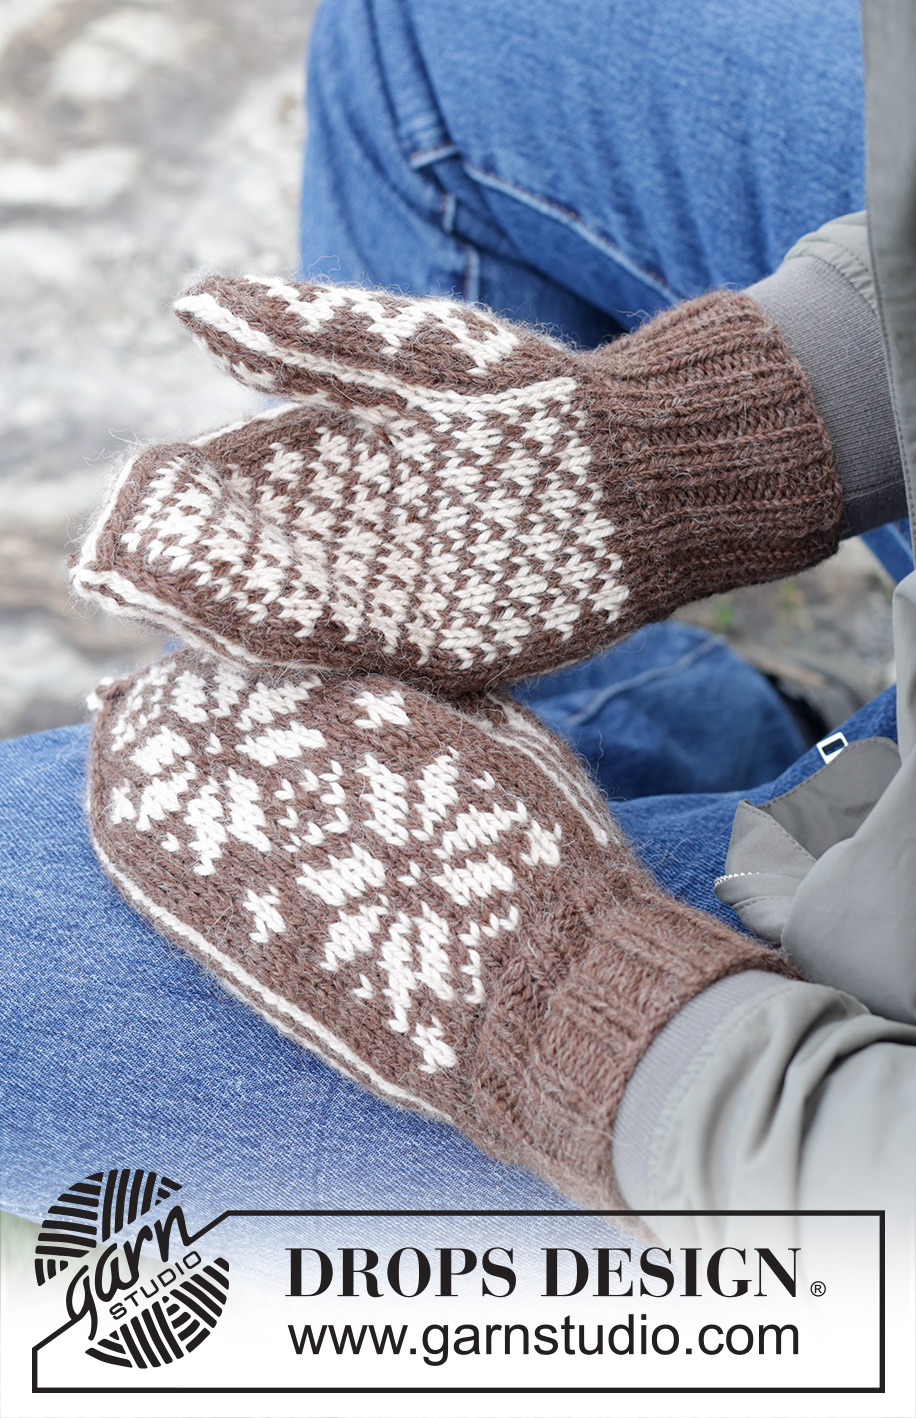
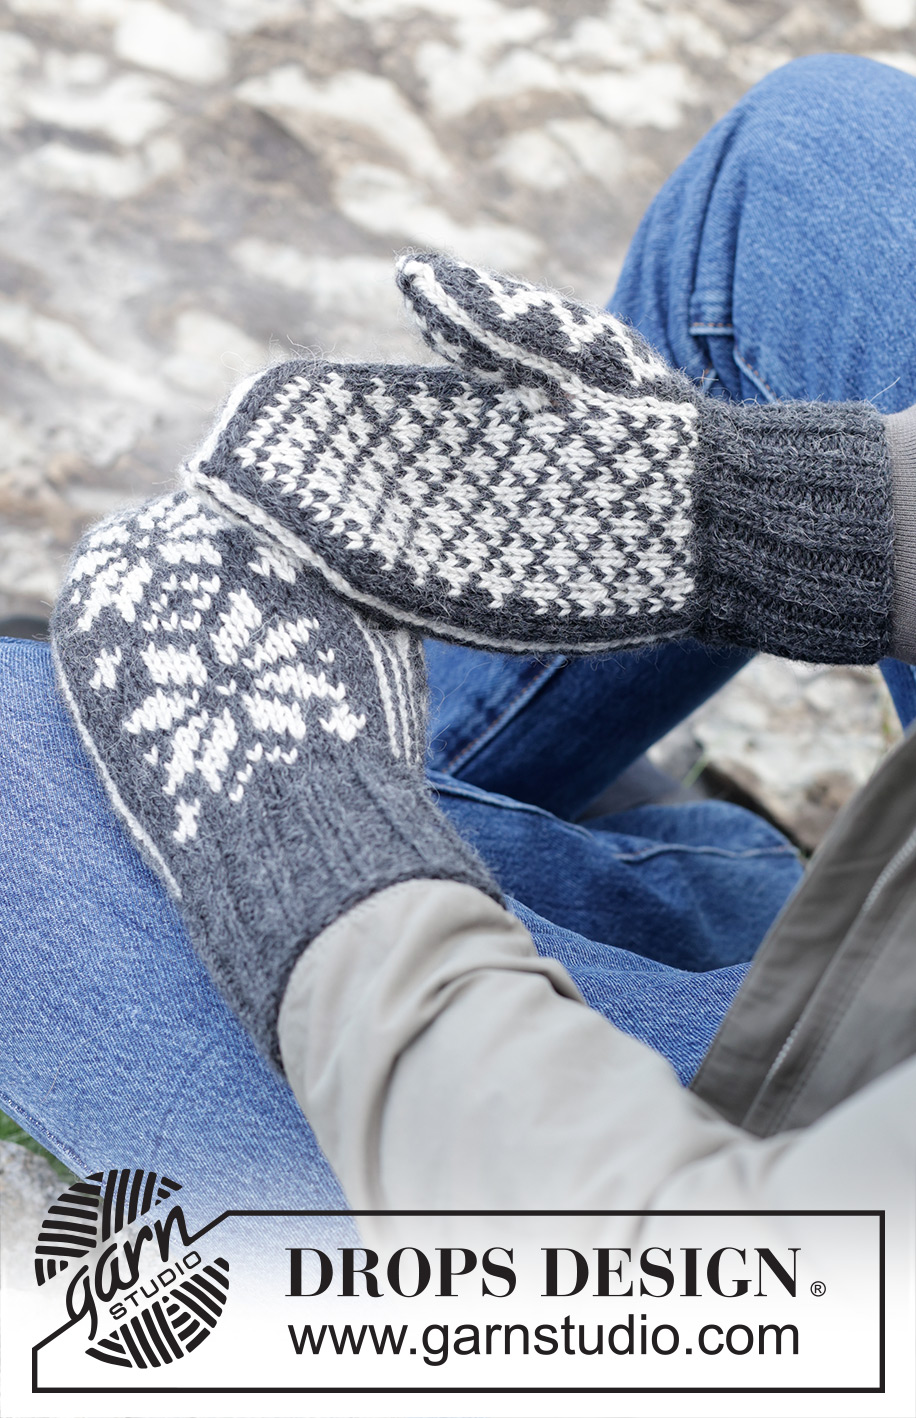
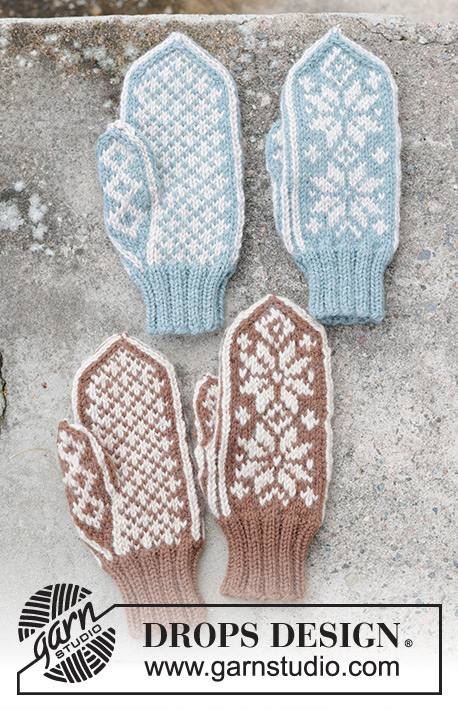
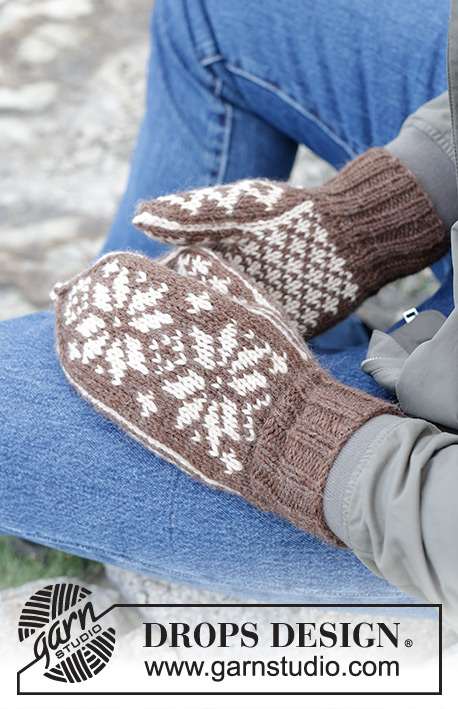
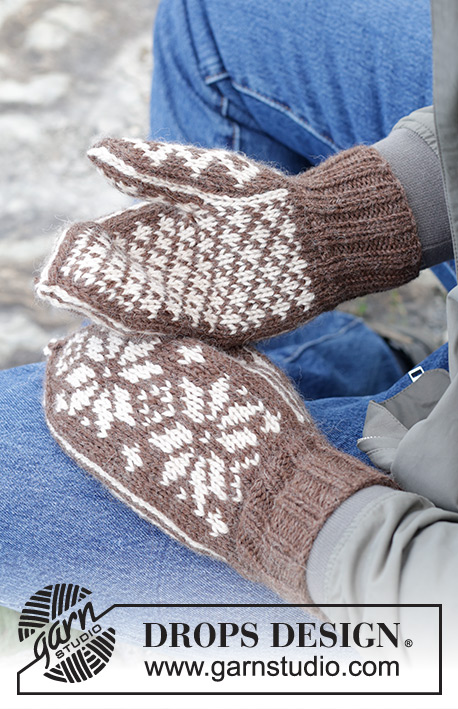
DROPS Nepal lõngast kootud Norra mustriga labakud meestele
DROPS 246-20 |
||||||||||||||||||||||
|
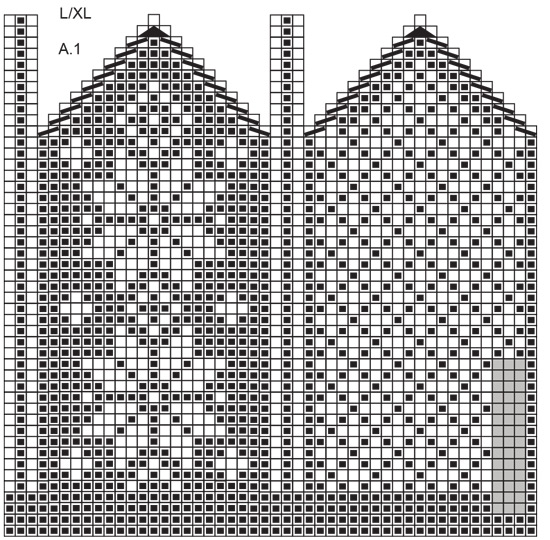
------------------------------------------------------- NÕUANDED: ------------------------------------------------------- MUSTER: Vaata skeeme A.1 kuni A.4. Vali suurusele sobiv skeem. ------------------------------------------------------- ALUSTA SIIT: ------------------------------------------------------- KINDAD – KOKKUVÕTE: Kootakse ringselt sukavarrastega. PAREM KINNAS: Loo 44-48 silmust 3 mm sukavarrastele tumehalli/pruuni DROPS Nepal lõngaga. Koo ringselt soonikut 2 parempidi/2 pahempidi 7-8 cm. Võta 3,5 mm vardad. Koo ülejäänud kinnas parempidises koes. Siis koo skeemi A.1. Koo skeemi A.2 hallidel ruutudel skeemil A.1 = pöial. JÄLGI KOETIHEDUST! Kui skeem A.2 on tehtud, on kasvatatud 8 silmust skeemil A.2 (= 11 silmust skeemil A.2). Järgmisel ringil tõsta skeemi A.2 silmused abilõngale ja loo 3 uut silmust hallide ruutude kohale skeemil A.1. Kui skeem A.1 on tehtud, katkesta lõng ja tõmba läbi allesjäänud silmuste, pinguta ja kinnita. PÖIAL: Tõsta 11 silmust abilõngalt tagasi 3,5 mm sukavarrastele. Nüüd loo 3 silmust pöidla taha ja kasvata samal ajal järgmiselt: alusta, kududes skeemi A.3 vardal olevatel silmustel, koo vardale 1 silmus tumehalliga/pruuniga, tee 1 õhksilmus helehalliga/helebeeziga, koo vardale 1 silmus helehalliga/ helebeežiga, tee 1 õhksilmus helehalliga/ helebeežiga, koo vardale 1 silmus tumehalliga/pruuniga, tee 1 õhksilmus helehalliga/ helebeežiga, koo vardale 1 silmus helehalliga/ helebeežiga, tee 1 õhksilmus helehalliga/ helebeežiga ja koo vardale 1 silmus tumehalliga/pruuniga. Skeemi A.3 esimene ring on nüüd tehtud. Järgmisel ringil koo õhksilmused keerdsilmustena vastavalt skeemi A.3 teisele ringile. Kui skeem A.3 on tehtud, katkesta lõng ja tõmba läbi allesjäänud silmuste, pinguta ja kinnita. VASAK KINNAS: Koo nagu teist kinnast, aga koo skeemi A.4 skeemi A.1 asemel. Koo skeemi A.2 teisel pool, skeemi A.4 hallidel ruutudel. Kui skeem A.4 on tehtud, koo pöial nagu teisel kindal. |
||||||||||||||||||||||
Skeemi seletused |
||||||||||||||||||||||
|
||||||||||||||||||||||
 |
||||||||||||||||||||||
 |
||||||||||||||||||||||
 |
||||||||||||||||||||||
 |
||||||||||||||||||||||
 |
||||||||||||||||||||||
Kas oled teinud seda mustrit?Lisa oma piltidele viide #dropspattern #snowflakemittens või saada link projektile meie #dropsfan galeriisse. Vajad abi selle mustriga?Garnstudio.com kodulehel on 20 õppevideot, küsimuste/vastuste osa ja muudki. © 1982-2026 DROPS Design A/S. Kõik õigused kaitstud. See dokument, ning selle alajaotused on kaitsud autoriõigustega. Loe rohkem, mida meie mustritega võib teha, iga mustrilehe alt meie kodulehel. |
||||||||||||||||||||||


Tegeledes üle 40 aasta kudumise ja heegeldamise disainidega, pakub DROPS Design ühte suurimat tasuta mustrite kollektsiooni internetis - tõlgituna 17 keelde. Tänaseks on meil 324 kataloogi ja 12290 mustrit - millest 9431 on tõlgitud Eesti keelde.
Me anname endast parima, et tuua teieni kõike mida kudumine ja heegeldamine võib pakkuda - inspiratsiooni, nõuandeid ning ka kvaliteetseid lõngu parima hinnaga! Soovid kasutada mustreid muukski, kui ainult oma tarbeks? Loe infot meie Copyright osas iga lehekülje all. Rõõmsat loomist!
Jäta kommentaar mustrile DROPS 246-20
Ootame kommentaare selle mustri kohta!
Kui soovid midagi küsida, siis kiiremaks vastuse saamiseks veendu, et valid õige kategooria alloleval formil. Vajaliku väljad *.