
Populaarsed kategooriad
Otsid lõnga?


Kommentaarid / Küsimused (53)
![]() Michaela kirjutas:
Michaela kirjutas:
Tut mir leid, vielleicht war die Frage vorher unklar. Wenn man im Diagramm A2 z.B. die 4. und 5. Reihe von unten ansieht, dann sind in der 4. Reihe 9 Stäbchen dargestellt. In der 5. Reihe sollen dann jeweils 4 Stäbchen zusammengehäkelt werden, und dass insgesamt dreimal. Das geht sich aber nicht aus - dazu bräuchte ich in der 4. Reihe 12 Stäbchen und nicht 9. Daher meine Frage, ob man hier nicht immer 3 Stäbchen zusammenhäkelt anstatt 4? Vielen Dank!
27.05.2024 - 10:18DROPS Design vastas:
Liebe Michaela, die 4 Stäbchen zusammen sind als nur 1 Stäbchen gezählt und werden so gehäket (Anfang der 5. Reihe: 1 Lm, 1 M überpsringen, 4 Stb zs in das nächste Stb, 2 Lm, 2 M überspringen, 4 Stb zs in das nächste Stb, 2 Lm, 2 M überspringen, 4 Stb zs in das nächste Stb, 1 Lm, 1 Stäbchen überspringen (= 1+1+2+1+2+1+1= 9 Maschen), dann 2 Stäbchen in nächsten Luftmaschenbogen, usw... Viel Spaß beim Häkeln!
27.05.2024 - 12:59
![]() Michaela kirjutas:
Michaela kirjutas:
In der Anleitung steht bei einem Symbol: "4 STÄBCHEN ZU 1 STÄBCHEN ZUSAMMENHÄKELN." Wenn man aber das Diagramm A2 ansieht und dort die Maschen zählt, sieht es eher so aus, als würden nur 3 Stäbchen zusammengehäkelt? Habe ich etwas übersehen? Vielen Dank!
26.05.2024 - 13:37DROPS Design vastas:
Liebe Michaela, hier wird man 4 Stäbchen zusammen häkeln, so zählt jedes als 1 Stäbchen (wie für 1 Noppe z.B.). Viel Spaß beim Häkeln!
27.05.2024 - 08:46
![]() Gunvor kirjutas:
Gunvor kirjutas:
Jag blir galen på varv 4! Hur jag än gör får jag 2 stolpar över vid hörnet. Om jag tolkat diagramet rätt, är det sammanlagt 11 relief stolpar i varvet innan. Hoppar över 2m, en stolpgrupp i nästa, hoppas över 2m, en stolpgrupp i nästa. Hoppas över 2m 1 stolpgrupp i nästa, hoppa över 1m. Då är jag framme vid hörnet och har 2 st kvar. Det funkar ju inte? Tänker jag fel? Mönstret är jättevackert, men diagrammet är svårt att följa. Hade föredragit en beskrivning i text.
24.05.2024 - 08:56DROPS Design vastas:
Hej Gunvor, du starter med at hoppe over 1m, 1 stolpgrupp i nästa, hoppa över 2, 1 stolpgrupp i nästa, hoppa över 2, 1 stolpgrupp i nästa, hoppa över 1, 2 stolpar i lm-bågen, 5lm, 2 stolpar i samma lm-båge, hoppa över 1 osv :)
24.05.2024 - 10:25
![]() Hennie Verhees kirjutas:
Hennie Verhees kirjutas:
Bij dit patroon voel ik mij misleid, jullie geven 1200 gram aan en ik heb nld 4 gebruikt de afmeting is hetzelfde ,maar ik houd ruim 4 bollen garen over. Hoe kan dit? 1 bol dat snap ik , maar niet 4 volle bollen . ook lijkt dit patroon op een luchtige omslagdoek , terwijl het een best zware deken is. Graag hier uw antwoord op . Met vriendelijke groet , Hennie Verhees
02.04.2024 - 11:06
![]() Kathleen A Dougherty kirjutas:
Kathleen A Dougherty kirjutas:
This is a beautiful blanket. I am going to start it. Thank You for the pattern.
05.02.2024 - 21:23
![]() Mattea kirjutas:
Mattea kirjutas:
Buongiorno, volevo una precisazione. Nella riga 6 devo lavorare una maglia alta sul gruppo di 4 maglie sottostante ma non so dove devo inserire l'uncinetto. C'è per caso un video esplicativo? grazie
23.12.2023 - 10:17DROPS Design vastas:
Buongiorno Mattea, deve lavorare la maglia alta attorno al gruppo di maglie sotto. Provi a vedere se questo video può esserle di aiuto. Buon lavoro!
30.12.2023 - 10:51
![]() Agnieszka kirjutas:
Agnieszka kirjutas:
Not clear for me second row. I start wt chain 3, wich counts as first DC. Then directly I make second DC. Shouldn't I start with chain 4, which counts as first DC plus chain 1 space? Otherwise I have two DCs, without chain space in the begining of the row.
23.11.2023 - 10:25DROPS Design vastas:
Dear Agnieszka, in this pattern, the 3 chains to start rounds are not replacing the first dc, this means A.1 is worked extra: you first work A.1 then repeat A.2 a total of 4 times in the round. Happy crocheting!
23.11.2023 - 15:36
![]() Connie Sahagun kirjutas:
Connie Sahagun kirjutas:
I already did all the squares but I started too crochet the sides together with the single stich but what I I don’t understand what to do in the corners.
27.07.2023 - 21:11DROPS Design vastas:
Dear Mrs Sahagun, for the edge you will crochet 3 double crochets (US-crochet terminology) in each corner (and. 1 double crochet in each stitch along the sides of each square + 1 double crochet in the transition between 2 squares). Happy crocheting!
28.07.2023 - 07:39
![]() Gabi kirjutas:
Gabi kirjutas:
Guten Tag Werden nur vordere Reliefstäbchen gehäkelt oder abwechselnd vordere und hintere ? Herzlichen Dank
10.07.2023 - 06:43DROPS Design vastas:
Liebe Gabi, Diagram wird in Runde gehäkelt, so die Reliefstäbchen werden immer so gehäkelt. Viel Spaß beim häkeln!
28.07.2023 - 09:08
![]() Linda Mcsweeney kirjutas:
Linda Mcsweeney kirjutas:
The graph is confusing for the last round. How many stitches should you have on one side? The graph does not line up with the stiches below on the left side. Thanks.
12.06.2023 - 19:57DROPS Design vastas:
Dear Mrs Mcsweeney, on the last round you will have 32 dc (US-English) on the last half side on the square (A.2) and 3 chains in the corner, then 29 dc on the first half part on next side, this means you should have 32+29= 61 dc along each side of the square. Happy crocheting!
13.06.2023 - 08:14
|
||||||||||||||||||||||||||||
Day By The Sea#daybytheseablanket |
||||||||||||||||||||||||||||
 |
 |
|||||||||||||||||||||||||||
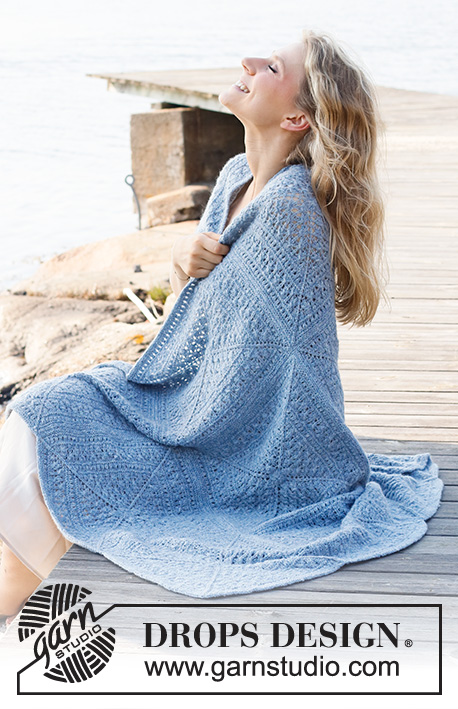
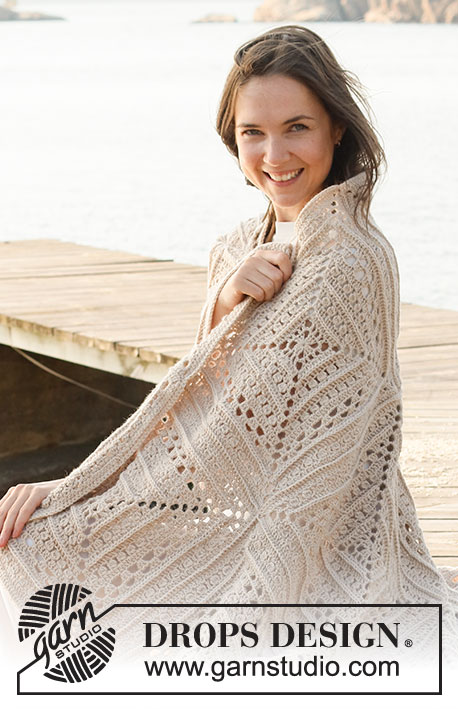
DROPS Lima lõngast heegeldatud ruutudega tekk
DROPS 221-2 |
||||||||||||||||||||||||||||
|
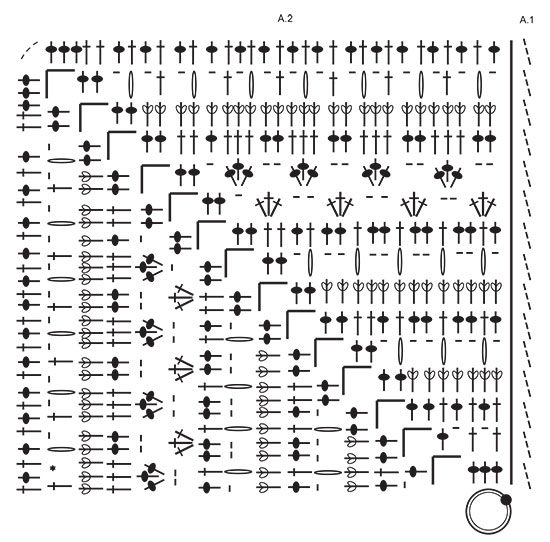
NÕUANDED: ------------------------------------------------------- MUSTER: Vaata skeeme A.1 ja A.2. Skeem A.1 näitab ringide algust ja lõppu. AHELSILMUS: Tihti võivad ahelsilmused tulla liiga lühikesed; 1 ahelsilmus peaks olema sama pikk kui on 1 sammas lai. ------------------------------------------------------- ALUSTA SIIT: ------------------------------------------------------- TEKK – KOKKUVÕTE: Tekk koosneb 12 ruudust, mis heegeldatakse skeemi järgi. Siis heegeldatakse ruudud kokku ning tehakse ääris ümber terve teki. RUUT: Heegelda 4 mm heegelnõelaga ja Lima lõngaga - loe ülevalt AHELSILMUS - skeemi A.2 kokku 4 korda ümber ahelsilmustest ringi – skeem A.1 näitab, kuidas ringid algavad ja lõppevad. JÄLGI HEEGELDAMISE TUGEVUST! Tee kokku 12 ruutu. VIIMISTLUS: Pane kõrvuti 3 x 4 ruutu - jälgi, et kõigil oleks töö paremal pool ülespoole. Heegelda kõik ruudud kokku algul laiuses, siis pikkuses. Pane 2 ruutu kokku, töö pahemad pooled vastastikku, ja heegelda läbi mõlema kihi järgmiselt: kinnita lõng 1 kinnissilmusega ümber nurga ahelsilmustest kaarel, * tee 1 kinnissilmus igasse silmusesse kuni järgmise nurgani (= 3 ahelsilmust), tee 1 kinnissilmus ümber nurga, 2 ahelsilmust ja 1 kinnissilmus ümber järgmise nurga (= 3 ahelsilmust). Korda * kuni * kuni kõik ruudud on heegeldatud kokku, aga lõpeta viimane ruut 1 kinnissilmusega viimases nurgas (= 3 ahelsilmust). Ühenda nii kõik ruudu laiuses, siis ühenda nii kõik ruudud pikkupidi. ÄÄRIS: Heegelda Lima lõngaga ja 4 mm heegelnõelaga 1 aassilmus esimesse nurka, siis tee 3 ahelsilmust ja 2 ühekordset sammast ümber esimese nurga; tee * 1 ühekordne sammas igasse silmusesse kuni järgmise nurgani, tee 1 ühekordne sammas ümber nurga *, korda * kuni * sellel teki küljel kuni nurgani. Ümber teise teki nurga tee 3 ühekordset sammast, korda * kuni * selle teki küljel. Ümber kolmanda teki nurga tee 3 ühekordset sammast, korda * kuni * selle teki küljel. Ümber neljanda teki nurga tee 3 ühekordset sammast, korda * kuni * kuni nurgani, lõpus tee 1 aassilmus kolmandasse ahelsilmusesse ringi alguses. Katkesta ja kinnita lõng. |
||||||||||||||||||||||||||||
Skeemi seletused |
||||||||||||||||||||||||||||
|
||||||||||||||||||||||||||||
 |
||||||||||||||||||||||||||||
Kas oled teinud seda mustrit?Lisa oma piltidele viide #dropspattern #daybytheseablanket või saada link projektile meie #dropsfan galeriisse. Vajad abi selle mustriga?Garnstudio.com kodulehel on 9 õppevideot, küsimuste/vastuste osa ja muudki. © 1982-2026 DROPS Design A/S. Kõik õigused kaitstud. See dokument, ning selle alajaotused on kaitsud autoriõigustega. Loe rohkem, mida meie mustritega võib teha, iga mustrilehe alt meie kodulehel. |
||||||||||||||||||||||||||||


Tegeledes üle 40 aasta kudumise ja heegeldamise disainidega, pakub DROPS Design ühte suurimat tasuta mustrite kollektsiooni internetis - tõlgituna 17 keelde. Tänaseks on meil 325 kataloogi ja 12298 mustrit - millest 9442 on tõlgitud Eesti keelde.
Me anname endast parima, et tuua teieni kõike mida kudumine ja heegeldamine võib pakkuda - inspiratsiooni, nõuandeid ning ka kvaliteetseid lõngu parima hinnaga! Soovid kasutada mustreid muukski, kui ainult oma tarbeks? Loe infot meie Copyright osas iga lehekülje all. Rõõmsat loomist!
Jäta kommentaar mustrile DROPS 221-2
Ootame kommentaare selle mustri kohta!
Kui soovid midagi küsida, siis kiiremaks vastuse saamiseks veendu, et valid õige kategooria alloleval formil. Vajaliku väljad *.