
Categorias populares
Procura um fio?


Comentários / Perguntas (20)
![]() Daisy escreveu:
Daisy escreveu:
Would love to see this as a baby pattern
04.01.2026 - 17:00
![]() Moni escreveu:
Moni escreveu:
Muß ich bei den 34 cm sofort in der erstenRunde die Maschen zunehmen oder in einer länge von 34 cm die Maschen verteilen
20.08.2025 - 08:10DROPS Design respondeu:
Liebe Moni, wenn Sie bei der Passe sind und die 5. Größe stricken, dann stricken Sie bis die Arbeit 34 cm ab Markierung misst, dann verteilen Sie die Arbeit bei der letzten Runde. Wenn Sie schon beim Rumfpteil sind (nach der Aufteilung), stricken Sie glatt rechts in der Runde bis die Arbeit 34 cm ab die Aufteilung misst, dann nehmen Sie regelmäßig verteilt bei der nächsten Runde zu = 252-399 Maschen, dann stricken Sie Bündchen mit den kleineren Nadeln. Viel Spaß beim Stricken!
20.08.2025 - 16:16
![]() Tom escreveu:
Tom escreveu:
Hello, love your designs! Just one question. When it comes to the bottom of the body, and it says to increase X stitches before the waistband, why is this? I would have thought it needed to decrease to give a tapered finish at the bottom, no? If I want a more tapered finish, would you recommend decreasing instead?
08.10.2024 - 14:08DROPS Design respondeu:
Dear Tom, you need more stitches for the same with when working rib with smaller needles than working stocking stithc with larger needles, as we don't want here the bottom edge to tighten piece together, we need to increase before working rib. Happy knitting!
08.10.2024 - 16:35
![]() Tyler escreveu:
Tyler escreveu:
Why does the pattern say to Dec 18 sts after the neck ribbing and then inc 54 sts right after that? Couldn’t I just inc 36sts after the ribbing? Does it affect the structure of the collar?
22.09.2024 - 16:15DROPS Design respondeu:
Dear Tyler, the decreases and increases not only maintain the correct number of stitches but also help shape the piece. You first decrease with a larger needle, used for the rib, so that the pattern won't be too tight when changing to a smaller needle. Then you increase with the smaller needle to get the necessary stitches for the English rib. Since you use different needles for each step, the gauge will be different from directly increasing 36 stitches with the larger needle; the effect from the 18 decreased stitches won't be as noticeable. Happy knitting!
23.09.2024 - 01:36
![]() AH escreveu:
AH escreveu:
Is there something amiss with the sleeve length? The sleeves seem very short and wide, and get significantly shorter as the sizes get larger. As written they seem like 3/4 length sleeves.
06.12.2023 - 03:11
![]() Rita Eriksen escreveu:
Rita Eriksen escreveu:
Den 3. raden med patentstrikk vrir seg veldig mot høyre, sett i strikkeretning . Hva har jeg gjort galt?
29.08.2023 - 15:04DROPS Design respondeu:
Hei Rita. Ta en titt på hjelpevidoen som viser hvordan man strikker helpatent rundt. Kanskje du da ser hva som blir feil. Videoen: Hvordan strikke helpatent rundt finner du under oppskriften. mvh DROPS Design
11.09.2023 - 12:47
![]() Asveig Synøve Jessen Gschib escreveu:
Asveig Synøve Jessen Gschib escreveu:
Montering,skal halskant brettes og syes ned, Finner ikke montering på mønsteret
19.12.2022 - 21:35
![]() Maria escreveu:
Maria escreveu:
Where it says " When piece measures 24-25-26-28-29-30 cm, increase 16-29-32-38-42-49 stitches evenly = 328-368-398-432-462-502 stitches" - should we measure the piece from the marker in the rib or at the beginning of the rib?
25.07.2022 - 14:56DROPS Design respondeu:
Hi Maria, you have to measure from the marker thread in the neck edge. Happy knitting!
25.07.2022 - 16:57
![]() Linn escreveu:
Linn escreveu:
Enkelt mönster att förstå. Har inte stickat någon tröja förut. Men det var enkelt att följa med iallafall. Tycker dock att inte att man behöver öka maskorna innan man stickar resåren i slutet av plagget. Såg ut som resåren tappat elasticitet när man gjorde så. Ökade inte på armarnas resår. Blev mycket bättre. Bytte garnet mot Drops You 9 recycled cotton.
22.03.2022 - 11:42
![]() Maria G escreveu:
Maria G escreveu:
När jag stickat provlappen i helpatent mäter den 8x8 centimeter. Ska jag byta till rundsticka 3,5 i det partiet. Slätstickningen stämmer med sticka nummer 3. Jag undrar också över varför man först ska minska antalet maskor för att på nästa varv öka dem i början på oket?
31.01.2022 - 10:31DROPS Design respondeu:
Hej Maria, ja du må prøve med en tykkere pind for at få 10 cm. Man gør det for at få en fin overgang. God fornøjelse!
04.02.2022 - 14:32
|
|
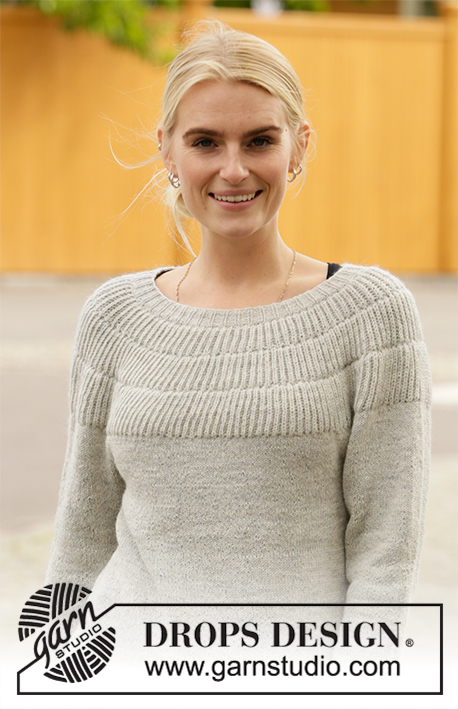
City Glow#cityglowsweater |
|
 |
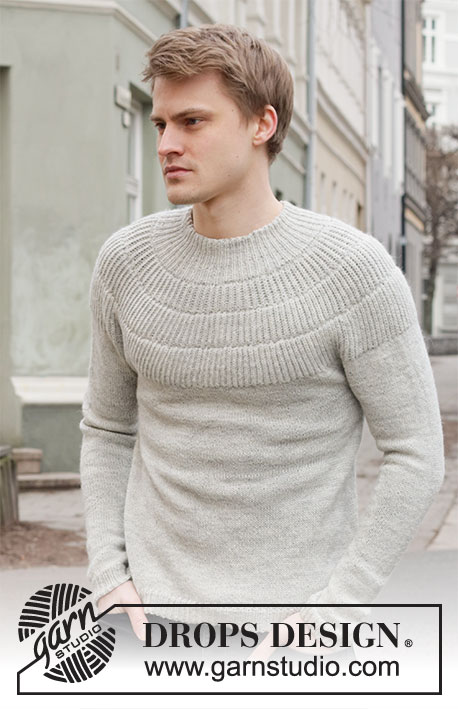 |
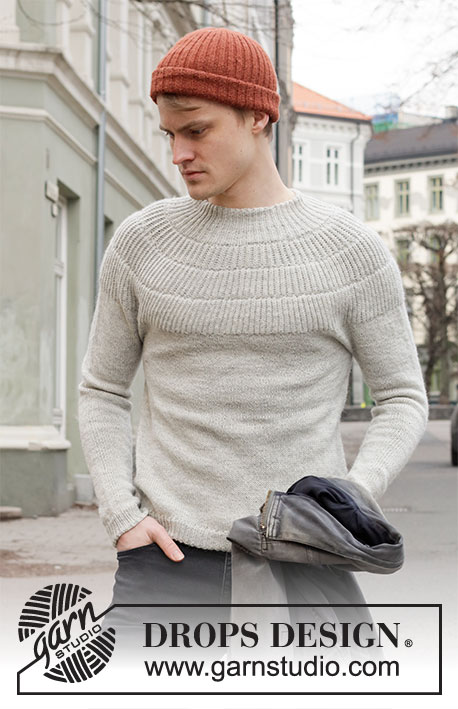
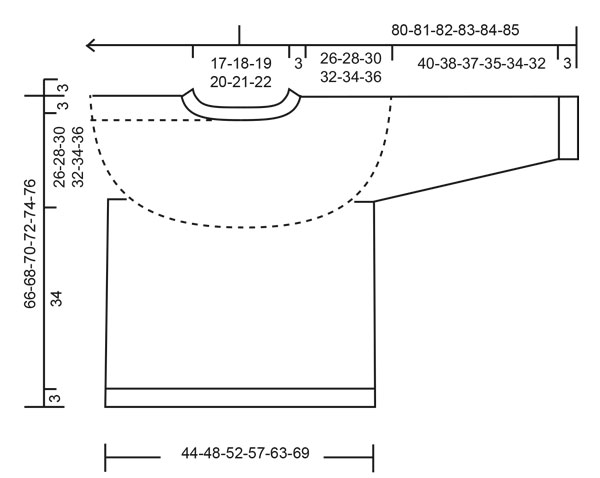
Pulôver tricotado de cima para baixo para homem, com encaixe arredondado em canelado inglês, em DROPS Alpaca. Do S ao XXXL
DROPS 219-7 |
|
|
---------------------------------------------------------- TÉCNICAS USADAS: ---------------------------------------------------------- DIMINUIÇÕES/AUMENTOS (a intervalos regulares): Para calcular quando diminuir/aumentar a intervalos regulares, contar o número total de malhas da carreira (por ex. 126 malhas) e dividi-lo pelo número de diminuições/aumentos a fazer (por ex. 16) = 7.8. Neste exemplo, vai-se diminuir tricotando juntamente em meia cerca de cada 7.ª e 8.ª malha. Para aumentar neste exemplo, levantar o fio entre 2 malhas depois de cerca de cada 8.ª malha (tricotar o fio torcido em meia para evitar buracos). CANELADO INGLÊS: CARREIRA 1: * Fazer 1 laçada, deslizar 1 malha em liga, 1 malha meia*, repetir de * a * em toda a carreira. CARREIRA 2: * tricotar juntamente em liga a laçada e a malha deslizada, 1 laçada, deslizar 1 malha em liga *, repetir de * a * em toda a carreira. CARREIRA 3: * Fazer 1 laçada, deslizar 1 malha em liga, tricotar juntamente em meia a laçada e a malha deslizada *, repetir de * a * em toda a carreira. Repetir as carreiras 2 e 3. DIMINUIÇÕES (mangas): Diminuir 1 malha de cada lado do fio marcador da seguinte maneira: Tricotar até restarem 3 malhas antes do fio marcador e tricotar 2 malhas juntamente em meia, 2 malhas meia (o fio marcador está entre estas malhas), deslizar 1 malha em meia, 1 malha meia, passar a malha deslizada por cima da malha tricotada. ---------------------------------------------------------- A PEÇA COMEÇA AQUI: ---------------------------------------------------------- PULÔVER - SUMÁRIO DA PEÇA: Tricota-se em redondo na agulha circular, de cima para baixo. As mangas tricotam-se em redondo com a pequena agulha circular/as agulhas de pontas duplas. GOLA: Montar 126-132-138-144-150-156 malhas com a agulha circular 2,5 mm em Alpaca. Tricotar 1 volta meia. Tricotar então em canelado (= 1 malha meia/2 malhas liga) durante 3 cm. Colocar um fio marcador aqui. MEDIR A PARTIR DAQUI! ENCAIXE: Continuar em canelado durante 4 cm, temos um total de 7 cm de canelado ao todo. Tricotar então 1 volta meia diminuindo ao mesmo tempo 16-17-18-19-20-22 malhas a intervalos regulares - ver DIMINUIÇÕES/AUMENTOS = 110-115-120-125-130-134 malhas. Continuar com a agulha circular 3 mm. Tricotar 1 volta meia aumentando ao mesmo tempo 50-51-54-55-56-62 malhas a intervalos regulares - não esquecer DIMINUIÇÕES/ AUMENTOS = 160-166-174-180-186-196 malhas. Tricotar 1 volta meia. Tricotar , então, em CANELADO INGLÊS – ver acima -, durante 4-4-4-5-5-5 cm. MANTER A MESMA TENSÃO DA INDICADA PARA A AMOSTRA! Tricotar então 1 volta meia e, ao mesmo tempo, tricotar as laçadas juntamente em meia com a sua malha deslizada – e aumentar ao mesmo tempo 68-72-80-88-96-104 malhas a intervalos regulares = 228-238-254-268-282-300 malhas. Tricotar 1 volta meia. Tricotar, então, em canelado inglês durante 5-5-5-6-6-6 cm. Tricotar 1 volta meia e, ao mesmo tempo, tricotar juntamente em meia as laçadas e a sua malha deslizada – e aumentar ao mesmo tempo 68-72-80-88-96-104 malhas a intervalos regulares = 296-310-334-356-378-404 malhas. Tricotar 1 volta meia. Tricotar, então, em canelado inglês durante 6-6-6-7-7-7 cm. Tricotar 1 volta meia ao mesmo tempo, tricotar juntamente em meia as laçadas com a sua malha – e aumentar ao mesmo tempo 16-29-32-38-42-49 malhas a intervalos regulares = 312-339-366-394-420-453 malhas. Tricotar então em ponto meia. Quando a peça medir 24-25-26-28-29-30 cm, aumentar 16-29-32-38-42-49 malhas a intervalos regulares = 328-368-398-432-462-502 malhas. Quando a peça medir 26-28-30-32-34-36 cm a partir do marcador, o encaixe está terminado. Tricotar a carreira seguinte da seguinte maneira: Tricotar as 47-52-56-62-68-76 primeiras malhas (= metade das costas), colocar as 69-79-86-91-94-99 malhas seguintes em espera num alfinete de malhas para a manga e montar 10-10-12-12-14-14 novas malhas (= lado, sob a manga), tricotar as 95-105-113-125-137-152 malhas seguintes (= frente), colocar as 69-79-86-91-94-99 malhas seguintes em espera num alfinete de malhas para a manga e montar 10-10-12-12-14-14 novas malhas (= lado, sob a manga), tricotar as 48-53-57-63-69-76 últimas malhas (= metade das costas). COSTAS & FRENTE: Temos , então, 210-230-250-274-302-332 malhas para as costas/a frente. Tricotar em ponto meia em redondo. Quando a peça medir 34 cm, aumentar 42-46-50-56-61-67 malhas a intervalos regulares = 252-276-300-330-363-399 malhas. Continuar com a agulha circular 2.5 mm em canelado (1 malha meia/2 malhas liga) em redondo durante 3 cm. Arrematar as malhas como elas se apresentam. O pulôver mede cerca de 66-68-70-72-74-76 cm de altura total a partir do ombro. MANGAS: Retomar as 69-79-86-91-94-99 malhas do alfinete de malhas de um lado da peça para a pequena agulha circular/as agulhas de pontas duplas 3 mm – levantar mais 1 malha em cada uma das 10-10-12-12-14-14 malhas montadas sob a manga = 79-89-98-103-108-113 malhas. Colocar um fio marcador a meio das novas malhas (= 5-5-6-6-7-7 novas malhas de cada lado do fio marcador). Tricotar em ponto meia em redondo. Quando a manga medir 4 cm, diminuir 1 malha de cada lado do fio marcador sob a manga - ver DIMINUIÇÕES. Diminuir desta maneira cerca de 10-14-17-19-20-21 vezes ao todo a cada 3½-2-1½-1½-1-1 cm = 59-61-64-65-68-71 malhas. Continuar em ponto meia até a manga medir 40-38-37-35-34-32 cm. Aumentar, então, 13-14-14-16-16-16 malhas a intervalos regulares = 72-75-78-81-84-87 malhas. Continuar com a agulha circular 2.5 mm. Tricotar em canelado (1 malha meia/2 malhas liga) em redondo durante 3 cm. Arrematar as malhas como elas se apresentam. A manga mede cerca de 43-41-40-38-37-35 cm a partir da separação. Tricotar a outra manga da mesma maneira. |
|
 |
|
Terminou este projecto?Então, identifique as suas fotos com as tags #dropspattern #cityglowsweater ou mostre-as na galeria #dropsfan. Precisa de ajuda para este modelo?Encontrará 21 turotiais em vídeo, uma rubrica Comentários/Perguntas e muito mais ao visitar a página do modelo em www.garnstudio.com © 1982-2026 DROPS Design A/S. Todos os direitos reservados. Este documento, incluuindo as suas su-secções, tem copyrights. Saia mais o que pode fazer com os nossos modelos no fim de cada uma das páginas do nosso site. |
|


Com mais de 40 anos no design de modelos de tricô e de croché, a DROPS Design oferece uma das mais vastas colecções demodelos gratuitos na Internet - traduzidos em 17 línguas. Neste dia de hoje, temos 324 catálogos e 12290 modelos - dos quais 12271 estão traduzidos em português.
Trabalhamos com muito empenho para lhe proporcionar o melhor que o tricô e o croché têm para oferecer, para lhe fornecer inspiração e conselhos bem como fios da mais elevada qualidade a preços incríveis! Gostaria de usar os nossos modelos para outros fins que não uso pessoal? Pode ler o que lhe é permitido fazer no Copyright texto que se encontra na parte de baixo de todos os nossos modelos. Bom tricô! Bom croché!
Deixe um comentário acerca do modelo DROPS 219-7
Gostaríamos muito de saber o que tem a dizer-nos acerca deste modelo!
Se deixar uma pergunta acerca do modelo, certifique-se de que escolhe a categoria adequada no formulário abaixo para acelerar o processo relativo à resposta. Os campos obrigatórios estão assinalados com um *.