
Categorias populares
Procura um fio?


Comentários / Perguntas (27)
![]() Della escreveu:
Della escreveu:
Hi. I’m wondering how I am going to fit 154 stitches at the end of A1 on a 15mm x 80cm circular needle. I’ve just started this garment and I’m doing the neck on the 12mm x 80cm and 44 stitches just fit 😳
22.08.2021 - 16:21DROPS Design respondeu:
Dear Della, our knitters didn't really had problems fitting the stitches on the needles, but you can always use a longer circular, or even two circs, if you feel they are too crowded. Happy Stitching!
22.08.2021 - 17:33
![]() Emmanuelle escreveu:
Emmanuelle escreveu:
Merci pour votre réponse ultra rapide. C\'est parti, je me lance ! Bonne journée, Emmanuelle
02.08.2021 - 08:01
![]() Emmanuelle escreveu:
Emmanuelle escreveu:
Bonjour, très joli modèle. Une question toutefois avant de me lancer : je n'ai pas d'aiguille double pointe en 12. Peut-on commencer à tricoter dès le début (col) en rond avec les aiguilles circulaires 12 ? Merci par avance de votre réponse.
01.08.2021 - 10:45DROPS Design respondeu:
Bonjour Emmanuelle et merci. Effectivement, vous pouvez tricoter le col sur une aiguille circulaire de 80 cm en utilisant la technique dite du magic loop jusqu'à ce que vous ayez augmenté suffisamment de mailles pour continuer sur une 60 ou sur la 80 mais en rond "normalement". Bon tricot!
02.08.2021 - 07:23
![]() Alica escreveu:
Alica escreveu:
Dear Drops, I have a problem with the yarn. Wanted to buy it, but I do not know which color is that colour 05, tan. When I choose colour 05 it is more brown. What does it mean tan? I would like to have the same colour as on the picture here. Pls help:)
04.05.2021 - 07:09DROPS Design respondeu:
Hei Alica, The name of Polaris no 5 is Taupe (not tan) and is the colour you see in the picture - a dark mauve/grey. Happy knitting!
04.05.2021 - 07:42
![]() Madou escreveu:
Madou escreveu:
Merci pour les explications et les précisions ! Mon pull est à présent terminé et mon chat me le pique déjà... Le pull tient vraiment chaud et est très confortable à porter ! Conseil : ne pas hésiter à bien serrer l'encolure ! J'ai réalisé le modèle en taille Medium et je tiens juste à préciser qu'il me reste encore à peu près 150 g de laine, donc 1000 g vont bien pour cette taille, alors même que j'ai rallongé un peu les manches. Très beau pull, merci !
10.04.2021 - 16:09
![]() Madou escreveu:
Madou escreveu:
Bonjour, J'adore ce modèle et je viens de finir l'empiècement devant et dos, il ne me reste donc plus que les manches à tricoter. J'ai repris mes 24 mailles pour tricoter la première manche, et dois monter 2 mailles sous la manche. Dois-je les monter sur l'aiguille gauche ou droite ? Aussi, pourquoi suis-je censée avoir 28 mailles après avoir monter 24 + 2 mailles sous la manche ? Je vous remercie d'avance. Madou
08.04.2021 - 16:12DROPS Design respondeu:
Bonjour Madou, montez 2 m de chaque côté des mailles en attente, par ex: montez 2 m, tricotez les 24 m de la manche et montez 2 m. La correction a été faite, merci. Bon tricot!
09.04.2021 - 07:11
![]() Laura Z Rhodes escreveu:
Laura Z Rhodes escreveu:
Hello, wonderfully patient DROPS design team. I have another sleeve question, regarding decreases. Are the decreases over 24 rows (one stitch decrease right side, one row no decreases, one row decrease left side, one row no decreases, for a total of 2 stitches decreased over 4 rows), or are the decreases over 12 rows (one stitch decrease start of knit row, one stitch decrease start of purl row, for a total of 2 stitches decreased over 2 rows)? Thank you.
17.02.2021 - 19:14DROPS Design respondeu:
Dear Mrs Rhodes, the decreases will be worked over 24 rows, (1 row decreasing 1 st on the right side, 1 row without decreasing, 1 row decreasing on the left side, 1 row without decreasing), repeat from (to) a total of 6 times = 6 sts have been decreased on each side and 24 rows have been worked, 16 sts remain - decrease either at the beginning or at the end of a row from RS. Happy knitting!
18.02.2021 - 09:12
![]() Laura Rhodes escreveu:
Laura Rhodes escreveu:
Thank you so much for clearing up my question about the end of row marker. I am now ready to do the sleeves, but I don’t understand what you mean by casting on stitches mid under sleeve? I am to cast on 2 stitches (I am making the M), but twice, for a total of 28 stitches? Where is mid under sleeve? Thanks so much. The knitting is going super and I am excited to finish. :-)
15.02.2021 - 03:26DROPS Design respondeu:
Hi Laura, The sleeve is worked over the stitches from the one thread as well as 2 stitches cast on, on each side = 4 new stitches (these stitches are used when the sleeve is sewn to the body when it is finished). You work back and forth until the sleeve is finished, then the sleeve seam and the opening under the sleeve are sewn together. Mid under the sleeve will be the underside of the sleeve, where the seam is. Hope this helps and happy knitting!
15.02.2021 - 07:54
![]() Laura Z Rhodes escreveu:
Laura Z Rhodes escreveu:
Thanks for your reply, but I am still confused about where the pattern starts in each row. At the start of A.1, I placed the marker before the first P. I understand increasing, but rnd7 seems to begin with a K placed BEFORE the marker. Is this the last K on rnd6? Then marker, then P1, K1, P1, K1 pattern? Rnd11 pattern is P1, P1 incr, P1, K1? Rnd12 is P1, K2, P1, K1? Rnd14 is P1, K2, P1, P incr? Or do you want the first incr on the last K of rnd13? Rnd15-18 is P1, K2? All start at EOR marker.
11.02.2021 - 17:30DROPS Design respondeu:
Dear Mrs Rhodes, you increase on row 6 and the stitch before the P stitch on row 7 is the new stitch that will be worked K, this means the marker on beg of round stays here and over P1, K1 (= increase on row 6), K1, you will now work: K1, P1, K1, P1. On row 11 work K1, P1, inc, P1 and row 12: K1, P1, K2, P1 etc... ie just work the stitches as they are shown in diagram. Hope this helps. Happy knitting!
12.02.2021 - 06:49
![]() Laura Z Rhodes escreveu:
Laura Z Rhodes escreveu:
Hello! I am following along the pattern chart, working from lower right to upper left, and I am at the row (row 7) where it looks like the pattern begins one stitch *before* the end-of-round marker. Is this correct? And then, in row 15, it again looks like I am adding stitches before the end-of-round marker. This would keep the purl stitches in line, which I assume you want? Thanks so much.
11.02.2021 - 02:44DROPS Design respondeu:
Dear Mrs Rhodes, yes that's correct, you increased one stitch in each repeat on previous round, and now you work K1, P1, K1, P1 over the (P1, K1 worked with the increase, P1). On row 15, you will start with K2 since you increased on previous row 1 stitch in the first stitch of the repeat. Hope this helps. Happy knitting!
11.02.2021 - 06:52
|
||||||||||
November Woodland#novemberwoodlandsweater |
||||||||||
 |
 |
|||||||||
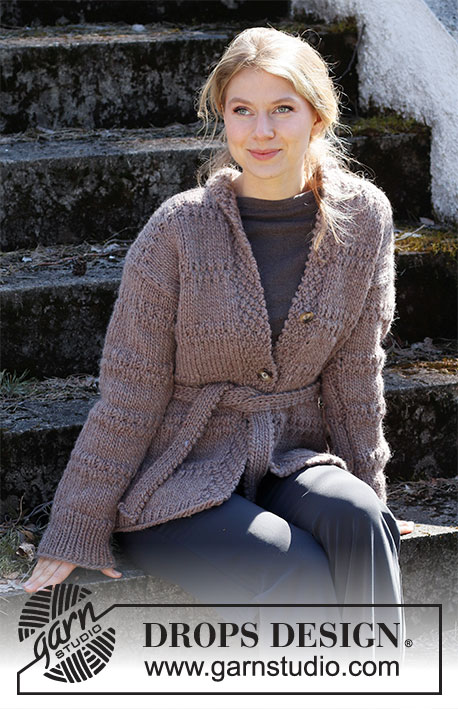
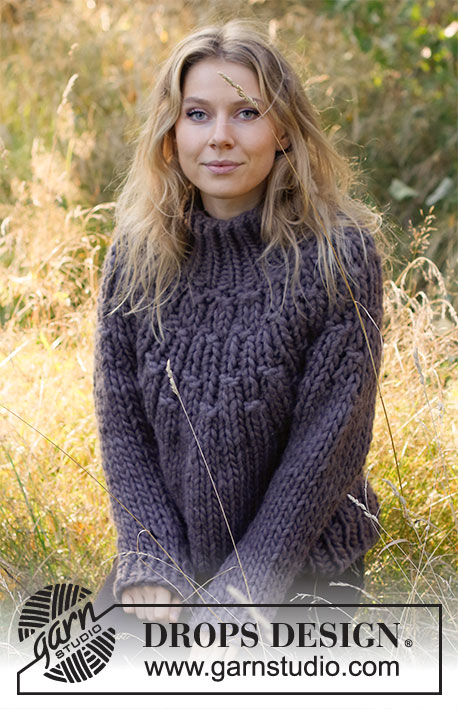
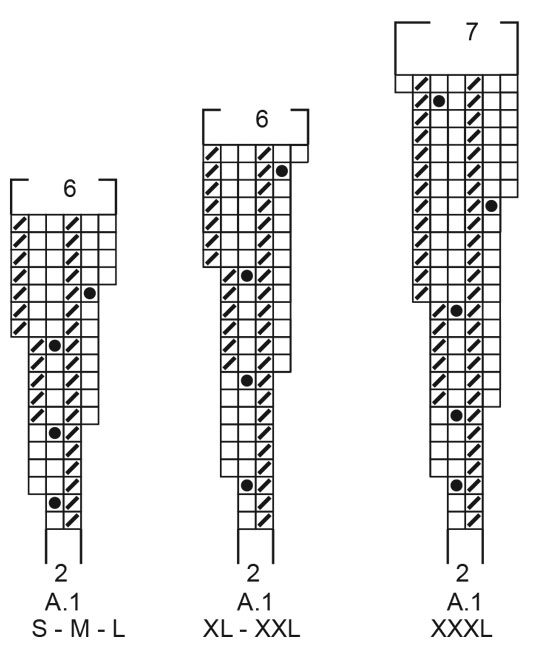
Pulôver tricotado de cima para baixo, com gola alta e encaixe arredondado, em DROPS Polaris. Do S ao XXXL
DROPS 216-24 |
||||||||||
|
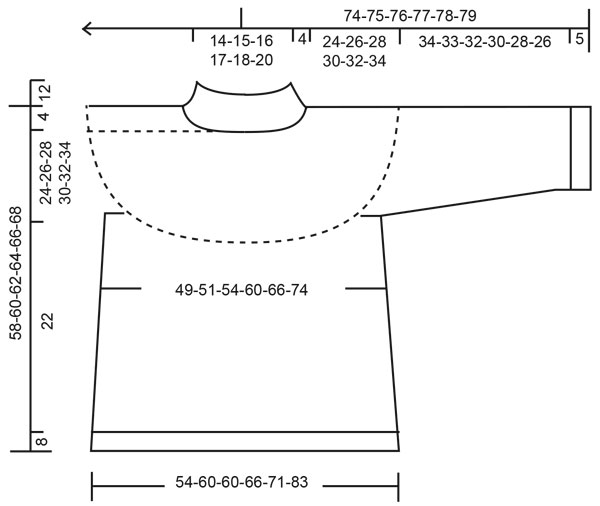
------------------------------------------------------- TÉCNICAS USADAS: ------------------------------------------------------- PONTO FANTASIA: Ver diagrama A.1 Ver diagrama indicado para cada tamanho. MAGIC LOOP: Se a agulha circular é demasiado comprida para tricotar em redondo, tricotar em magic loop da seguinte maneira: empurrar as malhas para o meio da agulha circular (a meio do cabo). Dividir o número de malhas ao meio aproximadamente e puxar o cabo entre 2 malhas. Empurrar então as malhas de um lado até a ponta da agulha e tricotar as malhas de um lado. Puxar o cabo ao meio entre 2 malhas do outro lado e continuar da mesma maneira - continuar desta maneira até haver malhas suficientes para tricotar em redondo. AUMENTOS (lado pulôver): Para aumentar 1 malha, fazer 1 laçada. Na carreira seguinte, tricotar as laçadas em meia torcida para evitar buracos. DIMINUIÇÕES (mangas): NOTA! Para diminuir alternadamente à direita e à esquerda da peça, proceder da seguinte maneira: Tricotar alternadamente no princípio e no fim de uma carreira de diminuições: Diminuir pelo direito da seguinte maneira: Tricotar 2 malhas juntamente em meia. Diminuir da seguinte maneira pelo avesso: Tricotar 2 malhas juntamente em liga. ------------------------------------------------------- A PEÇA COMEÇA AQUI: ------------------------------------------------------- PULÔVER – SUMÁRIO DA PEÇA: Tricota-se de cima para baixo, em redondo nas agulhas de pontas duplas/agulha circular. As mangas tricotam-se em idas e voltas na agulha circular e são então costuradas. GOLA: Montar 34-36-38-40-42-44 malhas nas agulhas de pontas duplas 12 mm em Polaris. Tricotar em redondo, em canelado = 1 malha meia/1 malha liga durante 12 cm. ENCAIXE: Ver MAGIC LOOP acima. Colocar 1 marcador aqui, MEDIR A PARTIR DAQUI! Continuar com a agulha circular 15 mm e tricotar A.1 em redondo – ver diagrama indicado para cada tamanho. MANTER A MESMA TENSÃO DA INDICADA PARA A AMOSTRA! Quando A.1 estiver terminado, temos 102-108-114-120-126-154 malhas. Tricotar 1 volta meia aumentando ao mesmo tempo 0-4-2-8-10-2 malhas a intervalos regulares – ver AUMENTOS acima = 102-112-116-128-136-156 malhas. Continuar então em ponto meia até a peça medir 24-26-28-30-32-34 cm a partir do marcador. Tricotar a carreira seguinte da seguinte maneira: Tricotar as 15-16-17-19-20-23 primeiras malhas (= metade das costas), colocar as 21-24-24-26-28-32 malhas seguintes em espera num alfinete de malhas para a manga e montar 4-4-4-4-6-6 malhas (= lado, sob a manga), tricotar as 30-32-34-38-40-46 malhas seguintes (= frente), colocar as 21-24-24-26-28-32 malhas seguintes em espera num alfinete de malhas para a manga e montar 4-4-4-4-6-6 malhas (= lado, sob a manga), tricotar as 15-16-17-19-20-23 últimas malhas (= metade das costas). Terminar, então, as costas/a frente e as mangas separadamente. MEDIR A PARTIR DAQUI! COSTAS & FRENTE: = 68-72-76-84-92-104 malhas. Tricotar em redondo em ponto meia até a peça medir 22 cm a partir da separação para todos os tamanhos. Continuar com a agulha circular 12 mm em canelado 1 malha meia/1 malha liga durante 8 cm para todos os tamanhos. Arrematar frouxamente as malhas meia em meia e as malhas liga em liga. O pulôver mede cerca de 58-60-62-64-66-68 cm a partir do ombro. MANGAS: As mangas tricotam-se em idas e voltas na agulha circular com uma costura. Retomar as 21-24-24-26-28-32 malhas de um dos alfinetes de malhas de um lado da peça para a agulha circular 15 mm e montar 2-2-2-2-3-3 malhas de cada lado = 25-28-28-30-34-38 malhas. Tricotar em ponto meia em idas e voltas e, ao mesmo tempo, na carreira seguinte pelo direito, diminuir 1-0-0-0-0-0 malhas (diminui-se apenas no tamanho S) tricotando 2 malhas juntamente em meia a esquerda da peça = 24-28-28-30-34-38 malhas. Quando a peça medir 4-2-2-4-4-2 cm, diminuir 1 malha da lado direito da peça – ver DIMINUIÇÕES. Diminuir alternadamente à esquerda e à direita 8-12-12-14-14-18 vezes ao todo (= 4-6-6-7-7-9 vezes de cada lado da peça) a cada 2-2-2-1-1-1 carreiras = 16-16-16-16-20-20 malhas. Tricotar até a peça medir 34-33-32-30-28-26 cm a partir da separação. (NOTA: Mais curto nos tamanhos grandes, porque os ombros são mais largos). Continuar com a agulha circular 12 mm em canelado 1 malha meia/1 malha liga durante 5 cm. Arrematar frouxamente as malhas meia em meia e as malhas liga em liga. Tricotar a outra manga da mesma maneira. MONTAGEM: Fazer a costura sob a manga na alça mais exterior das malhas para evitar que a costura fique demasiado grossa – dividir o fio para que seja mais fino quando se faz a costura. Fechar a abertura sob as mangas com uma costura. |
||||||||||
Explicações do diagrama |
||||||||||
|
||||||||||
 |
||||||||||
 |
||||||||||
Terminou este projecto?Então, identifique as suas fotos com as tags #dropspattern #novemberwoodlandsweater ou mostre-as na galeria #dropsfan. Precisa de ajuda para este modelo?Encontrará 23 turotiais em vídeo, uma rubrica Comentários/Perguntas e muito mais ao visitar a página do modelo em www.garnstudio.com © 1982-2026 DROPS Design A/S. Todos os direitos reservados. Este documento, incluuindo as suas su-secções, tem copyrights. Saia mais o que pode fazer com os nossos modelos no fim de cada uma das páginas do nosso site. |
||||||||||


Com mais de 40 anos no design de modelos de tricô e de croché, a DROPS Design oferece uma das mais vastas colecções demodelos gratuitos na Internet - traduzidos em 17 línguas. Neste dia de hoje, temos 324 catálogos e 12239 modelos - dos quais 12220 estão traduzidos em português.
Trabalhamos com muito empenho para lhe proporcionar o melhor que o tricô e o croché têm para oferecer, para lhe fornecer inspiração e conselhos bem como fios da mais elevada qualidade a preços incríveis! Gostaria de usar os nossos modelos para outros fins que não uso pessoal? Pode ler o que lhe é permitido fazer no Copyright texto que se encontra na parte de baixo de todos os nossos modelos. Bom tricô! Bom croché!
Deixe um comentário acerca do modelo DROPS 216-24
Gostaríamos muito de saber o que tem a dizer-nos acerca deste modelo!
Se deixar uma pergunta acerca do modelo, certifique-se de que escolhe a categoria adequada no formulário abaixo para acelerar o processo relativo à resposta. Os campos obrigatórios estão assinalados com um *.