
Categorias populares
Procura um fio?


Comentários / Perguntas (80)
![]() Sylvie escreveu:
Sylvie escreveu:
Bonjour,je fais le modèle Large. Dans la A.1, ligne 25 ,le grand triangle est sur 4 mailles et moi j’en prends 3, 1 glissée, 2 ensemble, passer la maille glissée sur les 2 ensemble,alors à la fin du motif, j’ai 2 mailles en trop. Expliquez-moi comment faire, merci
04.05.2024 - 15:55DROPS Design respondeu:
Bonjour Sylvie, sauf erreur de ma part, il n'y a pas de triangle sur 4 mailles dans A.1, quelle taille tricotez-vous que nous puissions vérifier encore une fois?
06.05.2024 - 08:09
![]() Sylvie escreveu:
Sylvie escreveu:
Je ne comprends pas le diagramme À.1.La première ligne indique 6 mailles et j’en compte 8 ,4 envers,2 endroit et 2 jetées. Me donner un suivi SVP
29.04.2024 - 17:00DROPS Design respondeu:
Bonjour Sylvie, au tout 1er rang du diagramme A.1 on répète A.1 sur 6 mailles, mais effectivement, comme on fait 2 jetés, on aura 8 mailles dans chaque A.1 à la fin de ce tour. Le 1er tour de A.1 va se tricoter ainsi: *2 m env, 1 jeté, 1 m end,1 jeté, 2 m env, 1 m end*, répétez de *à* tout le tour. Bon tricot!
30.04.2024 - 07:41
![]() Vaillant Isabelle escreveu:
Vaillant Isabelle escreveu:
Bonsoir, voilà je ne comprend pas bien dans les explications on nous demande de décaler le motif ,mais c est tout les motifs ? Je suis désolée je n arrive pas a comprendre . Merci par avance Isabelle.
28.03.2024 - 23:05DROPS Design respondeu:
Bonjour Mme Vaillant, procédez comme indiqué par le symbole du carré noir dans la légende: glissez la 1ère maille du tour sur l'aiguille droite, sans la tricoter, et continuez le diagramme comme indiqué: la dernière maille de chaque motif se tricote avec la 1ère maille du motif suivant, autrement dit, la 1ère maille du tour sera tricotée avec la dernière diminution du dernier motif du tour. Bon tricot!
02.04.2024 - 14:00
![]() Anja escreveu:
Anja escreveu:
Hej, Hvilken størrelse pinde skal jeg lave strikkeprøven på? Mvh Anja
15.02.2024 - 11:05DROPS Design respondeu:
Hei Anja. Bruk den pinnestr. som selve plagget strikkes i (ikke vrangbord). Strikkefastheten er oppgitt i glattstrikk. På denne modellen er det pinne 4 :) mvh DROPS Design
15.02.2024 - 12:15
![]() Anna-Lena Karlsson escreveu:
Anna-Lena Karlsson escreveu:
Har en fråga om varv 23. 20 m på varvet innan. Tolkar det som att, lyft en maska utan att sticka den, följ mönstret. Men jag får inte maskorna att räcka i slutet? Ska jag inte sticka en rät mellan omslagen i slutet? Saknas en maska för sista sticka ihop maskor i slutet av rapporten? Hoppas ni förstår vad jag menar😊 Tacksam för hjälp
02.09.2023 - 09:21DROPS Design respondeu:
Hei Anna-Lena Når du har 1 maske igjen på omgangen, skal denne masken og den masken du løftet over i begynnelsen av omgangen strikkes sammen (= ta 1 maske løs av pinnen som om den skulle strikkes rett, strikk 1 rett, løft den løse masken over masken som ble strikket). Da skal du ha nok masker. mvh DROPS Design
11.09.2023 - 13:59
![]() Pam Monty escreveu:
Pam Monty escreveu:
En las referencias del diagrama en español, para los 3 puntos en el mismo punto dice \"2 puntos disminuidos \". Es incorrecto debería ser \"2 puntos aumentados\".
29.08.2023 - 09:39
![]() Amanda Ellynor Kristensen escreveu:
Amanda Ellynor Kristensen escreveu:
Hejsa, Jeg skal til at starte mønster A.1 i M, hvor der er en masse hvide hvide feltet som ikke er “tegnet op” som hvis feltet men ligner blot “luft”. Skal disse forstås som hvide felter, altså retstrik eller hvorledes skal det forståes. På forhånd mange tak og tak for gode opskrifter Mvh Amanda
27.07.2023 - 11:05DROPS Design respondeu:
Hei Amanda. Nei, der er det ingen maske, hopp frem til neste blanke rute. Og når du har økt nok masker vil diagrammet komme sammen. mvh DROPS Design
27.07.2023 - 14:59
![]() Mitzi Russell escreveu:
Mitzi Russell escreveu:
Please help! Doing size M and completed round 19 with k2tgether, k, y.o., k, y.o., k. Round 20 starts. with 3 knits, but I only have 2 knits?? The pattern so far seems to be aligned.
18.07.2023 - 15:49DROPS Design respondeu:
Dear Mitzi, round 20 is worked similarly to round 18, where you need to take into account that the pattern has been displaced. The last stitch on round 19 compensates for the first stitch on round 20 and corresponds to the blank square seen at the beginning of round 20. So, in the first repeat of round 20, the first knit stitch is the last knit stitch on the previous round and then knit 2, purl 2 and continue with the chart . Then, on the second repeat, you work the first knit stitch over the last stitch of the previous repeat in the previous round. Happy knitting!
20.07.2023 - 14:11
![]() Breige McShane escreveu:
Breige McShane escreveu:
Exactly as you said - you finish row 17 with the slip stitch. (which is the 1st purl stitch.) Then on row 18 you have the 2nd purl stitch at the beginning of the row?????You show beginning of row with a knit stitch. I am stuck and do not know how I can begin row 18 with a knit
17.07.2023 - 16:50DROPS Design respondeu:
Dear Breige, round 17 is finished with k2tog, where you work the together the last stitch on the round and the slipped stitch (previous first stitch of the round). This last stitch will look like a knit stitch and corresponds to the blank square seen at the beginning of round 18. So, in the first repeat of round 18, you don't have to work the first knit stitch, you immediately start on the purl stitch over the purl stitch. Then, on the second repeat, you work the knit stitch over the last stitch of the previous repeat in the previous round. Happy knitting!
20.07.2023 - 14:05
![]() Breige McShane escreveu:
Breige McShane escreveu:
Truly I am not getting this and need a very explicit explanation. I have started row 17 with a slip stich which is the first purl stitch. Then I start A1 with the second purl stitch. I complete all of A1 finishing with the first slipped stitch which is the first purl stitch and then I have the second purl stitch to start the row. You show the next row starting with l knit stitch and then one purl stitch.
16.07.2023 - 16:55DROPS Design respondeu:
Dear Breige, we have slipped the first stitch in order to work the decrease at the end of the last repeat of A.1, where you will work ssk (slip stitch, knit 1 and pass over slipped stitch over knit stitch). Then, we continue the next row as indicated: knit over purl and purl over knit.
17.07.2023 - 13:49
|
|||||||||||||||||||||||||||||||
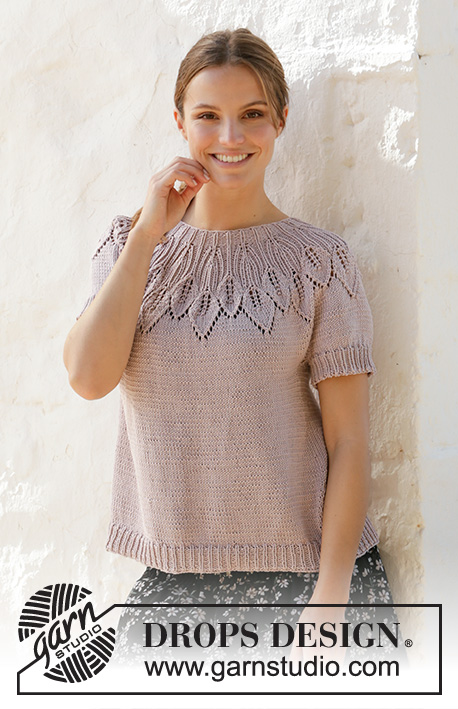
Lavender Charm Top#lavendercharmtop |
|||||||||||||||||||||||||||||||
 |
 |
||||||||||||||||||||||||||||||
Top tricotado de cima para baixo em DROPS Muskat, com encaixe arredondado, ponto de folhas e ponto rendado. Do S ao XXXL.
DROPS 213-22 |
|||||||||||||||||||||||||||||||
|
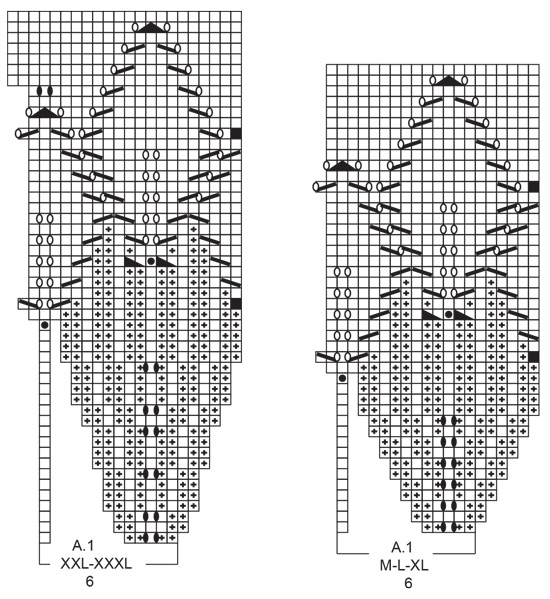
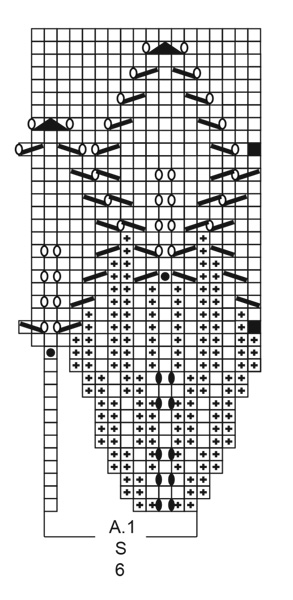
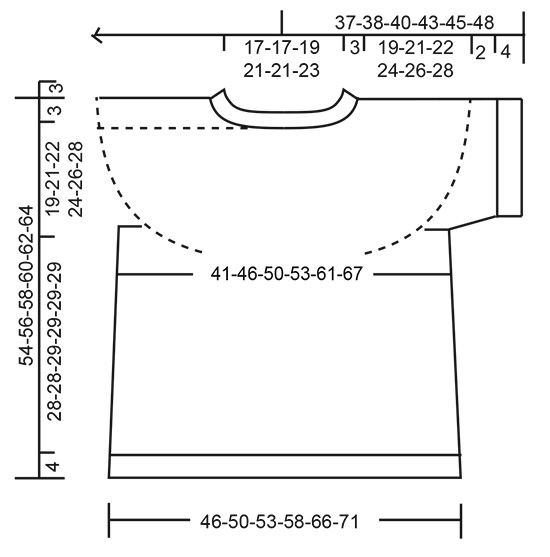
------------------------------------------------------- TÉCNICAS USADAS: ------------------------------------------------------- PONTO FANTASIA: Ver diagrama A.1. Ver diagrama indicado para cada tamanho. AUMENTOS (lados top): Tricotar até restarem 2 malhas antes do fio marcador, fazer 1 laçada, tricotar 4 malhas meia (o fio marcador fica entre estas 4 malhas) fazer 1 laçada. Na carreira seguinte, tricotar as laçadas torcidas em meia para evitar buracos. Tricotar então as novas malhas em ponto meia. DIMINUIÇÕES (mangas): Diminuir 1 malha de cada lado do fio marcador da seguinte maneira: Tricotar até restarem 3 malhas antes do fio marcador, tricotar 2 malhas juntamente em meia, 2 malhas meia (o fio marcador fica entre estas 2 malhas), deslizar 1 malha em meia, 1 malha meia e passar a malha deslizada por cima da malha tricotada. DICA PARA ARREMATAR: Para evitar que as malhas arrematadas fiquem demasiado apertadas, pode-se arrematar com uma agulha um tamanho acima. Se as malhas arrematadas continuarem apertadas, fazer 1 laçada depois de cerca de cada 4.ª malha e arrematar as laçadas como malhas normais. ------------------------------------------------------- A PEÇA COMEÇA AQUI: ------------------------------------------------------- TOP – SUMÁRIO DA PEÇA: A gola e o encaixe tricotam-se de cima para baixo, em redondo na agulha circular, a partir do meio das costas. Divide-se o encaixe para as costas/a frente e as orlas das mangas e continua-se as costas/a frente em redondo na agulha circular. As orlas das mangas tricotam-se em redondo com as agulhas de pontas duplas, de cima para baixo. GOLA: Montar 96-96-102-114-114-120 malhas com a agulha circular 3 mm em Muskat. Tricotar 1 volta meia. Tricotar em canelado (= 2 malhas liga / 1 malha meia). Quando a peça medir 3 cm, continuar com a agulha circular 4 mm. Colocar 1 marcador no princípio da carreira, a meio das costas; vai-se medir o encaixe a partir deste marcador! ENCAIXE: Tricotar A.1 (= 6 malhas) em redondo em todas as malhas (= 16-16-17-19-19-20 vezes em largura). MANTER A MESMA TENSÃO DA INDICADA PARA A AMOSTRA! Quando A.1 tiver sido tricotado 1 vez em altura, temos 288-320-340-380-418-440 malhas e a peça mede cerca de 14-16-16-16-18-18 cm a partir do marcador. Tricotar em redondo, em meia, até a peça medir 19-21-22-24-26-28 cm a partir do marcador. Dividir, então, a peça para as costas/a frente e as mangas da seguinte maneira: Tricotar as 40-45-49-53-60-65 primeiras malhas (= metade das costas), colocar as 63-69-72-84-89-90 malhas seguintes em espera num fio para a orla da manga e montar 6-6-6-6-8-10 novas malhas sob a manga, tricotar as 81-91-98-106-120-130 malhas seguintes (= frente), colocar as 63-69-72-84-89-90 malhas seguintes em espera num fio para a orla da manga e montar 6-6-6-6-8-10 novas malhas sob a manga, tricotar as 41-46-49-53-60-65 últimas malhas (= metade das costas). COSTAS & FRENTE: = 174-194-208-224-256-280 malhas. Colocar 1 fio marcador a meio das 6-6-6-6-8-10 malhas sob cada manga (= lados do top). Temos 87-97-104-112-128-140 malhas entre os fios para a frente e as costas. Fazer seguir os fios à medida que for tricotando; vão servir para marcar os aumentos dos lados. Tricotar em meia. Quando a peça medir 4 cm a partir da separação, aumentar 1 malha de cada lado dos 2 fios marcadores – ver AUMENTOS (= aumenta-se 4 malhas). Aumentar desta maneira 5-4-4-5-5-5 vezes ao todo a cada 4 cm = 194-210-224-244-276-300 malhas. Quando a peça medir 28-28-29-29-29-29 cm a partir da separação, aumentar 13-12-13-14-15-15 malhas a intervalos regulares = 207-222-237-258-291-315 malhas. Mudar para a agulha circular 3 mm em canelado (= 1 malha meia / 2 malhas liga) durante 4 cm. Arrematar em meia – ver DICA PARA ARREMATAR. A peça medir 32-32-33-33-33-33 cm a partir da separação. ORLA DAS MANGAS: Retomar as 63-69-72-84-89-90 malhas em espera num dos lados da peça para as agulhas de pontas duplas 4 mm e levantar 1 malha em cada uma das 6-6-6-6-8-10 malhas montadas sob a manga = 69-75-78-90-97-100 malhas. Tricotar em ponto meia em redondo durante 2 cm. Continuar com as agulhas de pontas duplas 3 mm em canelado (= 1 malha meia / 2 malhas liga) diminuindo AO MESMO TEMPO, na primeira carreira, 0-0-0-0-1-1 malha = 69-75-78-90-96-99 malhas. Arrematar quando o canelado medir 4 cm, tricotando as malhas meia em meia e as malhas liga em liga. Tricotar a orla da outra manga da mesma maneira. |
|||||||||||||||||||||||||||||||
Explicações do diagrama |
|||||||||||||||||||||||||||||||
|
|||||||||||||||||||||||||||||||
 |
|||||||||||||||||||||||||||||||
 |
|||||||||||||||||||||||||||||||
 |
|||||||||||||||||||||||||||||||
Terminou este projecto?Então, identifique as suas fotos com as tags #dropspattern #lavendercharmtop ou mostre-as na galeria #dropsfan. Precisa de ajuda para este modelo?Encontrará 28 turotiais em vídeo, uma rubrica Comentários/Perguntas e muito mais ao visitar a página do modelo em www.garnstudio.com © 1982-2026 DROPS Design A/S. Todos os direitos reservados. Este documento, incluuindo as suas su-secções, tem copyrights. Saia mais o que pode fazer com os nossos modelos no fim de cada uma das páginas do nosso site. |
|||||||||||||||||||||||||||||||


Com mais de 40 anos no design de modelos de tricô e de croché, a DROPS Design oferece uma das mais vastas colecções demodelos gratuitos na Internet - traduzidos em 17 línguas. Neste dia de hoje, temos 324 catálogos e 12290 modelos - dos quais 12271 estão traduzidos em português.
Trabalhamos com muito empenho para lhe proporcionar o melhor que o tricô e o croché têm para oferecer, para lhe fornecer inspiração e conselhos bem como fios da mais elevada qualidade a preços incríveis! Gostaria de usar os nossos modelos para outros fins que não uso pessoal? Pode ler o que lhe é permitido fazer no Copyright texto que se encontra na parte de baixo de todos os nossos modelos. Bom tricô! Bom croché!
Deixe um comentário acerca do modelo DROPS 213-22
Gostaríamos muito de saber o que tem a dizer-nos acerca deste modelo!
Se deixar uma pergunta acerca do modelo, certifique-se de que escolhe a categoria adequada no formulário abaixo para acelerar o processo relativo à resposta. Os campos obrigatórios estão assinalados com um *.