
Categorias populares
Procura um fio?


Comentários / Perguntas (80)
![]() Luhaib escreveu:
Luhaib escreveu:
I didn’t quite understand the explanation for the stitch (work 3 stitches in stitch as follows: Knit the stitch but wait to drop the stitch off the needle, make 1 yarn over on right needle and knit the stitch 1 more time, then drop the stitches of the needle = 3 stitches (= 2 stitches increased). Is there a video tutorial for this stitch? Or a name for it I could search YouTube maybe?
17.08.2025 - 19:54DROPS Design respondeu:
Hi Mrs Luhaib, please see the video HERE. Happy knitting!
17.08.2025 - 21:03
![]() Kathrin escreveu:
Kathrin escreveu:
Ich bin gerade dabei den Pulli von oben nach unten zu stricken. Das Muster A 1 habe ich nun bis zur 12 Runde gestrickt. In der letzten Reihe sind durch Umschläge nochmal 2 Maschen dazu gekommen. In der nächsten Runde tauchen diese nicht mehr auf und dafür am Rand jeweils 1 Masche mehr. Nehme ich am Anfang der Runde eine Masche zu komme ich trotzdem nicht auf eine Übereinstimmung der Runde vorher mit den Maschen in der neuen Runde. Und was ist mit den Umschlägen? Wie geht's weiter?
12.07.2025 - 22:17DROPS Design respondeu:
Liebe Kathrin, denken Sie daran, eine Markierung zwischen jedem Rapport in der Breite einzusetzen, so können Sie jeweils die Maschenanzahl prüfen. Wenn Sie eine unterschiedliche Maschenanzahl in jedem A.1 haben, teilen Sie bitte gerne die gestrickte Größe, so können wir auch mal weiter schauen. Viel Spaß beim Stricken!
24.07.2025 - 14:14
![]() Michelle Dumas escreveu:
Michelle Dumas escreveu:
Désolée j’ai oublier de vous dire la grandeur , c’est xxl
22.04.2025 - 19:44
![]() Michelle Dumas escreveu:
Michelle Dumas escreveu:
Bonjour je ne comprend pas la fin du rg. 21 avec l’espace vide et le point suivant Merci à l’avance
22.04.2025 - 16:59DROPS Design respondeu:
Bonjour Mme Dumas, vous devez décaler ce tour d'une maille: glissez la 1ère maille du tour sur l'aiguille droite, sans la tricoter, puis continuez le diagramme comme indiqué, quand il reste 1 maille de A.1, tricotez cette maille ensemble avec la m suivante (diminution à la fin du rang, celle qui "déborde"), continuez ainsi tout le tour et, à la fin du tour, tricotez la dernière maille et la 1ère maille du tour ensemble pour la dernière diminution du tour. Bon tricot!
23.04.2025 - 07:27
![]() Michelle Dumas escreveu:
Michelle Dumas escreveu:
Bonjour je ne comprend pas la fin du rg. 21 avec l’espace libre et le point suivant
22.04.2025 - 16:52
![]() Louane escreveu:
Louane escreveu:
Mon échantillon de laine ne correspond pas à "l'échantillon du modèle, du coup, je ne sais pas combien je dois monter de mailles. Mon échantillon de laine 24 mailles pour 10 cm alors que pour le patron c'est 21 mailles pour 10cm. Pour la taille xxxl, je doit monter combien de mailles pour le coup? Pourriez mod
29.01.2025 - 11:43DROPS Design respondeu:
Bonjour Louane, soit vous utilisez des aiguilles plus grosses pour obtenir le bon échantillon, soit, si votre laine ne le permet pas, vous devrez tout recalculer les explications en fonction de votre propre tension, vous pouvez vous inspirer d'un modèle de tension similaire - cf ici pour les modèles de tension 26-23 mailles pour 10 cm. Bon tricot!
29.01.2025 - 13:53
![]() Elisa escreveu:
Elisa escreveu:
Buongiorno, avrei una domanda per il diagramma A1 taglia S. Devo iniziare la riga numero 15 e il diagramma dice " sulla prima ripetizione di A1 il giro viene spostato di 1 maglia come segue: passare la prima maglia sul ferro destro senza lavorarla, poi lavorare A1 in tondo. Ogni volta che inizio di nuovo il diagramma devo sempre passare la prima maglia del diagramma sul ferro destro senza lavorarla, o la sposto solo a inizio giro quindi una sola volta? Grazie mille!
12.08.2024 - 15:51
![]() Sabine escreveu:
Sabine escreveu:
Ich habe für diesen Pullover in Größe XXXL ein Knäuel Wolle mehr gebraucht als in der Anleitung angegeben.
27.06.2024 - 18:05
![]() Paola Zordan escreveu:
Paola Zordan escreveu:
Buongiorno, nello schema A1, alla riga 17, come devo iniziare? Se passo la prima maglia senza lavorarla, poi devo lavorare 1 rovescio e continuo il lavoro normalmente e poi tutte le ripetizioni sono complete (cioè con 2 rovesci, 1 dritto, 2 rovesci...)?
12.05.2024 - 23:23DROPS Design respondeu:
Buonasera Paola, si, passa la prima maglia senza lavorarla, poi lavora il motivo come indicato, quindi con 1 rovescio, 1 diritto, 2 rovesci e così via. Buon lavoro!
15.05.2024 - 20:04
![]() Sylvie escreveu:
Sylvie escreveu:
Bonjour, ne tenez pas compte de ma dernière question, j’ai confondu 2 sigles.
04.05.2024 - 19:17
|
|||||||||||||||||||||||||||||||
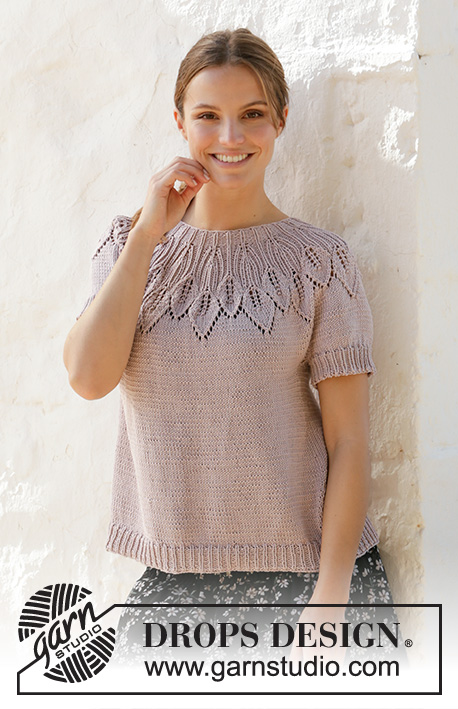
Lavender Charm Top#lavendercharmtop |
|||||||||||||||||||||||||||||||
 |
 |
||||||||||||||||||||||||||||||
Top tricotado de cima para baixo em DROPS Muskat, com encaixe arredondado, ponto de folhas e ponto rendado. Do S ao XXXL.
DROPS 213-22 |
|||||||||||||||||||||||||||||||
|
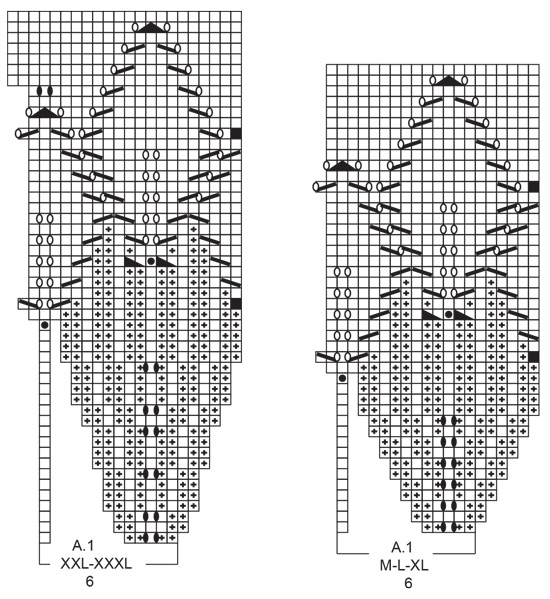
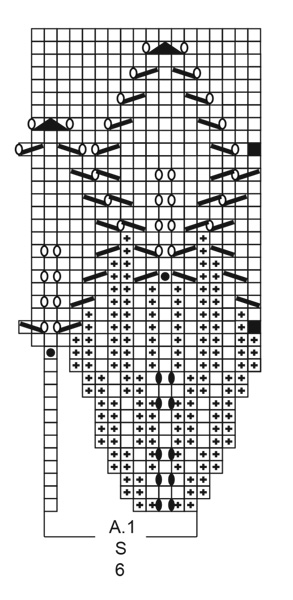
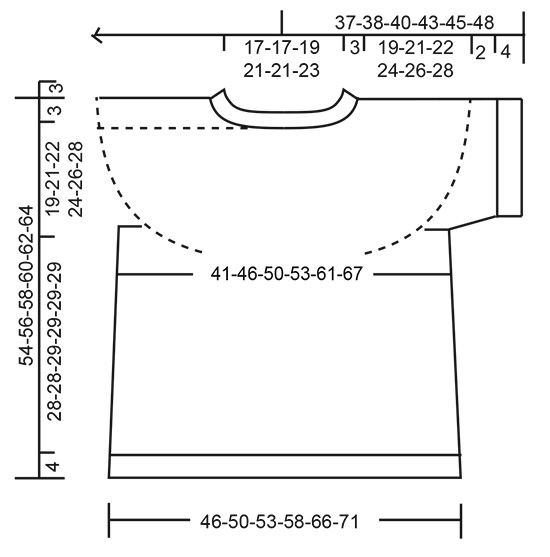
------------------------------------------------------- TÉCNICAS USADAS: ------------------------------------------------------- PONTO FANTASIA: Ver diagrama A.1. Ver diagrama indicado para cada tamanho. AUMENTOS (lados top): Tricotar até restarem 2 malhas antes do fio marcador, fazer 1 laçada, tricotar 4 malhas meia (o fio marcador fica entre estas 4 malhas) fazer 1 laçada. Na carreira seguinte, tricotar as laçadas torcidas em meia para evitar buracos. Tricotar então as novas malhas em ponto meia. DIMINUIÇÕES (mangas): Diminuir 1 malha de cada lado do fio marcador da seguinte maneira: Tricotar até restarem 3 malhas antes do fio marcador, tricotar 2 malhas juntamente em meia, 2 malhas meia (o fio marcador fica entre estas 2 malhas), deslizar 1 malha em meia, 1 malha meia e passar a malha deslizada por cima da malha tricotada. DICA PARA ARREMATAR: Para evitar que as malhas arrematadas fiquem demasiado apertadas, pode-se arrematar com uma agulha um tamanho acima. Se as malhas arrematadas continuarem apertadas, fazer 1 laçada depois de cerca de cada 4.ª malha e arrematar as laçadas como malhas normais. ------------------------------------------------------- A PEÇA COMEÇA AQUI: ------------------------------------------------------- TOP – SUMÁRIO DA PEÇA: A gola e o encaixe tricotam-se de cima para baixo, em redondo na agulha circular, a partir do meio das costas. Divide-se o encaixe para as costas/a frente e as orlas das mangas e continua-se as costas/a frente em redondo na agulha circular. As orlas das mangas tricotam-se em redondo com as agulhas de pontas duplas, de cima para baixo. GOLA: Montar 96-96-102-114-114-120 malhas com a agulha circular 3 mm em Muskat. Tricotar 1 volta meia. Tricotar em canelado (= 2 malhas liga / 1 malha meia). Quando a peça medir 3 cm, continuar com a agulha circular 4 mm. Colocar 1 marcador no princípio da carreira, a meio das costas; vai-se medir o encaixe a partir deste marcador! ENCAIXE: Tricotar A.1 (= 6 malhas) em redondo em todas as malhas (= 16-16-17-19-19-20 vezes em largura). MANTER A MESMA TENSÃO DA INDICADA PARA A AMOSTRA! Quando A.1 tiver sido tricotado 1 vez em altura, temos 288-320-340-380-418-440 malhas e a peça mede cerca de 14-16-16-16-18-18 cm a partir do marcador. Tricotar em redondo, em meia, até a peça medir 19-21-22-24-26-28 cm a partir do marcador. Dividir, então, a peça para as costas/a frente e as mangas da seguinte maneira: Tricotar as 40-45-49-53-60-65 primeiras malhas (= metade das costas), colocar as 63-69-72-84-89-90 malhas seguintes em espera num fio para a orla da manga e montar 6-6-6-6-8-10 novas malhas sob a manga, tricotar as 81-91-98-106-120-130 malhas seguintes (= frente), colocar as 63-69-72-84-89-90 malhas seguintes em espera num fio para a orla da manga e montar 6-6-6-6-8-10 novas malhas sob a manga, tricotar as 41-46-49-53-60-65 últimas malhas (= metade das costas). COSTAS & FRENTE: = 174-194-208-224-256-280 malhas. Colocar 1 fio marcador a meio das 6-6-6-6-8-10 malhas sob cada manga (= lados do top). Temos 87-97-104-112-128-140 malhas entre os fios para a frente e as costas. Fazer seguir os fios à medida que for tricotando; vão servir para marcar os aumentos dos lados. Tricotar em meia. Quando a peça medir 4 cm a partir da separação, aumentar 1 malha de cada lado dos 2 fios marcadores – ver AUMENTOS (= aumenta-se 4 malhas). Aumentar desta maneira 5-4-4-5-5-5 vezes ao todo a cada 4 cm = 194-210-224-244-276-300 malhas. Quando a peça medir 28-28-29-29-29-29 cm a partir da separação, aumentar 13-12-13-14-15-15 malhas a intervalos regulares = 207-222-237-258-291-315 malhas. Mudar para a agulha circular 3 mm em canelado (= 1 malha meia / 2 malhas liga) durante 4 cm. Arrematar em meia – ver DICA PARA ARREMATAR. A peça medir 32-32-33-33-33-33 cm a partir da separação. ORLA DAS MANGAS: Retomar as 63-69-72-84-89-90 malhas em espera num dos lados da peça para as agulhas de pontas duplas 4 mm e levantar 1 malha em cada uma das 6-6-6-6-8-10 malhas montadas sob a manga = 69-75-78-90-97-100 malhas. Tricotar em ponto meia em redondo durante 2 cm. Continuar com as agulhas de pontas duplas 3 mm em canelado (= 1 malha meia / 2 malhas liga) diminuindo AO MESMO TEMPO, na primeira carreira, 0-0-0-0-1-1 malha = 69-75-78-90-96-99 malhas. Arrematar quando o canelado medir 4 cm, tricotando as malhas meia em meia e as malhas liga em liga. Tricotar a orla da outra manga da mesma maneira. |
|||||||||||||||||||||||||||||||
Explicações do diagrama |
|||||||||||||||||||||||||||||||
|
|||||||||||||||||||||||||||||||
 |
|||||||||||||||||||||||||||||||
 |
|||||||||||||||||||||||||||||||
 |
|||||||||||||||||||||||||||||||
Terminou este projecto?Então, identifique as suas fotos com as tags #dropspattern #lavendercharmtop ou mostre-as na galeria #dropsfan. Precisa de ajuda para este modelo?Encontrará 28 turotiais em vídeo, uma rubrica Comentários/Perguntas e muito mais ao visitar a página do modelo em www.garnstudio.com © 1982-2026 DROPS Design A/S. Todos os direitos reservados. Este documento, incluuindo as suas su-secções, tem copyrights. Saia mais o que pode fazer com os nossos modelos no fim de cada uma das páginas do nosso site. |
|||||||||||||||||||||||||||||||


Com mais de 40 anos no design de modelos de tricô e de croché, a DROPS Design oferece uma das mais vastas colecções demodelos gratuitos na Internet - traduzidos em 17 línguas. Neste dia de hoje, temos 324 catálogos e 12290 modelos - dos quais 12271 estão traduzidos em português.
Trabalhamos com muito empenho para lhe proporcionar o melhor que o tricô e o croché têm para oferecer, para lhe fornecer inspiração e conselhos bem como fios da mais elevada qualidade a preços incríveis! Gostaria de usar os nossos modelos para outros fins que não uso pessoal? Pode ler o que lhe é permitido fazer no Copyright texto que se encontra na parte de baixo de todos os nossos modelos. Bom tricô! Bom croché!
Deixe um comentário acerca do modelo DROPS 213-22
Gostaríamos muito de saber o que tem a dizer-nos acerca deste modelo!
Se deixar uma pergunta acerca do modelo, certifique-se de que escolhe a categoria adequada no formulário abaixo para acelerar o processo relativo à resposta. Os campos obrigatórios estão assinalados com um *.