
Categorias populares
Procura um fio?


Comentários / Perguntas (80)
![]() Sharon Hunt escreveu:
Sharon Hunt escreveu:
Hello, how do you measure for length? My gauge is fine. But I cannot decide how to measure for length. If I lay flat I get 10 inches. If I hold up the project and measure the length is 11 inches. How does drops do this? Thanks
29.03.2026 - 11:18DROPS Design respondeu:
Dear Mrs Hunt, then you might have to hang up your work to measure it to avoid getting the piece becoming too long when worn. Happy knitting!
07.04.2026 - 11:38
![]() Sharon Hunt escreveu:
Sharon Hunt escreveu:
H! In regards to my last question it appears that I figured it out. Thanks for all your help so far on all questions I post here.
22.03.2026 - 19:19
![]() Sharon Hunt escreveu:
Sharon Hunt escreveu:
Hello, Making XXXL, 120 sts on my needles after rib. Worked the first p2, yo k1 yo p2. When working the next set of sts in this round am I supposed to start with a k1 then p2. Just not working out if I follow pattern after working the first set of 5 sts. Starting over again after completing this section in XXL. Cannot recall having this problem. Thanks as always for your help.
22.03.2026 - 11:39DROPS Design respondeu:
Dear Mrs Hunt, when working A.1 first row A.1 should fit over rib P2, K1 as you work on first round {P2, (YO), K1, (YO), P2, K1} so that you will increase ine very other K section of the rib you worked before. And you repeat the 6 sts repeat all the round. Can this help? Happy knitting!
23.03.2026 - 09:12
![]() Sharon Hunt escreveu:
Sharon Hunt escreveu:
Hi after working and completing the round with the misplaced stitch. The round above begins with knit st. Where as on my work the beg. starts with a purl. Thanks for your help with this problem. Not sure what am doing wrong.
10.03.2026 - 17:05DROPS Design respondeu:
Dear Mrs Hunt, when displacing the round 1 st, this is done at the beginning of the round as this first stitch of the round will be worked together with the last stitch last repeat in the round; and as you work the last stitch each A.1 is worked together with the first stitch next A.1 = this stitch (the decrease), is now the first stitch next repeat, so the next round starts with the decrease, then P1, the round is displaced just there where there is the black square at the beg of the row, afterwards, you just start the rounds as before. Happy knitting!
11.03.2026 - 07:27
![]() Sharon Hunt escreveu:
Sharon Hunt escreveu:
Hi worked the increase from one to 2 stitches. Thinking back because it seems like this is a hole from the base of the stitch. Are the inc. sts knitted twisted. Thanks
09.03.2026 - 06:52DROPS Design respondeu:
Hi Sharon, Yes, the yarn overs are worked twisted on the next round as described in the Increase Tip at the top of the pattern. Regards, Drops Team.
09.03.2026 - 06:58
![]() Lene escreveu:
Lene escreveu:
Har læst kommentarerne vedr. pind 23 og 24 og forstår at jeg skal strikke den sidste maske og den første maske som er taget løst af. Men nu er spørgsmålet så er denne maske nu den først på næste pind og ses som retmasken på pind 24? Og betyder det at vrangmaskerne stadigvæk skal følge hinanden ? Jeg strikker størrelse xxl
15.02.2026 - 10:08DROPS Design respondeu:
Hei Lene. Ja, vrangmaskerne skal stadigvæk skal følge hinanden. Om du forstørrer bildet av toppen, ser du det også tydelig :) mvh DROPS Design
16.02.2026 - 11:07
![]() Christine escreveu:
Christine escreveu:
I hope you can assist. We do not have access to Drops Yarn in South Africa. I would like to knit this with a cotton/acrylic blend with a gauge of about 24sts on 4mm.....which size should I knit? On a lucky note, a friend brought me some Belle yarn and I am looking forward to trying the patterns using Belle.
02.11.2025 - 20:45
![]() Josette escreveu:
Josette escreveu:
In het telpatoon staan er maar vijf steken en in de beschrijving staat dat je zes steken moet breien, sorry dat versta ik niet, graag een antwoord groeten Josette
04.10.2025 - 16:17
![]() Diana Follett escreveu:
Diana Follett escreveu:
I could not find measurements for the sizes. Am I just overlooking them? Thank you and I love the patterns and can't wait to try your yarn.
29.09.2025 - 16:55DROPS Design respondeu:
Hi Diana, There is a size chart at the bottom of the pattern, with all the measurements for the different sizes. Regards, Drops team.
30.09.2025 - 06:39
![]() Luhaib escreveu:
Luhaib escreveu:
I am not understanding this (on the first repeat of A.1, the round is displaced by 1 stitch as follows: Slip the first stitch onto the right needle without working it, then work A.1 in the round). Does it mean we do this slip stitch only on the first stitch at the beginning of the round or always when we reach the first stitch of the repeated round? I have worked this round with only the first stitch to be slipped then didn’t repeat it again but afterwards the stitches don’t align.
22.08.2025 - 19:00DROPS Design respondeu:
Dear Mme Luhaib, this round should be displaced by 1 stitch as follows: slip the first stitch onto the right needle without working it, then work A.1 in the round, at the end of round knit the last stitch together with the first stitch in this round. You have to slip 1 stitch only once, at the beginning of the round. Happy knitting!
22.10.2025 - 09:57
|
|||||||||||||||||||||||||||||||
Lavender Charm Top#lavendercharmtop |
|||||||||||||||||||||||||||||||
 |
 |
||||||||||||||||||||||||||||||
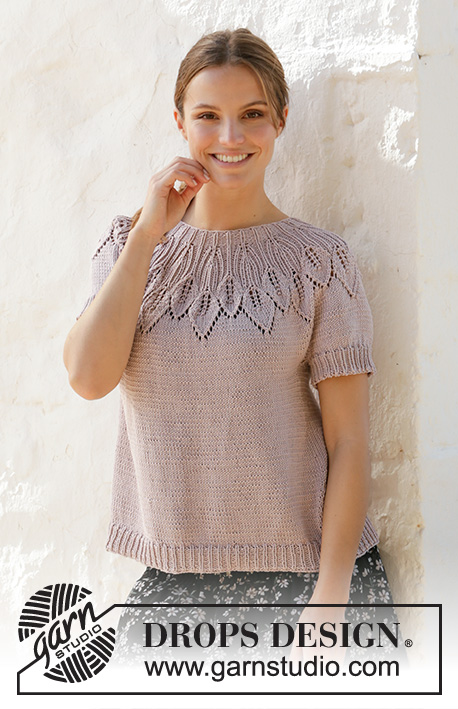
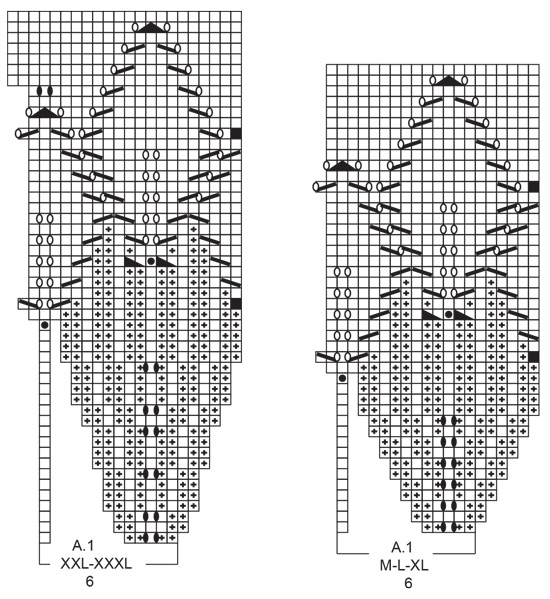
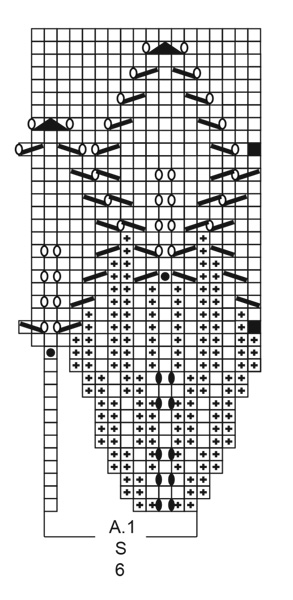
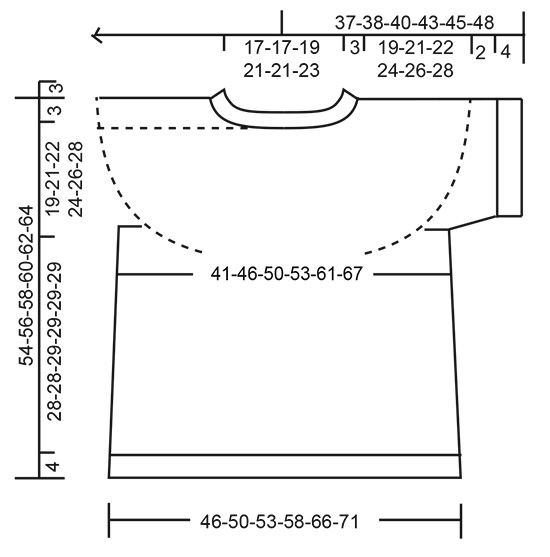
Top tricotado de cima para baixo em DROPS Muskat, com encaixe arredondado, ponto de folhas e ponto rendado. Do S ao XXXL.
DROPS 213-22 |
|||||||||||||||||||||||||||||||
|
------------------------------------------------------- TÉCNICAS USADAS: ------------------------------------------------------- PONTO FANTASIA: Ver diagrama A.1. Ver diagrama indicado para cada tamanho. AUMENTOS (lados top): Tricotar até restarem 2 malhas antes do fio marcador, fazer 1 laçada, tricotar 4 malhas meia (o fio marcador fica entre estas 4 malhas) fazer 1 laçada. Na carreira seguinte, tricotar as laçadas torcidas em meia para evitar buracos. Tricotar então as novas malhas em ponto meia. DIMINUIÇÕES (mangas): Diminuir 1 malha de cada lado do fio marcador da seguinte maneira: Tricotar até restarem 3 malhas antes do fio marcador, tricotar 2 malhas juntamente em meia, 2 malhas meia (o fio marcador fica entre estas 2 malhas), deslizar 1 malha em meia, 1 malha meia e passar a malha deslizada por cima da malha tricotada. DICA PARA ARREMATAR: Para evitar que as malhas arrematadas fiquem demasiado apertadas, pode-se arrematar com uma agulha um tamanho acima. Se as malhas arrematadas continuarem apertadas, fazer 1 laçada depois de cerca de cada 4.ª malha e arrematar as laçadas como malhas normais. ------------------------------------------------------- A PEÇA COMEÇA AQUI: ------------------------------------------------------- TOP – SUMÁRIO DA PEÇA: A gola e o encaixe tricotam-se de cima para baixo, em redondo na agulha circular, a partir do meio das costas. Divide-se o encaixe para as costas/a frente e as orlas das mangas e continua-se as costas/a frente em redondo na agulha circular. As orlas das mangas tricotam-se em redondo com as agulhas de pontas duplas, de cima para baixo. GOLA: Montar 96-96-102-114-114-120 malhas com a agulha circular 3 mm em Muskat. Tricotar 1 volta meia. Tricotar em canelado (= 2 malhas liga / 1 malha meia). Quando a peça medir 3 cm, continuar com a agulha circular 4 mm. Colocar 1 marcador no princípio da carreira, a meio das costas; vai-se medir o encaixe a partir deste marcador! ENCAIXE: Tricotar A.1 (= 6 malhas) em redondo em todas as malhas (= 16-16-17-19-19-20 vezes em largura). MANTER A MESMA TENSÃO DA INDICADA PARA A AMOSTRA! Quando A.1 tiver sido tricotado 1 vez em altura, temos 288-320-340-380-418-440 malhas e a peça mede cerca de 14-16-16-16-18-18 cm a partir do marcador. Tricotar em redondo, em meia, até a peça medir 19-21-22-24-26-28 cm a partir do marcador. Dividir, então, a peça para as costas/a frente e as mangas da seguinte maneira: Tricotar as 40-45-49-53-60-65 primeiras malhas (= metade das costas), colocar as 63-69-72-84-89-90 malhas seguintes em espera num fio para a orla da manga e montar 6-6-6-6-8-10 novas malhas sob a manga, tricotar as 81-91-98-106-120-130 malhas seguintes (= frente), colocar as 63-69-72-84-89-90 malhas seguintes em espera num fio para a orla da manga e montar 6-6-6-6-8-10 novas malhas sob a manga, tricotar as 41-46-49-53-60-65 últimas malhas (= metade das costas). COSTAS & FRENTE: = 174-194-208-224-256-280 malhas. Colocar 1 fio marcador a meio das 6-6-6-6-8-10 malhas sob cada manga (= lados do top). Temos 87-97-104-112-128-140 malhas entre os fios para a frente e as costas. Fazer seguir os fios à medida que for tricotando; vão servir para marcar os aumentos dos lados. Tricotar em meia. Quando a peça medir 4 cm a partir da separação, aumentar 1 malha de cada lado dos 2 fios marcadores – ver AUMENTOS (= aumenta-se 4 malhas). Aumentar desta maneira 5-4-4-5-5-5 vezes ao todo a cada 4 cm = 194-210-224-244-276-300 malhas. Quando a peça medir 28-28-29-29-29-29 cm a partir da separação, aumentar 13-12-13-14-15-15 malhas a intervalos regulares = 207-222-237-258-291-315 malhas. Mudar para a agulha circular 3 mm em canelado (= 1 malha meia / 2 malhas liga) durante 4 cm. Arrematar em meia – ver DICA PARA ARREMATAR. A peça medir 32-32-33-33-33-33 cm a partir da separação. ORLA DAS MANGAS: Retomar as 63-69-72-84-89-90 malhas em espera num dos lados da peça para as agulhas de pontas duplas 4 mm e levantar 1 malha em cada uma das 6-6-6-6-8-10 malhas montadas sob a manga = 69-75-78-90-97-100 malhas. Tricotar em ponto meia em redondo durante 2 cm. Continuar com as agulhas de pontas duplas 3 mm em canelado (= 1 malha meia / 2 malhas liga) diminuindo AO MESMO TEMPO, na primeira carreira, 0-0-0-0-1-1 malha = 69-75-78-90-96-99 malhas. Arrematar quando o canelado medir 4 cm, tricotando as malhas meia em meia e as malhas liga em liga. Tricotar a orla da outra manga da mesma maneira. |
|||||||||||||||||||||||||||||||
Explicações do diagrama |
|||||||||||||||||||||||||||||||
|
|||||||||||||||||||||||||||||||
 |
|||||||||||||||||||||||||||||||
 |
|||||||||||||||||||||||||||||||
 |
|||||||||||||||||||||||||||||||
Terminou este projecto?Então, identifique as suas fotos com as tags #dropspattern #lavendercharmtop ou mostre-as na galeria #dropsfan. Precisa de ajuda para este modelo?Encontrará 28 turotiais em vídeo, uma rubrica Comentários/Perguntas e muito mais ao visitar a página do modelo em www.garnstudio.com © 1982-2026 DROPS Design A/S. Todos os direitos reservados. Este documento, incluuindo as suas su-secções, tem copyrights. Saia mais o que pode fazer com os nossos modelos no fim de cada uma das páginas do nosso site. |
|||||||||||||||||||||||||||||||


Com mais de 40 anos no design de modelos de tricô e de croché, a DROPS Design oferece uma das mais vastas colecções demodelos gratuitos na Internet - traduzidos em 17 línguas. Neste dia de hoje, temos 324 catálogos e 12290 modelos - dos quais 12271 estão traduzidos em português.
Trabalhamos com muito empenho para lhe proporcionar o melhor que o tricô e o croché têm para oferecer, para lhe fornecer inspiração e conselhos bem como fios da mais elevada qualidade a preços incríveis! Gostaria de usar os nossos modelos para outros fins que não uso pessoal? Pode ler o que lhe é permitido fazer no Copyright texto que se encontra na parte de baixo de todos os nossos modelos. Bom tricô! Bom croché!
Deixe um comentário acerca do modelo DROPS 213-22
Gostaríamos muito de saber o que tem a dizer-nos acerca deste modelo!
Se deixar uma pergunta acerca do modelo, certifique-se de que escolhe a categoria adequada no formulário abaixo para acelerar o processo relativo à resposta. Os campos obrigatórios estão assinalados com um *.