
Categorias populares
Procura um fio?


Comentários / Perguntas (13)
![]() Alessandra escreveu:
Alessandra escreveu:
Buongiorno, mi servirebbe aiuto per la 4º riga del collo. Devo procedere in questo modo: Rovescio, yarn over, passo una maglia, rovescio, rovescio? In questo caso come lavoro lo yarn over della riga precedente? Nella didascalia dice di lavorarlo ritorto… Non devo fare un dritto, giusto? Perché in quel caso non potrei poi fare i due rovesci dello schema. Spero di essermi spiegata. Grazie!☺️
26.01.2025 - 22:15DROPS Design respondeu:
Buonasera Alessandra, deve lavorarlo a ritorto come indicato. Buon lavoro!
13.02.2025 - 23:21
![]() Simone escreveu:
Simone escreveu:
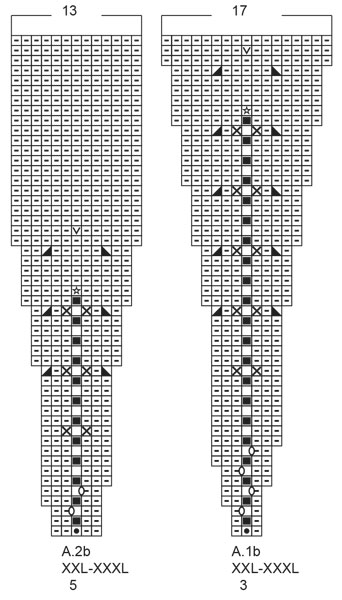
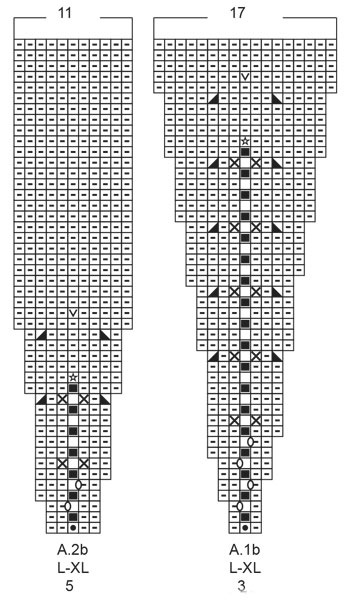
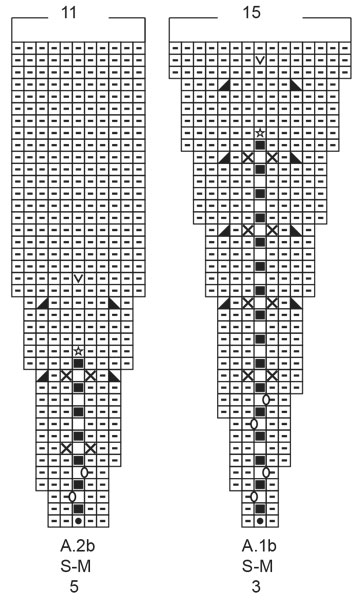
Hello, knitting another of your wonderful patterns.. September story but already I am stuck, Could you please explain the start of the yoke - Work A.1b over A.1a and A.2b over A.2a I don't understand how to proceed ? Work A/1b then A.1a then A.2b then A.2a or something else ? Many thanks again for your guidance
26.03.2023 - 21:54DROPS Design respondeu:
Hi Simone, The stitches you have worked in A.1a will now be worked according to diagram A.1b and the same applies to the stitches in A.2a, now worked according to diagram A.2b (no longer work A.1a or A.2a). Happy knitting!
27.03.2023 - 06:54
![]() Megan escreveu:
Megan escreveu:
Third row of A.1b and A.2b: after knitting yarn over and slip stitch together, making one yarn over, am I supposed to purl three times before knitting the next yarn over and slip stitch together? But there are only two stitches from the previous row for me to purl? Thank you,
01.10.2022 - 19:47DROPS Design respondeu:
Dear Megan, A.1b and A.2b are worked next to each other and repeated the whole row. Between the yarn over in A.1b and the yarn over in A.2b there are 3 purl stitches (1 from A.1b and 2 from A.2b). Happy knitting!
03.10.2022 - 00:57
![]() Megan escreveu:
Megan escreveu:
Thank you for your answering. If I yarn over once, slip a stitch to the right needle, I will have one more stitch for this row than what is shown in the diagram. Should I purl the next two stitches together then?
28.09.2022 - 16:37DROPS Design respondeu:
Dear Mega, the yarn over worked over the slipped stitch doesn't count as 1 stitch, both yarn overs + slipped stitch will count as 1 stitch in English rib; on the next round, you will knit the yarn over + the slipped stitch together as 1 stitch in English rib. This video shows how to work a pattern with such stitches, it might help you. Happy knitting!
29.09.2022 - 08:17
![]() Megan escreveu:
Megan escreveu:
This is a follow up question to my previous question about “make 1 yarn over and slip the stitch onto the right needle as if to purl (= English rib stitch)” in second row of A.1b and A.2b. In the answer to this question, “slip 1 stitch onto the right needle as if to purl, purl 1 and repeat,” what does “slip one stitch” mean? Does it mean a yarn over?
27.09.2022 - 16:24DROPS Design respondeu:
Hi Megan, Slipping a stitch means transferring it from the left needle to the right without working it. Slipping as if to purl means you insert the right needle from right to left when transferring it. Happy knitting!
28.09.2022 - 07:10
![]() Megan escreveu:
Megan escreveu:
“make 1 yarn over and slip the stitch onto the right needle as if to purl (= English rib stitch)” in second row of A.1b and A.2b, do you slip the stitch on the left needle onto the right needle and purl the next two stitches together? Thank you.
27.09.2022 - 06:54DROPS Design respondeu:
Hi Megan, In A.1b row 2 you purl 1, slip 1 stitch onto the right needle as if to purl, purl 1 and repeat. In A.2b you purl 2, slip 1 stitch onto the right needle as if to purl, purl 2 and repeat. Happy knitting!
27.09.2022 - 07:25
![]() Megan escreveu:
Megan escreveu:
If I use long tail cast on method, which creates both a cast-on and the first row, do I still need to knit one round? "Insert 1 marker at the beginning of the round mid back" What does "mid back" mean? Does it mean this marker will be in the middle of the back? Thank you.
22.09.2022 - 05:43DROPS Design respondeu:
Dear Megan, this knit row is worked before starting ribbing edge, just decide if you want it or rather start with rib. And correct, the rounds start /the marker is on the middle of back piece. Happy knitting!
22.09.2022 - 09:59
![]() Mary Culbertson escreveu:
Mary Culbertson escreveu:
I am stuck on how to proceed with yoke. Have been studying videos and charts and am confused. This is my first sweater other than simple baby sweaters. I love the look but haven't worked with charts.
02.01.2022 - 03:01DROPS Design respondeu:
Dear Mary, can you please tell us, exactly what confuses you? So we might be able to help you better. Thank you. Happy Stitching!
03.01.2022 - 02:05
![]() Kim Stellinga escreveu:
Kim Stellinga escreveu:
Ik heb de trui gebreid (s) in drops Alaska. Hij is mooi, maar wanneer de pas 20 cm meet ga je over in tricotsteek. Dit maakt dat de overgang ribbel/tricot halverwege de borst valt. Dit vind ik niet zo mooi omdat die rand best dik is. Het zou mooier zijn als je na 25 cm de overgang maakt. Dan valt hij onder de borst. Bij jullie model is zo te zien de overgang ook niet na 20 cm gebreid, want bij haar valt het ook onder de borst. Dit zou naar mijn idee moeten worden aangepast in het patroon.
13.10.2021 - 23:49
![]() Christel Poeter escreveu:
Christel Poeter escreveu:
Die Anleitung will ich in Groesse M stricken Halsausschnitt 1 Reihe re. stricken u.dann 1a u.2a über alle Maschen strichen das verstehe ich nicht 1a sind 3 Ma. u.2a 5Ma. nur rechte u. linke Ma.?Danke für die Hilfe
08.05.2020 - 22:36DROPS Design respondeu:
Liebe Frau Poeter, so sollen Sie stricken: *die 3 Maschen von A.1a, die 5 Maschen von A.2a*, diese 8 Maschen wiederholen Sie bis zur Ende der Runde, insgesamt 10 Mal = über alle 80 Maschen. Hier lesen Sie mehr über Diagramme. Viel Spaß beim stricken!
11.05.2020 - 08:37
|
|||||||||||||||||||||||||||||||
September Story Sweater#septemberstorysweater |
|||||||||||||||||||||||||||||||
 |
 |
||||||||||||||||||||||||||||||
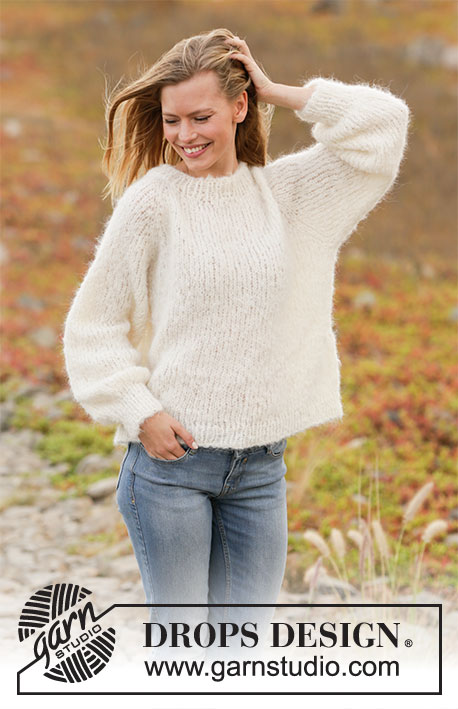
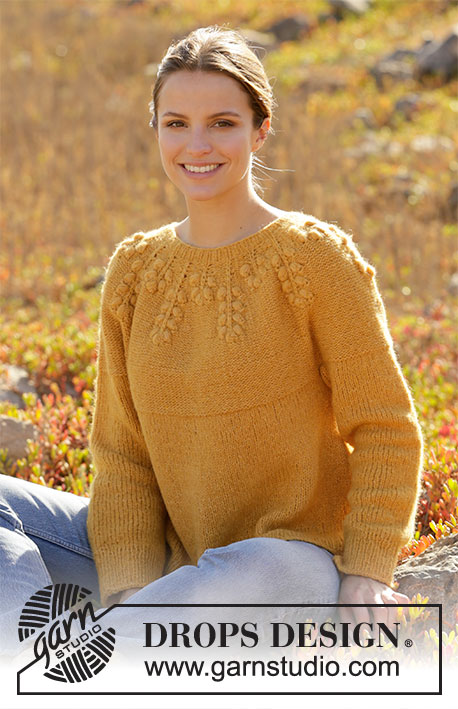
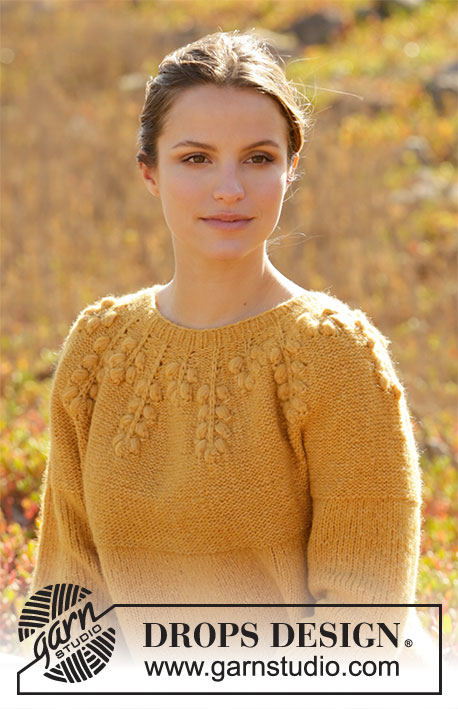
Pulôver tricotado de cima para baixo, com encaixe arredondado e borbotos em DROPS Air. Do S ao XXXL.
DROPS 213-25 |
|||||||||||||||||||||||||||||||
|
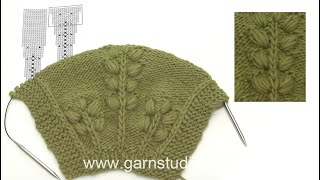
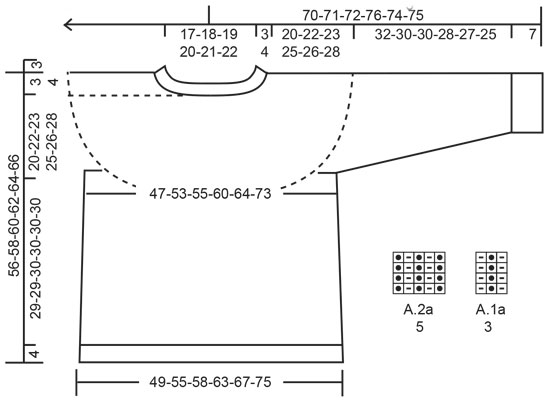
------------------------------------------------------ TÉCNICAS USADAS: ------------------------------------------------------- PONTO FANTASIA: Ver os diagramas A.1 e A.2. Ver diagrama indicado para cada tamanho. AUMENTOS (lados costas/frente): Tricotar até restarem 2 malhas antes do fio marcador, fazer 1 laçada, 4 malhas meia (o fio marcador fica entre estas 4 malhas) fazer 1 laçada (= aumenta-se 2 malhas). Na carreira seguinte, tricotar as laçadas torcidas para evitar buracos. As novas malhas tricotam-se em meia. DIMINUIÇÕES (mangas): Diminuir 1 malha de cada lado do fio marcador da seguinte maneira: Tricotar até restarem 3 malhas antes do fio marcador, tricotar 2 malhas juntamente em meia, 2 malhas meia (o fio marcador fica entre estas 2 malhas), deslizar 1 malha em meia, 1 malha meia e passar a malha deslizada por cima da malha tricotada (= diminui-se 2 malhas). DICA PARA ARREMATAR: Para evitar que as malhas arrematadas fiquem demasiado apertadas, pode-se arrematar com uma agulha um tamanho acima. Se as malhas arrematadas continuarem apertadas, fazer 1 laçada depois de cerca de cada 4.ª malha e arrematar as laçadas como malhas normais. ------------------------------------------------------- A PEÇA COMEÇA AQUI: ------------------------------------------------------- PULÔVER – SUMÁRIO DA PEÇA: Tricota-se de cima para baixo, em redondo na agulha circular, a partir do meio das costas. As mangas tricotam-se em redondo com as agulhas de pontas duplas, de cima para baixo. GOLA: Montar 72-80-80-88-88-96 malhas com a agulha circular 4,5 mm em Air. Tricotar 1 volta meia. Tricotar então *A.1a (= 3 malhas), A.2a (= 5 malhas)*, repetir de * a * em todas as malhas (= 9-10-10-11-11-12 vezes em largura) Quando a peça medir 3-3-3-3-4-4 cm continuar com a agulha circular 5,5 mm. Colocar 1 marcador no princípio da carreira a meio das costas; medir o encaixe a partir deste marcador! ENCAIXE: Tricotar A.1b por cima de A.1a e A.2b por cima de A.2a. MANTER A MESMA TENSÃO DA INDICADA PARA A AMOSTRA! Quando A.1b e A.2b tiverem sido tricotados 1 vez em altura, temos 234-260-280-308-330-360 malhas. Tricotar em liga até a peça medir 20-22-23-25-26-28 cm a partir do marcador. Dividir, então, o encaixe para as costas/a frente e as mangas da seguinte maneira: Tricotar 34-39-41-45-48-55 malhas meia, colocar as 48-52-58-64-68-70 malhas seguintes em espera num fio para a manga, montar 6 malhas (= lado, sob a manga), tricotar 69-78-82-90-97-110 malhas meia (= frente), colocar as 48-52-58-64-68-70 malhas seguintes em espera num fio para a manga, montar 6 malhas (= lado, sob a manga) e tricotar as 35-39-41-45-49-55 últimas malhas em meia. Terminar as costas/a frente e as mangas separadamente. MEDIR A PEÇA A PARTIR DAQUI! COSTAS & FRENTE: = 150-168-176-192-206-232 malhas. Colocar 1 fio marcador a meio das 6 malhas montadas sob cada manga. Temos 75-84-88-96-103-116 malhas para as costas e para a frente; fazer seguir os fios marcadores, servem para marcar os aumentos dos lados. Tricotar em meia, em redondo. Quando a peça medir 6 cm a partir da separação, aumentar 1 malha de cada lado dos 2 fios marcadores – ver AUMENTOS (= aumenta-se 4 malhas). Repetir estes aumentos quando a peça medir 16 cm = 158-176-184-200-214-240 malhas. Quando a peça medir 29-29-30-30-30-30 cm a partir da separação, continuar com a agulha circular 4,5 mm em canelado (= 1 malha meia, 1 malha liga). Arrematar em meia quando o canelado medir 4 cm – Ver DICA PARA ARREMATAR. MANGAS: Retomar as 48-52-58-64-68-70 malhas em espera num dos lados da peça para a pequena agulha circular 5,5 mm e levantar 1 malha em cada uma das 6 malhas montadas sob a manga = 54-58-64-70-74-76 malhas. Colocar um fio marcador a meio das 6 malhas sob a manga. Fazer seguir o fio marcador - vai servir para marcar as diminuições sob a manga. Começar no fio marcador e tricotar em meia em redondo. Quando a manga medir 3 cm a partir da separação, diminuir 2 malhas a meio sob a manga – ver DIMINUIÇÕES. Diminuir desta maneira 5-7-9-11-12-12 vezes ao todo a cada 6-3-2½-2-1½-1½ cm = 44-44-46-48-50-52 malhas. Continuar até este que a manga medir 32-30-30-28-27-25 cm a partir da separação, (falta ainda tricotar cerca de 7 cm antes do fim; pode-se experimentar o pulôver e tricotar até ao comprimento desejado). Continuar com as agulhas de pontas duplas 4 mm,5 em canelado (= 1 malha meia, 1 malha liga). Arrematar quando o canelado medir 7 cm. A manga mede cerca de 39-37-37-35-34-32 cm a partir da separação. Tricotar a outra manga da mesma maneira. |
|||||||||||||||||||||||||||||||
Explicações do diagrama |
|||||||||||||||||||||||||||||||
|
|||||||||||||||||||||||||||||||
 |
|||||||||||||||||||||||||||||||
 |
|||||||||||||||||||||||||||||||
 |
|||||||||||||||||||||||||||||||
 |
|||||||||||||||||||||||||||||||
Terminou este projecto?Então, identifique as suas fotos com as tags #dropspattern #septemberstorysweater ou mostre-as na galeria #dropsfan. Precisa de ajuda para este modelo?Encontrará 26 turotiais em vídeo, uma rubrica Comentários/Perguntas e muito mais ao visitar a página do modelo em www.garnstudio.com © 1982-2026 DROPS Design A/S. Todos os direitos reservados. Este documento, incluuindo as suas su-secções, tem copyrights. Saia mais o que pode fazer com os nossos modelos no fim de cada uma das páginas do nosso site. |
|||||||||||||||||||||||||||||||


Com mais de 40 anos no design de modelos de tricô e de croché, a DROPS Design oferece uma das mais vastas colecções demodelos gratuitos na Internet - traduzidos em 17 línguas. Neste dia de hoje, temos 324 catálogos e 12290 modelos - dos quais 12271 estão traduzidos em português.
Trabalhamos com muito empenho para lhe proporcionar o melhor que o tricô e o croché têm para oferecer, para lhe fornecer inspiração e conselhos bem como fios da mais elevada qualidade a preços incríveis! Gostaria de usar os nossos modelos para outros fins que não uso pessoal? Pode ler o que lhe é permitido fazer no Copyright texto que se encontra na parte de baixo de todos os nossos modelos. Bom tricô! Bom croché!
Deixe um comentário acerca do modelo DROPS 213-25
Gostaríamos muito de saber o que tem a dizer-nos acerca deste modelo!
Se deixar uma pergunta acerca do modelo, certifique-se de que escolhe a categoria adequada no formulário abaixo para acelerar o processo relativo à resposta. Os campos obrigatórios estão assinalados com um *.