
Categorias populares
Procura um fio?


Comentários / Perguntas (93)
![]() Sandrine escreveu:
Sandrine escreveu:
Bonjour, faut il couper le fil à chaque changement de couleur ou les faire suivre le long du tricot ? Merci
26.04.2025 - 17:50DROPS Design respondeu:
Bonjour Sandrine, vous pouvez faire suivre les fils au fur et à mesure et/ou les couper si les rayures sont trop hautes, cf vidéo. Bon tricot!
28.04.2025 - 08:05
![]() Sophie escreveu:
Sophie escreveu:
Bonjour, Je souhaite faire ce pull d'une seule couleur. Combien de pelotes dois-je prévoir? Merci d'avance
06.04.2025 - 14:42DROPS Design respondeu:
Bonjour Sophie, comme ce modèle a été tricoté avec des rayures, nous n'avons que les quantités nécessaires pour chaque couleur - et nous n'avons plus ce modèle. Vous pouvez additionner la totalité des couleurs, vous en aurez probablement besoin d'un peu moins - vous pouvez vous inspirer d'un modèle similaire en Melody (pensez à bien vérifier la tension et les mesures correspondantes) - votre magasin pourra également vous aider si besoin, même par mail ou téléphone. Bon tricot!
07.04.2025 - 08:45
![]() Marie escreveu:
Marie escreveu:
Hey, Wenn ich jeweils nur eine Runde einer Farbe stricke und dann zu einer neuen Farbe wechsele entsteht ein „Loch“ bzw. eine Spalte am Rundennanfang. Wie kann ich das vermeiden? Gibt es hierzu ein Video? Vielen Dank! :)
15.03.2025 - 21:15DROPS Design respondeu:
Liebe Marie, in diesem Video zeigen wir, wie man Streifen in Runden ohne Stufe stricken kann Viel Spaß beim Stricken!
17.03.2025 - 08:29
![]() Petra escreveu:
Petra escreveu:
Hallo Ist das Modell auch zum Stricken für Anfänger geeignet? Woran erkenne ich auf der HP den Schweregrad der Modelle?
26.02.2025 - 15:38DROPS Design respondeu:
Liebe Petra, lesen Sie die ganze Anleitung, sollten Sie Fragen haben, dann können Sie sie gerne hier stellen, wir werden uns dann bemühen, Ihnen zu helfen. Viel Spaß beim Stricken!
26.02.2025 - 18:01
![]() Patricia escreveu:
Patricia escreveu:
Bonjour, je ne comprends pas : placer les 12-14-14-16-16-18 mailles centrales en attente sur un fil pour l'encolure et terminer chaque épaule séparément. Rabattre ensuite les mailles tous les rangs à partir de l'encolure: 1 fois 2 mailles et 2 fois 1 maille = 19-20-23-24-27-30 mailles pour l'épaule. On rabat les mailles centrales, après avoir tricoté les épaules et comment? Je fais la taille M. merci
03.12.2024 - 23:55DROPS Design respondeu:
Bonjour Patricia, pour que l'encolure devant soit suffisamment souple, on ne rabat pas les mailles centrales pour l'encolure mais on les met en attente, et on termine chaque épaule séparément en rabattant 1 x 2 m et 2 x 1 m côté encolure (début de rang sur l'endroit pour le devant droit/début de rang sur l'envers pour le devant gauche). Bon tricot!
04.12.2024 - 07:46
![]() Monica Kugelberg escreveu:
Monica Kugelberg escreveu:
Vore bra om diagrammen vore lite större. Inte lätt att se vilken färg som markeringar avser.
02.12.2024 - 15:50
![]() Lucia Bandirali escreveu:
Lucia Bandirali escreveu:
Se volessi farlo di 1 solo colore, tg xs, quanto filato servirebbe, grazie
02.12.2024 - 15:33DROPS Design respondeu:
Buonasera Lucia, per un'assistenza così personalizzata, può rivolgersi al suo rivenditore DROPS di fiducia. Buon lavoro!
03.12.2024 - 22:42
![]() Patricia escreveu:
Patricia escreveu:
Bonjour, que signifie "Continuer en rabattant 1 maille au rang suivant à partir de l'encolure = 19-20-23-24-27-30 mailles. Continuer en jersey jusqu'à ce que l'ouvrage mesure 54-56-58-60-62-64 cm (= 18-19-20-21-22-23 cm depuis la maille rabattue de chaque côté pour les emmanchures), rabattre. " Comment passe t'on de 23 à 20 mailles pour la taille M par exemple? je ne comprends ça ni "de chaque côté" Merci
02.12.2024 - 01:24DROPS Design respondeu:
Bonjour Patricia, vous avez 68 m pour le dos en taille M, vous rabattez les 20 m centrales = vous avez 24 mailles pour chaque épaule. Au début du rang suivant à partir de l'encolure (en début de rang sur l'endroit pour l'épaule gauche/ en début de rang sur l'envers pour l'épaule droite), vous rabattez 1 maille = il reste 23 mailles. Vous tricotez jusqu'à ce que l'ouvrage mesure 58 cm = soit 20 cm depuis les mailles rabattues pour les emmanchures (à 38 cm). Bon tricot!
02.12.2024 - 10:49
![]() Ute Kruth escreveu:
Ute Kruth escreveu:
Kann ich die Wolle für dieses Modell bei Ihnrn bestellen?
06.11.2024 - 13:54DROPS Design respondeu:
Liebe Frau Kruth, sicher, schauen Sie mal bei der Farbkarte und klicken Sie auf "Bestellen" so sehen Sie die Liste von den Läden, die Melody online verkaufen, dann wählen Sie Ihr Laden und klicken auf "Bestellen" rechts von der Name. Viel Spaß beim Stricken!
06.11.2024 - 16:08
![]() Anna Wiberg escreveu:
Anna Wiberg escreveu:
Hej! Använder jag alltså rundstickor nr 9, 40 cm till ärmar och 60 cm till kroppen? Strumpstickor nr 8 till resår ärmar? Vad använder jag till resår halsringning? Strumpstickor nr 8 eller rundsticka nr 8? Vilken längd i så fall på rundsticka? Vad använder jag till resår nederkant? Rundsticka nr 8?vilken längd? Mvh Anna
08.10.2024 - 21:41DROPS Design respondeu:
Hej Anna. Du använder kort rundsticka och strumpstickor till ärmar och halsringning( strumpstickor när rundstickan blir för lång). Lång rundsticka används till kroppen. Mvh DROPS Design
14.10.2024 - 11:13
|
|||||||||||||||||||
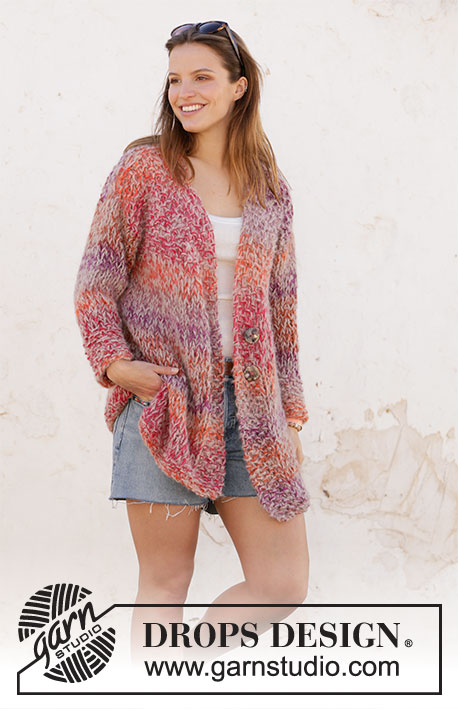
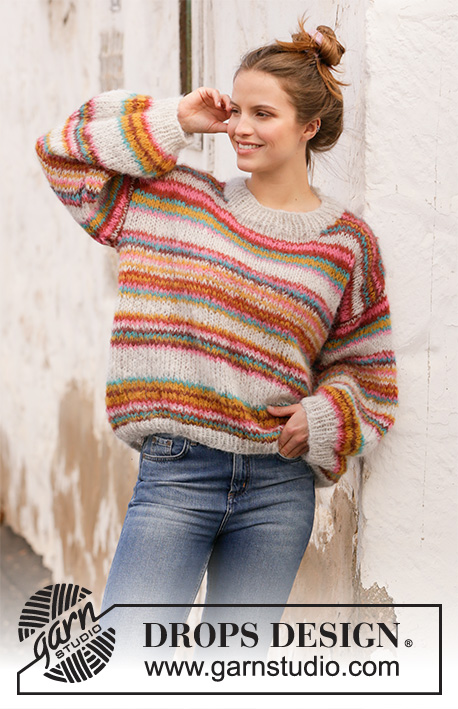
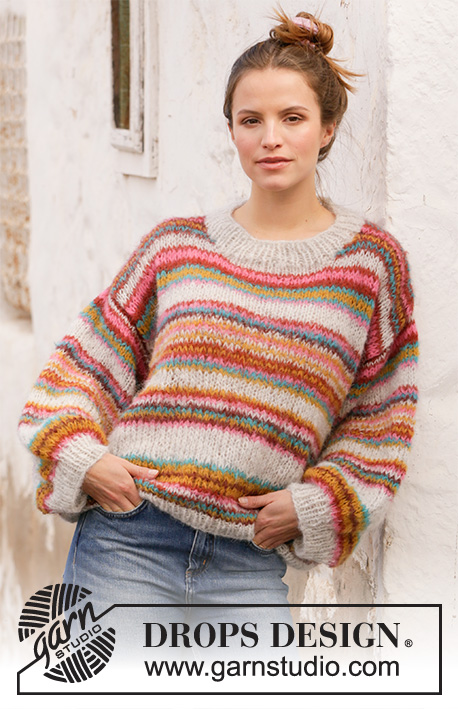
Moroccan Market Muse#moroccanmarketmusesweater |
|||||||||||||||||||
 |
 |
||||||||||||||||||
Pulôver tricotado com das riscas em DROPS Melody. Do XS ao XXL.
DROPS 212-20 |
|||||||||||||||||||
|
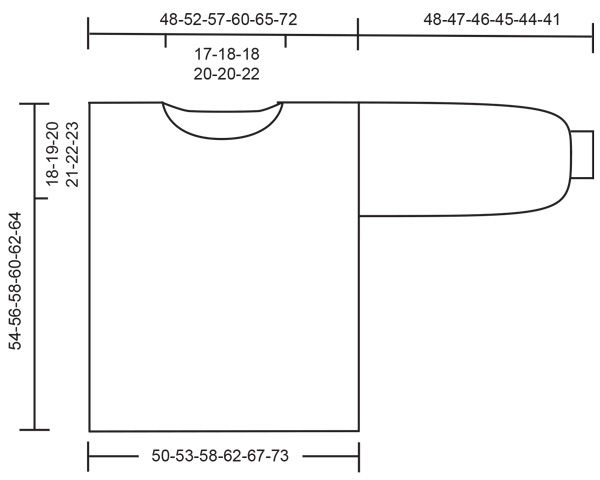
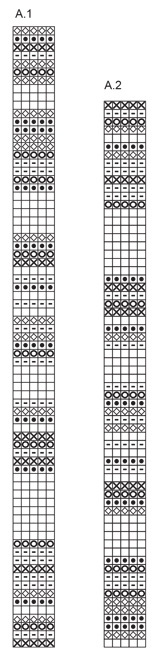
------------------------------------------------------- TÉCNICAS USADAS: ------------------------------------------------------- PONTO FANTASIA: Ver os diagramas A.1 e A.2. Repetir A.1 em altura até ao fim. AUMENTOS: Para aumentar, fazer 1 laçada de cada lado do fio marcador + 1 malha de cada lado da peça. Na carreira seguinte, tricotar as laçadas torcidas para evitar buracos. DIMINUIÇÕES (a intervalos regulares): Para calcular quando aumentar a intervalos regulares, contar o número total de malhas (por ex. 50 malhas) e dividi-lo pelo número de aumentos a fazer (por ex. 20) = 2.5. Neste exemplo, vai-se tricotar juntamente em meia alternadamente cada 1.ª e 2.ª malha e cada 2.ª e 3.ª malha. ------------------------------------------------------- A PEÇA COMEÇA AQUI: ------------------------------------------------------- PULÔVER – SUMÁRIO DA PEÇA: As costas/a frente tricotam-se em redondo na agulha circular, de baixo para cima. Divide-se a peça nas cavas e termina-se cada parte separadamente em idas e voltas. As mangas tricotam-se em redondo com as agulhas de pontas duplas/a pequena agulha circular, de cima para baixo. COSTAS & FRENTE: Montar 120-128-140-148-160-176 malhas com a agulha circular 8 mm em cinza pérola e tricotar 1 volta meia. Continuar em canelado da seguinte maneira: *1 malha meia / 1 malha liga*, repetir de * a * durante 4 cm. Mudar para a agulha circular 9 mm e continuar em ponto meia às riscas seguindo A.1 até ao fim. MANTER A MESMA TENSÃO DA INDICADA PARA A AMOSTRA! Quando a peça medir 36-37-38-39-40-41 cm, tricotar a carreira seguinte da seguinte maneira: Arrematar 1 malha, tricotar 58-62-68-72-78-86 malhas, arrematar 2 malhas, tricotar 58-62-68-72-78-86 malhas e arrematar 1 malha. Terminar, então, cada parte separadamente, em idas e voltas. Colocar as 58-62-68-72-78-86 primeiras malhas em espera num fio e tricotar as 58-62-68-72-78-86 malhas das costas. COSTAS: = 58-62-68-72-78-86 malhas. Continuar em ponto meia às riscas. Quando a peça medir 52-54-56-58-60-62 cm, arrematar as 18-20-20-22-22-24 malhas centrais para o decote e terminar cada ombro separadamente. Continuar, arrematando 1 malha na carreira seguinte a partir do decote = 19-20-23-24-27-30 malhas. Continuar em ponto meia até a peça medir 54-56-58-60-62-64 cm (= 18-19-20-21-22-23 cm a partir da malha arrematada de cada lado da peça para as cavas) e arrematar. Tricotar o outro ombro da mesma maneira. FRENTE: = 58-62-68-72-78-86 malhas. Continuar em ponto meia às riscas. Quando a peça medir 47-49-51-53-55-57 cm, colocar as 12-14-14-16-16-18 malhas centrais em espera num fio para o decote e terminar cada ombro separadamente. Arrematar então as malhas em todas as carreiras a partir do decote: 1 vez 2 malhas e 2 vezes 1 malha = 19-20-23-24-27-30 malhas para o ombro. Continuar em ponto meia até a peça medir 54-56-58-60-62-64 cm (= 18-19-20-21-22-23 cm a partir das malhas arrematadas medido em 1 malha de cada lado da peça para as cavas) e arrematar. Tricotar o outro ombro da mesma maneira. MONTAGEM: Costurar os ombros. MANGAS: As mangas tricotam-se com as agulhas de pontas duplas/a pequena agulha circular, de cima para baixo. Levantar 44-46-48-50-52-54 malhas à volta das cavas, na alça mais exterior das malhas, com a agulha circular 9 mm em tijolo – começar na divisão entre as costas e a frente e levantar 22-23-24-25-26-27 malhas até à costura do ombro e levantar 22-23-24-25-26-27 malhas a partir do ombro até à divisão. Colocar 1 fio marcador a meio sob a manga. Tricotar em ponto meia seguindo A.2. Quando a peça medir 30-29-28-27-26-23 cm, aumentar 1 malha de cada lado do fio marcador – ver AUMENTOS. Aumentar desta maneira 3 vezes ao todo a cada 5 cm para todos os tamanhos = 50-52-54-56-58-60 malhas. Continuar em ponto meia e A.2 até a peça medir 44-43-42-41-40-37 cm. Terminar, então, a manga em cinza pérola. Tricotar 1 volta meia diminuindo 20-22-20-22-20-22 malhas a intervalos regulares = 30-30-34-34-38-38 malhas. Continuar com as agulhas de pontas duplas 8 mm em canelado (1 malha meia / 1 malha liga) durante 4 cm. Arrematar as malhas como elas se apresentam quando a manga medir 48-47-46-45-44-41 cm. Tricotar a outra manga da mesma maneira. GOLA: Começando pelo direito, levantar em cinza pérola 60-80 malhas com a pequena agulha circular 8 mm (incluindo as malhas em espera – o número de malhas deve ser múltiplo de 2). Tricotar em canelado (1 malha meia / 1 malha liga) durante 4 cm. Arrematar as malhas como elas se apresentam. |
|||||||||||||||||||
Explicações do diagrama |
|||||||||||||||||||
|
|||||||||||||||||||
 |
|||||||||||||||||||
 |
|||||||||||||||||||
Terminou este projecto?Então, identifique as suas fotos com as tags #dropspattern #moroccanmarketmusesweater ou mostre-as na galeria #dropsfan. Precisa de ajuda para este modelo?Encontrará 23 turotiais em vídeo, uma rubrica Comentários/Perguntas e muito mais ao visitar a página do modelo em www.garnstudio.com © 1982-2026 DROPS Design A/S. Todos os direitos reservados. Este documento, incluuindo as suas su-secções, tem copyrights. Saia mais o que pode fazer com os nossos modelos no fim de cada uma das páginas do nosso site. |
|||||||||||||||||||


Com mais de 40 anos no design de modelos de tricô e de croché, a DROPS Design oferece uma das mais vastas colecções demodelos gratuitos na Internet - traduzidos em 17 línguas. Neste dia de hoje, temos 324 catálogos e 12290 modelos - dos quais 12271 estão traduzidos em português.
Trabalhamos com muito empenho para lhe proporcionar o melhor que o tricô e o croché têm para oferecer, para lhe fornecer inspiração e conselhos bem como fios da mais elevada qualidade a preços incríveis! Gostaria de usar os nossos modelos para outros fins que não uso pessoal? Pode ler o que lhe é permitido fazer no Copyright texto que se encontra na parte de baixo de todos os nossos modelos. Bom tricô! Bom croché!
Deixe um comentário acerca do modelo DROPS 212-20
Gostaríamos muito de saber o que tem a dizer-nos acerca deste modelo!
Se deixar uma pergunta acerca do modelo, certifique-se de que escolhe a categoria adequada no formulário abaixo para acelerar o processo relativo à resposta. Os campos obrigatórios estão assinalados com um *.