
Categorias populares
Procura um fio?


Comentários / Perguntas (32)
![]() Renie escreveu:
Renie escreveu:
3. At the beginning it should also say that the back piece is only knitted in stocking stitch (that's why there are less stitches than for the front piece with the special). 4. At the beginning of "Front Piece" please say that the cable stitch pattern A.2 requires more stitches (so you prevent another possible confusion). 5. The description of the first round re.: the front piece (when A.2 cable pattern begins) should be directly placed under "Front Piece", it only belongs there.
16.12.2018 - 09:07
![]() Renie escreveu:
Renie escreveu:
2. I understand why those quite simple ribs are being made an extra pattern "A.1". But by placing it directly under the main pattern A.2 without a certain note right by the pattern (NOT only in the text, the description) that A.1 is only to be knitted for 6 cm whereas A.2 is to be repeated until the respective piece ends (at the shoulders), this seems to confuse, obviously. Additionally, what about a small space between A.1 and A.2 for better optics? -> 3.
16.12.2018 - 08:43
![]() Renie escreveu:
Renie escreveu:
Hi Drops-Team, this is such an easy pattern, but you are complicating it. 1. At the beginning, it says "Knit up stitches around the armhole for sleeves and continue working IN THE ROUND with double pointed needles down the sleeve." Later, and in your answers, you say "The sleeve are worked BACK AND FORTH, top down." (By the way, it must say "sleeveS" - plural). -> 2.
16.12.2018 - 08:33
![]() Boize escreveu:
Boize escreveu:
I have the same problem, it seems that 34 sts makes a sleeve too narrow
09.12.2018 - 18:13DROPS Design respondeu:
Dear Mrs Boize, if your tension is right (9 sts = 10 cm in width), the 34 sts should measure 38 cm = 19 cm when folded double as shown in measurement chart. Happy knitting!
10.12.2018 - 10:42Marcia Miller escreveu:
I am confused about the sleeve. It seems that 35 stitches for size small is not nearly big enough for the armhole. Are we picking up the stitches from the body of the sweater or knitting the sleeve separately and then setting it into the armhole?
07.12.2018 - 21:45DROPS Design respondeu:
Hi Marcia! The sleeves are worked back and forth, top down. If knitting tension is right, 36 stitches is 40 cm. Should be enough for armhole. You can always pick a few more. Happy knitting!
09.12.2018 - 19:20
![]() Emmanouela Evanggelatou escreveu:
Emmanouela Evanggelatou escreveu:
THAT I WANT TO UNDERSTAND.. BEFORE I WAS WORKING in A.2 AND AT THE BEGGINING THE RIB IN A.1. SO YOU ARE TELLING ME TO CHANGE AND WORK THE SHOULDERS IN A.1 (KNIT 2 PURL 2 ..) AS THE RIB. IS THAT CORRECT?
08.11.2018 - 15:10DROPS Design respondeu:
Dear Mrs Evanggelatou, there might have been a typo in the previous answer - you will work the sts on each shoulder as before : on back piece: all sts will be worked in stocking stitch, and on front piece: either P or K as before in A.2 - there might be a typo in the pattern, our Design team will check this. Happy knitting!
08.11.2018 - 15:49Emmanouela Evanggelatou escreveu:
Hello again , i can't understand that.." Each shoulder is now finished separately. Continue with ...... in the same way." That paragraphe concernes the shoulders? and I knit them also in A1 as the rib? please explain me this paragr. for the front piece. Thank you!
07.11.2018 - 20:59DROPS Design respondeu:
Hi Emmanouela, After you have placed the middle stitches on a thread for the neck, you continue working one shoulder only, with knit and purl over the remaining stitches in A.1 as before. Decrease for the neck as described and continue working until this shoulder is finished. Then work the other shoulder in the same way. Happy knitting!
08.11.2018 - 08:24Emmanouela Evanggelatou escreveu:
Hello , i would like some help conserning the armholes...."Cast off the first 2-2-2-2-2-3 stitches on the round, work the next 49-53-57-61-65-69 stitches as before (= front piece), cast off the next 4-4-4-4-4-6 stitches, work until there are 2-2-2-2-2-3 stitches left, cast off these stitches. Cut the strand. ".... Please explain me this paragraphe. I cast off 2 stitches for each armhole or 1 stitche for each? and how i continue to cast off ?
04.11.2018 - 01:16DROPS Design respondeu:
Dear Mrs Evanggelatou, on this round in the first 5 sts you start casting off 2 sts at the beg of round, work the next 49-53-57-61-65 sts as before, cast off the next 4 sts for armhole, work the next sts as before until 2 sts remain before end of round (= before the first 2 sts cast off at the beg of the round) and cast off these last 2 sts, cut the yarn = there are now 4 sts cast off for each armhole on each side. You finish now each part separately joining the yarn at the beg of back piece first. Happy knitting!
05.11.2018 - 09:22
![]() Geke escreveu:
Geke escreveu:
Kunt u me uitleggen hoe ik 0-0-0-0-1 steek tricotsteek moet breien? Ik begrijp het niet.
04.10.2018 - 06:45
![]() Geke escreveu:
Geke escreveu:
Ik begrijp niet wat 0-0-0-0-0-1 steek tricot betekent. Kunt u me dat uitleggen?
02.10.2018 - 19:57DROPS Design respondeu:
Dag Geke, In maat S brei je 0 steken in tricot, in maat M 0 steken enz. De getallen staan in volgorde van de maten en je hoeft dus alleen maar in de grootste maat een steek in tricotsteek te breien.
04.10.2018 - 11:59
|
|||||||||||||
Cozy Weekend#cozyweekendsweater |
|||||||||||||
 |
 |
||||||||||||
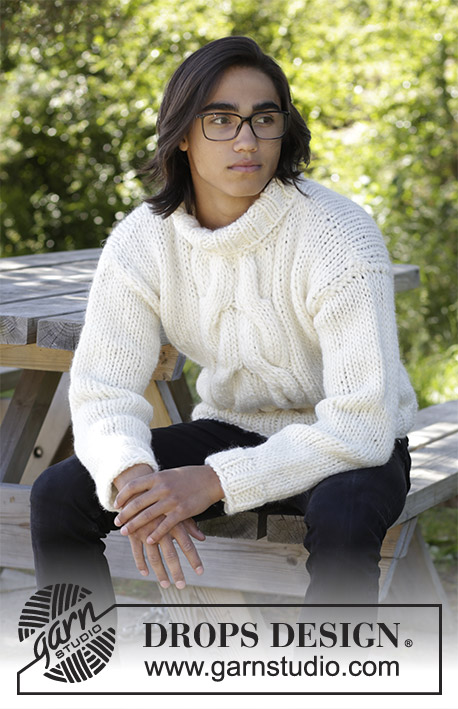
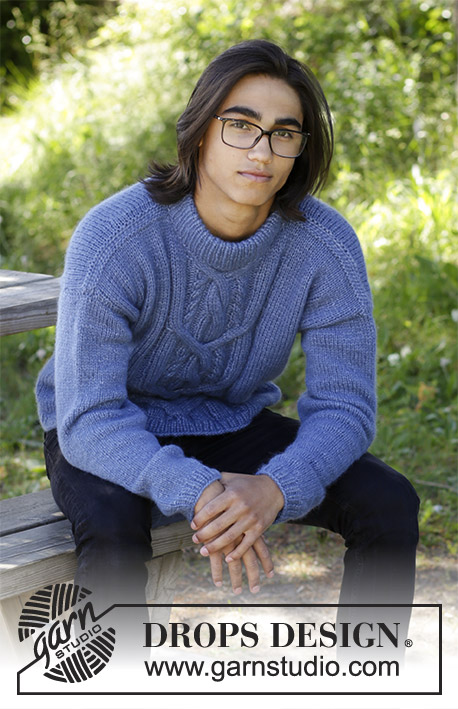
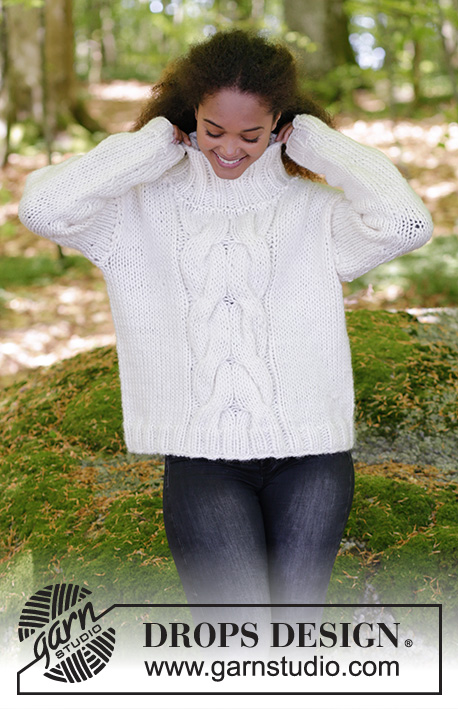
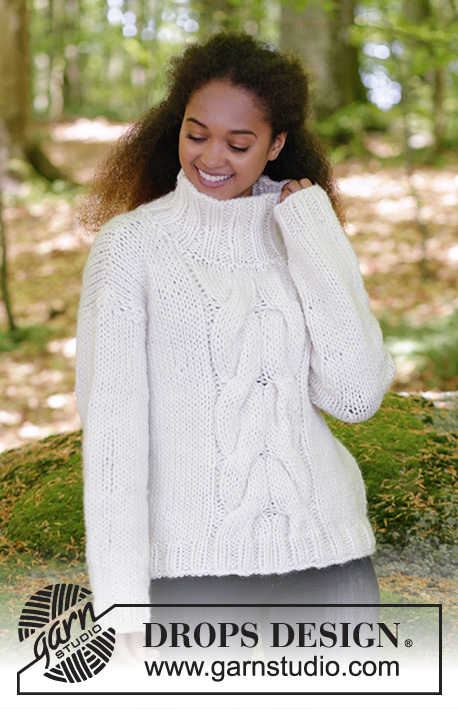
Pulôver com torcidos e gola alta. Do S ao XXXL. Tricota-se em DROPS Snow.
DROPS 181-13 |
|||||||||||||
|
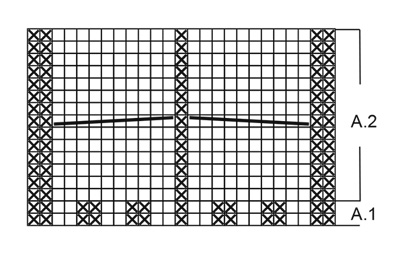
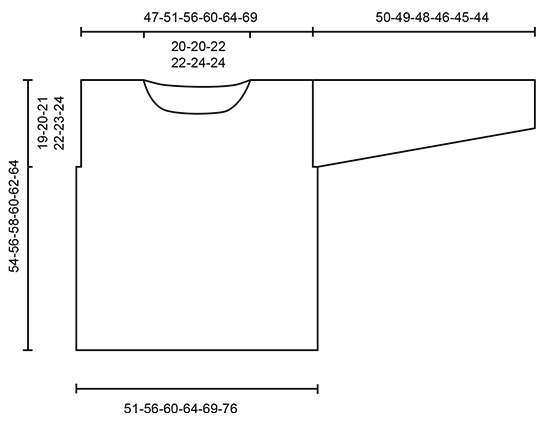
----------------------------------------------------------- TÉCNICAS USADAS: PONTO FANTASIA: Ver os diagramas A.1 e A.2. O diagrama mostra todas as carreiras do ponto fantasia, vistas pelo direito. ---------------------------------------------------------- PULÔVER: O pulôver tricota-se em redondo na agulha circular, de cima para baixo. Dividir a peça nas cavas e terminar as costas e a frente separadamente em idas e voltas. Levantar as malhas das mangas à volta das cavas e continuar em idas e voltas com as agulhas de pontas duplas, de cima para baixo. A gola tricota-se em redondo com a pequena agulha circular. COSTAS & FRENTE: Montar 99-107-115-123-131-143 malhas com a agulha circular 9 mm em Snow. Tricotar 1 volta meia, depois em canelado consoante cada tamanho da seguinte maneira: Tamanhos S-L- XXL-XXXL: *2 malhas meia, 2 malhas liga*, tricotar de * a * por cima das 12-16-20-24 primeiras malhas, 2 malhas meia, A.1 (= 25 malhas), *2 malhas meia, 2 malhas liga* por cima das 60-72-84-92 últimas malhas. Tamanhos M-XL: * 2 malhas liga, 2 malhas meia*, tricotar de * a * por cima das 16-20 primeiras malhas, A.1 (= 25 malhas), *2 malhas meia, 2 malhas liga*, tricotar de * a * por cima das 64-76 malhas seguintes e terminar com 2 malhas meia. TODOS OS TAMANHOS: Continuar em canelado desta maneira até a peça medir 6 cm. Mudar para a agulha circular 10 mm. Tricotar 0-0-0-0-0-1 malha em ponto meia. A carreira começa, então, aqui. Colocar 1 fio marcador (a carreira está, agora, inclinada 0-0-0-0-0-1 malha). Tricotar a carreira seguinte da seguinte maneira: Tricotar as 14-16-18-20-22-25 primeiras malhas em ponto meia, A.2 (= 25 malhas) por cima de A.1, em ponto meia por cima das 14-16-18-20-22-25 malhas seguintes, colocar 1 fio marcador (= frente), tricotar em ponto meia por cima das 46-50-54-58-62-68 últimas malhas. Continuar desta maneira. MANTER A MESMA TENSÃO DA INDICADA PARA A AMOSTRA! Quando a peça medir 35-36-37-38-39-40 cm, arrematar para as cavas na carreira seguinte da seguinte maneira (ajustar a altura para que a carreira seguinte seja a 1.ª-3.ª-5.ª-7.ª-9.ª-11.ª ou a 13.ª carreira de A.2): Arrematar as 2-2-2-2-2-3 primeiras malhas do princípio da carreira, tricotar as 49-53-57-61-65-69 malhas seguintes como antes (= frente), arrematar as 4-4-4-4-4-6 malhas seguintes, tricotar até restarem 2-2-2-2-2-3 malhas, arrematar estas malhas. Cortar o fio. Terminar , então, cada parte separadamente. COSTAS: = 42-46-50-54-58-62 malhas. Continuar em ponto meia em todas as malhas (a 1.ª carreira tricota-se pelo avesso). Quando a peça medir 17-18-19-20-21-22 cm a partir das malhas arrematadas para as cavas (a peça mede 52-54-56-58-60-62 cm de altura total), arrematar as 16-16-18-18-20-20 malhas centrais para o decote e terminar cada ombro separadamente = 13-15-16-18-19-21 malhas para cada ombro. Continuar em ponto meia e diminuir 1 malha na carreira seguinte a partir do decote = restam 12-14-15-17-18-20 malhas para o ombro. Continuar até a peça medir 19-20-21-22-23-24 cm a partir das malhas arrematadas para as cavas (a peça mede 54-56-58-60-62-64 cm de altura total). Arrematar. Tricotar o outro ombro da mesma maneira. FRENTE: = 49-53-57-61-65-69 malhas. Continuar até a peça medir 48-50-50-52-52-54 cm (a 1.ª carreira tricota-se pelo avesso). Colocar, então, as malhas do decote em espera num fio da seguinte maneira: Tricotar 16-18-19-21-22-24 malhas como antes, tricotar as 17-17-19-19-21-21 malhas seguintes como antes diminuindo 7 malhas a intervalos regulares, e colocá-las em espera num fio (= 10-10-12-12-14-14 malhas em o fio), tricotar as 16-18-19-21-22-24 últimas malhas como antes. Terminar, então, cada ombro separadamente. Continuar a tricotar as restantes malhas de A.2 como elas se apresentam, e arrematar para o decote no princípio de cada carreira a partir do decote: 1 vez 2 malhas e 2 vezes 1 malha = restam 12-14-15-17-18-20 malhas para o ombro. Continuar até a peça medir 54-56-58-60-62-64 cm - ajustar a altura pelas costas. Arrematar. Tricotar o outro ombro da mesma maneira. MONTAGEM: Fazer a costura dos ombros na técnica de grafting. MANGAS: Tricotam-se de cima para baixo, em idas e voltas. Levantar 34-36-38-40-42-44 malhas a 1 malha/carreira do rebordo ao longo da cava com a agulha circular 10 mm em Snow. Tricotar em ponto meia. Quando a peça medir 4 cm, diminuir 1 malha de cada lado do fio marcador (= diminui-se 2 malhas). Diminuir desta maneira 5-6-7-6-7-8 vezes ao todo a cada 9-7-5-6-5-4 cm = 24-24-24-28-28-28 malhas. Quando a peça medir 45-44-43-41-40-39 cm, continuar com a agulha circular 9 mm em canelado (= 2 malhas meia/ 2 malhas liga). Quando a manga medir 50-49-48-46-45-44 cm, retomar a agulha circular 10 mm e arrematar todas as malhas em meia. GOLA: Tricota-se em redondo. Levantar 56-56-60-60-64-64 malhas à volta do decote (incluindo as malhas em espera) com a pequena agulha circular 9 mm em Snow. Tricotar 1 volta liga e 1 volta meia, depois, continuar em canelado (= 2 malhas meia/ 2 malhas liga) durante 12 cm. Arrematar FROUXAMENTE as malhas como elas se apresentam. MONTAGEM : Costurar as mangas na alça mais exterior das malhas ourela. |
|||||||||||||
Explicações do diagrama |
|||||||||||||
|
|||||||||||||
 |
|||||||||||||
 |
|||||||||||||
Terminou este projecto?Então, identifique as suas fotos com as tags #dropspattern #cozyweekendsweater ou mostre-as na galeria #dropsfan. Precisa de ajuda para este modelo?Encontrará 22 turotiais em vídeo, uma rubrica Comentários/Perguntas e muito mais ao visitar a página do modelo em www.garnstudio.com © 1982-2026 DROPS Design A/S. Todos os direitos reservados. Este documento, incluuindo as suas su-secções, tem copyrights. Saia mais o que pode fazer com os nossos modelos no fim de cada uma das páginas do nosso site. |
|||||||||||||


Com mais de 40 anos no design de modelos de tricô e de croché, a DROPS Design oferece uma das mais vastas colecções demodelos gratuitos na Internet - traduzidos em 17 línguas. Neste dia de hoje, temos 324 catálogos e 12290 modelos - dos quais 12271 estão traduzidos em português.
Trabalhamos com muito empenho para lhe proporcionar o melhor que o tricô e o croché têm para oferecer, para lhe fornecer inspiração e conselhos bem como fios da mais elevada qualidade a preços incríveis! Gostaria de usar os nossos modelos para outros fins que não uso pessoal? Pode ler o que lhe é permitido fazer no Copyright texto que se encontra na parte de baixo de todos os nossos modelos. Bom tricô! Bom croché!
Deixe um comentário acerca do modelo DROPS 181-13
Gostaríamos muito de saber o que tem a dizer-nos acerca deste modelo!
Se deixar uma pergunta acerca do modelo, certifique-se de que escolhe a categoria adequada no formulário abaixo para acelerar o processo relativo à resposta. Os campos obrigatórios estão assinalados com um *.