
Categorias populares
Procura um fio?


Comentários / Perguntas (27)
![]() Viola escreveu:
Viola escreveu:
Hallo, ich würde diese Jacke für ein neunjähriges Mädchen stricken. Es gibt nicht zufällig diese Anleitung für die Größe XXS oder XS? Viele Grüße
03.04.2018 - 21:17DROPS Design respondeu:
Liebe Frau Viola, dieses Modell gibt es nur in Damen-Größe. Viel Spaß beim stricken!
04.04.2018 - 08:54
![]() Holly Hensel Kinsella escreveu:
Holly Hensel Kinsella escreveu:
When not working the A-1 pattern or the front band garter do you knit on your purls and purl on your knits on the opposite sides? After you set up the pattern it just says to continue the pattern upwards and I find this confusing? Exp. on the 25 knit stitches on either side do you purl these on the wrong side? And the 2 purls between the patterns do you knit these on the wrong sides? Thank you!
12.03.2018 - 21:30DROPS Design respondeu:
Dear Mrs Kinsella, from WS you work in garter st the sts in garter st and K over K and P over P and diagram as shown on WS row in diagram. Happy knitting!
13.03.2018 - 09:30
![]() Barbara escreveu:
Barbara escreveu:
Guten Tag, ich wollte mir diese Anleitung ausdrucken, aber es hat leider NICHT funktioniert, nur die Seiten 1 - 3 sind ausdruckbar, das Lochmuster und die Skizze für die Maße kann ich nicht ausdrucken, können Sie mir bitte weiterhelfen? Grüße Barbara
24.02.2018 - 18:41DROPS Design respondeu:
Liebe Barbara, die Settings Ihrer Drücker sollen Sie vielleicht mal prüfen, damit alle Seiten gedrückt werden. Viel Spaß beim stricken!
26.02.2018 - 08:09
![]() Fran Miller escreveu:
Fran Miller escreveu:
I am assembling the piece and working on the neck and so there is no decreasing at all. I want to know if I should knit the stitches off of the thread and then pick up stitches around the rest of the neck and then knit the final 15 stitches that are on the thread.
15.01.2018 - 17:28DROPS Design respondeu:
Dear Mrs Miller, correct, you will knit the sts from thread back on needle and knit up sts around whole neckline, beg on one shoulder or on mid back. Happy knitting!
16.01.2018 - 09:03
![]() Fran Miller escreveu:
Fran Miller escreveu:
I still have a question about the stitches on the thread. Since they are at the beginning of each side, there are no stitches that have been worked previously. If I slip the first 15 on the right needle and then join a yarn to work the others of the neck on to the needle, the last 15 are on the thread. If I just slip them on, then my yarn would be in the middle of a row. If I knit them on, then the first 15 have not been knitted but the last 15 have! Please clarify as I am very confused.
15.01.2018 - 15:04DROPS Design respondeu:
Dear Mrs Miller, for neck you will work first 15 sts from RS then slip them on a st holder (so that you don't have to cut the yarn), work to the end of row. Turn and work return row. At the beg from next row from RS beg to dec for neck. Happy knitting!
15.01.2018 - 15:54
![]() Fran Miller escreveu:
Fran Miller escreveu:
I am assembling my sweater and am on the neckline. How do I know up the stitches for the neckline, specifically the 15 stitches that are on the threads. Do I just slip them on the needle and then join yarn to get the other stitches on the needle or do I treat these stitches like bound off stitches and pull thread through them. I have tried finding a video but can't find any.
15.01.2018 - 02:02DROPS Design respondeu:
Hi Fran, Slip the stitches on the thread onto the right needle when you have knitted up the other stitches as far as the front and then work them too. Then carry on knitting up stitches on the other side of the thread stitches. I hope this helps and happy knitting!
15.01.2018 - 06:18
![]() Sabina escreveu:
Sabina escreveu:
Hi.can you please explain in detail the sleeve cap and the 3 stitches cast off on each side-does that mean you cast off while on wrong side and right side? Thanks
17.12.2017 - 09:24DROPS Design respondeu:
Hi Sabina, Yes, you cast off at the beginning of each row, so the one will be RS the other WS. Happy knitting!
18.12.2017 - 06:21
![]() Fran Miller escreveu:
Fran Miller escreveu:
I have another question about the front piece. On the right front piece, if you put the first 15 stitches on the thread, the yarn from your knitting is with it. So do you attach new yarn to do the stitches after that so you can begin the bind off? Likewise on the left side, do you work from the wrong side and take the 15 stitches off at the beginning or do you work from the right side and slip them to the thread at the end? Again what happens to that yarn if done in the beginning?
18.11.2017 - 23:52DROPS Design respondeu:
Dear Mrs Miller, when slipping the first 15 sts from RS on right front piece, work them first to avoid cutting the yarn. On left front piece, leave the last 15 sts from RS unworked and turn. This way you won't have to cut yarn and join it on next row. Happy knitting!
20.11.2017 - 09:21
![]() Fran Miller escreveu:
Fran Miller escreveu:
I still have a question about the right front piece. After you put the 15 stitches on the thread, what happens to them. I don't see anything in the directions. Also when it says"bind off for the neck at the beginning of the row from the neck " does this mean after the stitches that are on the thread? I would think so in order to have the 18 stitches for the shoulder.
18.11.2017 - 01:13DROPS Design respondeu:
Hi Fran, The 15 stitches on the thread are worked when you get to Neck, The new stitches that you bind off are, as you say, the ones next to the stitches on the thread so you shape the neck up to the shoulders. Happy knitting!
18.11.2017 - 07:07
![]() Fran Miller escreveu:
Fran Miller escreveu:
I am starting this sweater and want clarification on the ribbing. Is the purl row just done for the first row? So knit 5, (knit 2,purl 2) to last 7 stitches, knit last 7 stitches is done every row?
24.10.2017 - 22:19DROPS Design respondeu:
Dear Mrs Miller, you will K every row the first 5 sts and the last 5 sts on row, all remaining sts between these will be worked K2/P2, ie from RS you will finish with K7 and from WS you will start with K5 (= front band), then work K over K and P over P for the rib, and finish with K5 (= front band). Happy knitting!
25.10.2017 - 08:44
|
||||||||||||||||
Lotus Jacket#lotusjacket |
||||||||||||||||
 |
 |
|||||||||||||||
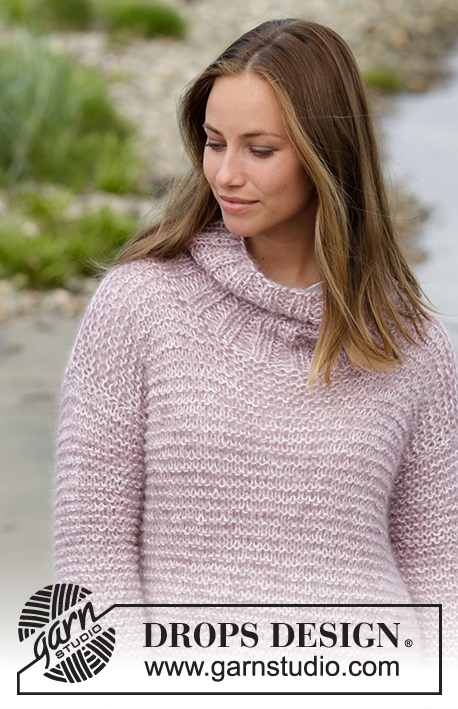
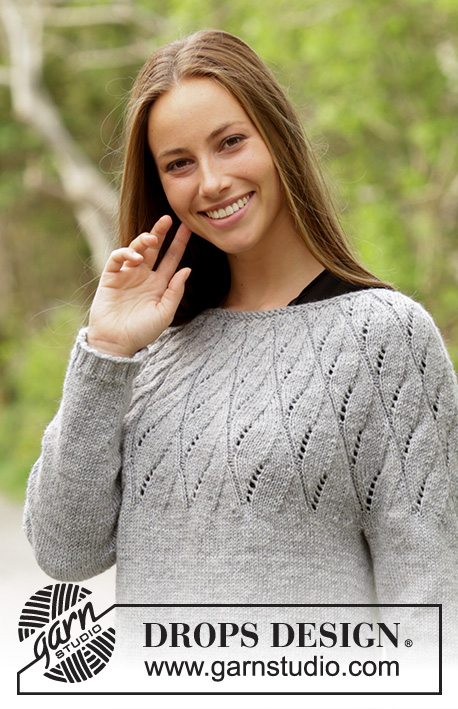
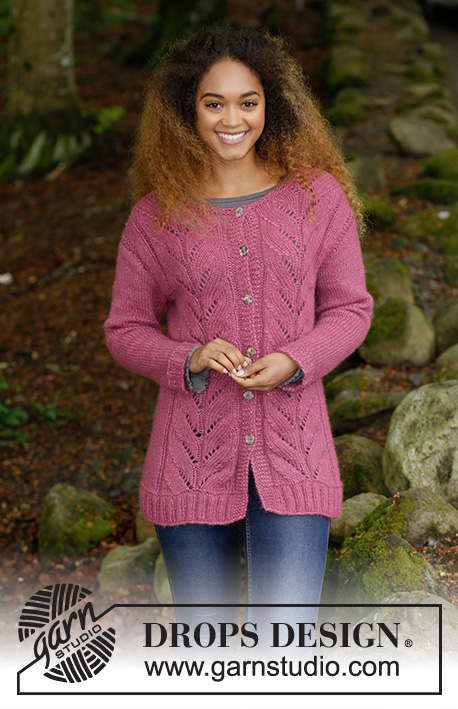
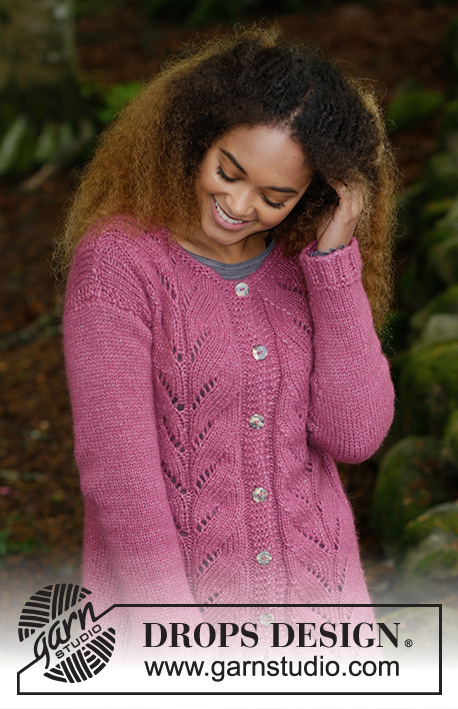
Casaco com ponto rendado e canelado. Do S ao XXXL. Tricota-se em DROPS Air.
DROPS 179-18 |
||||||||||||||||
|
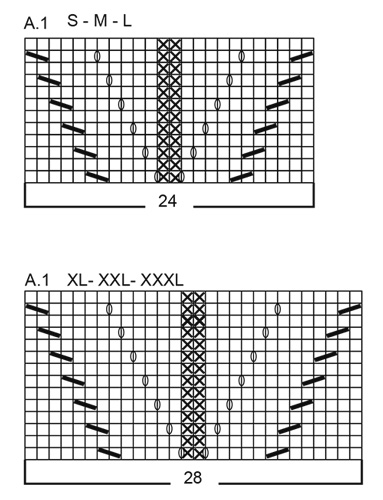
---------------------------------------------------------- TÉCNICAS USADAS: PONTO JARRETEIRA (em redondo): 1 barra jarreteira = 2 carreiras. Tricotar 1 volta meia e 1 volta liga. PONTO JARRETEIRA (em idas e voltas): 1 barra jarreteira = Tricotar 2 carreiras meia. PONTO FANTASIA: Ver diagrama A.1. O diagrama mostra todas as carreiras do ponto fantasia, vistas pelo direito. Ver diagrama indicado para cada tamanho. DIMINUIÇÕES (lados): Começando 3 malhas antes do fio marcador no lado, tricotar 2 malhas juntamente em meia, 2 malhas meia (o fio marcador fica entre estas 2 malhas), deslizar 1 malha em meia, 1 malha meia, passar a malha deslizada por cima da malha tricotada. AUMENTOS (meio sob a manga): Começando 1 malha antes do fio marcador, fazer 1 laçada, 2 malhas meia (o fio marcador fica entre estas 2 malhas), 1 laçada (= aumenta-se 2 malhas). Na carreira seguinte, tricotar as laçadas torcidas em meia para evitar buracos. CASAS: Fazer as casas na orla frente direita. 1 CASA = tricotar juntamente em meia a 3.ª e a 4.ª malha da orla e fazer 1 laçada. Na carreira seguinte, tricotar a laçada em meia = buraco. Fazer as casas quando a peça medir: S: 16, 25, 34, 43, 52 e 61 cm M: 16, 25, 34, 43, 53 e 63 cm L: 16, 25, 35, 45, 55 e 65 cm XL: 16, 24, 32, 40, 49, 58 e 67 cm XXL: 16, 24, 33, 42, 51, 60 e 69 cm XXXL: 16, 26, 35, 44, 53, 62 e 71 cm ---------------------------------------------------------- CASACO: Tricota-se em idas e voltas a partir do meio da frente, até às cavas. Terminar então as frentes e as costas separadamente, em idas e voltas na agulha circular. As mangas tricotam-se em redondo com as agulhas de pontas duplas/a pequena agulha circular. COSTAS & FRENTES: Montar 204-220-232-252-272-296 malhas com a agulha circular 5 mm em Air. Tricotar 1 carreira liga pelo avesso, depois, em canelado da seguinte maneira – pelo direito: 5 malhas em PONTO JARRETEIRA – ver acima -, *2 malhas meia / 2 malhas liga*, repetir de * a * até restarem 7 malhas e terminar com 2 malhas meia e 5 malhas em ponto jarreteira. Continuar em canelado até a peça medir 6 cm. Mudar para a agulha circular 6 mm e tricotar 1 barra jarreteira em todas as malhas, diminuindo, AO MESMO TEMPO, na 1.ª carreira da barra jarreteira 34-38-38-42-46-50 malhas a intervalos regulares = 170-182-194-210-226-246 malhas. Continuar desta maneira – pelo direito: 5 malhas em ponto jarreteira, 2 malhas liga, A.1 (= 24-24-24-28-28-28 malhas), 2 malhas liga, 25-31-37-37-45-55 malhas meia, 2 malhas liga, A.1, 2 malhas liga, A.1, 2 malhas liga, 25-31-37-37-45-55 malhas meia, 2 malhas liga, A.1, 2 malhas liga e 5 malhas em ponto jarreteira. Continuar desta maneira. MANTER A MESMA TENSÃO DA INDICADA PARA A AMOSTRA! Colocar 1 fio marcador de cada lado da peça, a 45-48-51-55-59-64 malhas do meio da frente (costas = 80-86-92-100-108-118 malhas entre os fios marcadores). Quando a peça medir 8 cm, diminuir 1 malha de cada lado dos fios marcadores dos lados = diminui-se 4 malhas, VER DIMINUIÇÕES! Diminuir 4 vezes ao todo a cada 12-12-13-13-14-14 cm = 154-166-178-194-210-230 malhas. AO MESMO TEMPO, quando a peça medir 16 cm, começar as CASAS – ver acima. Quando a peça medir 48-49-50-51-52-53 cm, tricotar em ponto jarreteira por cima das 14 malhas de cada lado da peça (= 7 malhas de cada lado dos fios marcadores). Depois destas 2 barras jarreteira por cima das malhas dos lados, tricotar a carreira seguinte da seguinte maneira – pelo direito: Tricotar 37-40-43-47-51-56 malhas, arrematar as 8 malhas seguintes para a cava (= 4 malhas de cada lado dos fios marcadores), tricotar 64-70-76-84-92-102 malhas, arrematar as 8 malhas seguintes para a cava, tricotar 37-40-43-47-51-56 malhas. Terminar , então, cada parte separadamente. COSTAS: = 64-70-76-84-92-102 malhas. Continuar como antes, as 3 malhas de cada lado da peça tricotam-se , então, em ponto jarreteira. Quando a peça medir 66-68-70-72-74-76 cm, arrematar para o decote as 26-26-28-28-30-30 malhas centrais e terminar cada ombro separadamente. Arrematar 1 malha na carreira seguinte a partir do decote = restam 18-21-23-27-30-35 malhas para o ombro. Continuar até a peça medir 68-70-72-74-76-78 cm (as malhas restantes de A.1 tricotam-se em ponto meia) e arrematar. Tricotar o outro ombro da mesma maneira. FRENTE DIREITA: = 37-40-43-47-51-56 malhas. Continuar como antes, as 3 malhas no lado da cava tricotam-se , então, em ponto jarreteira. NÃO ESQUECER AS CASAS. Continuar até a peça medir 62-64-66-68-70-72 cm. Colocar , então, em espera num fio as 15-15-16-16-17-17 primeiras malhas para o decote. Continuar como antes e arrematar para o decote no princípio de cada carreira a partir do decote: 1 vez 2 malhas e 2 vezes 1 malha = restam 18-21-23-27-30-35 malhas para o ombro. Continuar até a peça medir 68-70-72-74-76-78 cm (as malhas restantes de A.1 tricotam-se em ponto meia) e arrematar. Tricotar o outro ombro da mesma maneira. FRENTE ESQUERDA: Tricotar como se fez para a frente direita, mas em sentido contrário. MANGAS: Tricotam-se em redondo com as agulhas de pontas duplas/a agulha circular. Montar 40-40-44-48-52-52 malhas com as agulhas de pontas duplas 5 mm em Air. Tricotar 1 volta meia, depois, em canelado 2 malhas meia/ 2 malhas liga durante 5 cm. Continuar com as agulhas de pontas duplas 6 mm e tricotar 1 BARRA JARRETEIRA - ver acima -, diminuindo na primeira carreira da barra jarreteira 6-6-8-10-12-12 malhas a intervalos regulares = 34-34-36-38-40-40 malhas. Continuar em ponto meia. Colocar 1 fio marcador no princípio da carreira = meio sob a manga. Quando a peça medir 8-8-8-8-10-9 cm, aumentar 2 malhas a meio sob a manga – VER AUMENTOS. Aumentar desta maneira 12-13-14-14-15-16 vezes ao todo a cada 3½-3-2½-2½-2-2 cm = 58-60-64-66-70-72 malhas. Quando a peça medir 49-48-47-46-44-41 cm (mais curto nos tamanhos grandes, porque os ombros são mais largos), arrematar as 6 malhas a meio sob a manga e terminar o arredondado das mangas em idas e voltas na agulha circular. Tricotar em ponto meia e arrematar no princípio de cada carreira de cada lado da peça: 3 vezes 3 malhas = 34-36-40-42-46-48 malhas. A manga medir cerca de 52-51-50-48-47-44 cm. Arrematar as malhas restantes. Tricotar a outra manga da mesma maneira. MONTAGEM: Fazer a costura dos ombros. Montar as mangas. Costurar os botões na frente esquerda. GOLA: Levantar cerca de 80 - 100 malhas (incluindo as malhas em espera) com a agulha circular 5 mm em Air. Tricotar 2 barras jarreteira em idas e voltas e arrematar em meia pelo direito. |
||||||||||||||||
Explicações do diagrama |
||||||||||||||||
|
||||||||||||||||
 |
||||||||||||||||
 |
||||||||||||||||
Terminou este projecto?Então, identifique as suas fotos com as tags #dropspattern #lotusjacket ou mostre-as na galeria #dropsfan. Precisa de ajuda para este modelo?Encontrará 27 turotiais em vídeo, uma rubrica Comentários/Perguntas e muito mais ao visitar a página do modelo em www.garnstudio.com © 1982-2026 DROPS Design A/S. Todos os direitos reservados. Este documento, incluuindo as suas su-secções, tem copyrights. Saia mais o que pode fazer com os nossos modelos no fim de cada uma das páginas do nosso site. |
||||||||||||||||


Com mais de 40 anos no design de modelos de tricô e de croché, a DROPS Design oferece uma das mais vastas colecções demodelos gratuitos na Internet - traduzidos em 17 línguas. Neste dia de hoje, temos 324 catálogos e 12291 modelos - dos quais 12272 estão traduzidos em português.
Trabalhamos com muito empenho para lhe proporcionar o melhor que o tricô e o croché têm para oferecer, para lhe fornecer inspiração e conselhos bem como fios da mais elevada qualidade a preços incríveis! Gostaria de usar os nossos modelos para outros fins que não uso pessoal? Pode ler o que lhe é permitido fazer no Copyright texto que se encontra na parte de baixo de todos os nossos modelos. Bom tricô! Bom croché!
Deixe um comentário acerca do modelo DROPS 179-18
Gostaríamos muito de saber o que tem a dizer-nos acerca deste modelo!
Se deixar uma pergunta acerca do modelo, certifique-se de que escolhe a categoria adequada no formulário abaixo para acelerar o processo relativo à resposta. Os campos obrigatórios estão assinalados com um *.