
Categorias populares
Procura um fio?


Comentários / Perguntas (25)
![]() Hetty escreveu:
Hetty escreveu:
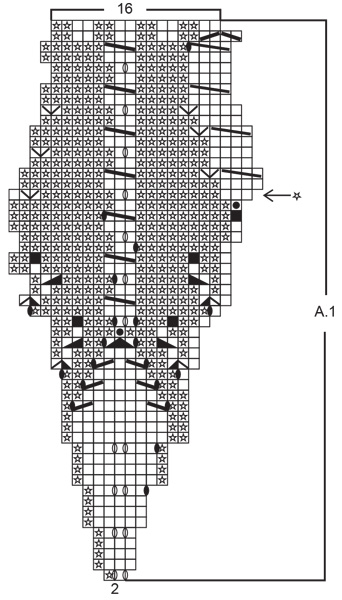
This mess concerning rows 36 and 37 is stressing me out. “The last stitch of the last report”?, “finish the round one stitch before”? Can you clarify what you mean please? How can I finish the row before the row is finished? What’s a report? Why didn’t you just alter the diagram? (I don’t know how you’d do that because I don’t understand what you’re trying to achieve).
26.04.2026 - 11:40DROPS Design respondeu:
Dear Hetty, "Report" is a typo; it should be repeat. That is, when you work the last repeat of A.1 in that round, finish one stitch before the end of the round and start with the first symbol in the next round. So the last repeat of A.1 in round 36 of the chart should be purl 2 together and then you start directly with the 4 knit stitches of the first repeat of A.1 in round 37. We don't alter the chart because the knit stitch isn't omitted in all other repeats of A.1 in that same round, only at the very last repeat. At the same time, the chart in round 37 will need 4 knit stitches at the start of every repeat of A.1 in that round. So the best way to skip this stitch is to add a note to round 36 to skip the last stitch. Happy knitting!
27.04.2026 - 02:09
![]() Hetty escreveu:
Hetty escreveu:
Is there an alternative method to starting this beret? I can not, even trying dozens of times, to do this magic circle. Yes, I have watched the video, No, it is not working for me. It goes too quickly. I am left-handed. I do not know how to crochet. I am not from Europe or Scandinavia so I do not knit in the same way. I would be happy to have the hole if it meant I could begin this hat.
23.04.2026 - 13:16DROPS Design respondeu:
Dear Hetty, you ca just cast on the 14 stitches onto 4 double pointed with your usual technique, at the very end of the beret, just thread the end through the cast on edge to tigthen/close hole. Happy knitting!
23.04.2026 - 16:15
![]() Asia escreveu:
Asia escreveu:
Dzień dobry, Przerobiłam okrążenie 20, które rozpoczyna się od narzutu. W okrążeniu 21 wg schematu trzeba najpierw przerobić oczko lewe a potem zrobić oczko przekręcone na prawo w narzucie.. tylko u mnie jest najpierw narzut a potem oczko lewe. Jak to rozwiązać? Pozdrawiam
12.03.2026 - 14:00DROPS Design respondeu:
Witaj Asiu, okrążenie 20 zaczyna się od 1 oczka prawego, a następnie jest narzut. Pozdrawiamy!
16.03.2026 - 16:58
![]() Claire escreveu:
Claire escreveu:
Row 20 starts with a Yarn over then row 21 starts with the symbol '/' plus 'split square' which the instructions say "slip 1 P on cable needle behind piece, K YO twisted (= not hole), P 1 from cable needle". As my first stitch is the yarn over how does this work? I'd have to slip the YO to the cable needle? Thanks!
27.04.2023 - 15:53DROPS Design respondeu:
Dear Claire, the 20th round starts with K1, Yarn over, so that you can work the cable as explained. Happy knitting!
27.04.2023 - 17:15
![]() Vanessa Bunton escreveu:
Vanessa Bunton escreveu:
I do not understand how the arrow code affects the working of row 37 and does this affect row 38. Thank you for your assistance
20.02.2023 - 19:29DROPS Design respondeu:
Dear Mrs Bunton, this round (with a star) starts with the last stitch from last repeat, then work digaram as shown and start next repeat with last stitch 1st repeat etc. Happy knitting!
21.02.2023 - 10:04
![]() Kornelia Plitschka escreveu:
Kornelia Plitschka escreveu:
Ich weiß nicht warum aber in der 27. Runde komme ich einfach nicht weiter an der Stelle wo man mit der zopfnadel das erste Mal arbeiten must. Ich würde ja sagen da hat sich in der strickschrieft ein Fehler eingeschlichen weil mir aufgefallen ist dass die Erwachsenen Mütze genau an diese Stelle anders geschrieben ist
22.01.2022 - 16:01DROPS Design respondeu:
Liebe Frau Plitschka, am Anfang der 27. Runde stricken Sie 1 Masche rechts (die 1. Masche A.1), dann die Zunahmen von vorrigen Runde + die nächste als Zopf (= 9. Symbol) und am Ende A.1 die letzte linke Masche + die Zunahmmen von vorrigen Runde als Zopf (= 10.Symbol) stricken. Viel Spaß beim stricken!
24.01.2022 - 10:52
![]() Sarah escreveu:
Sarah escreveu:
I'm having the same problem as everyone else with rows 36 & 37 -- there are 24 stitches in row 36 and then 23 stitches in row 37. It starts out well enough, but as I go around, the cable pattern gets more and more out of line, and the round ends in the middle of a repetition. Can you please direct me to a corrected pattern, or help me make sense of this discrepancy in stitches? Thanks.
25.01.2021 - 23:45DROPS Design respondeu:
Hi Sarah, sorry for late answer, diagram has now been edited. Happy knitting!
26.04.2021 - 14:04
![]() Ana-Carin Eby escreveu:
Ana-Carin Eby escreveu:
Varv 36 och 37 i A1 beredde mig mycket problem. Det finns en tidigare kommentar om att mönstret skulle rättas men det är inte gjort. Ökningen i sista maskan på v 36 ska INTE göras. Första maskan på v 37 = sista maskan på v 36. Det måste kommenteras i mönstret annars går det inte att förstå.
04.01.2021 - 10:34
![]() Maria escreveu:
Maria escreveu:
Hej. Jag funderade på att sticka denna barnbasker, men förstår inte den magiska cirkeln alls. Skulle den kunna komma som instruktionsvideo? Hälsningar Maria
30.07.2020 - 20:59DROPS Design respondeu:
Hej Maria, du hittar videon nederst i mönstret. Se här: Hur man lägger upp med en cirkel = magic loop
04.08.2020 - 10:41
![]() Gabriele escreveu:
Gabriele escreveu:
Ich meine den Fehler gefunden zu haben.In der 36.Runde darf nur 1x1Masche zugenommen werden,nicht 2x. LG.,Gabriele
09.12.2019 - 01:52
|
||||||||||||||||||||||||||||||||||||||||||||||||||||
Little Sunshine#littlesunshinehat |
||||||||||||||||||||||||||||||||||||||||||||||||||||
|
|
||||||||||||||||||||||||||||||||||||||||||||||||||||
Boina tricotada de cima para baixo com ponto de folhas para crianças em DROPS Karisma.
DROPS Children 27-17 |
||||||||||||||||||||||||||||||||||||||||||||||||||||
|
---------------------------------------------------------- NOTA: Existem termos diferentes de tricô e croché em português de Portugal e do Brasil. Tricô: Malha = Ponto Canelado = Barra Ponto Jarreteira = Cordões de Tricô Ponto Liga = Ponto Tricô Croché: mpa - meio ponto alto pa - ponto alto pad - ponto alto duplo pat - ponto alto triplo pb - ponto baixo pbx - ponto baixíssimo pc - ponto corrente ---------------------------------------------------------- PONTO FANTASIA: Ver diagrama A.1. ARO MÁGICO: Começar com esta técnica evita um buraco ao meio: Segurar na ponta do fio na mão esquerda e fazer um aro à volta do dedo indicador esquerdo (da esquerda para a direita). Segurar no aro com o polegar e o dedo indicador esquerdo. Enfiar a agulha no aro, apanhar o fio do novelo (ou seja, passar o fio 1 vez por cima da agulha de frente para trás), passar o fio pelo aro, 1 laçada (passar agora o fio de trás para a frente) e passar a laçada pela m/p na agulha, * enfiar a agulha no aro, 1 laçada (passar o fio de trás para a frente), passar a laçada pelo aro, 1 laçada (de trás para a frente) e passar a laçada pela última m/p na agulhà direita (ou seja, a última m/p) *, repetir de * a * até haver 14 ms/pts na agulha. Distribuir as ms/pts por 4 agulhas de pontas duplas 3 ou 3.5 mm de acordo com o tamanho como indicado abaixo. Continuar então como indicado abaixo, – AO MESMO TEMPO, puxar a ponta do fio para fechar o aro e fazer desaparecer o buraco. ---------------------------------------------------------- BOINA: Tricota-se em redondo nas agulhas de pontas duplas - mudar para a agulha circular quando achar necessário. Começar em Karisma com um ARO MÁGICO - ver acima = 14 ms/pts. Distribuir as ms/pts por 4 agulhas de pontas duplas 3 ou 3.5 mm à razão de 4 ms/pts por cada uma das 3 primeiras agulhas e 2 ms/pts na última agulha. Tricotar então em redondo, seguindo o diagrama A.1 (= 7 motivos de 2 ms/pts). NÃO ESQUECER DE MANTER A MESMA TENSÃO DA INDICADA NA AMOSTRA! Quando restar 1 carreira de A.1 para fazer, temos 112 ms/pts. Continuar com a agulha circular 2.5 ou 3 mm em canelado/barra como na última carreira de A.1. Quando o canelado/barra medir 4-5 cm, arrematar as ms/pts como elas se apresentam (ter cuidado para não fazer um remate demasiado apertado). |
||||||||||||||||||||||||||||||||||||||||||||||||||||
Explicações do diagrama |
||||||||||||||||||||||||||||||||||||||||||||||||||||
|
||||||||||||||||||||||||||||||||||||||||||||||||||||
 |
||||||||||||||||||||||||||||||||||||||||||||||||||||
Terminou este projecto?Então, identifique as suas fotos com as tags #dropspattern #littlesunshinehat ou mostre-as na galeria #dropsfan. Precisa de ajuda para este modelo?Encontrará 22 turotiais em vídeo, uma rubrica Comentários/Perguntas e muito mais ao visitar a página do modelo em www.garnstudio.com © 1982-2026 DROPS Design A/S. Todos os direitos reservados. Este documento, incluuindo as suas su-secções, tem copyrights. Saia mais o que pode fazer com os nossos modelos no fim de cada uma das páginas do nosso site. |
||||||||||||||||||||||||||||||||||||||||||||||||||||


Com mais de 40 anos no design de modelos de tricô e de croché, a DROPS Design oferece uma das mais vastas colecções demodelos gratuitos na Internet - traduzidos em 17 línguas. Neste dia de hoje, temos 324 catálogos e 12290 modelos - dos quais 12271 estão traduzidos em português.
Trabalhamos com muito empenho para lhe proporcionar o melhor que o tricô e o croché têm para oferecer, para lhe fornecer inspiração e conselhos bem como fios da mais elevada qualidade a preços incríveis! Gostaria de usar os nossos modelos para outros fins que não uso pessoal? Pode ler o que lhe é permitido fazer no Copyright texto que se encontra na parte de baixo de todos os nossos modelos. Bom tricô! Bom croché!
Deixe um comentário acerca do modelo DROPS Children 27-17
Gostaríamos muito de saber o que tem a dizer-nos acerca deste modelo!
Se deixar uma pergunta acerca do modelo, certifique-se de que escolhe a categoria adequada no formulário abaixo para acelerar o processo relativo à resposta. Os campos obrigatórios estão assinalados com um *.