
Categorias populares
Procura um fio?


Comentários / Perguntas (53)
![]() Silvia escreveu:
Silvia escreveu:
I am just not getting how to put the pieces together...they are both the same size....and the video hasn't helped at all....where do I need to go from here? Thanks for any help you can give me.
19.03.2019 - 19:50DROPS Design respondeu:
Dear Silvie, this video shows how to assembly such a poncho, ie 2 rectangular pieces together into a poncho. The video shows 2 knitted pieces but you have to sew the both crocheted pieces the same way here. Happy crocheting!
20.03.2019 - 08:43
![]() Tertia escreveu:
Tertia escreveu:
Thanks for a quick response! Must have had a blonde moment!
22.02.2019 - 09:03
![]() Tertia escreveu:
Tertia escreveu:
EXCUSE MY IGNORANCE but how do I print this pattern out?
21.02.2019 - 16:46DROPS Design respondeu:
Hi Tertia! Before the pattern instructions, on the right, there is a printer icon with the word 'pattern'. Click there any you will be able to print the pattern. Kind regards!
22.02.2019 - 08:20Carla escreveu:
Que es p.t.?
07.01.2019 - 23:42DROPS Design respondeu:
Hola Carla. Abreviatura pt = punto.
16.01.2019 - 16:02
![]() Leah escreveu:
Leah escreveu:
I want to express my thank you to how well you provide what you provide and how gracious you are with your responses to various comments that are sometimes written when people are frustrated with their project. I'm so impressed with how you can overcome so many cultural and language differences with the charts and videos. My world has expanded through the service you provide. I will buy your yarns whenever possible to support this.
03.11.2018 - 13:26
![]() Leah escreveu:
Leah escreveu:
In working towards the 65 cm length of the scarf and wanting to end on a DC row, what is done to make up the difference? Do you repeat the pattern in its sequence or is it best to expand certain sections? Thank you,
03.11.2018 - 13:14DROPS Design respondeu:
Dear Leah, Depending on your tension in height you will have to work either some more rows or fewer rows so that piece will end with a dc row - piece may measures a few more cm or be somewhat shorter, adjust to the best measurements. Happy crocheting!
05.11.2018 - 08:53Irene Hendry escreveu:
Monica, please help. Pattern drops168-13. I am not understanding how to join the two part to form the poncho. Thanks in advance. Irene
10.01.2018 - 13:12DROPS Design respondeu:
Dear Mrs Hendry, this shows how to assembly a poncho made of 2 rectangles, pieces are knitted in the video but the technique will be the same for a crocheted poncho. Happy assembly!
10.01.2018 - 13:46
![]() Hanna B escreveu:
Hanna B escreveu:
Har ni glömt skriva att det ska virkas en lm mellan alla grupper av tre stolpar i första varvet/uppläggningsvarvet?
30.08.2017 - 16:20DROPS Design respondeu:
Hej Hanna, första varvet beskriver vi såhär: * hoppa över 1 lm, 1 st i var och en av de 3 nästa lm *, upprepa *-* v ut. Lycka till!
12.09.2017 - 15:27
![]() Janneke Koster escreveu:
Janneke Koster escreveu:
Ik vind dit een erg mooi patroon, maar ik kan hem niet meer in Mn favorieten zetten. Klopt dit? Er stond toch altijd ergens een hartje om hem in de favorieten te plaatsen. Deze kan ik nergens meer vinden? Hoe kan dat???
28.08.2017 - 22:38DROPS Design respondeu:
Hallo Janneke, Bovenaan het patroon, na het stuk over hoeveel garen en welke naalden je nodig hebt, staat een roze knop, waarmee je hem kunt toevoegen aan je favorieten.
29.08.2017 - 17:45
![]() Brandi Perkins escreveu:
Brandi Perkins escreveu:
In the first row where it says skip chain 1 am I supposed to chain 1 and skip the next chain or just skip the next chain?
25.08.2017 - 04:54DROPS Design respondeu:
Hello Brandi. You just skip the next chain. Happy crocheting!
25.08.2017 - 14:55
|
|||||||||||||||||||||||||||||||
Sky Love#skyloveponcho |
|||||||||||||||||||||||||||||||
 |
 |
||||||||||||||||||||||||||||||
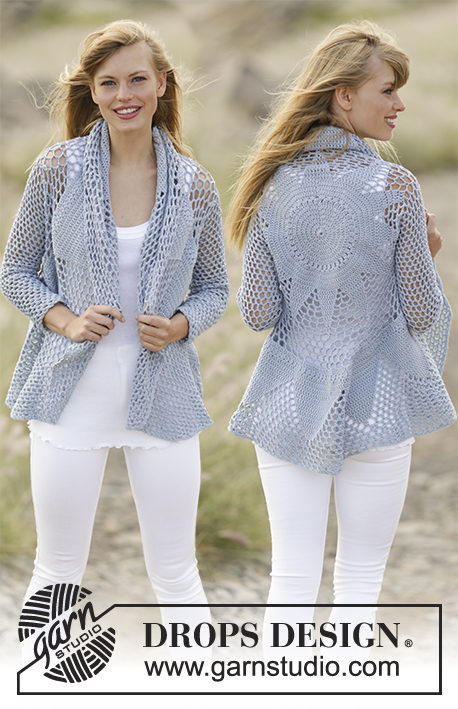
Poncho rendado DROPS em croché, em ”Paris”. Do S ao XXXL.
DROPS 168-13 |
|||||||||||||||||||||||||||||||
|
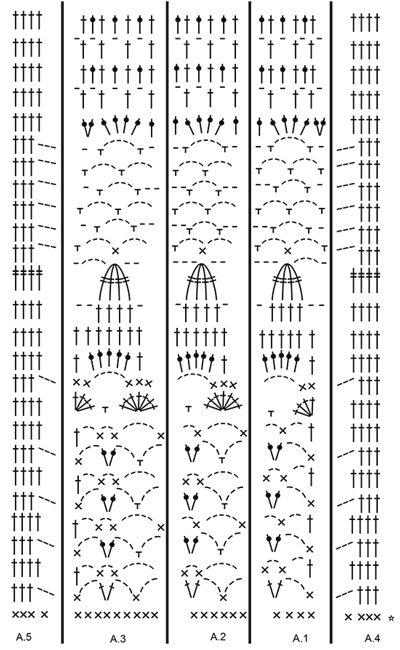
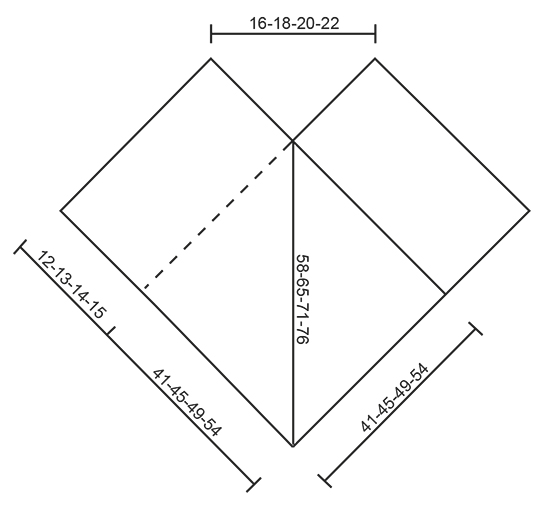
---------------------------------------------------------- NOTA: Existem termos diferentes de tricô e croché em português de Portugal e do Brasil. Tricô: Malha = Ponto Canelado = Barra Ponto Jarreteira = Cordões de Tricô Ponto Liga = Ponto Tricô Croché: mpa - meio ponto alto pa - ponto alto pad - ponto alto duplo pat - ponto alto triplo pb - ponto baixo pbx - ponto baixíssimo pc - ponto corrente ---------------------------------------------------------- DICA CROCHÉ: Começar todas as carreiras de pb por 1 pc (substitui o 1.º pb). Começar todas as carreiras de pa por 3 pc (substituem o 1.º pa). Começar todas as carreiras de pad por 4 pc (substituem o 1.º pad). PONTO FANTASIA: Ver diagramas A.1 a A.5. ---------------------------------------------------------- PONCHO: A peça é feita como 2 écharpes unidas para formar um poncho. Montar uma corrente de 77-85-93-101 pc com a agulha de croché 5 mm em Paris. Crochetar 1 pa no 4.º pc a partir da agulha de croché (= 2 pa), 1 pa no pc seguinte, *saltar 1 pc, 1 pa em cada um dos 3 pc seguintes*, repetir de * a * em toda a carreira = 57-63-69-75 pa. Crochetar então 1 pb em cada pa (= pelo avesso) – ver DICA CROCHÉ = 57-63-69-75 pb. Continuar então da seguinte maneira: A.4 nos 4 primeiros pb, A.1 por cima dos 4 pb seguintes, A.2 por cima dos 36-42-48-54 pb seguintes (= 6-7-8-9 vezes em largura), A.3 por cima dos 9 pb seguintes, terminar com A.5 nos 4 últimos pb. NÃO ESQUECER DE MANTER A MESMA TENSÃO DA INDICADA PARA A AMOSTRA! Continuar desta maneira até a peça medir 65-71-77-84 cm, e terminar com 1 carreira de pa no diagrama, arrematar. Crochetar outra peça igual. MONTAGEM: Colocar a última carreira da 1.ª parte contra o lado direito da parte mais comprida da 2.ª parte - na parte de baixo do lado da corrente de base e subindo 41-45-49-54 cm – ter cuidado para não esticar demasiado a peça. Costurar as 2 peças entre elas com pequenos pontos. Unir então da mesma maneira a última carreira da 2.ª parte ao lado |
|||||||||||||||||||||||||||||||
Explicações do diagrama |
|||||||||||||||||||||||||||||||
|
|||||||||||||||||||||||||||||||
 |
|||||||||||||||||||||||||||||||
 |
|||||||||||||||||||||||||||||||
Terminou este projecto?Então, identifique as suas fotos com as tags #dropspattern #skyloveponcho ou mostre-as na galeria #dropsfan. Precisa de ajuda para este modelo?Encontrará 8 turotiais em vídeo, uma rubrica Comentários/Perguntas e muito mais ao visitar a página do modelo em www.garnstudio.com © 1982-2026 DROPS Design A/S. Todos os direitos reservados. Este documento, incluuindo as suas su-secções, tem copyrights. Saia mais o que pode fazer com os nossos modelos no fim de cada uma das páginas do nosso site. |
|||||||||||||||||||||||||||||||


Com mais de 40 anos no design de modelos de tricô e de croché, a DROPS Design oferece uma das mais vastas colecções demodelos gratuitos na Internet - traduzidos em 17 línguas. Neste dia de hoje, temos 324 catálogos e 12290 modelos - dos quais 12271 estão traduzidos em português.
Trabalhamos com muito empenho para lhe proporcionar o melhor que o tricô e o croché têm para oferecer, para lhe fornecer inspiração e conselhos bem como fios da mais elevada qualidade a preços incríveis! Gostaria de usar os nossos modelos para outros fins que não uso pessoal? Pode ler o que lhe é permitido fazer no Copyright texto que se encontra na parte de baixo de todos os nossos modelos. Bom tricô! Bom croché!
Deixe um comentário acerca do modelo DROPS 168-13
Gostaríamos muito de saber o que tem a dizer-nos acerca deste modelo!
Se deixar uma pergunta acerca do modelo, certifique-se de que escolhe a categoria adequada no formulário abaixo para acelerar o processo relativo à resposta. Os campos obrigatórios estão assinalados com um *.