
Categorias populares
Procura um fio?


Comentários / Perguntas (53)
![]() Cathie escreveu:
Cathie escreveu:
I have been crocheting for 50 years. I do not know how to read a diagram. I only use written instructions. However, I have no clue what you are talking about after the 2nd row. What is A.4 over the next 4 stitches, etc? What is the A. ? Help please. I am so lost!
08.03.2020 - 03:40DROPS Design respondeu:
Dear Cathie, it is well worth the time and effort to figure out how to read pattern diagrams, because they not only tell you what to do at the very next step, but also show you how the stitches AND the rows relate to each other. In this case pattern A.4 shows you the trebles stitches at the right of the diagram. HERE you can find a lesson on how to read crochet diagrams, and do not forget, that you can always ask for help (in person or over teh phone) for help in the store where you bought your DROPS yarn from. Happy Crafting!
08.03.2020 - 22:56
![]() Imelda Parra Suarez escreveu:
Imelda Parra Suarez escreveu:
Quisiera elaborar el poncho con patron de calados en Paris pero no entiendo las abreviasiones que colocan me gustaría algo más claro o una fotografia donde se observe claramente las puntadas. Muchas gracias por su atención quedo atenta.
14.11.2019 - 21:03DROPS Design respondeu:
Hola Imelda. No disponemos de más fotos que las que están publicadas de este modelo. Tienes bajo el patrón varios vídeos explicativos y el diccionario de abreviaturas está en este link https://www.garnstudio.com/dictionary.php?lang=es
17.11.2019 - 19:34
![]() Phoebe Musa escreveu:
Phoebe Musa escreveu:
Kindly give us the pattern in writing, diagrams are kind of confusing
15.10.2019 - 10:15DROPS Design respondeu:
Dear Mrs Musa, when there are only diagrams in a pattern, such as this one for example, you will find help with crochet diagrams here. Happy crocheting!
15.10.2019 - 10:25
![]() Birgitta escreveu:
Birgitta escreveu:
Hej. Jag skulle vilja veta bredden på "halsduken". Mvh Birgitta
26.08.2019 - 11:08DROPS Design respondeu:
Hej. Du hittar alla mått i de olika storlekarna på måttskissen längst ner på mönstret. Lycka till!
27.08.2019 - 08:15
![]() SAROJ escreveu:
SAROJ escreveu:
Hi there Is there any way I can get this pattern fully written out, I get extremely confused reading a diagram. Please assist.
23.07.2019 - 11:20DROPS Design respondeu:
Dear Mrs Saroj, there are only diagrams to this pattern but you will find here how to read crochet diagrams, should you need any further assistance reading diagrams, feel free to contact your DROPS store even per mail or telephone. Happy crocheting!
06.08.2019 - 09:45
![]() Carrie escreveu:
Carrie escreveu:
Hello again! I’m just about to finish the first part of the diagram. When starting the diagram again, to get the length, do I start with the rows of single crochets at the very bottom, or do I start with the second row of 3 dc, chain 3 on top of the top most row of dc? Thank you! I think I’m going to like diagrams much better than the US way of writing every line out! :)
14.06.2019 - 02:57DROPS Design respondeu:
Dear Carrie, when repeating the diagrams in height, start from 2nd row in diagram, ie skip the single crochets row from the very bottom. Happy crocheting!
14.06.2019 - 07:27
![]() Carrie escreveu:
Carrie escreveu:
I have gotten up to the 4th row above the row of single crochets and have torn it out 3 times. Where does the 4th DC in stitch go? The first of the chain 3 below? I am assuming that this row goes from A4-A5. I can’t tell where single crochets go between A1 and A2. Do they go into each of the DC around chain below? The diagram looks like one DC in the first DC around and the second in the first of chain 3. That just doesn’t seem right. Thank you, Carrie
11.06.2019 - 02:20DROPS Design respondeu:
Dear Carrie, on row 3 (5, 7..) in A.4/A.5 the 4th dc (in A.4) and the first dc (in A.5) will be worked in the first chain (A.4)/last chain (= next to the dc) in A.5. So that there are either 3 or 4 dc in A.4/A.5. Happy crocheting!
11.06.2019 - 12:32
![]() Hedi escreveu:
Hedi escreveu:
Ich möchte wissen wie ich dieses teil zusammen nähe
02.05.2019 - 21:49DROPS Design respondeu:
Liebe Hedi, dieses Video zeigt wie man einen gestrickten Poncho zusammennäht - beim gehäkelten wird es die gleiche Technik. Viel Spaß beim häkeln!
03.05.2019 - 09:00
![]() Gemma escreveu:
Gemma escreveu:
Leuk patroon. Om de juiste hoogte, 84 cm voor maat XXL, te krijgen, veronderstel ik dat ik na de gegeven toeren ik weer ergens aan het begin van de tekening werder moet haken. Klopt dat? Bij welke toer moet ik dan weer verder haken? Alvast bedankt voor jullie antwoord.
20.04.2019 - 21:50DROPS Design respondeu:
Dag Gemma,
Je kan inderdaad, nadat je A.x 1 keer in de hoogte hebt gebreid, gewoon weer opnieuw beginnen onderaan, dus bij de eerste toer na de toer met het sterretje.
21.04.2019 - 16:51
![]() Silvia escreveu:
Silvia escreveu:
The video doesn't help...but thanks
20.03.2019 - 15:25
|
|||||||||||||||||||||||||||||||
Sky Love#skyloveponcho |
|||||||||||||||||||||||||||||||
 |
 |
||||||||||||||||||||||||||||||
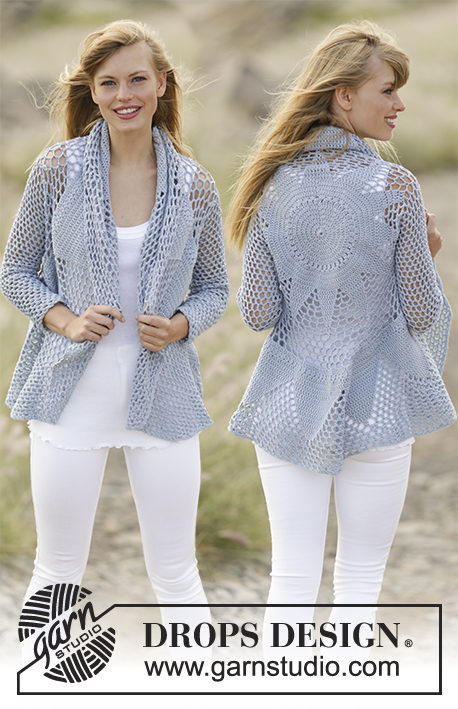
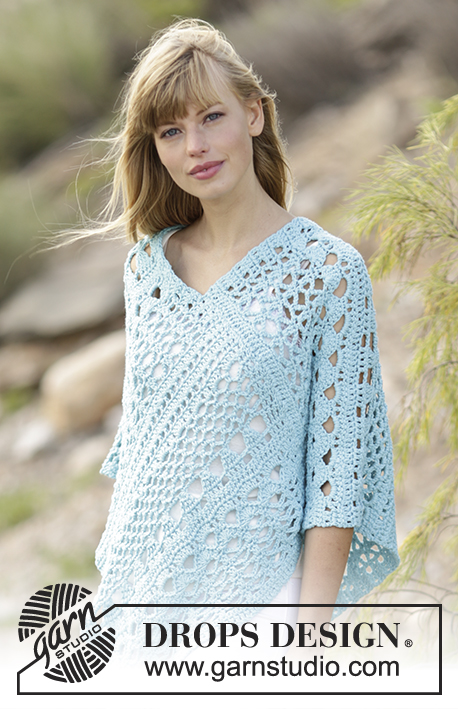
Poncho rendado DROPS em croché, em ”Paris”. Do S ao XXXL.
DROPS 168-13 |
|||||||||||||||||||||||||||||||
|
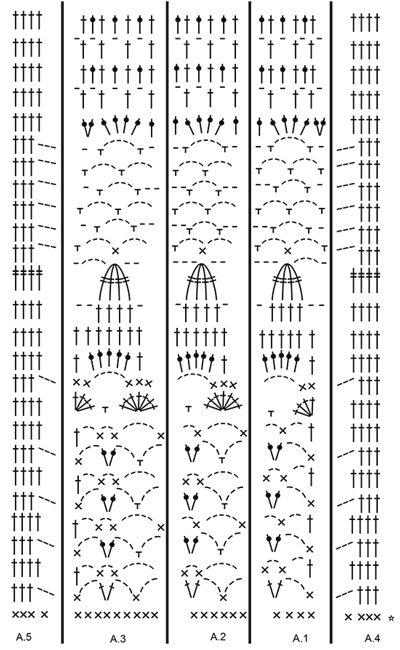
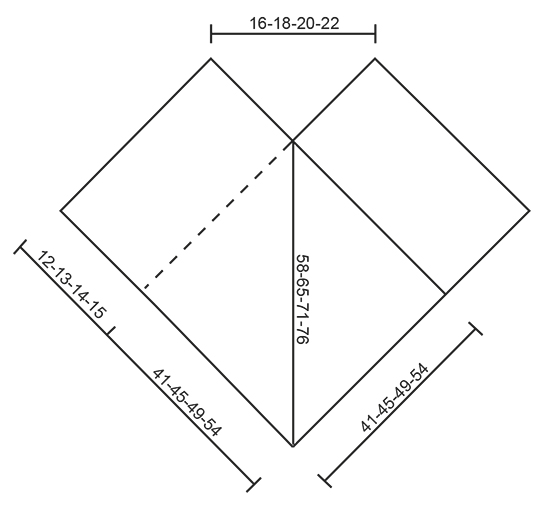
---------------------------------------------------------- NOTA: Existem termos diferentes de tricô e croché em português de Portugal e do Brasil. Tricô: Malha = Ponto Canelado = Barra Ponto Jarreteira = Cordões de Tricô Ponto Liga = Ponto Tricô Croché: mpa - meio ponto alto pa - ponto alto pad - ponto alto duplo pat - ponto alto triplo pb - ponto baixo pbx - ponto baixíssimo pc - ponto corrente ---------------------------------------------------------- DICA CROCHÉ: Começar todas as carreiras de pb por 1 pc (substitui o 1.º pb). Começar todas as carreiras de pa por 3 pc (substituem o 1.º pa). Começar todas as carreiras de pad por 4 pc (substituem o 1.º pad). PONTO FANTASIA: Ver diagramas A.1 a A.5. ---------------------------------------------------------- PONCHO: A peça é feita como 2 écharpes unidas para formar um poncho. Montar uma corrente de 77-85-93-101 pc com a agulha de croché 5 mm em Paris. Crochetar 1 pa no 4.º pc a partir da agulha de croché (= 2 pa), 1 pa no pc seguinte, *saltar 1 pc, 1 pa em cada um dos 3 pc seguintes*, repetir de * a * em toda a carreira = 57-63-69-75 pa. Crochetar então 1 pb em cada pa (= pelo avesso) – ver DICA CROCHÉ = 57-63-69-75 pb. Continuar então da seguinte maneira: A.4 nos 4 primeiros pb, A.1 por cima dos 4 pb seguintes, A.2 por cima dos 36-42-48-54 pb seguintes (= 6-7-8-9 vezes em largura), A.3 por cima dos 9 pb seguintes, terminar com A.5 nos 4 últimos pb. NÃO ESQUECER DE MANTER A MESMA TENSÃO DA INDICADA PARA A AMOSTRA! Continuar desta maneira até a peça medir 65-71-77-84 cm, e terminar com 1 carreira de pa no diagrama, arrematar. Crochetar outra peça igual. MONTAGEM: Colocar a última carreira da 1.ª parte contra o lado direito da parte mais comprida da 2.ª parte - na parte de baixo do lado da corrente de base e subindo 41-45-49-54 cm – ter cuidado para não esticar demasiado a peça. Costurar as 2 peças entre elas com pequenos pontos. Unir então da mesma maneira a última carreira da 2.ª parte ao lado |
|||||||||||||||||||||||||||||||
Explicações do diagrama |
|||||||||||||||||||||||||||||||
|
|||||||||||||||||||||||||||||||
 |
|||||||||||||||||||||||||||||||
 |
|||||||||||||||||||||||||||||||
Terminou este projecto?Então, identifique as suas fotos com as tags #dropspattern #skyloveponcho ou mostre-as na galeria #dropsfan. Precisa de ajuda para este modelo?Encontrará 8 turotiais em vídeo, uma rubrica Comentários/Perguntas e muito mais ao visitar a página do modelo em www.garnstudio.com © 1982-2026 DROPS Design A/S. Todos os direitos reservados. Este documento, incluuindo as suas su-secções, tem copyrights. Saia mais o que pode fazer com os nossos modelos no fim de cada uma das páginas do nosso site. |
|||||||||||||||||||||||||||||||


Com mais de 40 anos no design de modelos de tricô e de croché, a DROPS Design oferece uma das mais vastas colecções demodelos gratuitos na Internet - traduzidos em 17 línguas. Neste dia de hoje, temos 324 catálogos e 12290 modelos - dos quais 12271 estão traduzidos em português.
Trabalhamos com muito empenho para lhe proporcionar o melhor que o tricô e o croché têm para oferecer, para lhe fornecer inspiração e conselhos bem como fios da mais elevada qualidade a preços incríveis! Gostaria de usar os nossos modelos para outros fins que não uso pessoal? Pode ler o que lhe é permitido fazer no Copyright texto que se encontra na parte de baixo de todos os nossos modelos. Bom tricô! Bom croché!
Deixe um comentário acerca do modelo DROPS 168-13
Gostaríamos muito de saber o que tem a dizer-nos acerca deste modelo!
Se deixar uma pergunta acerca do modelo, certifique-se de que escolhe a categoria adequada no formulário abaixo para acelerar o processo relativo à resposta. Os campos obrigatórios estão assinalados com um *.