
Categorias populares
Procura um fio?


Comentários / Perguntas (53)
![]() Anja escreveu:
Anja escreveu:
Het tel patroon begint met een stokje boven op een ander stokje maar het eerste stokje zijn 3 losse hoe los ik dat op
20.04.2026 - 09:33DROPS Design respondeu:
Dag Anja,
Het eerste stokje op de toer vervang je inderdaad door 3 lossen. Deze 3 lossen komen dus boven het stokje van de vorige toer en het tweede stokje haak je in het voorlaatste stokje van de vorige toer.
22.04.2026 - 13:47
![]() Julianne escreveu:
Julianne escreveu:
P.S. I also went down to a 4.5mm (7) hook, and the panel measures 18" wide...still too wide! Do I keep going down in hook size...just don't want this to end up being a tiny poncho!
12.06.2025 - 21:10DROPS Design respondeu:
Dear Julianne, do you get the correct tension? You should have 14 double crochets x 8,5 rows = 4"x4"/10x10 cm - you can compare your yarn with the one used in the pattern, ie DROPS Paris to check if it's suitable. Happy crocheting!
13.06.2025 - 08:08
![]() Julianne escreveu:
Julianne escreveu:
HELP! I love this Sky Love Poncho pattern #168-13; but having gauge issues. The yarn provided to me for this project is Hobby Lobby's "I Love This Cotton" yarn. Since it's also a 4wt, I thought H hook would work, but the panel measures about 19" wide...should only be 16.25" wide. How do I adjust?
12.06.2025 - 21:07
![]() Dita Klompenhouwer escreveu:
Dita Klompenhouwer escreveu:
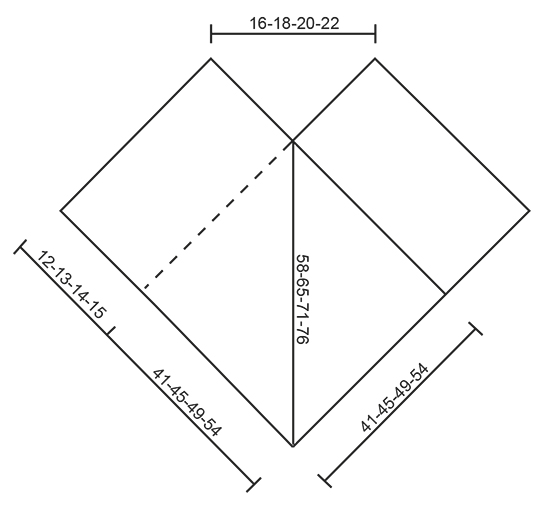
Graag andere uitleg van de delen tot poncho te maken, tekening snap ik niets van, ben ervaren naaister en haakster. Hoe ziet de achterkant van de poncho eruit?? bij voorbaat dank.
10.04.2025 - 20:16DROPS Design respondeu:
Dag Dita,
De achterkant van de poncho ziet er hetzelfde uit als de voorkant. Je haakt 2 rechthoekige lappen, waarbij de opzetranden en de afkantranden de korte kanten zijn. De korte kant van lap 1 naai je tegen een lange kant van lap 2. De korte kant van lap 2 naai je tegen een lange kant van lap 1.
13.04.2025 - 09:17
![]() Rob escreveu:
Rob escreveu:
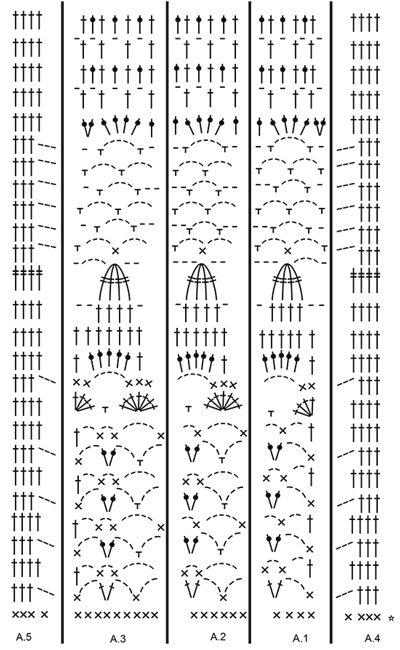
This is my first time using a Drops pattern. In section A3 it says this is over 9 stitches but in the top row of the diagram it only shows 7 stitches. What am I missing? Where are the other 2 stitches?
07.01.2025 - 15:20DROPS Design respondeu:
Dear Rob, note that diagrams are worked from bottom up, the number of stitches for each repeat is shown with the row with the star at the very bottom. So just work diagram as shown - read from the right towards the left from right side, and from the left towards the right from wrong side. Happy crocheting!
07.01.2025 - 17:13
![]() Ruth Bellmer escreveu:
Ruth Bellmer escreveu:
Is schon lustig was die Leute da fragen. Obwohl die DROPS-Anleitungen so toll und verständlich sind. Und Diagramme einfach und klar sind. Ich find Eure Anleitungen toll!!!
17.04.2023 - 23:39
![]() GLADYS escreveu:
GLADYS escreveu:
HEERMOSO Y FASIL DE ENTENDER MUCHAS GRACIAS
10.08.2021 - 20:57
![]() Sandra Hoffmann-Klein escreveu:
Sandra Hoffmann-Klein escreveu:
Liebes Drops-Team, ich wollte diesen Poncho in Größe L häkeln und habe wie beschreiben 69 Stäbchen in die Luftmaschenkette mit Nadelstärke 5 gehäkelt. Diese hat eine Länge von ca. 65 cm. Kann das sein? Eigentlich müßte sie ja laut Zeichnung 49 cm lang sein, oder?
19.03.2021 - 14:52DROPS Design respondeu:
Liebe Frau Hoffmann-Klein, stimmt Ihre Maschenprobe? Mit 14 Stäbchen = 10 cm, sollten Sie 49 cm mit 69 Stäbchen haben. Viel Spaß beim häkeln!
19.03.2021 - 15:29
![]() Anna Plummer escreveu:
Anna Plummer escreveu:
Why is there no crochet gauge given for Drops yarns? There's a huge difference between knitting & crochet gauge, especially the rows. I did a swatch for Paris, and I was off by 8 rows, and # of rows should not not change much, not like horizontal sts do. I compared to 3 yarns from other brands, my gauge was perfect. I want to use Paris, though. but I can't find any crochet gauge. Thank You!
18.05.2020 - 08:37DROPS Design respondeu:
Dear Mrs Plummer, gauge will change depending on the fabric required, you will find the matching tension in each pattern, for example here you need 14 dc x 8.5 rows = 4'' x 4'' (10 x 10 cm) - read more about tension here. Happy crocheting!
18.05.2020 - 08:49
![]() Ada escreveu:
Ada escreveu:
Goedemiddag, ben de poncho in maat M/L aan het maken. Nu bij de 3e herhaling t/m toer 7 en ben 67 cm hoog (dus bijna bij de 71 cm). Zag dat je in ieder geval bij een toer met stokjes moet stoppen. 2 vragen: 1. Ik neem aan dat dit ook halverwege het patroon kan? 2. Maakt het nog uit of dit dan toer 12 of 13 is? Alvast bedankt voor de reactie. Groet, Ada
21.03.2020 - 14:41DROPS Design respondeu:
Dag Ada,
Ja hoor, dit kan halverwege het patroon en toer 12 of 13 maakt ook niet uit want het zijn beide toeren met stokjes.
22.03.2020 - 16:53
|
|||||||||||||||||||||||||||||||
Sky Love#skyloveponcho |
|||||||||||||||||||||||||||||||
 |
 |
||||||||||||||||||||||||||||||
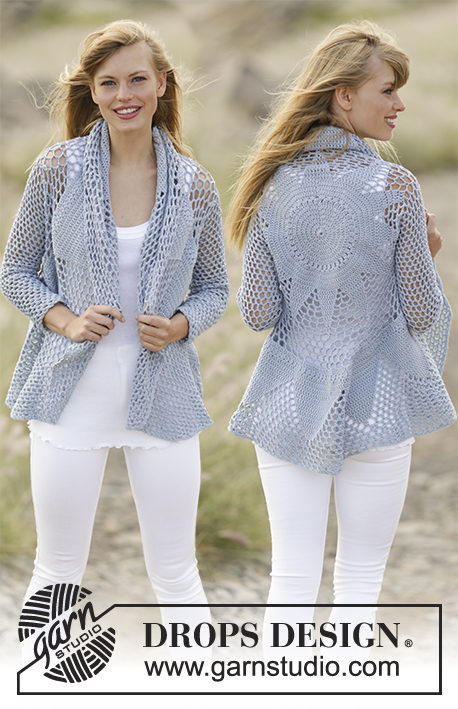
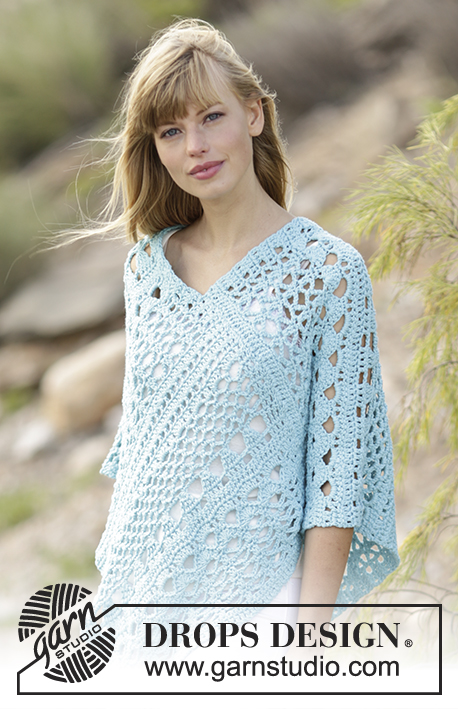
Poncho rendado DROPS em croché, em ”Paris”. Do S ao XXXL.
DROPS 168-13 |
|||||||||||||||||||||||||||||||
|
---------------------------------------------------------- NOTA: Existem termos diferentes de tricô e croché em português de Portugal e do Brasil. Tricô: Malha = Ponto Canelado = Barra Ponto Jarreteira = Cordões de Tricô Ponto Liga = Ponto Tricô Croché: mpa - meio ponto alto pa - ponto alto pad - ponto alto duplo pat - ponto alto triplo pb - ponto baixo pbx - ponto baixíssimo pc - ponto corrente ---------------------------------------------------------- DICA CROCHÉ: Começar todas as carreiras de pb por 1 pc (substitui o 1.º pb). Começar todas as carreiras de pa por 3 pc (substituem o 1.º pa). Começar todas as carreiras de pad por 4 pc (substituem o 1.º pad). PONTO FANTASIA: Ver diagramas A.1 a A.5. ---------------------------------------------------------- PONCHO: A peça é feita como 2 écharpes unidas para formar um poncho. Montar uma corrente de 77-85-93-101 pc com a agulha de croché 5 mm em Paris. Crochetar 1 pa no 4.º pc a partir da agulha de croché (= 2 pa), 1 pa no pc seguinte, *saltar 1 pc, 1 pa em cada um dos 3 pc seguintes*, repetir de * a * em toda a carreira = 57-63-69-75 pa. Crochetar então 1 pb em cada pa (= pelo avesso) – ver DICA CROCHÉ = 57-63-69-75 pb. Continuar então da seguinte maneira: A.4 nos 4 primeiros pb, A.1 por cima dos 4 pb seguintes, A.2 por cima dos 36-42-48-54 pb seguintes (= 6-7-8-9 vezes em largura), A.3 por cima dos 9 pb seguintes, terminar com A.5 nos 4 últimos pb. NÃO ESQUECER DE MANTER A MESMA TENSÃO DA INDICADA PARA A AMOSTRA! Continuar desta maneira até a peça medir 65-71-77-84 cm, e terminar com 1 carreira de pa no diagrama, arrematar. Crochetar outra peça igual. MONTAGEM: Colocar a última carreira da 1.ª parte contra o lado direito da parte mais comprida da 2.ª parte - na parte de baixo do lado da corrente de base e subindo 41-45-49-54 cm – ter cuidado para não esticar demasiado a peça. Costurar as 2 peças entre elas com pequenos pontos. Unir então da mesma maneira a última carreira da 2.ª parte ao lado |
|||||||||||||||||||||||||||||||
Explicações do diagrama |
|||||||||||||||||||||||||||||||
|
|||||||||||||||||||||||||||||||
 |
|||||||||||||||||||||||||||||||
 |
|||||||||||||||||||||||||||||||
Terminou este projecto?Então, identifique as suas fotos com as tags #dropspattern #skyloveponcho ou mostre-as na galeria #dropsfan. Precisa de ajuda para este modelo?Encontrará 8 turotiais em vídeo, uma rubrica Comentários/Perguntas e muito mais ao visitar a página do modelo em www.garnstudio.com © 1982-2026 DROPS Design A/S. Todos os direitos reservados. Este documento, incluuindo as suas su-secções, tem copyrights. Saia mais o que pode fazer com os nossos modelos no fim de cada uma das páginas do nosso site. |
|||||||||||||||||||||||||||||||


Com mais de 40 anos no design de modelos de tricô e de croché, a DROPS Design oferece uma das mais vastas colecções demodelos gratuitos na Internet - traduzidos em 17 línguas. Neste dia de hoje, temos 324 catálogos e 12290 modelos - dos quais 12271 estão traduzidos em português.
Trabalhamos com muito empenho para lhe proporcionar o melhor que o tricô e o croché têm para oferecer, para lhe fornecer inspiração e conselhos bem como fios da mais elevada qualidade a preços incríveis! Gostaria de usar os nossos modelos para outros fins que não uso pessoal? Pode ler o que lhe é permitido fazer no Copyright texto que se encontra na parte de baixo de todos os nossos modelos. Bom tricô! Bom croché!
Deixe um comentário acerca do modelo DROPS 168-13
Gostaríamos muito de saber o que tem a dizer-nos acerca deste modelo!
Se deixar uma pergunta acerca do modelo, certifique-se de que escolhe a categoria adequada no formulário abaixo para acelerar o processo relativo à resposta. Os campos obrigatórios estão assinalados com um *.