
Categorias populares
Procura um fio?


Comentários / Perguntas (11)
![]() Pascale escreveu:
Pascale escreveu:
Je n’ai pas compris ce que voulait dire « 1er rang = sur l’envers », au début de l’ouvrage. Après réflexion, j’ai commencé par un rang envers. Et c’est au moment de tricoter en rond que j’ai compris. Donc j’ai dû défaire 2 rangs pour me retrouver dans le bon sens. Je regrette que les explications n’aient pas été plus détaillées, comme dans certains modèles. C’est la 1ère fois qu’elle je me retrouve bloquée avant même de commencer 😁
17.11.2022 - 07:57
![]() Rafael escreveu:
Rafael escreveu:
Hello again! Thanks for the immediate replies so far. Please could you elaborate on your last message as I am a beginner? My question is that I did put both pieces on the same needle and hence I have two tails. I will be using one of these tails to knit in the round but what am I supposed to do with the other tail?
24.06.2020 - 16:16DROPS Design respondeu:
Dear Rafael, after you have worked first piece (back piece) and put aside, you can cut the yarn (you then just have to weave it in). Then you work front piece and you work both pieces together in the round with the same ball (= the one from front piece). Happy knititng!
24.06.2020 - 17:08
![]() Rafael escreveu:
Rafael escreveu:
Hello! According to pattern, I've done the front and back pieces of the poncho and now I am supposed to slip stc them together in the same needle. How do I do it? I've seen a couple of videos of what slip stc is but how do I to put them together? I'm a bit confused with that part. Should I slip stc the sides of each piece together? Should I to do something with the stics that were kept "alive"? Could someone guide me through? Thank you very much.
22.06.2020 - 18:25DROPS Design respondeu:
Dear Rafael, work one row from Right side over stitches on front piece, then at the end of this row, work the stitches of back piece from right sided and, when the last of the stitches on back piece has been worked, insert a marker on the needle (= to mark beg of round) and work stitches on front piece = you have joined pieces in the round, continue now knitting all stitches (as before). Happy knitting!
23.06.2020 - 08:58
![]() Rafael escreveu:
Rafael escreveu:
Hello! In the pattern it says "leave it aside" about the front piece and the same goes for the back piece as well. Does that mean that I have to cast off the last row of each piece? Because later on pattern says that they need to be joined together with slip stitch. So I'm a bit confused. Thanks.
23.12.2019 - 12:49DROPS Design respondeu:
Dear Rafael, the phrase +leave it (or put it) aside means that you should either leave the stitches on the needle and make the other pieces with another one, or put the stitches on a stitch holder or a piece of leftover yarn, while making the other bits. It is important that you dont bind off the stitches, but keep them "alive" so you can continue knitting them later. Happy Knitting!
24.12.2019 - 17:02
![]() Belén Ramón escreveu:
Belén Ramón escreveu:
Podría mandarme a que talla corresponde cada L o XL . Si la L corresponde a talla 46 o 48.... desgraciadamente varía depende de los fabricantes. Creo que sería muy útil. Gracias!!!!
04.12.2019 - 17:34DROPS Design respondeu:
Hola Belen. Bajo cada modelo tienes un diagrama de la prenda con las medidas en cm, que es mejor orientación que las tallas. Ante de la duda entre dos tallas, siempre recomendamos elegir la talla más grande . No se puede concretar la correspondencia a las tallas porque esta varia dependiendo del país.
09.12.2019 - 23:54
![]() Rafael escreveu:
Rafael escreveu:
Hello! pattern suggets: "Work 3 rows in GARTER ST . K 1 row. " Could you please explain to me that? I know that garter st is a pattern rather than a technique and K stands for knit stitch which is the standard knitting stitch (i saw the videos that you also include here). My question is: Do I knit all stitches for the next 3 rows after casting on and then i knit 1 more row? or do i create 3 ridges through garter stitch, which essentially means to knit 6 rows and then knit 1 more row?
21.11.2019 - 19:49DROPS Design respondeu:
Dear Rafael, you should in fact work 3 ridges (= knit 6 rows), then work one more row knitting all stitches, and on next row (8th row from the cast on), work in stocking stitch with 5 sts in garter stitch on each side. Pattern will be edited. Thank you, Happy knitting!
22.11.2019 - 08:07Ylva Forss escreveu:
Jag beställde rundstickor nr 5, 40 cm ( trä, kantiga). De har inte kommit. Skulle komma v. 11. Jag har redan betalat dem.
21.03.2017 - 13:25DROPS Design respondeu:
Hej Ylva. Du kan bedre kontakte butikken hvor du har bestilt for at höre hvor lang tid der gaar endnu.
21.03.2017 - 14:47YlvavForss escreveu:
Håller på att sticka denna poncho och jag stickar slätstickning nerifrån, enl. instruktionerna skall jag börja sticka mönsterstickning då arbetet mäter 34 cm i mitt fall, men nu måste väl arbetet i sin helhet vara 15 + 34?
17.03.2017 - 18:23
![]() Claudia Carolina escreveu:
Claudia Carolina escreveu:
Mi affascina questo modello e il filato non l'ho ancora usato, sono molto curiosa e spero prossimamente sperimentare l'emozione "Neuquén". Grazie Drops per tanto spunti meravigliosi. Claudia
22.03.2016 - 11:46
![]() Claudia Carolina escreveu:
Claudia Carolina escreveu:
Mi affascina questo modello e il filato non l'ho ancora usato, sono molto curiosa e spero prossimamente sperimentare l'emozione "Neuquén". Grazie Drops per tanto spunti meravigliosi. Claudia
22.03.2016 - 11:46
|
|||||||||||||||||||
Neuqu |
|||||||||||||||||||
|
|
|||||||||||||||||||
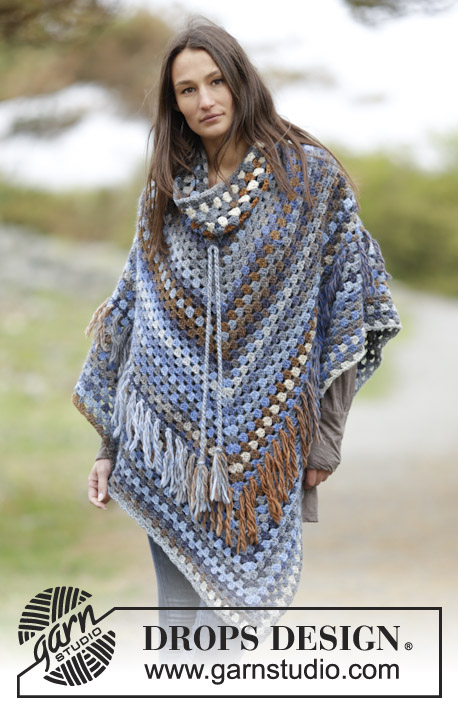
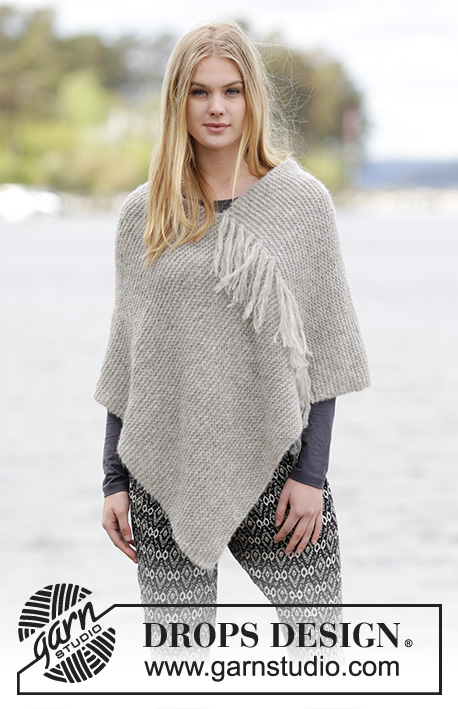
Poncho DROPS com jacquard norueguês, em ”Nepal”. Do S ao XXXL.
DROPS Extra 0-1164 |
|||||||||||||||||||
|
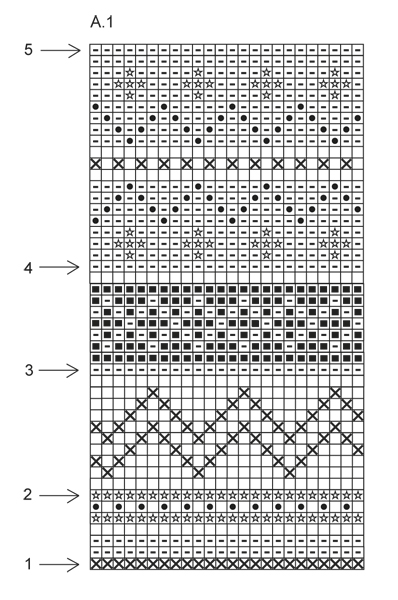
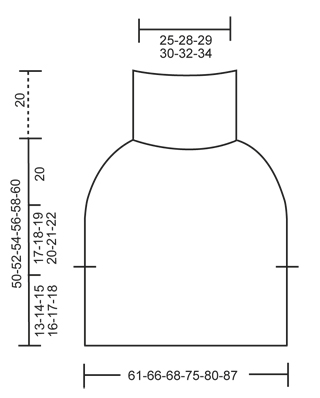
---------------------------------------------------------- NOTA: Existem termos diferentes de tricô e croché em português de Portugal e do Brasil. Malha = Ponto Canelado = Barra Ponto Jarreteira = Cordões de Tricô Ponto Liga = Ponto Tricô Croché : mpa – meio ponto alto pa – ponto alto pad – ponto alto duplo pat – ponto alto triplo pb – ponto baixo pbx – ponto baixíssimo pc – ponto corrente ---------------------------------------------------------- PONTO JARRETEIRA (em idas e voltas): Tricotar todas as carreiras em meia. 1 barra jarreteira = 2 carreiras meia. JACQUARD: Ver diagrama A.1 – tricota-se totalmente em ponto meia. DICA TRICÔ: Para evitar que o jacquard fique demasiado apertado, é importante não puxar os fios pelo avesso da peça. Mudar para agulhas mais grossas quando tricotar o jacquard se achar que está apertado. DIMINUIÇÕES: Para calcular quando fazer as diminuições, dividir o número total de ms/pts da carreira (por ex. 264 ms/pts) pelo número de ms/pts a diminuir (por ex. 32) = 8.25. Ou seja, neste exemplo, tricotar juntamente em meia cada 7.ª e 8.ª ms/pts. AUMENTOS: Para aumentar 1 m/p, fazer 1 laçada, Na carreira seguinte, tricotar a laçada torcida (ou seja, na alça de trás e não na alça da frente) para evitar buracos. ---------------------------------------------------------- PONCHO: Tricota-se em idas e voltas na agulha circular até às fendas dos lados e, depois, continuar em redondo. COSTAS (até às fendas): Tricota-se em idas e voltas na agulha circular. Montar 106-114-118-130-138-150 ms/pts com a agulha circular 5 mm em cinza claro. Tricotar 3 barras jarreteira - ver acima (1.ª carreira = pelo avesso). Tricotar então 1 carreira meia e continuar em ponto meia com 5 ms/pts em ponto jarreteira de cada lado da peça. NÃO ESQUECER DE MANTER A MESMA TENSÃO DA INDICADA NA AMOSTRA! A 13-14-15-16-17-18 cm de altura total, diminuir 1 m/p ourela de cada lado da peça, - ajustar para que a carreira seguinte seja pelo direito = 104-112-116-128-136-148 ms/pts. Colocar em espera e tricotar a frente. FRENTE (até às fendas): Montar e tricotar como se fez para as costas. COSTAS & FRENTE: Tricotam-se em redondo. Colocar as ms/pts da frente e das costas na mesma agulha circular = 208-224-232-256-272-296 ms/pts. Continuar então em ponto meia em cinza claro até a peça medir 30-32-34-36-38-40 cm. Tricotar então o jacquard do diagrama A.1 e, AO MESMO TEMPO, na carreira assinalada com a flecha 1 no diagrama, distribuir 6-8-8-10-10-12 diminuições - VER DIMINUIÇÕES e DICA TRICÔ = 202-216-224-246-262-284 ms/pts. Continuar o jacquard. Na carreira com a flecha 2, distribuir 18-24-24-30-30-36 diminuições = 184-192-200-216-232-248 ms/pts. Continuar o jacquard. Na carreira com a flecha 3, distribuir 32-32-32-36-44-48 diminuições = 152-160-168-180-188-200 ms/pts. Continuar o jacquard. Na carreira com a flecha 4, distribuir 32-34-36-42-44-50 diminuições = 120-126-132-138-144-150 ms/pts. Continuar o jacquard. Na carreira com a flecha 5 (= última carreira), distribuir 34-30-34-36-36-34 diminuições = 86-96-98-102-108-116 ms/pts. Tricotar 1 carreira em cinza claro e, ao mesmo tempo, distribuir 4-6-4-6-6-4 aumentos - VER AUMENTOS = 90-102-102-108-114-120 ms/pts. Continuar então em canelado/barra 2 ms/pts meia/4 ms/pts liga/tricô na pequena agulha circular. Arrematar frouxamente as ms/pts como elas se apresentam a cerca de 20 cm de altura de canelado/barra. |
|||||||||||||||||||
Explicações do diagrama |
|||||||||||||||||||
|
|||||||||||||||||||
 |
|||||||||||||||||||
 |
|||||||||||||||||||
Terminou este projecto?Então, identifique as suas fotos com as tags #dropspattern ou mostre-as na galeria #dropsfan. Precisa de ajuda para este modelo?Encontrará 20 turotiais em vídeo, uma rubrica Comentários/Perguntas e muito mais ao visitar a página do modelo em www.garnstudio.com © 1982-2026 DROPS Design A/S. Todos os direitos reservados. Este documento, incluuindo as suas su-secções, tem copyrights. Saia mais o que pode fazer com os nossos modelos no fim de cada uma das páginas do nosso site. |
|||||||||||||||||||


Com mais de 40 anos no design de modelos de tricô e de croché, a DROPS Design oferece uma das mais vastas colecções demodelos gratuitos na Internet - traduzidos em 17 línguas. Neste dia de hoje, temos 324 catálogos e 12290 modelos - dos quais 12271 estão traduzidos em português.
Trabalhamos com muito empenho para lhe proporcionar o melhor que o tricô e o croché têm para oferecer, para lhe fornecer inspiração e conselhos bem como fios da mais elevada qualidade a preços incríveis! Gostaria de usar os nossos modelos para outros fins que não uso pessoal? Pode ler o que lhe é permitido fazer no Copyright texto que se encontra na parte de baixo de todos os nossos modelos. Bom tricô! Bom croché!
Deixe um comentário acerca do modelo DROPS Extra 0-1164
Gostaríamos muito de saber o que tem a dizer-nos acerca deste modelo!
Se deixar uma pergunta acerca do modelo, certifique-se de que escolhe a categoria adequada no formulário abaixo para acelerar o processo relativo à resposta. Os campos obrigatórios estão assinalados com um *.