
Categorias populares
Procura um fio?


Comentários / Perguntas (69)
![]() KTY escreveu:
KTY escreveu:
Bonsoir, très joli modèle. Est-il possible de rallonger les manches de quelques centimètres sans avoir à recalculer? Merci pour votre réponse
23.03.2021 - 21:29DROPS Design respondeu:
Bonjour Kty, probablement, vous trouverez ici d'autres hauts tricotés en fils du groupe B, avec des longueurs de manches différentes; vous pourrez vous en inspirer pour trouver la longueur/la méthode qui vous convient. Bon tricot!
24.03.2021 - 07:52
![]() Louise Ojén escreveu:
Louise Ojén escreveu:
Jeg er lidt over halvvejs i bærestykket med A2. Og det går nu op for mig at mønsteret er skævt. I opskriften står der at jeg skal strikke 14 m ret, A2 osv. Men hvornår starter de 14 masker ret? For starter de altid lige efter raglan mærket så vil mønstret jo ikke ende midt på...? Hvordan sikrer jeg mig at mønstret bliver på midten af forstykket, når der i opskriften står jeg skal strikke 14 masker derefter A2 osv? Vh. Louise.
05.01.2020 - 21:54
![]() Eva escreveu:
Eva escreveu:
Dobrý den, prosím jak na to raglánové skosení při Velikosti XL. NEMOHU SE V TOM VYZNAT. Děkuji
30.06.2019 - 13:05DROPS Design respondeu:
Dobrý den, Evo, text návodu je upravený a přeformulovaný, podívejte se, prosím, na odstavec RAGLÁNOVÉ ZKOSENÍ a pak rozpis pro SEDLO - věřím, že teď bude postup srozumitelnější a jasnější. Příjemné letní pletení! Hana
01.07.2019 - 08:43
![]() Deb From Nova Scotia escreveu:
Deb From Nova Scotia escreveu:
I mad this sweater in Belle navy blue, hand washed with Eucalan delicate soap, blocked and let it dry. Love the yarn; drapes nicely & has a nice weight and shine to it. I like the fit of the sweater, but, like a few others, I find the neck too wide. I’m a fairly new knitter and don’t know what to do to make the neck opening smaller. What do you suggest? I’d like to make another sweater from this pattern. I’m guessing that I should cast on fewer stitches, and knit extra rows. Correct?
20.02.2019 - 02:58DROPS Design respondeu:
Dear Deb From Nova Scotia, this pattern has a quite large neck as shown in the picture. We are unfortunately not able to adapt every pattern to every single request but please contact your DROPS store - even per mail or telephone - for any individual assistance. Happy knitting!
20.02.2019 - 09:36
![]() Dk escreveu:
Dk escreveu:
Hello, I finished the a2 and done all the 17 raglan repetitions for size small. However, instead of finding 294 stitches I only have 286. Which actually makes sense since 17 repetitions times 8 stitches is actually 136, plus the previous 150 totals 286. Is this a mistake on the pattern? Thank you !
04.11.2018 - 17:19DROPS Design respondeu:
Dear Dk, you increase for the raglan a total of 18 times (= 17 more times = 18 times), so that you will have 150 sts + (8 sts inc x 18 times = 144)= 294 sts. Happy knitting!
05.11.2018 - 09:44
![]() Kathy Fae escreveu:
Kathy Fae escreveu:
Thank you for the help. Another question regarding A2 section. I’m making a large. I have 50 sts on that section. (Instructions were knit 49, knit 1, then place a marker) So I have 50. I’ll work raglan increase, 4 sts, knit 16, work chart, (17 sts), that’s a total of 37 sts that only leaves 13 sts until marker. The A2 design will not be centered on the chest. What am I doing wrong?
21.06.2018 - 18:19DROPS Design respondeu:
Dear Mrs Fae, A.2 should be centered over the 49 sts on front piece = K16, work A.2, K14, inc for raglan = YO, K1, YO, K1fb, K1 (= st with marker), K1fb, YO, K1, YO and continue working inc at each raglan, at the end of round you will work the increase on each side of first marker (= at the end of round + at the beg of next round). Happy knitting!
22.06.2018 - 07:54
![]() Kathy Fae escreveu:
Kathy Fae escreveu:
I’m unsure about A2 section. I’ve placed all my raglan markers. I’m making a Large. Is this correct: Row 1, work raglan increases (4 sts), knit 16, work row 1 of chart, then continue on with knit and regular increases to end. Row 2, knit all, twisted knit ay certain YOs. Row 3, work raglan increases, then knit 16 again, then row 3 of chart. I’m uncertain because the charted area moves over two stitches due to the two raglan increases. Am I doing this right?
21.06.2018 - 09:18DROPS Design respondeu:
Dear Mrs Fae, when you will work row 3 in A.2 you should line it up over the row 1 in A.2, ie over the same 17 sts as on row 1 (you can insert a marker before and after these 17 sts to mark where A.2 should be worked). The number of sts on each side of A.2 will increase due to the raglan increases. Happy knitting!
21.06.2018 - 15:24
![]() Julie escreveu:
Julie escreveu:
Right now i have 294 stitches when i separate the stitches for the sleeves and the front and back on my needles i will only have 162 stitches when it written that i should have 174 the extra 12 stitches is that what i'm adding to the sleeves and counts for the 174? where does a person put the stitch markers?
28.05.2018 - 02:53DROPS Design respondeu:
Dear Julie, the new markers will be inserted in the middle of the new 6 sts cast on under sleeve: 81 sts (= front piece), 6 sts (= 3 sts, 1 marker, 3 sts), 81 sts (= back piece), 6 sts (= 3 sts, 1 marker, 3 sts) = 174 sts (there are now 66 sts on each side on thread/st holders). Happy knitting!
28.05.2018 - 09:48
![]() Julie escreveu:
Julie escreveu:
Hi I have another question the A 2 design how many stitches are between the holes? I really don’t understand the directions so any kind of help you could give would be much appreciated
18.05.2018 - 05:39DROPS Design respondeu:
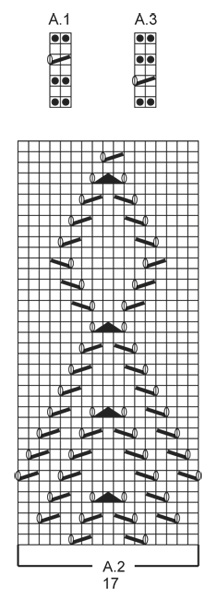
Dear Julie, diagram A.2 is showing the 17 sts you have to work on mid front. Start reading diagram from the bottom corner on the right side towards the left on every round. Inserting a marker at the beg and another marker at the end of A.2 to mark these 17 sts can help. Happy knitting!
18.05.2018 - 09:05
![]() Julie escreveu:
Julie escreveu:
Could you please explain to me on the yoke part of the pattern when i switch the needles to size 4 i increased the 16 stitches on the next round it says it wants to set 4 markers than i knitted the 45 stitches and knitted one more stitch and put the 2nd marker on this stitch is this stitch is to be the dividing stitch between front and the sleeve?jploog
17.05.2018 - 03:30DROPS Design respondeu:
Dear Julie, that's right the stitch with the 2nd marker is the st on raglan line between front and sleeve, the st with 3rd marker is between sleeve and back piece, the st with 4th marker is between back piece and sleeve (first st on round is the one between sleeve and front piece). Happy knitting!
17.05.2018 - 09:02
|
|||||||||||||||||||
Serene Spring |
|||||||||||||||||||
 |
 |
||||||||||||||||||
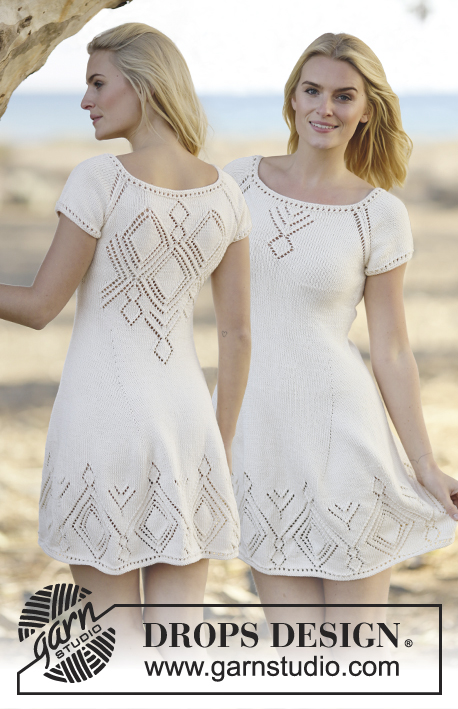
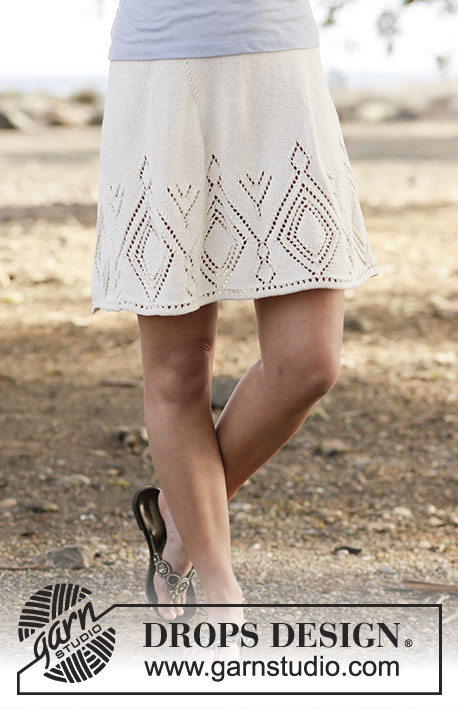
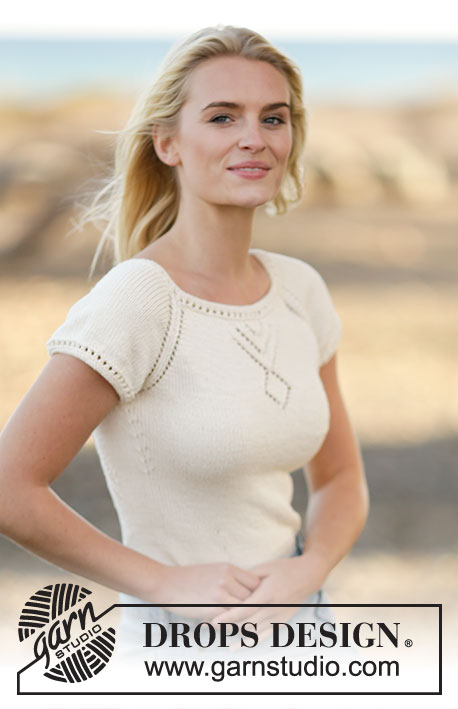
Top raglan rendado DROPS, em ”Belle”. Tricota-se de cima para baixo (top down). do S ao XXXL.
DROPS Extra 0-1104 |
|||||||||||||||||||
|
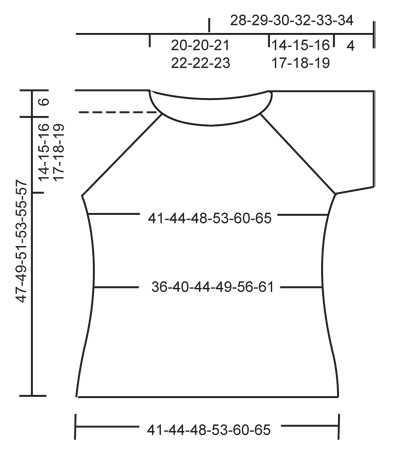
---------------------------------------------------------- NOTA: Existem termos diferentes de tricô e croché em português de Portugal e do Brasil. Malha = Ponto Canelado = Barra Ponto Jarreteira = Cordões de Tricô Ponto Liga = Ponto Tricô Croché : mpa – meio ponto alto pa – ponto alto pad – ponto alto duplo pat – ponto alto triplo pb – ponto baixo pbx – ponto baixíssimo pc – ponto corrente ---------------------------------------------------------- PONTO FANTASIA: Ver os diagramas A.1 a A.3. DIMINUIÇÕES: Diminuir 1 m/p antes do marcador da seguinte maneira: tricotar até restarem 2 ms/pts antes do marcador, deslizar 1 m/p em meia, 1 m/p meia, passar a m/p deslizada por cima da m/p tricotada. Diminuir 1 m/p depois do marcador da seguinte maneira: 2 ms/pts tricotadas juntamente em meia. RAGLAN: Aumenta-se para o raglan de forma diferente consoante o tamanho : Tamanho S-M: Aumentar 2 ms/pts a cada marcador (= 8 aumentos ao todo) da seguinte maneira: Aumentar 1 m/p de cada lado de cada marcador (= 8 aumentos) da seguinte maneira: 1 laçada, 1 m/p torcida em meia, 1 m/p meia, 1 m/p torcida em meia, 1 laçada. Não tricotar as laçadas torcidas na carreira seguinte porque devem formar ajours (buracos). Repetir estes aumentos mais 17-19 vezes a cada 2 carreiras. NOTA: Os aumentos de cada lado do 1.º marcador (= na última m/p da carreira) faz-se da seguinte maneira: no princípio da carreira; 1 m/p torcida em meia, 1 laçada No fim da carreira: 1 laçada, 1 m/p torcida em meia, 1 m/p meia (= m/p com o marcador). TAMANHO L-XL-XXL-XXXL: Aumentar 2 ms/pts de cada lado de todos os marcadores (= 16 aumentos ao todo) da seguinte maneiras: 1 laçada,1 m/p meia, 1 laçada, 1 m/p em meia torcida, 1 m/p meia (= m/p com o marcador), 1 m/p em meia torcida, 1 laçada, 1 m/p meia, 1 laçada (tricotar aa primeira e a última laçada torcidas na carreira seguinte porque não devem formar buracos enquanto as 2 laçadas do meio devem formar buracos). Repetir estes aumentos a cada 2 carreiras mais 1-1-1-3 vezes. NOTA: Os aumentos de cada lado do 1.º marcador (= na última m/p da carreira) faz-se da seguinte maneira: no princípio da carreira; 1 m/p torcida em meia, 1 laçada, 1 m/p meia, 1 laçada. No fim da carreira: 1 laçada, 1 m/p meia, 1 laçada, 1 m/p torcida em meia, 1 m/p meia (= m/p com o marcador). Depois, aumentar da seguinte maneira: aumentar 1 m/p da cada lado de todos os marcadores (= 8 aumentos ao todo) da seguinte maneira: 1 laçada, 1 m/p em meia torcida, 1 m/p meia (= m/p com o marcador), 1 m/p em meia torcida, 1 laçada. Não tricotar em meia torcida as laçadas porque devem formar buracos. Repetir estes aumentos mais 19-20-22-21 vezes ao todo a cada 2 carreiras. AUMENTOS: Começar 1 m/p antes do marcador e aumentar da seguinte maneira: 1 laçada, 2 ms/pts meia (o marcador está entre estas 2 ms/pts), 1 laçada. Na carreira seguinte, tricotar as laçadas torcidas em meia para evitar buracos. ---------------------------------------------------------- TOP: Tricota-se em redondo na agulha circular, de cima para baixo. ENCAIXE: Montar 134-134-140-144-144-148 ms/pts com a agulha circular 3.5 mm em Belle. Tricotar A.1 (= 2 ms/pts) em todas as ms/pts. Quando A.1 tiver sido tricotado 1 vez em altura, continuar com a agulha circular 4,mm e, na carreira seguinte, tricotar todas as ms/pts em meia distribuindo 16-20-14-22-42-46 aumentos = 150-154-154-166-186-194 sts. Na carreira seguinte, colocar 4 marcadores da seguinte maneira: Colocar o 1.º marcador na última m/p na última carreira, 45-47-49-55-65-71 ms/pts meia (= frente), 1 m/p meia e colocar o 2.º marcador nessa m/p, 28-28-26-26-26-24 ms/pts meia (= manga),1 m/p meia e colocar o 3.º marcador nessa m/p, 45-47-49-55-65-71 ms/pts meia (= costas), 1 m/p meia e colocar o 4.º marcador nessa m/p, 28-28-26-26-26-24 ms/pts meia (= manga). NÃO ESQUECER DE MANTER A MESMA TENSÃO DA INDICADA PARA A AMOSTRA! Tricotar então da seguinte maneira - ao mesmo tempo, aumentar para o RAGLAN - ver acima. Fazer metade dos aumentos para o raglan para o 1.º marcador (ver acima): 14-15-16-19-24-27 ms/pts meia, A.2 (= 17 ms/pts), tricotar em meia até restarem 1-1-2-2-2-2 ms/pts antes do 2.º marcador, fazer o RAGLAN - ver acima -, tricotar em meia até restar 1-1-2-2-2-2 ms/pts antes do 3.º marcador, fazer o raglan, tricotar em meia até restarem 1-1-2-2-2-2 ms/pts antes do 4.º marcador, fazer o raglan, tricotar em meia até restarem 1-1-2-2-2-2 ms/pts antes do 1.º marcador, fazer oraglan. tricotar os aumentos em ponto meia. Quando A.2 tiver sido tricotado 1 vez em altura, tricotar todas estas ms/pts em ponto meia. Quando todos os aumentos estão feitos, temos 294-314-338-358-394-426 ms/pts. A peça mede cerca de 14-15-16-17-18-19 cm. Continuar em ponto meia da seguinte maneira: tricotar as 81-87-95-103-117-129 primeiras ms/pts (= frente), deslizar as 66-70-74-76-80-84 ms/pts seguintes para um alfinete de ms/pts para a manga, montar 6-6-6-8-8-8 ms/pts sob a manga (colocar um marcador a meio destas novas ms/pts), tricotar as 81-87-95-103-117-129 ms/pts seguintes (= costas), deslizar as 66-70-74-76-80-84 ms/pts seguintes para um alfinete de ms/pts para a manga, montar 6-6-6-8-8-8 ms/pts sob a manga (colocar um marcador a meio destas novas ms/pts) = restam 174-186-202-222-250-274 ms/pts. Colocar 1 marcador. Medir, então, a partir daqui. COSTAS & FRENTE: Continuar em ponto meia e. a 3 cm, diminuir 1 m/p de cada lado de cada um dos marcadores dos lados (= 4 diminuições) - ver DIMINUIÇÕES! Repetir estas diminuições mais 5-3-3-3-3-3 vezes a cada 2½-4-4-4-4-4 cm = 150-170-186-206-234-258 ms/pts. A 20 cm para todos os tamanhos, aumentar 1 m/p de cada lado de cada um dos marcadores dos lados (= 4 aumentos) - ver AUMENTOS. Repetir estes aumentos mais 5-3-3-3-3-3 vezes a cada 2-4-4-4-4-4 cm = 174-186-202-222-250-274 ms/pts. A 31-32-33-34-35-36 cm, continuar com a agulha circular 3.5 mm e tricotar A.3 (= 2 ms/pts) em todas as ms/pts. Arrematar. MANGAS: Tricotam-se em redondo nas agulhas de pontas duplas. Retomar as ms/pts em espera e colocá-las nas agulhas de pontas duplas 4 mm e montar 6-6-6-8-8-8 ms/pts sob a manga = 72-76-80-84-88-92 ms/pts. Tricotar em ponto meia durante 2 cm e, na carreira seguinte, distribuir 8 diminuições = 64-68-72-76-80-84 ms/pts. Mudar para as agulhas de pontas duplas 3,5 mm e tricotar A.3 em todas as ms/pts. Arrematar. Tricotar a outra manga da mesma maneira. |
|||||||||||||||||||
Explicações do diagrama |
|||||||||||||||||||
|
|||||||||||||||||||
 |
|||||||||||||||||||
 |
|||||||||||||||||||
Terminou este projecto?Então, identifique as suas fotos com as tags #dropspattern ou mostre-as na galeria #dropsfan. Precisa de ajuda para este modelo?Encontrará 21 turotiais em vídeo, uma rubrica Comentários/Perguntas e muito mais ao visitar a página do modelo em www.garnstudio.com © 1982-2026 DROPS Design A/S. Todos os direitos reservados. Este documento, incluuindo as suas su-secções, tem copyrights. Saia mais o que pode fazer com os nossos modelos no fim de cada uma das páginas do nosso site. |
|||||||||||||||||||


Com mais de 40 anos no design de modelos de tricô e de croché, a DROPS Design oferece uma das mais vastas colecções demodelos gratuitos na Internet - traduzidos em 17 línguas. Neste dia de hoje, temos 324 catálogos e 12290 modelos - dos quais 12271 estão traduzidos em português.
Trabalhamos com muito empenho para lhe proporcionar o melhor que o tricô e o croché têm para oferecer, para lhe fornecer inspiração e conselhos bem como fios da mais elevada qualidade a preços incríveis! Gostaria de usar os nossos modelos para outros fins que não uso pessoal? Pode ler o que lhe é permitido fazer no Copyright texto que se encontra na parte de baixo de todos os nossos modelos. Bom tricô! Bom croché!
Deixe um comentário acerca do modelo DROPS Extra 0-1104
Gostaríamos muito de saber o que tem a dizer-nos acerca deste modelo!
Se deixar uma pergunta acerca do modelo, certifique-se de que escolhe a categoria adequada no formulário abaixo para acelerar o processo relativo à resposta. Os campos obrigatórios estão assinalados com um *.