
Categorias populares
Procura um fio?


Comentários / Perguntas (23)
![]() Kajsa Schrewelius escreveu:
Kajsa Schrewelius escreveu:
Hej! Jättefint mönster men ska börja med kanten nu! Förstår inte första"kanten" ..*2 fm om nästa lm-båge (MED 2 lm)? Ska man virka 2 lm extra och var i såfall vardå??? eller ingår de i de 2 fm??
20.10.2025 - 07:28DROPS Design respondeu:
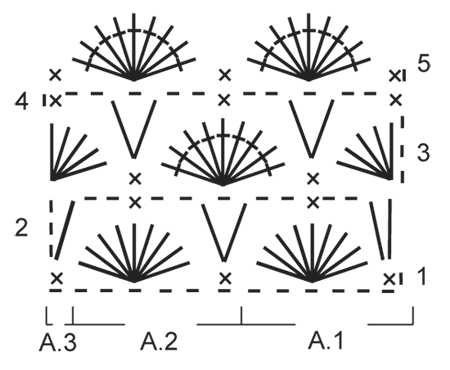
Hei Kajsa. (med 2 lm) betyr at det er en luftmaskebue som består av 2 luftmasker. Når du avsluttet diagrammene (A.1.-A.2-A.3) skulle 2. rad være den siste. Den raden består av mange 2 luftmasker (= luftmaskebue). Så når du starter på kanten hekler du: 1 luftmaske + 1 fastmaske i 1.stav fra forrige rad, 2 fastmasker om de 2 luftmaskene (luftmaskebuen), 1 fastmaske i neste fastmaske.....så følger du beskrivningen i oppskriften.. mvh DROPS Design
27.10.2025 - 12:01
![]() Delia escreveu:
Delia escreveu:
If find your first row isn’t working out right, I would suggest marking each chain that should have a stitch with a stitch marker. I found that the chain gets distorted as you put in stitches and it’s easy to miss/mistake a chain.
31.12.2023 - 20:59
![]() Ragnhild escreveu:
Ragnhild escreveu:
Hei! Hvordan hekler man 9st om 1lm? Har dere en video på det? Prøver lære meg mønster her, men akkurat hvordan det hekles forstår jeg rett og slett ikke. Jeg forstår 9st i 1lm, men ikke når det står «om».
28.01.2021 - 18:18DROPS Design respondeu:
Hej Ragnhild. Kanske denna video kan vara till hjälp. Mvh DROPS Design
29.01.2021 - 06:54
![]() Sara Rose escreveu:
Sara Rose escreveu:
Hi, on start of row 3, in the diagram - you have 3 chain and five dc's (or trebles depending on UK/USA references), should that not be: 3chain and 4 dc's? Otherwise you end up with an extra stitch on one side (Right side.) The 3 chain compensates for the dc inclusive? I think its a diagramatic mistake and not intended? It's a beautiful pattern. Love it! I will post my cloth on instagram
27.11.2020 - 13:10
![]() Kim escreveu:
Kim escreveu:
Hi! Thank you for posting this wonderful pattern. I keep getting stuck with row one. I made a chain of 32, but when I skip two chains every time after crocheting the double crochet or 9 triple crochet in one chain, I only have 4 bows in the end and and not enough chains left to do a 5th bow and end with A3. Could you tell me what I’m doing wrong? Don’t I have to skip 2 chains? Or is it something else? Thank you in advance.
25.08.2020 - 18:21DROPS Design respondeu:
Dear Kim, crochet 1 dc in 2nd ch from hook, skip 2 ch, 9 tr in next ch, skip 2 ch (= A.1 = 6 sts + 1 ch to turn); then repeat A.2 = 1 dc in next ch, skip 2 ch, 9 tr in next ch, skip 2 ch = 6 ch x 4 = 24 ch, 1 dc in last chain = 7 + 24+1= 32 chains. Happy crocheting!
26.08.2020 - 08:07
![]() Madeleine Deguise escreveu:
Madeleine Deguise escreveu:
. je ne comprend pas le modele rang A1et rang A2
17.01.2020 - 15:40DROPS Design respondeu:
Bonjour Mme Deguise, vous devez crocheter les 3 diagrammes à chaque rang, sur l'endroit, commencez par A.1 (= 1 fois), répétez ensuite 4 fois A.2 et terminez par A.3. Sur l'envers, commencez par A.3, répétez 4 fois A.2 et terminez par A.1. - plus d'infos sur les diagrammes ici. Bon crochet!
17.01.2020 - 15:49
![]() Lisa escreveu:
Lisa escreveu:
Hej! Jeg har hæklet række 1-4, men jeg synes simpelthen at det er stram i den nederste kant. Jeg har lavet meget løse luftmasker, så jeg ved ikke hvad jeg gør galt. Er det også sådan ved jer? Eller kan man evt starte med flere luftmasker og springe nogle af dem over?
20.06.2019 - 09:18DROPS Design respondeu:
Hej Lisa, ja det er en god ide, hvis kanten bliver for stram, så lav gerne flere luftmasker :)
09.07.2019 - 09:28
![]() Anette escreveu:
Anette escreveu:
Hej Det er så smukt et mønster, men allerede efter jeg har hæklet ca 7cm i højden kan man se, at det ligesom trækker til den ene side. Kluden bliver således ikke firkantet, men rhombeformet. Jeg mener, jeg følger mønsteret nøje og kan derfor ikke forstå hvorfor dette sker. Har I evt. et bud på en forklaring? Hvad gør jeg mon forkert? V.h. Anette
14.02.2019 - 19:01DROPS Design respondeu:
Hei Anette. Jeg har dessverre ingen god forklaring på hvorfor dette skjer. Diagrammet strikkes jo frem og tilbake, og det er forholdsvis likt i begge sider, så det er ingen grunn til at det skal trekke til den ene siden. Kanskje er det en butikk med DROPS garn i nærheten du kan ta med deg arbeidet ditt til? de kan nok kanskje se hva som eventuelt har skjedd. God fornøyelse
18.02.2019 - 14:57Olivia escreveu:
Hello, is there written instructions for the pattern? The diagram doesn't make sense to me and I really love the look of the pattern! Thank you so much.
12.08.2018 - 22:52DROPS Design respondeu:
Dear Olivia, there is only diagram to this pattern: start reading diagram from the RS as follows: work A.1, repeat A.2 and finish with A.3. From WS work: A.3, repeat A.2 (reading from the left towards the right) and finish with A.1. Each symbol in diagram match a stitch/group of stitch - see diagram key. Happy crocheting!
13.08.2018 - 10:11
![]() Susan escreveu:
Susan escreveu:
Many thanks for the link to the photo sequence. The visuals make the diagram very clear. I look forward to starting this pattern this evening.
09.07.2018 - 00:37
|
||||||||||||||||
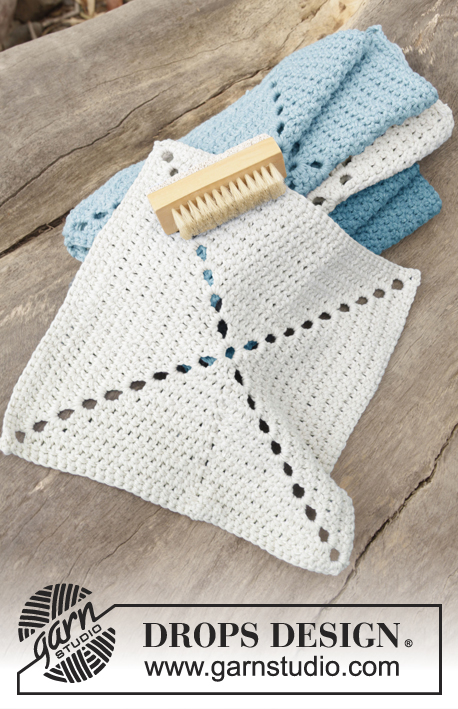
Warm And Soothing#warmandsoothingcloth |
||||||||||||||||
|
|
||||||||||||||||
Toalhete DROPS em croché, em ponto de conchas, em ”Cotton Light”.
DROPS 162-37 |
||||||||||||||||
|
---------------------------------------------------------- NOTA: Existem termos diferentes de tricô e croché em português de Portugal e do Brasil. Malha = Ponto Canelado = Barra Ponto Jarreteira = Cordões de Tricô Ponto Liga = Ponto Tricô Croché : mpa – meio ponto alto pa – ponto alto pad – ponto alto duplo pat – ponto alto triplo pb – ponto baixo pbx – ponto baixíssimo ---------------------------------------------------------- PONTO FANTASIA: Ver diagramas A.1, A.2 e A.3. ---------------------------------------------------------- TOALHETE: Montar frouxamente uma corrente de 32 pc (incluindo 1 pc para virar) com a agulha de croché 3.5 mm em Cotton Light. Crochetar então em PONTO FANTASIA - ver diagrama - da seguinte maneira: A.1, repetir 4 vezes A.2 ao todo, terminar com A.3. Quando o diagrama tiver sido crochetado 1 vez em altura, repetir as carreiras 2-5. Continuar até o toalhete medir cerca de 22 cm de altura - ajustar a altura para que a última carreira seja a carreira 2 do diagrama. ORLA: Virar e crochetar a seguinte orla em redondo, começando ao longo da última carreira da seguinte maneira: 1 pc e 1 pb no 1.º pa, * 2 pb no aro (de 2 pc) seguinte, 1 pb no pb seguinte, 2 pb no aro (de 2 pc) seguinte, 1 pb no aro (de 1 pc) seguinte*, repetir de * a * em toda a carreira e terminar com 1 pb, 1 pc e 1 pb no último pa (= canto). Girar a peça e crochetar, descendo ao longo do lado da seguinte maneira : 1 pb no mesma pa do canto, *1 pb no pb seguinte, 1 pc, 2 pb em cada um dos 2 pa seguintes*, repetir de * a * e terminar com 1 pb, 1 pc e 1 pb no último pb/ponto (= canto). Girar a peça e crochetar ao longo da corrente de base da seguinte maneira: *2 pb no aro (de 2 pc) seguinte, 1 pb no pb seguinte, 1 pc, 2 pb no aro (de 2 pc) seguinte*, repetir de * a * em toda a carreira e terminar com 1 pb, 1 pc e 1 pb no último pb. Girar novamente a peça e subir ao longo do lado crochetando como se fez para o 1.º lado. Terminar com 1 pb, 1 pc e 1 pbx no 1.º pb do princípio da carreira. Arrematar. |
||||||||||||||||
Explicações do diagrama |
||||||||||||||||
|
||||||||||||||||
 |
||||||||||||||||
Terminou este projecto?Então, identifique as suas fotos com as tags #dropspattern #warmandsoothingcloth ou mostre-as na galeria #dropsfan. Precisa de ajuda para este modelo?Encontrará 4 turotiais em vídeo, uma rubrica Comentários/Perguntas e muito mais ao visitar a página do modelo em www.garnstudio.com © 1982-2026 DROPS Design A/S. Todos os direitos reservados. Este documento, incluuindo as suas su-secções, tem copyrights. Saia mais o que pode fazer com os nossos modelos no fim de cada uma das páginas do nosso site. |
||||||||||||||||


Com mais de 40 anos no design de modelos de tricô e de croché, a DROPS Design oferece uma das mais vastas colecções demodelos gratuitos na Internet - traduzidos em 17 línguas. Neste dia de hoje, temos 324 catálogos e 12290 modelos - dos quais 12271 estão traduzidos em português.
Trabalhamos com muito empenho para lhe proporcionar o melhor que o tricô e o croché têm para oferecer, para lhe fornecer inspiração e conselhos bem como fios da mais elevada qualidade a preços incríveis! Gostaria de usar os nossos modelos para outros fins que não uso pessoal? Pode ler o que lhe é permitido fazer no Copyright texto que se encontra na parte de baixo de todos os nossos modelos. Bom tricô! Bom croché!
Deixe um comentário acerca do modelo DROPS 162-37
Gostaríamos muito de saber o que tem a dizer-nos acerca deste modelo!
Se deixar uma pergunta acerca do modelo, certifique-se de que escolhe a categoria adequada no formulário abaixo para acelerar o processo relativo à resposta. Os campos obrigatórios estão assinalados com um *.