
Categorias populares
Procura um fio?


Comentários / Perguntas (107)
![]() Susanne Altenburg escreveu:
Susanne Altenburg escreveu:
Hallo hab mal eine Frage. Ich muss ja bei meiner Größe 74 lm für die Ärmel nehmen.aber die 12 luft maschen für die Verbindung zählen die dann später zu den 74 luftmachen ? Dann hätte ich ja wenn ich alles ein mal rum häkel dann ins gesamt 86 Stäbchen für die ärmel were es richtig? Gruß Frau Altenburg
22.02.2021 - 17:49DROPS Design respondeu:
Liebe Frau Altenburg, ja so stimmt es, und dann bei der 1. Runde bei den Ärmeln häkeln Sie noch 2 Stäbchen dazu und zwar jet 1 Stäbchen um das Stäbchen der Stäbchen Reihe an der Stelle, wo die Luftmaschen unter den Arm gehäkelt werden (-= also beidseitig, vor den 12 und nach den 12) = 86 + 2 = 88 Stäbchen. Viel Spaß beim häkeln!
23.02.2021 - 09:34
![]() Cloudy escreveu:
Cloudy escreveu:
Hi there I’m up to the finishing touch on the sleeve edge. It says for size L to do the A2 diagram 11 times but then it says to do it once vertically. Can you please explain which it is.
16.12.2020 - 05:11DROPS Design respondeu:
Dear Cloudy, you have 88 sts around sleeve edge and can repeat a total of 11 times the 8 stitches in A.2. After you have worked the 2 rows of A.2, diagram is finished (and has been worked one time in height = vertically). Edge is finished. Cut and fasten the yarn. Happy crocheting!
16.12.2020 - 07:10
![]() Erin escreveu:
Erin escreveu:
Hello! I am working on this in XXL and I am confused on the marker placement portion. I have (23+4+4+20+4+4+46+4+4+23+4+4=144) with each + being a marker, but I need 164 stitches? Any clarification provided would be much appreciated. Thank you!
15.10.2020 - 18:31DROPS Design respondeu:
Dear Erin, it looks like you have forgotten 20 one time after the 46+4+4, ie: 23+4+4+20 +4+4+ 46 + 4+4+20+4+4+23=164. Happy crocheting!
16.10.2020 - 08:54
![]() Cloudy escreveu:
Cloudy escreveu:
The garment on the model looks fitted coming in at the waist and flaring out towards the hem. Another reader said hers looks like a dress and so does mine. Very disappointed in this pattern.
09.10.2020 - 03:16DROPS Design respondeu:
Dear Cloudy, did you check and kept correct tension as explained in the pattern? remember to check your size with the measurement chart - read more about charts here. Happy crocheting!
09.10.2020 - 08:08
![]() Moira escreveu:
Moira escreveu:
One more thing that’s confusing. It says in A1 to work 1st-3rd rounds 40 times (XL) size and then 3rd round until work measures 33cm. It looks like the 1st round is only done once like a set up row, is that correct? If it is and the 3rd is repeated then why are there two instructions, to repeat 40 times and to repeat until work measures 33cm? One would assume that 1st and 3rd rounds are repeated 40 times just by the way it’s written.i must admit these patterns are not easy to work out.
08.10.2020 - 19:28DROPS Design respondeu:
Dear Moira, you repeat 40 times A.1 in the round in size XL (= the row with the arrow 1 to the row with the 3. on the right side) - then after these 3 rows have been worked, you repeat row 3 until piece measures 33 cm, then work row/repeat 4. in A.1 until piece measures 45 cm. Happy crocheting!
09.10.2020 - 07:39
![]() Moira escreveu:
Moira escreveu:
Hi there, the A1 diagram does not make any sense in your explanation to a previous knitter. According to your abbreviations, the first row is a sc, then skip 2 and 4 ch, but the next sc is not in any particular dc from the previous row, it is in the middle of two dc. I don’t understand that. Then row 2 (which doesn’t say it’s row 2) starts off with a dc in the chain space. Can you please clarify as your diagram and abbreviations are very confusing.
08.10.2020 - 17:44DROPS Design respondeu:
Dear Moira, you repeat the diagram in widht, ie (1 sc in next dc, 4 chains, skip 2 dc, 1 sc in next dc, 4 chains, skip 2 dc) and repeat from (to). Row 2 just starts wit 3 ch (see CROCHET INFO-1) ie crochet: 3 chains (= 1st dc), 3 dc+2ch+3dc in next ch-space, and repeat with 1 dc in next ch-space. If you like the first dc of 2nd row being in the middle of the first ch-space, you can crochet some sl st in the first ch-space. Happy crocheting!
09.10.2020 - 07:27
![]() Johanna escreveu:
Johanna escreveu:
Erg mooi patroon! Ik heb een vraag over de markeerders. Ik ben nu bij de toer gekomen waar ik aan elke kant van de markeerders moet meerderen, maar wat moet ik met de markeerders doen wanneer ik naar de volgende toer ga? Moet ik ze laten zitten en dan op dezelfde hoogte in de volgende goede kant weer meerderen, of neem ik ze steeds mee naar de volgende toer? ( het is de eerste keer dat ik een ronde pas haak...😅) Alvast bedankt!
29.09.2020 - 01:23DROPS Design respondeu:
Dag Johanna,
Je kunt de markeerders inderdaad laten zitten en meenemen in de hoogte, zodat je weet waar je de volgende keer moet meerderen.
21.10.2020 - 12:20
![]() Debbie Zaayman escreveu:
Debbie Zaayman escreveu:
I have started with this pattern and have started the first four rows of the fan pattern. Can i please give you my email address and then you can forward me your email address. I want to send you a picture so you can see if looks right before i continue. Currently it looks like a dress and dont know if it is suppose to look like that.\r
24.08.2020 - 16:44
![]() Debbie Zaayman escreveu:
Debbie Zaayman escreveu:
Can you please clarify for me with regrds to the first fan patter row..... do i understand it correctly: A1 the first row, is it three trebles in one chain, two chains(skip 2 chains) three treble in next chain and one treble in next chain
16.08.2020 - 16:46DROPS Design respondeu:
Dear Mrs Zaayman, start A.1 with 1 double crochet (= UK Engish), then 4 chains, skip 2 stitches, then repeat (1 dc in next st, 4 chains, skip 2 sts) around. on 2nd row work 3 ch (at the beg of round only to replace 1st treble), then crochet around next ch-space: 3 tr, 2 ch, 3 tr, and repeat (1 tr around next ch-space, 3tr +2 ch+3 tr around next ch-space). Happy crocheting!
17.08.2020 - 08:51
![]() Anna escreveu:
Anna escreveu:
Bei den Zunahmen vor und nach, bzw. dann nur noch vor dem Markier steht, dass diese in den Hinreihen gearbeitet werden. Ist hiermit tatsächlich nur jede zweite Reihe gemeint und die Rückreihen finden ohne Zunahmen statt?
20.07.2020 - 09:19DROPS Design respondeu:
Liebe Anna, wenn Sie in jede Hinreihe zunehmen sollen, dann nehmen Sie in jeder 2. Reihe, dh nur bei den Hinreihen, bei den Rückreihen werden Sie nicht zunehmen. Viel Spaß beim häkeln!
20.07.2020 - 10:01
|
||||||||||||||||||||||||||||
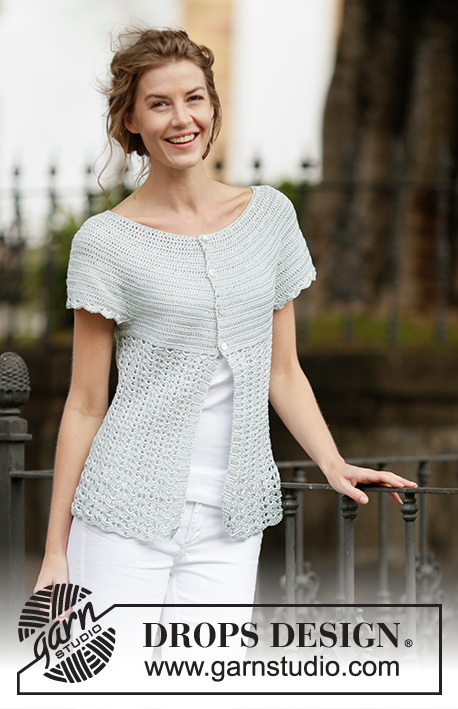
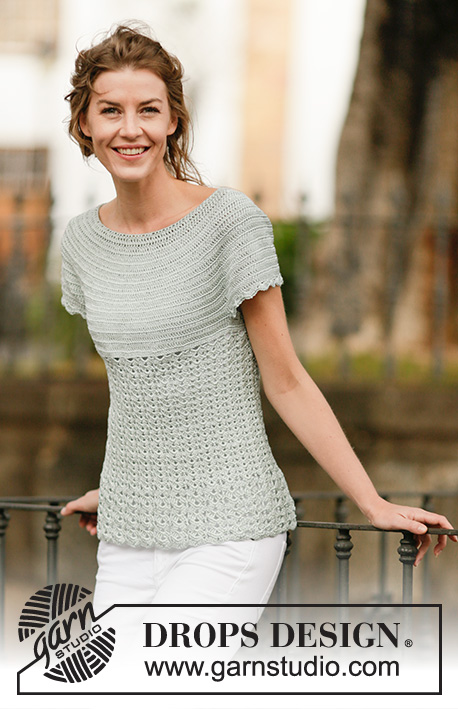
Lady Ascot#ladyascottop |
||||||||||||||||||||||||||||
 |
 |
|||||||||||||||||||||||||||
Top DROPS em croché com ponto de leques e encaixe arredondado, crochetado de cima para baixo (top down), em ”Cotton Viscose”. Do S ao XXXL.
DROPS 162-26 |
||||||||||||||||||||||||||||
|
---------------------------------------------------------- NOTA: Existem termos diferentes de tricô e croché em português de Portugal e do Brasil. Malha = Ponto Canelado = Barra Ponto Jarreteira = Cordões de Tricô Ponto Liga = Ponto Tricô Croché : mpa – meio ponto alto pa – ponto alto pad – ponto alto duplo pat – ponto alto triplo pb – ponto baixo pbx – ponto baixíssimo pc – ponto corrente ---------------------------------------------------------- PONTO FANTASIA: Ver diagramas A.1-A.2. DICA CROCHÉ-1: Substituir o 1.º pa de cada carreira de pa por 3 pc, terminar a carreira com 1 pbx no 3.º pc. DICA CROCHÉ-2: Começar todas as carreiras com 3 pc e terminar a carreira com 1 pbx no 3.º pc. AUMENTOS: Para aumentar 1 pa, crochetar 2 pa num pa. ---------------------------------------------------------- TOP: Crocheta-se de cima para baixo a partir do meio das costas. Montar uma corrente de 133-137-142-147-152-157 pc com a agulha de croché 3.5 mm em Cotton Viscose e unir em redondo com 1 pbx no 1.º pc. Crochetar a carreira seguinte da seguinte maneira: 3 pc (= 1 pa), 1 pa no 1.º pc do aro de pc, *saltar 1 pc, 1 pa em cada um dos 5 pc seguintes*, repetir de * a * até restarem 0-4-3-2-1-0 pc, 1 pa em cada um dos 0-4-3-2-1-0 últimos pc = 112-116-120-124-128-132 pa. Continuar então em idas e voltas, terminando cada carreira com 1 pbx no 1.º pc do princípio da carreira - VER DICA CROCHÉ-1. Virar. Crochetar 1 carreira de pa (= 1 pa em cada pa) e, AO MESMO TEMPO, aumentar 28 pa a intervalos regulares (ou seja, aumentar 1 pa depois de cerca de cada 4e pa) – VER AUMENTOS = 140-144-148-152-156-160 pa. Colocar 12 marcadores da seguinte maneira: Crochetar 17-18-19-20-21-22 pa (= meias costas) e, AO MESMO TEMPO, aumentar 1-0-0-2-2-1 pa a intervalos regulares, colocar o 1.º marcador, *crochetar 4 pa, colocar o marcador seguinte*, repetir de * a * mais 1 vez, crochetar 20 pa, colocar o marcador seguinte, *crochetar 4 pa, colocar o marcador seguinte*, repetir de * a * mais 1 vez, crochetar 34-36-38-40-42-44 pa (= frente) AO MESMO TEMPO, aumentar 2-0-0-4-4-2 pa a intervalos regulares, colocar o marcador seguinte, *crochetar 4 pa, colocar o marcador seguinte*, repetir de * a * mais 1 vez, crochetar 20 pa, colocar o marcador seguinte, *crochetar 4 pa, colocar o marcador seguinte*, repetir de * a * mais 1 vez, crochetar 17-18-19-20-21-22 pa (= meias costas) AO MESMO TEMPO, aumentar 1-0-0-2-2-1 pa a intervalos regulares = 144-144-148-160-164-164 pa. NÃO ESQUECER DE MANTER A MESMA TENSÃO DA INDICADA PARA A AMOSTRA! Na carreira seguinte pelo direito, aumentar 1 pa de cada lado de cada marcador (= 24 pa aumentados), repetir estes aumentos 1-4-5-7-8-10 vezes ao todo em todas as carreiras pelo direito e, depois, aumentar antes de cada marcador (= 12 pa aumentados), e repetir estes aumentos 9-6-6-4-4-3 vezes ao todo em todas as carreiras pelo direito = 276-312-340-376-404-440 pa. A peça mede cerca de 18-18-20-20-22-23 cm. Crochetar a carreira seguinte da seguinte maneira: 36-43-48-54-59-66 pa (= meias costas), crochetar 12 pc (colocar 1 marcador a meio desses novos pc = sob a manga), saltar 66-70-74-80-84-88 pa da carreira precedente (= manga), crochetar 72-86-96-108-118-132 pa (= frente), 12 pc (colocar 1 marcador a meio dessas novos pc = sob a manga), saltar 66-70-74-80-84-88 pa da carreira precedente e crochetar 36-43-48-54-59-66 pa (= meias costas) = 168-196-216-240-260-288 pa/pc (= 84-98-108-120-130-144 pa/pc para as costas e a frente). Colocar 1 marcador. MEDIR, ENTÃO, A PEÇA A PARTIR DAQUI! Crochetar 1 carreira de pa (= 1 pa em cada pa e 1 pa em cada pc sob a manga), AO MESMO TEMPO, aumentar 18-8-6-0-10-6 pa a intervalos regulares = 186-204-222-240-270-294 pa. Crochetar 1 carreira de pa e continuar , então, em redondo, mas sem virar. PONTO DE LEQUES: Crochetar 31-34-37-40-45-49 vezes as carreiras 1 -3 de A.1 - VER DICA CROCHÉ-2. Repetir então a 3.ª carreira até a peça medir cerca de 29-31-31-33-31-31 cm. Crochetar, então, a 4.ª carreira até a peça medir cerca de 40-42-43-45-45-45 cm. Arrematar. ORLA DAS MANGAS: Começar a meio sob a manga da seguinte maneira: 1 pb no 6e dos 12 pc da cava, 3 pc (= 1 pa), 1 pa em cada um dos 6 pc seguintes, 1 pa na carreira de pa em que a corrente da 'cava foi crochetada, 1 pa em cada um dos 66-70-74-80-84-88 pa seguintes (= manga) e, AO MESMO TEMPO, aumentar 0-4-0-2-6-2 pa a intervalos regulares, 1 pa na carreira de pa em que a corrente da cava foi crochetada, 1 pa em cada um dos restantes 5 pc sob a manga = 80-88-88-96-104-104 pa. Crochetar então 10-11-11-12-13-13 vezes A.2 ao todo. Arrematar quando A.2 tiver sido crochetado 1 vez em altura. Crochetar a outra orla da manga da mesma maneira. |
||||||||||||||||||||||||||||
Explicações do diagrama |
||||||||||||||||||||||||||||
|
||||||||||||||||||||||||||||
 |
||||||||||||||||||||||||||||
 |
||||||||||||||||||||||||||||
Terminou este projecto?Então, identifique as suas fotos com as tags #dropspattern #ladyascottop ou mostre-as na galeria #dropsfan. Precisa de ajuda para este modelo?Encontrará 13 turotiais em vídeo, uma rubrica Comentários/Perguntas e muito mais ao visitar a página do modelo em www.garnstudio.com © 1982-2026 DROPS Design A/S. Todos os direitos reservados. Este documento, incluuindo as suas su-secções, tem copyrights. Saia mais o que pode fazer com os nossos modelos no fim de cada uma das páginas do nosso site. |
||||||||||||||||||||||||||||


Com mais de 40 anos no design de modelos de tricô e de croché, a DROPS Design oferece uma das mais vastas colecções demodelos gratuitos na Internet - traduzidos em 17 línguas. Neste dia de hoje, temos 324 catálogos e 12290 modelos - dos quais 12271 estão traduzidos em português.
Trabalhamos com muito empenho para lhe proporcionar o melhor que o tricô e o croché têm para oferecer, para lhe fornecer inspiração e conselhos bem como fios da mais elevada qualidade a preços incríveis! Gostaria de usar os nossos modelos para outros fins que não uso pessoal? Pode ler o que lhe é permitido fazer no Copyright texto que se encontra na parte de baixo de todos os nossos modelos. Bom tricô! Bom croché!
Deixe um comentário acerca do modelo DROPS 162-26
Gostaríamos muito de saber o que tem a dizer-nos acerca deste modelo!
Se deixar uma pergunta acerca do modelo, certifique-se de que escolhe a categoria adequada no formulário abaixo para acelerar o processo relativo à resposta. Os campos obrigatórios estão assinalados com um *.