
Categorias populares
Procura um fio?


Comentários / Perguntas (100)
![]() Mariam Khan escreveu:
Mariam Khan escreveu:
Hei. I A3 så er det grupper med 4 staver oppover i midten. Jeg syns diagrammet viser veldig dårlig hvordan det skal bli gjort. Skal stavene bli heklet i maskene fra forrige rundes staver eller skal de hekles i en gruppe i luftmaske buen?
29.09.2016 - 17:30DROPS Design respondeu:
Hej Mariam. De förste 4 staver + 2 lm + 4 staver (rk 3) haekles om lm fra forrige omg. Naeste gruppe staver (rk 4) haekles om de 2 lm fra forrige omg. I rk 5 ligesaa. I rk 6 haekles först de 4 staver överst i de 3 lm, saa 4 lm og 1 fm nederst i de 3 lm, 3 lm, 1 fm nederst om de naeste 3 lm, 4 lm og 4 staver överst i de 3 lm. Osv.
04.10.2016 - 16:41
![]() Mariam Khan escreveu:
Mariam Khan escreveu:
I diagrammet er det et symbol som forklares slik: Hekle 1 st i neste st - men vent med siste gjennomtrekning (= 2 m på nåla), hekle 1 st i hver av de neste 2 st på samme måte, dra tråden gjennom alle 4 m på nåla. Jeg vet ikke om dere har skrevet feil eller om jeg misforstår. Hvis man skal vente med siste gjennomtrekning på totalt 3 staver, vil det på slutten av stav nr 3 være seks masker på nåla som skal dras gjennom. Er det slik det skal gjøres?
13.09.2016 - 19:01DROPS Design respondeu:
Hej Mariam. Det er korrekt hvad der staar. Du skal slaa om og trekke igennem 1 gang hver gang, saa har du 4 m paa naalen naar du har heklet de 3 st. Dvs: du hekler 1 st, men vent med å trekke igjennom den siste løkken av st (det er nå 2 løkker på nålen), hekl st nr 2, men vent med å trekke igjennom den siste løkken av st = 3 m paa naalen, hekl st nr 3, efter förste gennemtraek har du ialt 4 m paa pinden
14.09.2016 - 11:43Maria escreveu:
Very nice and easy to make 🙂
30.08.2016 - 16:29
![]() Mette Munch-Boutrup escreveu:
Mette Munch-Boutrup escreveu:
Jeg har hæklet denne flotte nederdel i Safran og er meget glad for den. Nu vil jeg gerne hækle den med garn der giver en lettere nederdel, evt. med en silkeagtigt overflade. Kan I hjælpe mig med hvilket drops garn jeg kan bruge (evt. kombinationer) uden at jeg skal ændrer på opskriften? Mvh Mette
22.06.2016 - 09:03DROPS Design respondeu:
Hej Mette. Her er garnalternativerne til Safran, du kan eventuelt lave den i BabyAlpaca Silk. Eller tag en snak med din garnbutik, maaske har de ogsaa et alternativ.
23.06.2016 - 12:35
![]() Sacha Roest escreveu:
Sacha Roest escreveu:
Can you please explain the last row on the bottom of the skirt? I cant seem to make it look good. When it says skip 3dc; the ch4 stretches out to much and doesnt look right. And the ch4 insert in next ch sp looks a bit awkward aswell. As if they are too close together in certain places.
24.04.2016 - 18:43Sacha Roest respondeu:
I just asked you a question but I have figured it out. Thanks anyway!
24.04.2016 - 19:09
![]() Kelly escreveu:
Kelly escreveu:
I was wondering if you could explain in the A1 pattern and the others, if we are supposed to work stitch/chain for stitch/chain how is it that in the first part of the A1/AX rows the number of stitches go up or down from round to round, how do we maintain the stitch count to be the same (in my case 252 stitches for each round, before we reach the next increase)? I'm confused on this part to be able to match the pattern? Please explain. Thanks Kelly
08.04.2016 - 04:45DROPS Design respondeu:
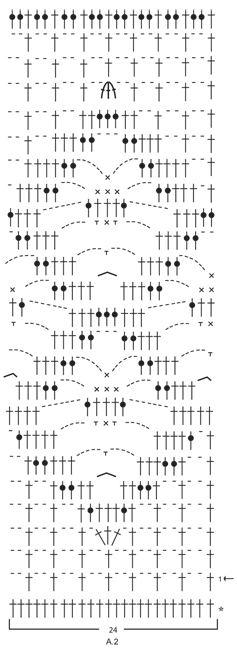
Dear Kelly, A.1 is worked over 12 sts and will be repeated 12 times in total in width, there is no inc in A.1, insert a marker between each repeat so that you can check each row in diagram. After you have worked A.1 (and A.X a total of 2 times), work 12 rounds with dc while inc 36 dc evenly, then work A.2 on next round. Read more about diagrams here and how to inc evenly here. Happy crocheting!
08.04.2016 - 09:05
![]() Kelly escreveu:
Kelly escreveu:
I was wondering for the graph, if each stitch was individual to each chain. Most diagrams have chain's underneath the symbol to indicate where the stitch is going. Also when it says to work from 1st round in A1 (=12 dc) 21 times in width, and when AX has been worked verticall what does that mean? At this point are you supposed to actually crochet 12dc and turn 21 times? Thanks, Kelly
05.04.2016 - 00:27DROPS Design respondeu:
Dear Kelly, the diagram A.1 will be worked a total of 21 times in width on the round (work first round 1 over all sts, then round 2 over all sts etc..) - inserting a marker between each repeat may help - Make 1 ch for each "-" in diagram, so that on row 3 in A.1, you will work 5 ch, 1 sc, 5 ch between the dc - A.X = row 3 to 6 in A.1. When working A.1, work to row 6 = including A.X then work again the row 3 to 6 (= A.X) then continue A.1 with next row (= row 7 in A.1, coming after A.X). Happy crocheting!
05.04.2016 - 09:31
![]() Rendi escreveu:
Rendi escreveu:
Hello, are the instructions available in English, please? I have not yet learned to use charts. Thank you :-)
31.01.2016 - 17:34DROPS Design respondeu:
Dear Rendi, there are only diagrams to this pattern - each symbol represent 1 st/group of st as stated under diagram text, start reading from the right and read every round from the right towards the left. You are welcome to contact your DROPS store for any further individual assistance. Happy crocheting!
01.02.2016 - 11:19
![]() Sacha Roest escreveu:
Sacha Roest escreveu:
Please look at the terms in the diagram, maybe its a mistake... The little X says "sc in/around st", the little T: "sc in ch-space". My question is how to sc in ch-space. The term: "dc around ch-space" I get... So is this just wrong? Should the little T be called "sc around ch-space"? Or is it the same as the little X?
05.09.2015 - 20:16DROPS Design respondeu:
Dear Mrs Roest, you crochet around the ch-space inserting crochet hook in the ch-space, but when you have to crochet in the st (eg in the sc below), you will insert crochet hook under both threads of st (sc in this example) from previous round. Happy crocheting!
07.09.2015 - 10:42
![]() Sacha Roest escreveu:
Sacha Roest escreveu:
In the diagram explanation one symbol is the "dc around ch-space" another "sc in ch-space". Is there is a difference inbetween "in" and "around"? As far as I know they are the same and the only difference is the dc and sc.. Please let me know if this is true. (I made the mistake by posting this question for uk aswell..)
03.09.2015 - 12:13DROPS Design respondeu:
See answer below.
03.09.2015 - 15:35
|
|||||||||||||||||||||||||||||||||||||
Summer Escape#summerescapeskirt |
|||||||||||||||||||||||||||||||||||||
 |
 |
||||||||||||||||||||||||||||||||||||
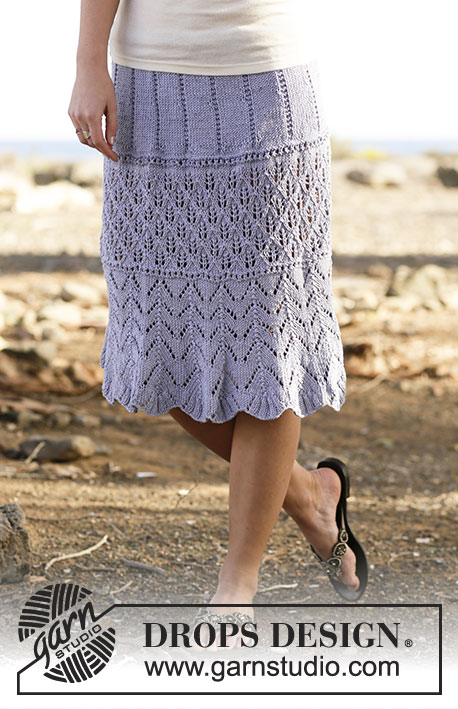
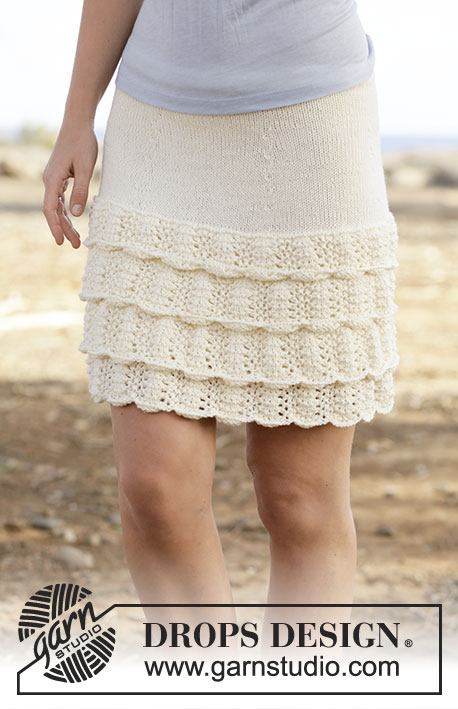
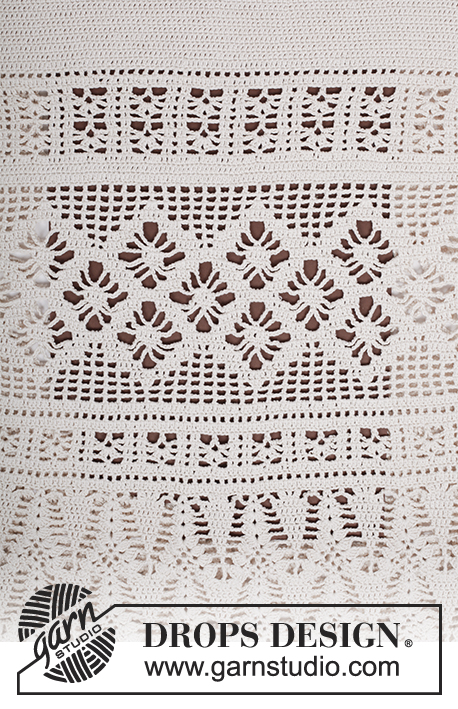
Saia DROPS em croché, em pontos altos e ponto rendado, crochetado de cima para baixo (top down), em ”Safran”. Do S ao XXXL.
DROPS 162-18 |
|||||||||||||||||||||||||||||||||||||
|
---------------------------------------------------------- NOTA: Existem termos diferentes de tricô e croché em português de Portugal e do Brasil. Malha = Ponto Canelado = Barra Ponto Jarreteira = Cordões de Tricô Ponto Liga = Ponto Tricô Croché : mpa – meio ponto alto pa – ponto alto pad – ponto alto duplo pat – ponto alto triplo pb – ponto baixo pbx – ponto baixíssimo pc – ponto corrente ---------------------------------------------------------- DICA CROCHÉ: Substituir o 1.º pa do princípio da carreira por 3 pc. Terminar a carreira com 1 pa no 3.º pc da carreira precedente (quando se crocheta em idas e voltas) e terminar a carreira com 1 pbx no 3e pc do princípio da carreira (quando se crocheta em redondo). NÃO substituir o 1.º pb do princípio da carreira mas crochetar 1 pc antes do pb do princípio da carreira. Terminar com 1 pbx no 1.º pc da carreira. AUMENTOS: Para aumentar 1 pa, crochetar 2 pa no mesmo pa. DIMINUIÇÕES: Crochetar 1 pa mas não fazer a última laçada (= 2 argolas na agulha de croché), crochetar então o pa seguinte mas na última laçada, crochetar juntamente as 3 argolas que estão na agulha de croché = 1 ponto diminuído. PONTO FANTASIA: Ver diagramas A.1 a A.3. ---------------------------------------------------------- SAIA: Crocheta-se de cima para baixo, em idas e voltas, até à fenda lateral e, depois, continua-se em redondo. Montar uma corrente de 186-209-232-258-279-305 pc (incluindo 3 pc para virar) com a agulha de croché 3.5 mm em Safran. Crochetar a 1.ª carreira da seguinte maneira: 1 pa no 4.º pc a partir du agulha de croché, 1 pa em cada um dos 4 pc seguintes, *saltar 1 pc, 1 pa em cada um dos 6 pc seguintes*, repetir de * a * até restarem 3-5-7-5-5-3 pc, saltar 1 pc e terminar com 1 pa em cada um dos 2-4-6-4-4-2 últimas pa = 158-178-198-220-238-260 pa. Crochetar então em idas e voltas, em pa (= 1 pa em cada pa) - VER DICA CROCHÉ. NÃO ESQUECER DE MANTER A MESMA TENSÃO DA INDICADA PARA A AMOSTRA! Quando 5 carreiras tiverem sido crochetadas, colocar 6 marcadores da seguinte maneira: o 1.º depois de 14-14-16-20-21-22 pa, depois, distribuir os outros marcadores com 26-30-33-36-39-43 pa entre eles; há 14-14-17-20-22-23 pa depois do último marcador no fim da carreira. Na carreira seguinte, aumentar 1 pa antes de cada marcador – VER AUMENTOS! Repetir estes aumentos mais 6-6-7-8-9-10 vezes ao todo a cada 2 carreiras - NOTA: aumentar alternadamente antes e depois dos marcadores = 200-220-246-274-298-326 pa. AO MESMO TEMPO, depois de um total de 12 carreiras em altura, arrematar a fenda no lado e continuar em redondo, começando le carreira no lado – VER DICA CROCHÉ! A 24-24-25-25-25-26 cm de altura total, aumentar 28-32-30-26-38-22 pontos a intervalos regulares na carreira seguinte = 228-252-276-300-336-348 pontos. Crochetar , então, da seguinte maneira: Crochetar 19-21-23-25-28-29 vezes a partir da 1.ª carreira de A.1 (= 12 pa) em largura. Quando A.X tiver sido crochetado 1 vez em altura, repetir A.X mais 1 vez antes de continuar para a carreira seguinte do diagrama. Crochetar então 1-2-2-1-2-3 carreiras de pa e, AO MESMO TEMPO, na última carreira, aumentar 36-36-36-36-24-36 pontos a intervalos regulares = 264-288-312-336-360-384 pa. Crochetar , então, a partir da 1.ª carreira de A.2 (= 11-12-13-14-15-16 vezes em largura), AO MESMO TEMPO, na última carreira, aumentar 12 pa a intervalos regulares para todos os tamanhos = 276-300-324-348-372-396 pa. Continuar com A.1 (= 23-25-27-29-31-33 vezes em largura), 1 vez em altura e, AO MESMO TEMPO, na última carreira, aumentar 12-20-12-20-12-20 pa a intervalos regulares = 288-320-336-368-384-416 pa. Crochetar , então, A.3 (= 18-20-21-23-24-26 vezes em largura). Quando A.3 tiver sido crochetado 1 vez em altura, repetir mais 1-1-1-2-2-2 vezes A.Z em altura. Crochetar , então, da seguinte maneira: 1 pc (= 1 pb), ** crochetar * 4 pc, 1 pb no aro seguinte*, repetir de * a *mais 2 vezes, 4 pc, saltar 3 pa, 1 pb no pa seguinte**, repetir de ** a ** em toda a carreira, e terminar com 1 pbx no 1.º pc da carreira. AROS DE CASAS: Ao longo da abertura da frente, crochetar aros de casas da seguinte maneira (começar na parte de baixo): 2 pb no 1.º pa, 3 pc, saltar 1 pa, *2 pb em cada um dos 2 pa seguintes, 3 pc, saltar 1 pa*, repetir de * a * 3 vezes ao todo e terminar com 2 pb no último pa na parte de cima, virar e crochetar a carreira de volta da seguinte maneira: 1 pb em cada pb e 3 pb em cada aro. ORLA DE ABOTOAMENTO: Ao longo do outro lado da abertura, crochetar 5 carreiras de pb em idas e voltas (na 1.ª carreira, crochetar 2 pb em cada pa = 24 pb), cortar o fio. Costurar os botões na orla. ORLA: Fazer a seguinte orla na parte de cima da saia, ao longo da cintura, da seguinte maneira pelo direito: unir o fio com 1 pbx ao rebordo da orla de abotoamento, 1 pc, *1 pc, saltar 1 pc, 1 pb no pc seguinte*, repetir de * a * ao longo da cintura. Arrematar. |
|||||||||||||||||||||||||||||||||||||
Explicações do diagrama |
|||||||||||||||||||||||||||||||||||||
|
|||||||||||||||||||||||||||||||||||||
 |
|||||||||||||||||||||||||||||||||||||
 |
|||||||||||||||||||||||||||||||||||||
 |
|||||||||||||||||||||||||||||||||||||
Terminou este projecto?Então, identifique as suas fotos com as tags #dropspattern #summerescapeskirt ou mostre-as na galeria #dropsfan. Precisa de ajuda para este modelo?Encontrará 12 turotiais em vídeo, uma rubrica Comentários/Perguntas e muito mais ao visitar a página do modelo em www.garnstudio.com © 1982-2026 DROPS Design A/S. Todos os direitos reservados. Este documento, incluuindo as suas su-secções, tem copyrights. Saia mais o que pode fazer com os nossos modelos no fim de cada uma das páginas do nosso site. |
|||||||||||||||||||||||||||||||||||||


Com mais de 40 anos no design de modelos de tricô e de croché, a DROPS Design oferece uma das mais vastas colecções demodelos gratuitos na Internet - traduzidos em 17 línguas. Neste dia de hoje, temos 324 catálogos e 12290 modelos - dos quais 12271 estão traduzidos em português.
Trabalhamos com muito empenho para lhe proporcionar o melhor que o tricô e o croché têm para oferecer, para lhe fornecer inspiração e conselhos bem como fios da mais elevada qualidade a preços incríveis! Gostaria de usar os nossos modelos para outros fins que não uso pessoal? Pode ler o que lhe é permitido fazer no Copyright texto que se encontra na parte de baixo de todos os nossos modelos. Bom tricô! Bom croché!
Deixe um comentário acerca do modelo DROPS 162-18
Gostaríamos muito de saber o que tem a dizer-nos acerca deste modelo!
Se deixar uma pergunta acerca do modelo, certifique-se de que escolhe a categoria adequada no formulário abaixo para acelerar o processo relativo à resposta. Os campos obrigatórios estão assinalados com um *.