
Categorias populares
Procura um fio?


Comentários / Perguntas (100)
![]() Anette Glasell escreveu:
Anette Glasell escreveu:
Hej. Hur börjar jag varv 9 i diagram A2 då varvet ska börja med 4 luftmaskor som ska hänga ihop med de 4 luftmaskor som avslutar varvet? Jag har ju avslutat varv 8 med en smygmaska i lm-stolpen?
12.04.2026 - 19:01
![]() Anny Baade Nielsen escreveu:
Anny Baade Nielsen escreveu:
Hvordan får jeg startet med at hækle rundt ? forstår ikke lige hvad i mener mvh Anny
08.04.2026 - 09:49DROPS Design respondeu:
Hei Anny. Når det er heklet totalt 12 rader i høyden slutter splitten i siden og arbeidet skal nå hekles rundt. Ikke snu arbeidet , men start med 1 kjedemaske i 3. luftmaske i 1. maske på begynnelsen av forrige rad. Start med å hekle 3 luftmasker, forstsett med 1 stav i hver stav omgangen rundt og avslutt omgangen med 1 kjedemaske i 3.luftmaske på begynnelsen av omgangen. mvh DROPS Design
13.04.2026 - 12:06
![]() Birgit escreveu:
Birgit escreveu:
Hej Jeg er ved at hækle A1 i diagrammet og er i tvivl om hvad "st i/om m" vil sige? Skal jeg hækle i eller om masken? På forhånd tak. Mvh Birgit
16.02.2026 - 13:07DROPS Design respondeu:
Hei Birgit. Om du ser på 1. rad i A.1 (med pil) hekles stavene i en stav fra forrige omgang, men om du ser på 5.rad hekles de 2 første stavene i en stav fra forrige omgang, mens de 4 neste stavene hekles om luftmaskebue fra forrige rad. mvh DROPS Design
23.02.2026 - 11:16
![]() Jessica escreveu:
Jessica escreveu:
Hoeveel bollen garen heb ik nodig voor dit patroon
12.02.2026 - 12:24DROPS Design respondeu:
Dag Jessica,
Bovenaan bij de materialenlijst staat per maat aangegeven hoeveel gram je nodig hebt. (Het eerste getal geldt voor maat S, het tweede getal voor maat M, enzovoort). 1 bol weegt meestal 50 gram, maar let erop dat dit per garensoort verschillend kan zijn. Dus als er bijvoorbeeld 400 gram staat dan zou je 8 bollen nodig hebben als 1 bol 50 gram weegt.
12.02.2026 - 19:22
![]() Birgit escreveu:
Birgit escreveu:
Hej Jeg er nået til diagram A1 og er i tvivl om de to "st i/om m" og "fm i/om m". Skal jeg så hækle i eller om masken? Mvh. Birgit
03.02.2026 - 09:17DROPS Design respondeu:
Hei Birgit. Husk HÆKLEINFO, står øvert i oppskriften (Første st i beg af rækken/omg erstattes med 3 lm. Afslut rækken med 1 st i 3.lm fra forrige række (når arb hækles frem og tilbage) og afslut omg med 1 km i 3.lm i beg af omg (når arb hækles rundt). Første fm i beg af omg erstattes IKKE, men der hækles 1 lm før fm i beg af omg. Afslut med 1 km i første lm på omg. Mvh DROPS Design
09.02.2026 - 08:02
![]() Bettina escreveu:
Bettina escreveu:
Hallo ich häkle diesen rock aber mach ihn gleich in runden also lasse die knopfleiste weg weil ich einen gummi in einem tunnel ziehe muß ich trotzdem die ersten runden so häkeln wie beschrieben oder ist das nur wegen den knöpfen so?
13.01.2026 - 14:12DROPS Design respondeu:
Liebe Bettina, Sie können so anfangen wie beschrieben, aber direkt in Runden. Ansonsten ändert sich nichts. Viel Spaß beim Häkeln!
06.02.2026 - 13:45
![]() Zsofia escreveu:
Zsofia escreveu:
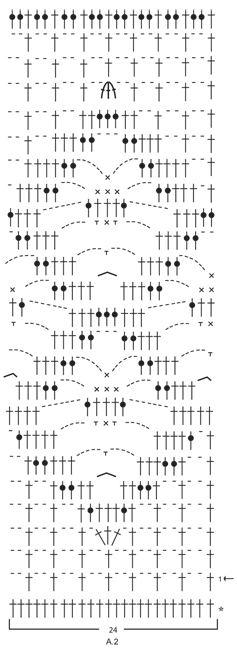
In A.1, specifically A.X middle row, are you sure that the double crochet (US term) should go IN the stitches? If yes, the two sc of previous row? On the pictures it seems that the dc go AROUND the middle chain space.
04.12.2024 - 18:43DROPS Design respondeu:
Dear Zsofia, the double crochet symbol in the third row is used for working both in or around the stitches, as indicated in the chart key above. In this specific case, the dc are worked around the central chain space. Happy crochetting!
08.12.2024 - 17:58
![]() Diya escreveu:
Diya escreveu:
In the A3 diagram on row 3,4,5,6 the middle, do I have to DC only in the chain space or also on the previous row DCs and the chain space?
28.08.2024 - 12:09DROPS Design respondeu:
Dear Diya, the dc (US-English) on rows 3,4,5 and 6 are worked in the chain spaces below. Happy crocheting!
29.08.2024 - 09:31
![]() Linda Sjelvgren escreveu:
Linda Sjelvgren escreveu:
Förstår ej hur jag ska gå från fram och tillbaka till att virka runt, trots beskrivningen. Innebär detta att man byter varv på arbetet när man för ihop ändarna?
07.08.2024 - 20:14DROPS Design respondeu:
Hej Linda, Uanset om du virkar fram och tillbaka, börjar du varvet med 3 lm för att komma upp på nästa varv. Se VIRKINFO øverst under Instruktioner :)
14.08.2024 - 14:58
![]() Basil escreveu:
Basil escreveu:
I am confused on how to go from working back and forth at the beginning of the pattern to working in the round. Do I join to the first double crochet to create a circle? And do I sew the two sides together? Thanks
19.05.2024 - 05:39DROPS Design respondeu:
Dear Basil, first you work back and forth to create a vent; this will be used for the buttonband and buttonhole band. Then you join to continue in the round. The joining method is explained in CROCHET INFO: 1 slip stitch in the 3rd chain from the beginning of the round and then simply work over the previous stitches. Happy crochetting!
20.05.2024 - 00:19
|
|||||||||||||||||||||||||||||||||||||
Summer Escape#summerescapeskirt |
|||||||||||||||||||||||||||||||||||||
 |
 |
||||||||||||||||||||||||||||||||||||
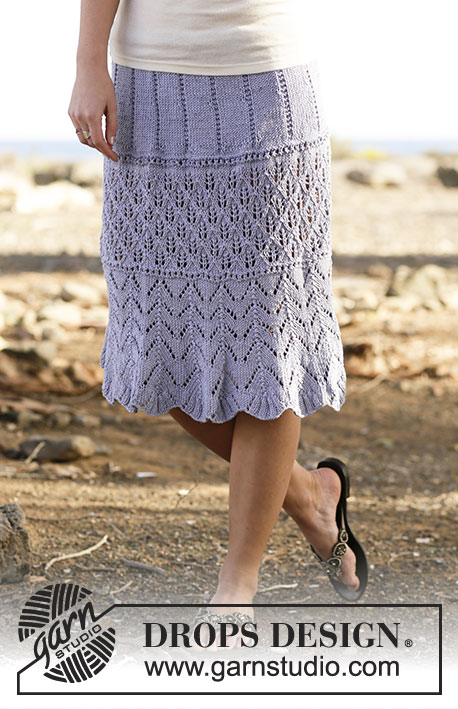
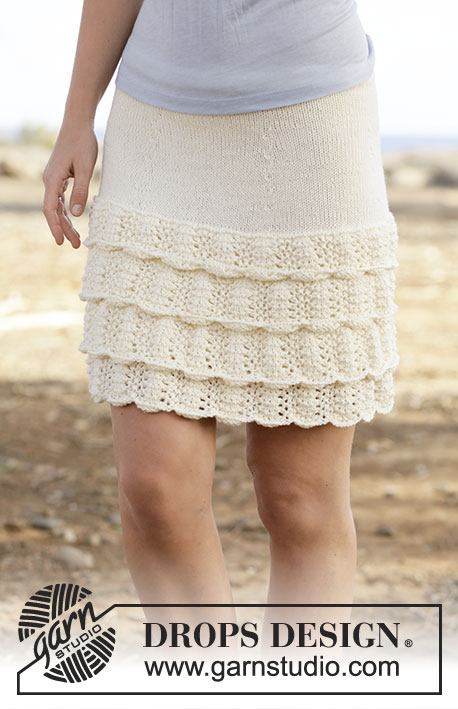
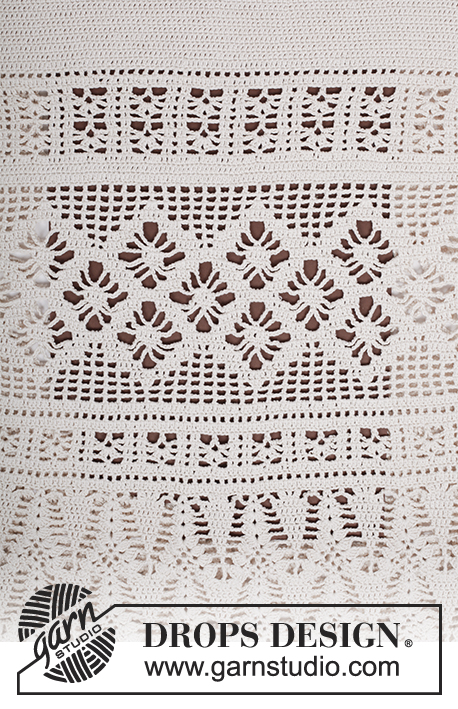
Saia DROPS em croché, em pontos altos e ponto rendado, crochetado de cima para baixo (top down), em ”Safran”. Do S ao XXXL.
DROPS 162-18 |
|||||||||||||||||||||||||||||||||||||
|
---------------------------------------------------------- NOTA: Existem termos diferentes de tricô e croché em português de Portugal e do Brasil. Malha = Ponto Canelado = Barra Ponto Jarreteira = Cordões de Tricô Ponto Liga = Ponto Tricô Croché : mpa – meio ponto alto pa – ponto alto pad – ponto alto duplo pat – ponto alto triplo pb – ponto baixo pbx – ponto baixíssimo pc – ponto corrente ---------------------------------------------------------- DICA CROCHÉ: Substituir o 1.º pa do princípio da carreira por 3 pc. Terminar a carreira com 1 pa no 3.º pc da carreira precedente (quando se crocheta em idas e voltas) e terminar a carreira com 1 pbx no 3e pc do princípio da carreira (quando se crocheta em redondo). NÃO substituir o 1.º pb do princípio da carreira mas crochetar 1 pc antes do pb do princípio da carreira. Terminar com 1 pbx no 1.º pc da carreira. AUMENTOS: Para aumentar 1 pa, crochetar 2 pa no mesmo pa. DIMINUIÇÕES: Crochetar 1 pa mas não fazer a última laçada (= 2 argolas na agulha de croché), crochetar então o pa seguinte mas na última laçada, crochetar juntamente as 3 argolas que estão na agulha de croché = 1 ponto diminuído. PONTO FANTASIA: Ver diagramas A.1 a A.3. ---------------------------------------------------------- SAIA: Crocheta-se de cima para baixo, em idas e voltas, até à fenda lateral e, depois, continua-se em redondo. Montar uma corrente de 186-209-232-258-279-305 pc (incluindo 3 pc para virar) com a agulha de croché 3.5 mm em Safran. Crochetar a 1.ª carreira da seguinte maneira: 1 pa no 4.º pc a partir du agulha de croché, 1 pa em cada um dos 4 pc seguintes, *saltar 1 pc, 1 pa em cada um dos 6 pc seguintes*, repetir de * a * até restarem 3-5-7-5-5-3 pc, saltar 1 pc e terminar com 1 pa em cada um dos 2-4-6-4-4-2 últimas pa = 158-178-198-220-238-260 pa. Crochetar então em idas e voltas, em pa (= 1 pa em cada pa) - VER DICA CROCHÉ. NÃO ESQUECER DE MANTER A MESMA TENSÃO DA INDICADA PARA A AMOSTRA! Quando 5 carreiras tiverem sido crochetadas, colocar 6 marcadores da seguinte maneira: o 1.º depois de 14-14-16-20-21-22 pa, depois, distribuir os outros marcadores com 26-30-33-36-39-43 pa entre eles; há 14-14-17-20-22-23 pa depois do último marcador no fim da carreira. Na carreira seguinte, aumentar 1 pa antes de cada marcador – VER AUMENTOS! Repetir estes aumentos mais 6-6-7-8-9-10 vezes ao todo a cada 2 carreiras - NOTA: aumentar alternadamente antes e depois dos marcadores = 200-220-246-274-298-326 pa. AO MESMO TEMPO, depois de um total de 12 carreiras em altura, arrematar a fenda no lado e continuar em redondo, começando le carreira no lado – VER DICA CROCHÉ! A 24-24-25-25-25-26 cm de altura total, aumentar 28-32-30-26-38-22 pontos a intervalos regulares na carreira seguinte = 228-252-276-300-336-348 pontos. Crochetar , então, da seguinte maneira: Crochetar 19-21-23-25-28-29 vezes a partir da 1.ª carreira de A.1 (= 12 pa) em largura. Quando A.X tiver sido crochetado 1 vez em altura, repetir A.X mais 1 vez antes de continuar para a carreira seguinte do diagrama. Crochetar então 1-2-2-1-2-3 carreiras de pa e, AO MESMO TEMPO, na última carreira, aumentar 36-36-36-36-24-36 pontos a intervalos regulares = 264-288-312-336-360-384 pa. Crochetar , então, a partir da 1.ª carreira de A.2 (= 11-12-13-14-15-16 vezes em largura), AO MESMO TEMPO, na última carreira, aumentar 12 pa a intervalos regulares para todos os tamanhos = 276-300-324-348-372-396 pa. Continuar com A.1 (= 23-25-27-29-31-33 vezes em largura), 1 vez em altura e, AO MESMO TEMPO, na última carreira, aumentar 12-20-12-20-12-20 pa a intervalos regulares = 288-320-336-368-384-416 pa. Crochetar , então, A.3 (= 18-20-21-23-24-26 vezes em largura). Quando A.3 tiver sido crochetado 1 vez em altura, repetir mais 1-1-1-2-2-2 vezes A.Z em altura. Crochetar , então, da seguinte maneira: 1 pc (= 1 pb), ** crochetar * 4 pc, 1 pb no aro seguinte*, repetir de * a *mais 2 vezes, 4 pc, saltar 3 pa, 1 pb no pa seguinte**, repetir de ** a ** em toda a carreira, e terminar com 1 pbx no 1.º pc da carreira. AROS DE CASAS: Ao longo da abertura da frente, crochetar aros de casas da seguinte maneira (começar na parte de baixo): 2 pb no 1.º pa, 3 pc, saltar 1 pa, *2 pb em cada um dos 2 pa seguintes, 3 pc, saltar 1 pa*, repetir de * a * 3 vezes ao todo e terminar com 2 pb no último pa na parte de cima, virar e crochetar a carreira de volta da seguinte maneira: 1 pb em cada pb e 3 pb em cada aro. ORLA DE ABOTOAMENTO: Ao longo do outro lado da abertura, crochetar 5 carreiras de pb em idas e voltas (na 1.ª carreira, crochetar 2 pb em cada pa = 24 pb), cortar o fio. Costurar os botões na orla. ORLA: Fazer a seguinte orla na parte de cima da saia, ao longo da cintura, da seguinte maneira pelo direito: unir o fio com 1 pbx ao rebordo da orla de abotoamento, 1 pc, *1 pc, saltar 1 pc, 1 pb no pc seguinte*, repetir de * a * ao longo da cintura. Arrematar. |
|||||||||||||||||||||||||||||||||||||
Explicações do diagrama |
|||||||||||||||||||||||||||||||||||||
|
|||||||||||||||||||||||||||||||||||||
 |
|||||||||||||||||||||||||||||||||||||
 |
|||||||||||||||||||||||||||||||||||||
 |
|||||||||||||||||||||||||||||||||||||
Terminou este projecto?Então, identifique as suas fotos com as tags #dropspattern #summerescapeskirt ou mostre-as na galeria #dropsfan. Precisa de ajuda para este modelo?Encontrará 12 turotiais em vídeo, uma rubrica Comentários/Perguntas e muito mais ao visitar a página do modelo em www.garnstudio.com © 1982-2026 DROPS Design A/S. Todos os direitos reservados. Este documento, incluuindo as suas su-secções, tem copyrights. Saia mais o que pode fazer com os nossos modelos no fim de cada uma das páginas do nosso site. |
|||||||||||||||||||||||||||||||||||||


Com mais de 40 anos no design de modelos de tricô e de croché, a DROPS Design oferece uma das mais vastas colecções demodelos gratuitos na Internet - traduzidos em 17 línguas. Neste dia de hoje, temos 324 catálogos e 12290 modelos - dos quais 12271 estão traduzidos em português.
Trabalhamos com muito empenho para lhe proporcionar o melhor que o tricô e o croché têm para oferecer, para lhe fornecer inspiração e conselhos bem como fios da mais elevada qualidade a preços incríveis! Gostaria de usar os nossos modelos para outros fins que não uso pessoal? Pode ler o que lhe é permitido fazer no Copyright texto que se encontra na parte de baixo de todos os nossos modelos. Bom tricô! Bom croché!
Deixe um comentário acerca do modelo DROPS 162-18
Gostaríamos muito de saber o que tem a dizer-nos acerca deste modelo!
Se deixar uma pergunta acerca do modelo, certifique-se de que escolhe a categoria adequada no formulário abaixo para acelerar o processo relativo à resposta. Os campos obrigatórios estão assinalados com um *.