
Categorias populares
Procura um fio?


Comentários / Perguntas (22)
![]() Jen escreveu:
Jen escreveu:
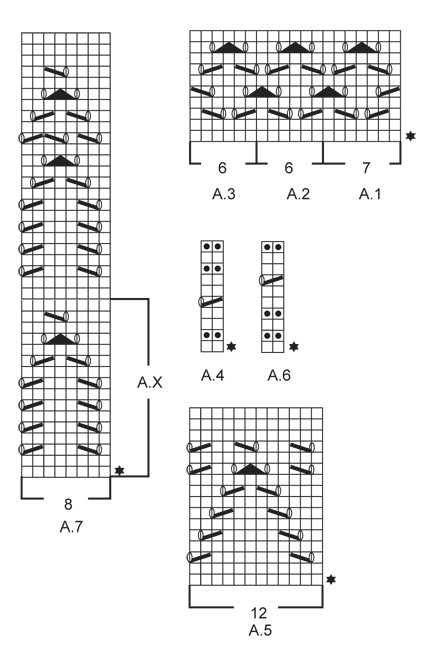
Thank you for the toutorial attached, it was helpful indeed. However i think i am still confused on line 5 of A.1,A.2 and A.3 - I'm not certain of the pattern exactly if i am supposed to knit A.1 then A.2 37 times then A.3 at the end and if so how do I split that since the stitches between A.1, A.2 and A.3 are 1 yo, sl 1 as if to k, k2 tog,psso, 1 yo? Thanks for any assistance you can provide on that part.
07.04.2016 - 01:42DROPS Design respondeu:
Dear Jen, on row 5, the last 2 sts in A.1 will be worked tog with the first st in A.2, the YO will then belong to A.2 - when working A.2, work the last 2 sts in A.2 tog with the next st in next A.2 and then with the first st in A.3. Happy knitting!
07.04.2016 - 09:15Jen escreveu:
Hello, I'm having difficulty with this lace pattern - I'm not sure how the instructions are asking me to do this exactly so I decided to work the pattern straight through A.1 then A.2 then a.3 until the end of the round but I am fining it difficult to make a 19 stitch lace pattern (7 stitched, 6 and then 6) fit evenly on all 235 stitches in the round. Can someone explain how this pattern should be worked to fit correctly?
04.04.2016 - 21:44DROPS Design respondeu:
See below - let us know if you have more questions after having whatched the video. Happy knitting!
05.04.2016 - 09:22
![]() Marjo Methorst escreveu:
Marjo Methorst escreveu:
Ik begrijp niet hoe het eerste telpatroon gebreid moet worden. De eerste twee naalden zijn recht. Waarom staat er dan dat in de eerste naald A1, A2 gebreid moet worden tot er zes steken over zijn op de naald? Wat doe ik met die zes steken? In de tweede naald moet ik A2, A3 breien maar ook die naald is helemaal recht. Ik moet 3 steken minderen in deze tweede naald. In de derde naald begint eigenlijk pas het motief maar hoe brei ik dat?
06.09.2015 - 17:13DROPS Design respondeu:
Hoi Marjo. Er staat: Brei A.1, A.2 tot er 6 st over zijn op de nld, minder 1-3-5-1-5-3 st gelijkmatig verdeeld in de eerste nld van A.2, A.3. Dus je breit eerst A.1 (= 7 st), dan herhaal je A.2 tot er 6 st over zijn - en mindert tegelijkertijd 3 st over deze st, je breit A.3 over de laatste 6 st. Omdat je breit in de rondte is elke nld op de goede kant - lees hier verder hoe je onze teltekeningen moet lezen.
08.09.2015 - 15:40
![]() Kirsten Broby Johansen escreveu:
Kirsten Broby Johansen escreveu:
Er ved at samle for-og rygstykke. Tæller den pind med i diagrammet? Ang. første mønster: Strikker jeg skiftevis A1 og A2 pinden igennem til jeg mangler 6 masker og strikker så A3, hvor jeg tager 1 maske ind? Synes ikke, maskeantallet passer. Jeg strikker small
29.06.2015 - 10:16DROPS Design respondeu:
Hej, På pinden hvor du samler arbejdet strikker du glatstrik, når du starter på diagrammet strikker du A.1 over de første 7m, A.2 som du gentager til du ha 6 m tilbage som du strikker ifølge A.3 (husk at tage 1 m ind på første omgang) god fornøjelse!
31.07.2015 - 12:26
![]() Tina Skaaning escreveu:
Tina Skaaning escreveu:
Hej Drops jeg har rigtig svært ved udtagningerne, er det kun på forstykket der tages ud eller er det hele vejen rundt ? når jeg har sat stykkerne sammen ? Med glad hilsen Tina
19.03.2015 - 10:46DROPS Design respondeu:
Hej Tina. Naar du har sat forstykket og bagstykket sammen, tager du ud jaevnt fordelt over alle masker = hele vejen rundt.
19.03.2015 - 13:34
![]() Lene escreveu:
Lene escreveu:
Hei, i oppskriften står det at jeg skal øke 1 maske på hver side av merket 2.hver pinne totalt 19 ganger (jeg strikker str XL). Og at arb skal måle 8cm når jeg er ferdig med dette, men det stemmer jo ikke, for når jeg er ferdig å øke 19 ganger er jeg komt opp i 10cm...? Og strikkefastheten er god. Hva gjør jeg galt? Eller er det en feil i oppskriften?
02.03.2015 - 23:23DROPS Design respondeu:
Hej Lene, Jo det stemmer, du strikker mange flere riller på 10 cm end hvad du strikker i glatstrik. Så efter de 19 udtagninger bør arb måle 8 cm. God fornøjelse!
26.05.2015 - 13:33
![]() Isabella escreveu:
Isabella escreveu:
Modello carinissimo e aspetto la spiegazione ,ma VI PREGO BASTA con i ferri circolari.E' una tecnica difficile ,date la versione con i ferri semplici,prima davanti,poidietro e poi le maniche.In questo caso la lavorazione a partire da una manica.Comunque siete bravi!
07.01.2015 - 14:42
![]() Ann-Charlotte Hallberg Wessman escreveu:
Ann-Charlotte Hallberg Wessman escreveu:
Härlig modell som både är nätt och smickrande för figuren. Hoppas få möjlighet att sticka detta linne i Drops Safran som finns i så många fina färger.
02.01.2015 - 23:04
![]() Mita escreveu:
Mita escreveu:
Ook dit model is ideaal voor de zomer
31.12.2014 - 12:27
![]() Kauer B. escreveu:
Kauer B. escreveu:
Ein wunderschönes Modell. Freue mich schon auf die Anleitung.
18.12.2014 - 18:08
|
|||||||||||||||||||
Ava#avatop |
|||||||||||||||||||
 |
 |
||||||||||||||||||
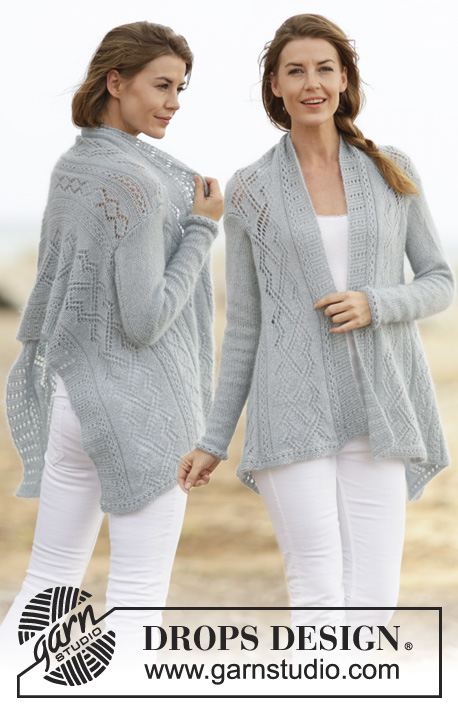
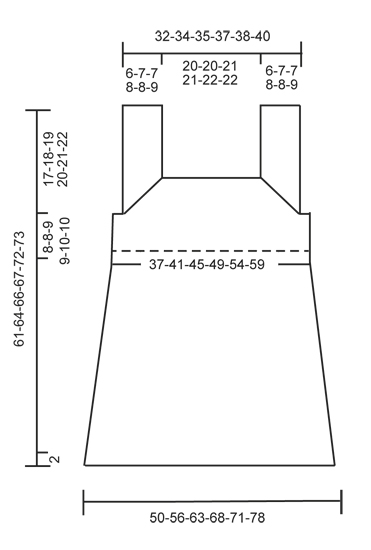
Top DROPS em ponto jarreteira com ponto rendado, tricotado de cima para baixo (top down), em ”Safran”. Do S ao XXXL.
DROPS 161-14 |
|||||||||||||||||||
|
---------------------------------------------------------- NOTA: Existem termos diferentes de tricô e croché em português de Portugal e do Brasil. Malha = Ponto Canelado = Barra Ponto Jarreteira = Cordões de Tricô Ponto Liga = Ponto Tricô Croché : mpa – meio ponto alto pa – ponto alto pad – ponto alto duplo pat – ponto alto triplo pb – ponto baixo pbx – ponto baixíssimo pc – ponto corrente ---------------------------------------------------------- PONTO JARRETEIRA (em idas e voltas): Tricotar todas as carreiras em meia. 1 barra jarreteira = 2 carreiras meia. PONTO JARRETEIRA (em redondo): Tricotar: *1 carreira meia, 1 carreira liga/tricô*, repetir de * a *. 1 barra jarreteira = 2 carreiras. PONTO FANTASIA: Ver os diagramas A.1 a A.7. Os diagramas mostram todas as carreiras do ponto fantasia, vistas pelo direito. AUMENTOS: Todos os aumentos fazem-se pelo direito. Para aumentar 1 m/p, fazer 1 laçada - na carreira seguinte, tricotar a laçada torcida em liga/tricô (ou seja, tricotar na alça de trás e não na alça da frente) para evitar buracos. Nas partes em ponto jarreteira, tricotar a laçada torcida em meia na carreira seguinte. ---------------------------------------------------------- TOP: Tricota-se de cima para baixo. A frente e as costas tricotam-se primeiro separadamente, em idas e voltas, até a parte em ponto jarreteira estar feita. Então, retoma-se as 2 peças juntamente e tricota-se em redondo. FRENTE: Tricota-se em idas e voltas na agulha circular. Montar 102-102-110-110-117-123 ms/pts com a agulha circular 3 mm em Safran. Continuar com a agulha circular 2.5 mm. Colocar 1 marcador na 28.ª-28.ª-31.ª-31.ª-33,ª-36.ª m/p de cada lado da peça (= 46-46-48-48-51-51 ms/pts entre os marcadores). Tricotar 1 carreira meia pelo avesso. Continuar em ponto jarreteira em idas e voltas - ver acima! AO MESMO TEMPO, na carreira seguinte, aumentar 1 m/p de cada lado das 2 ms/pts com um marcador - Ver AUMENTOS! Repetir estes aumentos 14-17-17-19-19-22 vezes ao todo a cada 2 carreiras = 158-170-178-186-193-211 m/p. Tricotar 1 carreira meia pelo avesso depois do último aumento. NÃO ESQUECER DE MANTER A MESMA TENSÃO DA INDICADA PARA A AMOSTRA! A peça mede cerca de 6-7-7-8-8-9 cm. Tricotar a carreira seguinte da seguinte maneira (pelo direito): Arrematar frouxamente as 41-44-47-49-51-57 primeiras ms/pts (= alça), tricotar em meia as 76-82-84-88-91-97 ms/pts seguintes (a 1.ª dessas ms/pts está já na agulha direita), e arrematar frouxamente as 41-44-47-49-51-57 últimas ms/pts (= alça), cortar o fio. Tricotar a carreira seguinte pelo avesso da seguinte maneira: Montar 7-9-13-16-20-24 ms/pts no princípio da carreira, tricotar as 76-82-84-88-91-97 ms/pts na agulha e montar 7-9-13-16-20-24 ms/pts no fim da carreira = 90-100-110-120-131-145 ms/pts. Tricotar em ponto jarreteira em idas e voltas durante 8-8-9-9-10-10 cm – AO MESMO TEMPO, depois de 7-7-8-8-9-9 cm, diminuir pelo direito, 1 m/p de cada lado da peça tricotando 2 ms/pts juntamente em meia a 1 m/p dos rebordos = 88-98-108-118-129-143 ms/pts. Ajustar a altura para que a última carreira seja pelo avesso. Colocar em espera. COSTAS: Montar e tricotar como se fez para a frente. COSTAS & FRENTE: Continuar com a agulha circular 3 mm e tricotar em ponto meia todas as ms/pts das costas e, depois, as da frente = 176-196-216-236-258-286 ms/pts. Continuar em redondo e tricotar A.1, A.2 até restarem 6 ms/pts e, ao mesmo tempo, distribuir 1-3-5-1-5-3 diminuições na 1.ª carreira de A.2, e terminar com A.3 = 175-193-211-235-253-283 ms/pts. Quando A.1-A.3 tiverem sido tricotados 1 vez em altura, tricotar A.4 e, ao mesmo tempo, distribuir 15-11-9-9-11-9 aumentos na 1.ª carreira = 190-204-220-244-264-292 ms/pts. Quando A.4 tiver sido tricotado 1 vez em altura, tricotar A.5 e, ao mesmo tempo, distribuir 14-12-8-8-12-8 aumentos na 1.ª carreira = 204-216-228-252-276-300 ms/pts. Quando A.5 tiver sido tricotado 1 vez em altura, tricotar A.6 e, ao mesmo tempo, distribuir 24-30-32-32-28-32 aumentos na 1.ª carreira = 228-246-260-284-304-332 ms/pts. Quando A.6 tiver sido tricotado 1 vez em altura, tricotar A.7 e, ao mesmo tempo, distribuir 4-10-12-12-8-12 aumentos = 232-256-272-296-312-344 ms/pts. Repetir 2-2-2-2-3-3 vezes A.X em altura ao todo (aumentar apenas na 1.ª vez que se tricota A.X em altura) e tricotar então as restantes carreiras de A.7. Continuar , então, da seguinte maneira em cada tamanho: TAMANHO S: Tricotar 2 barras jarreteira e, AO MESMO TEMPO, na carreira seguinte, distribuir 9 aumentos = 241 ms/pts. TAMANHO MS/PTS, L, XL, XXL e XXXL: Tricotar A.4 e, ao mesmo tempo, distribuir 15-29-29-31-29 aumentos na 1.ª carreira = 271-301-325-343-373 ms/pts. TODOS OS TAMANHOS: Tricotar A.1, A.2 até restarem 6 ms/pts, A.3. (NOTA: Não aumentar na 1.ª carreira.) Quando A.1-A.3 tiverem sido tricotados 1 vez em altura, tricotar 2 carreiras em ponto meia e, AO MESMO TEMPO, distribuir 19-20-27-29-26-33 aumentos = 260-291-328-354-369-406 ms/pts. Continuar com a agulha circular 2.5 mm e tricotar em ponto jarreteira - ver acima -, durante 2 cm. Arrematar frouxamente. MONTAGEM: Costurar os ombros e fazer a costura sob as cavas na alça mais exterior das ms/pts. |
|||||||||||||||||||
Explicações do diagrama |
|||||||||||||||||||
|
|||||||||||||||||||
 |
|||||||||||||||||||
 |
|||||||||||||||||||
Terminou este projecto?Então, identifique as suas fotos com as tags #dropspattern #avatop ou mostre-as na galeria #dropsfan. Precisa de ajuda para este modelo?Encontrará 24 turotiais em vídeo, uma rubrica Comentários/Perguntas e muito mais ao visitar a página do modelo em www.garnstudio.com © 1982-2026 DROPS Design A/S. Todos os direitos reservados. Este documento, incluuindo as suas su-secções, tem copyrights. Saia mais o que pode fazer com os nossos modelos no fim de cada uma das páginas do nosso site. |
|||||||||||||||||||


Com mais de 40 anos no design de modelos de tricô e de croché, a DROPS Design oferece uma das mais vastas colecções demodelos gratuitos na Internet - traduzidos em 17 línguas. Neste dia de hoje, temos 324 catálogos e 12290 modelos - dos quais 12271 estão traduzidos em português.
Trabalhamos com muito empenho para lhe proporcionar o melhor que o tricô e o croché têm para oferecer, para lhe fornecer inspiração e conselhos bem como fios da mais elevada qualidade a preços incríveis! Gostaria de usar os nossos modelos para outros fins que não uso pessoal? Pode ler o que lhe é permitido fazer no Copyright texto que se encontra na parte de baixo de todos os nossos modelos. Bom tricô! Bom croché!
Deixe um comentário acerca do modelo DROPS 161-14
Gostaríamos muito de saber o que tem a dizer-nos acerca deste modelo!
Se deixar uma pergunta acerca do modelo, certifique-se de que escolhe a categoria adequada no formulário abaixo para acelerar o processo relativo à resposta. Os campos obrigatórios estão assinalados com um *.