
Categorias populares
Procura um fio?


Comentários / Perguntas (63)
TAL escreveu:
Hello again, i think i am doing something wrong )-: becoues the shape does not looks as of the model.if i make the small- 31 cm should it be also in the middle of the garment (where is the decreasing is done)? thanks
29.01.2014 - 20:01DROPS Design respondeu:
Dear Tal, measure the 31 cm straight up along the sides of piece (see measurement chart). Happy knitting!
30.01.2014 - 10:12TAL escreveu:
Hello, could you please explane when it is written to inc in the beg of every row does it means in the beg of the rs row or also in the beg of wr row?
24.01.2014 - 07:56DROPS Design respondeu:
Dear Tal, you are correct when you inc at the beg of every row, you will inc at the beg of row from RS and from WS. Happy knitting!
24.01.2014 - 09:20
![]() Chrislibrarian escreveu:
Chrislibrarian escreveu:
Eureka! I just had a lightbulb moment and finally understood what you meant by "flat" and it's fine :) can't believe I missed that! Thanks for your patience :D Merry Christmas!
19.12.2013 - 11:45DROPS Design respondeu:
No worries, glad to read everything is now fine. Thank you ! Happy knitting !
19.12.2013 - 13:54
![]() Chrislibrarian escreveu:
Chrislibrarian escreveu:
Sorry to post twice, I forgot to change the country :( Thanks for getting back to me. I've done this 3 times now and laid it flat to measure, but the increase in length over 8 rows isn't 11cms. My tension is fine though. I would need to increase only 3sts over 16 rows to get anywhere near 11cms in length from the first increase. So I'm still confused. If I start knitting "straight" (on the diagonal) after the last increase marker, the jumper will be 7cms shorter than it should be.
19.12.2013 - 11:34DROPS Design respondeu:
See below - while casting on sts each side, do not forget to dec in the middle as before to keep V shape. Happy knitting!
19.12.2013 - 13:53
![]() Chrislibrarian escreveu:
Chrislibrarian escreveu:
Thanks for getting back to me. I've done this 3 times now and laid it flat to measure, but the increase in length over 8 rows isn't 11cms. My tension is fine though. I would need to increase only 3sts over 16 rows to get anywhere near 11cms in length from the first increase. So I'm still confused. If I start knitting "straight" (on the diagonal) after the last increase marker, the jumper will be 7cms shorter than it should be.
19.12.2013 - 11:29DROPS Design respondeu:
Dear Mrs Chrislibrarian, if your tension is correct, you should have this 11 cm, the 24 sts inc each side (less the dec in the middle of piece) should give you approx. 16 cm measured along edges. Let's take size S: you start inc when piece measures 31 cm, after these inc you should have a total of 42 cm -measured straight along the side of piece (not in knitting direction). Happy knitting!
19.12.2013 - 13:52
![]() Chrislibrarian escreveu:
Chrislibrarian escreveu:
All ok up to the increase for the shoulders. I'm confused by the instructions. I have tried to incr 6 sts each end over 8 rows (so 24 sts more each side) but that doesn't measure 11cms in length as the image suggests. 11cms would be a totally different increase/cast-on. Or am I missing something?
18.12.2013 - 01:09DROPS Design respondeu:
Dear Chrislibrarian, since you are working diagonnally, your get 24 extra sts each side. Lay your work flat to check measurements and you should then have 11 cm. Happy knitting!
18.12.2013 - 14:03
![]() Signe escreveu:
Signe escreveu:
Har i et ca mål for hvor langt blusen strækker sig når man har den på og hvilken str. Har modellen på? Mvh signe skov
12.11.2013 - 17:15
![]() Lone escreveu:
Lone escreveu:
Jeg har et akut problem ved afslutningen på ryggen. Der står , at man skal strikke de 2 første og de 2 sidste masker sammen på hver retpind. I en parentes står der så, at man derved tager ind både mod halssiden og skulderen. Det kan jeg ikke forstå. Håber der er en, der har tid til at svare mig. På forhånd tak. Mvh Lone Haslund
05.11.2013 - 22:56DROPS Design respondeu:
Jo men indtagningerne midt på fortsætter til færdig mål, så ud over disse indtagninger lukker du også af til skulder i hver side ved at strikke de 2 yderste m sammen på hver retpind ifølge opskriften.
06.11.2013 - 08:57
![]() Lone escreveu:
Lone escreveu:
Jeg har et akut problem. Er kommet til indtagning ved skulder. Først står der, at man skal strikke de 2 første og de 2 sidste masker sammen på hver retpind. I en parentes står så, at man lukker af både mod halssiden og skulderen. Det forstår jeg bare ikke. Håber I hurtigt kan hjælpe. Mvh Lone Haslund
05.11.2013 - 22:53DROPS Design respondeu:
Hej Lone. I og med du strikker de 2 förste og de 2 sidste masker sammen paa hver retpind lukker du af i begge sider af arbejdet.
06.11.2013 - 10:40
![]() Andrea Lange escreveu:
Andrea Lange escreveu:
Ja das ist richtig, man sieht die cm Angabe links von der Massskizze.Aber um richtig messen zu können muss man die Rundstricknadel aus den Maschen ziehen und erst dann kann man das hochgezogene "V" sehen und richtig messen.Also gut, dann werde ich bis auf 20 Reihen alles auftrennen und dann sieht es mit dem Wollverbrauch auch viel besser aus. Danke
27.09.2013 - 14:03
|
||||
Haze Tunica#hazetunica |
||||
|
|
||||
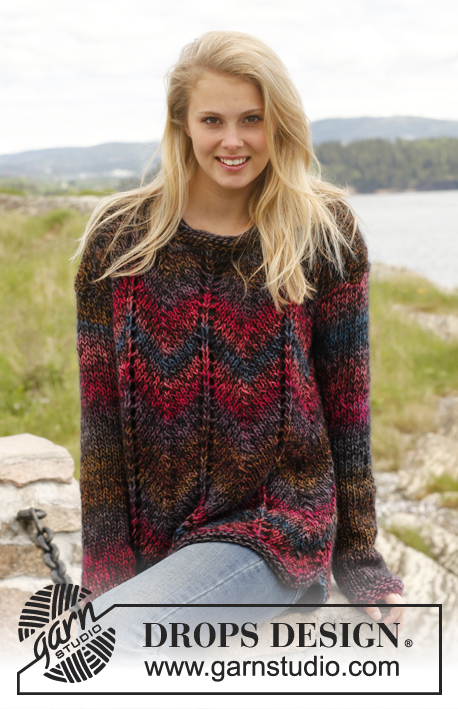
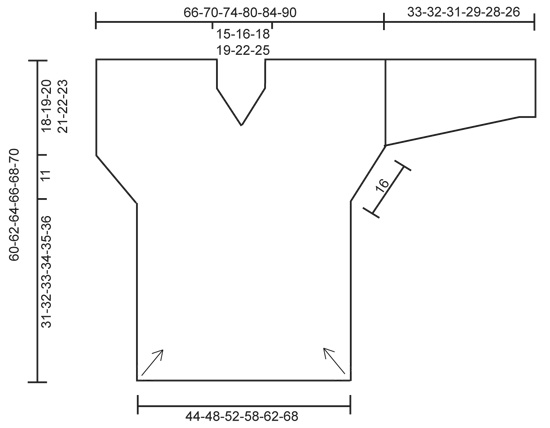
Pulôver DROPS em ponto jarreteira em ”Big Delight” – Tricotado na diagonal. Do S ao XXXL.
DROPS 150-23 |
||||
|
---------------------------------------------------------- NOTA: Existem termos diferentes de tricô e croché em português de Portugal e do Brasil. TRICÔ : Malha = Ponto Canelado = Barra Ponto Jarreteira = Cordões de Tricô Ponto Liga = Ponto Tricô CROCHÉ : mpa – meio ponto alto pa – ponto alto pad – ponto alto duplo pat – ponto alto triplo pb – ponto baixo pbx – ponto baixíssimo pc – ponto corrente ---------------------------------------------------------- PONTO JARRETEIRA (em idas e voltas) : Tricotar todas as carreiras em meia. 1 “barra” jarreteira = 2 carreiras meia. ---------------------------------------------------------- PULÔVER: As flechas no esquema indicam a direcção do tricô. O pulôver tricota-se totalmente em PONTO JARRETEIRA - ver acima. NÃO ESQUECER DE MANTER A MESMA TENSÃO DA INDICADA PARA A AMOSTRA – Uma tensão incorrecta irá afectar a forme do pulôver ! COSTAS : Tricota-se em idas e voltas na agulha circular para que haja espaço suficiente para todas as ms/pts. Montar 3-3-4-4-4-4 ms/pts com a agulha circular 7 mm e o fio Big Delight. Tricotar em PONTO JARRETEIRA - ver acima (1.ª carreira = pelo direito). AO MESMO TEMPO, aumentar 1 m/p no princípio de cada carreira tricotando 2 vezes a 1.ª m/p em todas as carreiras até se ter 47-51-56-62-66-72 ms/pts. Colocar em espera e tricotar outra peça idêntica. Colocar, então, as 2 peças na mesma agulha circular 7 mm = 94-102-112-124-132-144 ms/pts. Colocar um marcador entre as 2 peças e tricotar, então, da seguinte maneira, pelo direito: Tricotar 2 vezes a 1.ª m/p, continuar até restarem 2 ms/pts antes do marcador, 2 ms/pts tricotadas juntamente em meia, marcador, deslizar 1 m/p em meia, 1 m/p meia, passar a m/p deslizada por cima da m/p tricotada, continuar até restar 1 m/p, tricotar 2 vezes a última m/p. Continuar desta maneira com os aumentos e as diminuições em todas as carreiras, pelo direito (o número de ms/pts permanece o mesmo) até a peça medir 31-32-33-34-35-36 cm - medir a direito, ao longo do lado da peça (e não no sentido do tricô) - ver esquema. Colocar 1 marcador no lado. Montar, então, as ms/pts para os ombros no fim de cada carreira (ou seja, nos lados) da seguinte maneira: Montar 4 vezes 6 ms/pts no lado (= 24 ms/pts aumentadas de cada lado da peça). Colocar um outro marcador no lado. NOTA: Não esquecer de continuar a diminuir a meio das costas como antes até ao fim = 134-142-152-164-172-184 ms/pts. Depois do último aumento para o ombro, continuar a aumentar nos lados como antes (ou seja, tricotar 2 vezes a 1.ª e a última m/p em todas as carreiras, pelo direito). A 18-19-20-21-22-23 cm a partir do último marcador (medir a direito, ao longo do lado), diminuir para o ombro da seguinte maneira: tricotar juntamente as 2 primeiras ms/pts e as 2 últimas ms/pts em todas as carreiras, pelo direito até restarem 38-42-44-48-52-56 ms/pts (ou seja, diminui-se, ao mesmo tempo, a meio e de cada lado da peça). Colocar as 13 primeiras ms/pts num alfinete de ms/pts (depois de as ter tricotado), arrematar as 12-16-18-22-26-30 ms/pts seguintes = restam 13 ms/pts. Continuar em ponto jarreteira nessas ms/pts e, AO MESMO TEMPO diminuir 1 m/p no princípio de cada carreira. Continuar desta maneira até restar 1 m/p, cortar o fio e passá-lo pela última m/p. Voltar a colocar as ms/pts em espera nas agulhas, tricotar da mesma maneira acima dessas 13 ms/pts. FRENTE : Montar e tricotar como se fez para as costas. MANGAS : Tricotam-se em idas e voltas. Montar 36-38-40-42-44-46 ms/pts com a agulha circular 7 mm e o fio Big Delight. Tricotar em ponto jarreteira. A 6 cm de altura total, aumentar 1 m/p de cada lado da peça, e repetir estes aumentos mais 4-5-5-5-6-6 vezes a cada 6-4½-4-4-3-3 cm (= 5-6-6-6-7-7 aumentos ao todo) = 46-50-52-54-58-60 ms/pts. Arrematar todas as ms/pts a 33-32-31-29-28-26 cm de altura total (mais curto para os tamanhos maiores porque os ombros são mais largos). MONTAGEM : Fazer a costura dos ombros. Montar as mangas. Fazer a costura sob as mangas e a dos lados na alça antes da frente das ms/pts mais exteriores para evitar que a costura seja demasiado grossa. |
||||
Explicações do diagrama |
||||
|
||||
 |
||||
Terminou este projecto?Então, identifique as suas fotos com as tags #dropspattern #hazetunica ou mostre-as na galeria #dropsfan. Precisa de ajuda para este modelo?Encontrará 13 turotiais em vídeo, uma rubrica Comentários/Perguntas e muito mais ao visitar a página do modelo em www.garnstudio.com © 1982-2026 DROPS Design A/S. Todos os direitos reservados. Este documento, incluuindo as suas su-secções, tem copyrights. Saia mais o que pode fazer com os nossos modelos no fim de cada uma das páginas do nosso site. |
||||


Com mais de 40 anos no design de modelos de tricô e de croché, a DROPS Design oferece uma das mais vastas colecções demodelos gratuitos na Internet - traduzidos em 17 línguas. Neste dia de hoje, temos 324 catálogos e 12290 modelos - dos quais 12271 estão traduzidos em português.
Trabalhamos com muito empenho para lhe proporcionar o melhor que o tricô e o croché têm para oferecer, para lhe fornecer inspiração e conselhos bem como fios da mais elevada qualidade a preços incríveis! Gostaria de usar os nossos modelos para outros fins que não uso pessoal? Pode ler o que lhe é permitido fazer no Copyright texto que se encontra na parte de baixo de todos os nossos modelos. Bom tricô! Bom croché!
Deixe um comentário acerca do modelo DROPS 150-23
Gostaríamos muito de saber o que tem a dizer-nos acerca deste modelo!
Se deixar uma pergunta acerca do modelo, certifique-se de que escolhe a categoria adequada no formulário abaixo para acelerar o processo relativo à resposta. Os campos obrigatórios estão assinalados com um *.