
Categorias populares
Procura um fio?


Comentários / Perguntas (63)
![]() Karen escreveu:
Karen escreveu:
Hi What bust size is the large Thank you
24.01.2016 - 23:34DROPS Design respondeu:
Dear Karen, you will find at the end of the pattern a measurement chart with all measurements for each size taken flat from side to side. Compare these to a similar garment you have and like the shape to find out the matching size. Happy knitting!
25.01.2016 - 14:19
![]() Grete escreveu:
Grete escreveu:
Håber at få et svar på: der lukkes af til skulder således, 2 første og 2 sidste m sammen og midt på, på retsidens til der er 38 m tilbage .. Er det 38 m på hver skulder ?
09.04.2015 - 10:30DROPS Design respondeu:
Hei Grete. Nej du har fellet til skulder i hver side, saa du har 38 i alt paa pinden. Saa har du de förste 13 m paa en traad (=skulder 1) , fell 12 m og behold de sidte 13 m paa p (=skulder 2)
22.04.2015 - 16:11
![]() Grete escreveu:
Grete escreveu:
Hej jeg er kommet til der hvor jeg skal tage ud til ærmerne der står, 6 nye m i slutningen af pinden , hvad så i starten af pinden skal jeg stadig strikke 2 m i den første m. Og tage ind på midten ?
11.03.2015 - 08:37DROPS Design respondeu:
Hej Grete, Ja det stemmer, du tager nye masker ud til ærmer i hver side og indtagningerne midt på fortsætter som tidligere. God fornøjesle!
18.05.2015 - 11:39
![]() Madelene Dahlström escreveu:
Madelene Dahlström escreveu:
Hej! Nu har jag stickat alla delarna och ska sy ihop den och då stämmer inte armarna med med tröjan. Armhålan är mycket mindre än på själva tröjan, ca 10 cm mindre. Hur kan det komma sig? Mvh Madelene Dahlström
03.02.2015 - 09:26DROPS Design respondeu:
Hej Madelene, Jo ärmerna skall stämma med tröjan enligt stickfastheten. Se till att maska av löst, du kan evt öka ett par m på de sista varven... Lycka till!
26.05.2015 - 16:06
![]() Svenja escreveu:
Svenja escreveu:
Hallo, mir ist ein kleiner Rechenfehler aufgefallen. Rückenteil: (=auf jeder Seite 24 M auf genommen)Schulter zunahme. = 134-142-152-164-172-184M aber ausgehend von 94-102-112-124-132-144 M müßten es dann nicht 142-150-160-172-180-192 M sein? Gruß Svenja
25.08.2014 - 09:37DROPS Design respondeu:
Liebe Svenja, nein, das ist kein Rechenfehler, denn Sie nehmen ja außerdem an der hinteren Mitte in den 4 R, in denen Sie die Zunahmen für die Ärmel machen (insgesamt 48 M = 4x 2x 6 M), weiterhin je 2 M ab, es sind also insgesamt 8 M, die Sie abnehmen, bleiben unterm Strich noch 40 zugenommene M, dann kommen Sie auf die angegebene Maschenzahl.
01.09.2014 - 13:07
![]() Ariana escreveu:
Ariana escreveu:
Ich habe einen kleinen Fehler in der deutschen Anleitung gefunden: Im letzten Absatz zum Rückenteil heißt es im ersten Satz: "..., die nächsten 12-16-18-22-26-30 M stricken = 13 M auf der Nadel." Statt "stricken" müsste hier "abketten" stehen. Habe das auch in der englischen Anleitung überprüft, da steht es korrekt: "cast off". Viele Grüße Ariana
10.08.2014 - 13:39DROPS Design respondeu:
Vielen Dank für den Hinweis, das wird nun korrigiert! Viel Spaß beim Weiterstricken!
12.08.2014 - 09:42
![]() Katrine Molberg escreveu:
Katrine Molberg escreveu:
Jeg har lige et spørgsmål mere :) Jeg har fået sat de to dele sammen og strikket første pind. Der står nu i opskriften: "Fortsæt således med udtagninger og indtagninger på hver p fra retsiden (m-antallet vil dermed holdes konstant)" Betyder det at der nu kun skal laves ind- og udtagninger på retsiden og at der bare strikkes en hel retpind uden nogen ind- og udtagninger på alle vrangpinde. Eller blot at der startes på retsiden? På forhånd tak - Katrine
30.06.2014 - 16:59DROPS Design respondeu:
Hej Katrine. Ja, du skal kun lave ind- og udtagningerne paa retsiden. Vrangpindene strikker du ret uden at foretage dig noget. God fornöjelse.
02.07.2014 - 10:24
![]() Katrine Molberg escreveu:
Katrine Molberg escreveu:
Jeg forastår ikke helt målene. På modellen på bikledet ligner det en tunika eller kjole der går til midt på lårene men selv i den største størrelse går den, i følge målene på tegningen, kun mig til lige under hofterne. Er det en fejl? Jeg synes heller ikke ærmerne og halsen på tegningen passer med billedet. På forhånd tak:)
07.06.2014 - 15:50DROPS Design respondeu:
Hei Katrine. Maalene er korrekte. En laengde paa 60-70 cm er en lang tröje. Pröv eventuel at sammenligne med en egen tunika eller tröje som du har. Aermer og hals er ogsaa korrekte, det er saa ikke helt saa tydeligt at se paa billedet. God fornöjelse med den.
10.06.2014 - 16:28
![]() Muriel Piazza escreveu:
Muriel Piazza escreveu:
Modèle très amusant à tricoter. Mais il faut modifier les dimensions des manches pour obtenir le résultat de la photo. Pour le modèle S, il faut monter 30 mailles au lieu de 36 et faire toutes les augmentations sur les 10 derniers centimètres.
17.03.2014 - 12:17DROPS Design respondeu:
Bonjour Mme Piazza, aviez-vous bien le bon échantillon de 13 m x 26 rangs au point mousse = 10 x 10 cm ? mais si vous souhaitiez le bas des manches plus serré, vous avez bien fait. Bon tricot!
17.03.2014 - 18:52
![]() Kirsten Garde escreveu:
Kirsten Garde escreveu:
Har et stort problem. Har slået op på ryggen og samlet de to dele. Jeg skal nu strikke til arbejdet måler 33 cm op langs siden. Hvis jeg lægger det op og måler er der 33 cm efter ca. Skal de 33 cm måles efter at delene er sat sammen?
19.02.2014 - 10:33DROPS Design respondeu:
Hej Kirsten. Du skal maale fra starten af - fra underkanten af delene og op langs siden (maal ikke i strikkeretningen).
19.02.2014 - 14:14
|
||||
Haze Tunica#hazetunica |
||||
|
|
||||
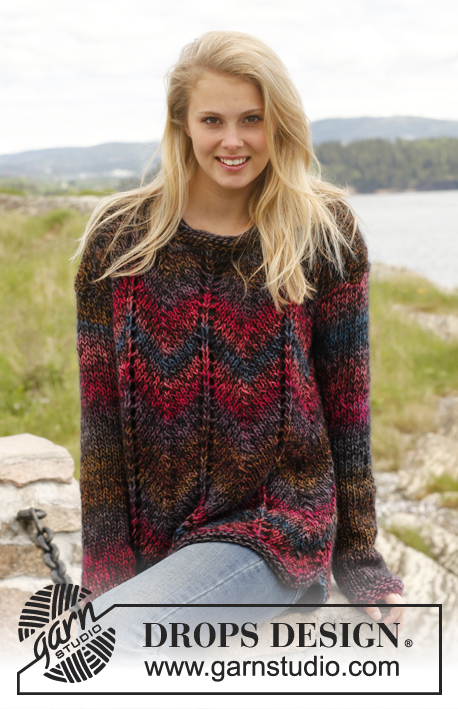
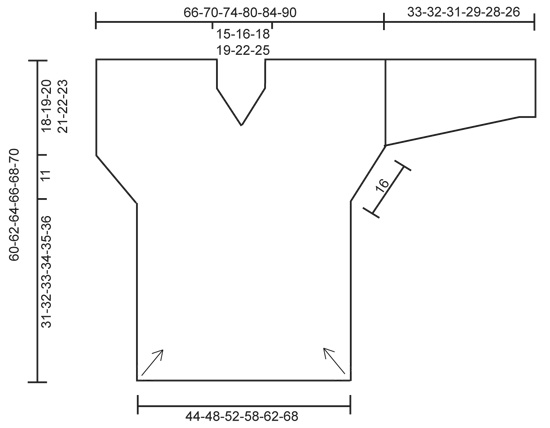
Pulôver DROPS em ponto jarreteira em ”Big Delight” – Tricotado na diagonal. Do S ao XXXL.
DROPS 150-23 |
||||
|
---------------------------------------------------------- NOTA: Existem termos diferentes de tricô e croché em português de Portugal e do Brasil. TRICÔ : Malha = Ponto Canelado = Barra Ponto Jarreteira = Cordões de Tricô Ponto Liga = Ponto Tricô CROCHÉ : mpa – meio ponto alto pa – ponto alto pad – ponto alto duplo pat – ponto alto triplo pb – ponto baixo pbx – ponto baixíssimo pc – ponto corrente ---------------------------------------------------------- PONTO JARRETEIRA (em idas e voltas) : Tricotar todas as carreiras em meia. 1 “barra” jarreteira = 2 carreiras meia. ---------------------------------------------------------- PULÔVER: As flechas no esquema indicam a direcção do tricô. O pulôver tricota-se totalmente em PONTO JARRETEIRA - ver acima. NÃO ESQUECER DE MANTER A MESMA TENSÃO DA INDICADA PARA A AMOSTRA – Uma tensão incorrecta irá afectar a forme do pulôver ! COSTAS : Tricota-se em idas e voltas na agulha circular para que haja espaço suficiente para todas as ms/pts. Montar 3-3-4-4-4-4 ms/pts com a agulha circular 7 mm e o fio Big Delight. Tricotar em PONTO JARRETEIRA - ver acima (1.ª carreira = pelo direito). AO MESMO TEMPO, aumentar 1 m/p no princípio de cada carreira tricotando 2 vezes a 1.ª m/p em todas as carreiras até se ter 47-51-56-62-66-72 ms/pts. Colocar em espera e tricotar outra peça idêntica. Colocar, então, as 2 peças na mesma agulha circular 7 mm = 94-102-112-124-132-144 ms/pts. Colocar um marcador entre as 2 peças e tricotar, então, da seguinte maneira, pelo direito: Tricotar 2 vezes a 1.ª m/p, continuar até restarem 2 ms/pts antes do marcador, 2 ms/pts tricotadas juntamente em meia, marcador, deslizar 1 m/p em meia, 1 m/p meia, passar a m/p deslizada por cima da m/p tricotada, continuar até restar 1 m/p, tricotar 2 vezes a última m/p. Continuar desta maneira com os aumentos e as diminuições em todas as carreiras, pelo direito (o número de ms/pts permanece o mesmo) até a peça medir 31-32-33-34-35-36 cm - medir a direito, ao longo do lado da peça (e não no sentido do tricô) - ver esquema. Colocar 1 marcador no lado. Montar, então, as ms/pts para os ombros no fim de cada carreira (ou seja, nos lados) da seguinte maneira: Montar 4 vezes 6 ms/pts no lado (= 24 ms/pts aumentadas de cada lado da peça). Colocar um outro marcador no lado. NOTA: Não esquecer de continuar a diminuir a meio das costas como antes até ao fim = 134-142-152-164-172-184 ms/pts. Depois do último aumento para o ombro, continuar a aumentar nos lados como antes (ou seja, tricotar 2 vezes a 1.ª e a última m/p em todas as carreiras, pelo direito). A 18-19-20-21-22-23 cm a partir do último marcador (medir a direito, ao longo do lado), diminuir para o ombro da seguinte maneira: tricotar juntamente as 2 primeiras ms/pts e as 2 últimas ms/pts em todas as carreiras, pelo direito até restarem 38-42-44-48-52-56 ms/pts (ou seja, diminui-se, ao mesmo tempo, a meio e de cada lado da peça). Colocar as 13 primeiras ms/pts num alfinete de ms/pts (depois de as ter tricotado), arrematar as 12-16-18-22-26-30 ms/pts seguintes = restam 13 ms/pts. Continuar em ponto jarreteira nessas ms/pts e, AO MESMO TEMPO diminuir 1 m/p no princípio de cada carreira. Continuar desta maneira até restar 1 m/p, cortar o fio e passá-lo pela última m/p. Voltar a colocar as ms/pts em espera nas agulhas, tricotar da mesma maneira acima dessas 13 ms/pts. FRENTE : Montar e tricotar como se fez para as costas. MANGAS : Tricotam-se em idas e voltas. Montar 36-38-40-42-44-46 ms/pts com a agulha circular 7 mm e o fio Big Delight. Tricotar em ponto jarreteira. A 6 cm de altura total, aumentar 1 m/p de cada lado da peça, e repetir estes aumentos mais 4-5-5-5-6-6 vezes a cada 6-4½-4-4-3-3 cm (= 5-6-6-6-7-7 aumentos ao todo) = 46-50-52-54-58-60 ms/pts. Arrematar todas as ms/pts a 33-32-31-29-28-26 cm de altura total (mais curto para os tamanhos maiores porque os ombros são mais largos). MONTAGEM : Fazer a costura dos ombros. Montar as mangas. Fazer a costura sob as mangas e a dos lados na alça antes da frente das ms/pts mais exteriores para evitar que a costura seja demasiado grossa. |
||||
Explicações do diagrama |
||||
|
||||
 |
||||
Terminou este projecto?Então, identifique as suas fotos com as tags #dropspattern #hazetunica ou mostre-as na galeria #dropsfan. Precisa de ajuda para este modelo?Encontrará 13 turotiais em vídeo, uma rubrica Comentários/Perguntas e muito mais ao visitar a página do modelo em www.garnstudio.com © 1982-2026 DROPS Design A/S. Todos os direitos reservados. Este documento, incluuindo as suas su-secções, tem copyrights. Saia mais o que pode fazer com os nossos modelos no fim de cada uma das páginas do nosso site. |
||||


Com mais de 40 anos no design de modelos de tricô e de croché, a DROPS Design oferece uma das mais vastas colecções demodelos gratuitos na Internet - traduzidos em 17 línguas. Neste dia de hoje, temos 324 catálogos e 12290 modelos - dos quais 12271 estão traduzidos em português.
Trabalhamos com muito empenho para lhe proporcionar o melhor que o tricô e o croché têm para oferecer, para lhe fornecer inspiração e conselhos bem como fios da mais elevada qualidade a preços incríveis! Gostaria de usar os nossos modelos para outros fins que não uso pessoal? Pode ler o que lhe é permitido fazer no Copyright texto que se encontra na parte de baixo de todos os nossos modelos. Bom tricô! Bom croché!
Deixe um comentário acerca do modelo DROPS 150-23
Gostaríamos muito de saber o que tem a dizer-nos acerca deste modelo!
Se deixar uma pergunta acerca do modelo, certifique-se de que escolhe a categoria adequada no formulário abaixo para acelerar o processo relativo à resposta. Os campos obrigatórios estão assinalados com um *.