
Categorias populares
Procura um fio?


Comentários / Perguntas (22)
Renée escreveu:
Hi Thanks for your response, but I figured it out myself, I was just a bit confused by the mid front and mid back. I am very pleased with the result. It looks really lovely. Thanks for all your help!
13.12.2013 - 11:48Renée escreveu:
Hi Could you please explain the assembly instructions as they are rather confusing.
10.12.2013 - 10:44DROPS Design respondeu:
Dear Renée, on both pieces, you increased on one side and not on the other one. Put both pieces tog so that edge without inc are on mid back. Sew cast off rows together starting from mid front, and continue along edges on back side, this seam should measure approx. 30 cm (back of head). Happy knitting!
10.12.2013 - 13:41
![]() Renée escreveu:
Renée escreveu:
Thank you for clarifying.
08.12.2013 - 11:21René escreveu:
Just to clarify; for part 1 you do the increase at the beginning of the row after the edge stitch. And for Part 2, you do the increase before the final stitch at the end of the row. You wrote in your previous post that you do the increase every other row, but you meant every 4th row as stated in the pattern.
02.12.2013 - 09:31DROPS Design respondeu:
Dear Renée, you are correct, I mistyped last answer, you inc approx. every 2 cm, ie every 4 th row (= every 2nd row from RS). Inc will be done at beg of row from RS for 1st part and at the end of row from RS for 2nd part. Happy knitting!
02.12.2013 - 13:57Renée escreveu:
The pattern states that the part 1 increase,should be done on the RS. I assumed this was the right side of the work, i.e. the side worn outwards. But, as this is garter stitch there is no right/outer side or wrong/inner side, as both sides look the same. The part 2 increase is done on the left side. I am a little puzzled. Surely, it does not matter which side you do the increase on, as you would merely join the 2 sides that have been increased? Or I am missing something?
29.11.2013 - 15:44DROPS Design respondeu:
Dear Renée, you will inc here at the right side of piece, seen from RS, ie at beg of row every other row. And for 2nd part you will inc at the end of row every other row (=every row from WS). Happy knitting!
29.11.2013 - 16:46Renee escreveu:
Thank you!
21.11.2013 - 13:02Renée escreveu:
Hi I am confused by the increase. I realise a YO is needed, but do not know what is meant by "inc 1 st from RS inside 1 st on the right side of the piece". I understand that the increase is done with the Right Side (RS) of the knitting facing you. However, I am not sure what is meant by "inside 1 st on the right side of the piece" Do you mean you knit the first stitch in the row and then do the YO? Can you please explain.
20.11.2013 - 10:06DROPS Design respondeu:
Dear Renée, it means you will inc after the edge st, at the beg of row, seen from RS: K1 (edge st), YO (inc) and continue until end of RS row. Happy knitting!
20.11.2013 - 11:13
![]() Siv Aarflot escreveu:
Siv Aarflot escreveu:
Denne kunne vært morsom og prøve seg på.
01.02.2012 - 15:27
![]() Faultier escreveu:
Faultier escreveu:
Sehr leicht zu stricken, wunderschön und hält warm.
23.01.2011 - 19:31
![]() Karen Sanborn escreveu:
Karen Sanborn escreveu:
This one is very nice to wear with a coat during winter
30.06.2010 - 18:29
|
|
Sandy Wind |
|
 |
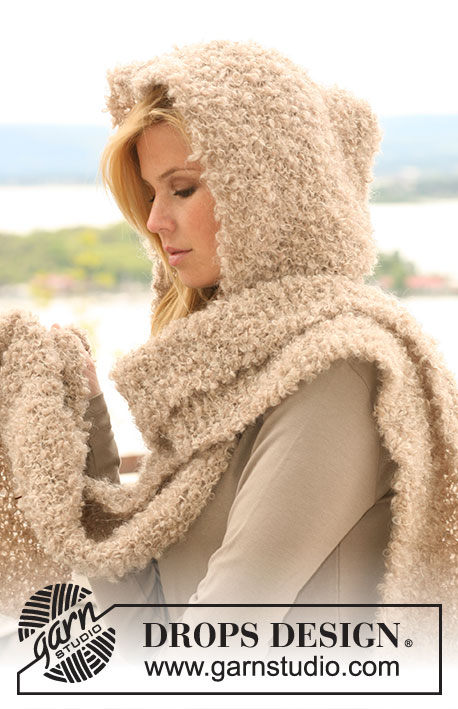 |
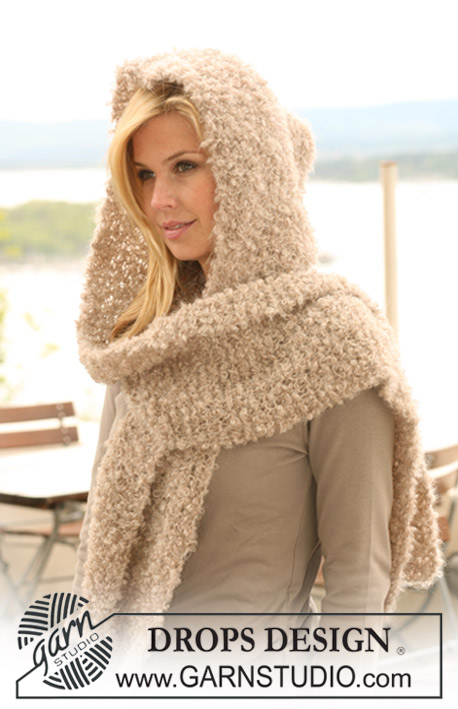
Cachecol com capuz tricotado em ponto jarreteira em DROPS Puddel. DROPS design: Modelo n° V-055
DROPS 123-36 |
|
|
NOTA: Existem termos diferentes de tricô e croché em português de Portugal e do Brasil. Malha = Ponto Canelado = Barra Ponto Jarreteira = Cordões de Tricô Ponto Liga = Ponto Tricô Croché : mpa – meio ponto alto pa – ponto alto pad – ponto alto duplo pat – ponto alto triplo pb – ponto baixo pbx – ponto baixíssimo pc – ponto corrente -------------------------------------------------------- PONTO JARRETEIRA (em idas e voltas) : Tricotar todas as carreiras em meia AUMENTOS: Aumentar fazendo 1 laçada. Na carreira seguinte tricotar a laçada em meia torcida (enfiar a agulha na parte de trás da laçada) para evitar um buraco. -------------------------------------------------------- CACHECOL COM CAPUZ : Tricota-se em 2 partes que, depois, são unidas uma à outra. 1.ª PARTE : Tricota-se em idas e voltas. Montar 25 ms/pts com as agulhas 7 mm. Tricotar em PONTO JARRETEIRA – ver acima! NÃO ESQUECER DE MANTER A MESMA TENSÃO DA INDICADA PARA A AMOSTRA ! A 106 cm de altura total, aumentar 1 m/p pelo direito, a 1 m/p do rebordo, à direita da peça – Ver AUMENTOS ! Repetir estes aumentos num total de 8 vezes a cada 4 carreiras (a cerca de cada 2 cm) = 33 ms/pts. Continuar em ponto jarreteira. Arrematar FROUXAMENTE a 130 cm de altura total. 2.ª PARTE : Tricota-se como a 1.ª parte mas aumentar à esquerda. MONTAGEM : Os lados sem aumentos marcam o meio da parte de trás. Costurar as 2 partes uma à outra, na parte de cima, orla com orla, começando a meio da frente. Continuar a costura em cerca 30 cm ao longo da parte de baixo do cachecol. Arrematar os fios. |
|
Terminou este projecto?Então, identifique as suas fotos com as tags #dropspattern ou mostre-as na galeria #dropsfan. Precisa de ajuda para este modelo?Encontrará 8 turotiais em vídeo, uma rubrica Comentários/Perguntas e muito mais ao visitar a página do modelo em www.garnstudio.com © 1982-2026 DROPS Design A/S. Todos os direitos reservados. Este documento, incluuindo as suas su-secções, tem copyrights. Saia mais o que pode fazer com os nossos modelos no fim de cada uma das páginas do nosso site. |
|


Com mais de 40 anos no design de modelos de tricô e de croché, a DROPS Design oferece uma das mais vastas colecções demodelos gratuitos na Internet - traduzidos em 17 línguas. Neste dia de hoje, temos 324 catálogos e 12290 modelos - dos quais 12271 estão traduzidos em português.
Trabalhamos com muito empenho para lhe proporcionar o melhor que o tricô e o croché têm para oferecer, para lhe fornecer inspiração e conselhos bem como fios da mais elevada qualidade a preços incríveis! Gostaria de usar os nossos modelos para outros fins que não uso pessoal? Pode ler o que lhe é permitido fazer no Copyright texto que se encontra na parte de baixo de todos os nossos modelos. Bom tricô! Bom croché!
Deixe um comentário acerca do modelo DROPS 123-36
Gostaríamos muito de saber o que tem a dizer-nos acerca deste modelo!
Se deixar uma pergunta acerca do modelo, certifique-se de que escolhe a categoria adequada no formulário abaixo para acelerar o processo relativo à resposta. Os campos obrigatórios estão assinalados com um *.