
Categorias populares
Procura um fio?


Comentários / Perguntas (33)
![]() Judith Thompson escreveu:
Judith Thompson escreveu:
I cannot figure out the row after the fans - I see the V stitch but then what? 7 chains? Doesn't seen enough?
24.01.2015 - 10:33DROPS Design respondeu:
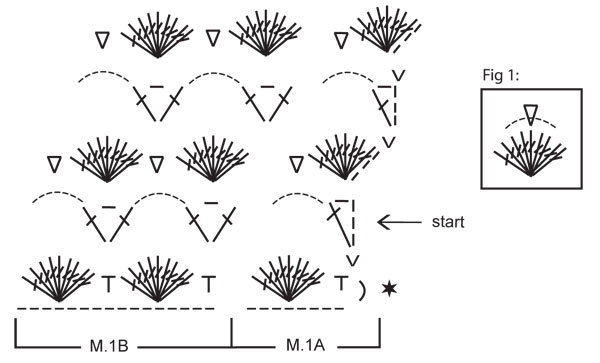
Dear Mrs Thompson, on row 2 and 4 in diag, start with 4 ch, 1 tr in sl st from previous row, 7 ch, *in next sc work 1 tr, 1 ch, 1 tr, 7 ch*, repeat from *-* around and join with a sl st in 3rd ch from beg of round. Happy crocheting!
26.01.2015 - 09:32
![]() Antje Schupp escreveu:
Antje Schupp escreveu:
Unsere Stricklady aus dem Dropsladen hat sie in blau und mit einem Band gemacht, das ist noch viel schöner ;O). Ich nehm das Muster und mach eine eckige Tasche draus ( in beige, hab ich noch ;O)).
06.07.2014 - 23:31
![]() Mary escreveu:
Mary escreveu:
Hi! I'm so excited to start making this bag! I do have one question though, I haven't followed a pattern like this before and I'm confused by the explanation of rounds 5-11 saying at the same time increase by x amount. Could you please explain in further detail?
13.04.2014 - 10:30DROPS Design respondeu:
Dear Mary, from round 5 you continue as before with inc, ie, Rd 5 will be worked as follows: *2 dc in first dc, 1 dc in each of the next 4 dc* repeat from *-*, Rd 6:*2 dc in first dc, 1 dc each of the next 5 dc*, and so on, you will have 1 more dc between 2 inc on each inc round. Happy crocheting!
14.04.2014 - 09:07
![]() Barbara Miller escreveu:
Barbara Miller escreveu:
FYI, I boldly went where I'd never gone before and got it done. I have been crocheting for about 50 years and never had used a chart. Now I understand them and whole new world of opportunities is open for me. I modified the straps to a sling because that's what my daughter wanted and she LOVES it. Now I'm making one for myself. Thanks! Your patterns really rock. I was so initimidated by the chart and you've helped me get over my fears.
05.06.2013 - 17:38
![]() Barbara Miller escreveu:
Barbara Miller escreveu:
I was wondering if there are written instructions for the fan portion of this bag. Or a tutorial on how to do it. I cannot make sense of the chart. Thanks.
20.05.2013 - 05:11DROPS Design respondeu:
Dear Mrs Miller, there are no written instruction for the fan portion but you'll find above the diagrams all diagram texts to figure out how to work the diagrams. Happy crocheting!
21.05.2013 - 10:18
![]() Marjan escreveu:
Marjan escreveu:
José bedankt! Ik ga het proberen. Inmiddels ben ik begonnen maar kom gelijk bij de 2e toer een vraag tegen. Ik kan niet terugvinden of je de stokjes in de voorste, de achterste of allebei de lussen moet insteken?
09.01.2013 - 12:19DROPS Design respondeu:
Haak standaard door beide lussen, zie ook onze haakvideo's
10.01.2013 - 21:58
![]() Marjan escreveu:
Marjan escreveu:
Lijkt me een prachtige tas! Ik wil 'm graag gaan maken, wel 1 probleem. Op mijn Mac krijg ik het niet voor elkaar het patroon te downloaden. Heeft iemand het in PDF voor mij? Of een tip om het toch te downloaden? Alvast bedankt!
04.01.2013 - 16:40José respondeu:
Hallo Marjan, kies NIET afdrukken patroon. Maar ga in je Safari werkbalk naar Archief en kies: druk af en dan kom je in je print programma. Succes.
04.01.2013 - 19:31
![]() Conny escreveu:
Conny escreveu:
Goedemorgen, Deze tas ben ik aan het haken en ben toegekomen aan het veren patroon. Kunt u mij vertellen hoe ik de tweede toer gaat starten? Ik snap van de tekening niet zo veel, ben een beginner in het haken. Alvast super bedankt!
20.08.2012 - 10:39DROPS Design respondeu:
In TIP VOOR HET HAKEN-1 en 2, kan je lezen hoe een toer moet beginnen. In de teltekening zie je de 1 of 3 losse ook staan als 1 of 3 stipjes (rechts bij de ster of pij het pijltje start). Je haakt het diagram vanaf start vanaf rechts naar links, eerst met 3+1 lossen, 1 dstk, 7 l, 1 dstk, 1 l, 1 dstk in de vaste van vorige toer enzo voort.
21.08.2012 - 16:37
![]() DROPS Design NL escreveu:
DROPS Design NL escreveu:
De eerste toer staat al beschreven in het patroon zelf. Je haakt eerst de bodem (t/m toer 18). Vervolgens haak je door volgens telpatroon M.1A en M.1B. De telpatronen staan onderaan incl. vertaling van de symbolen. Je begint bij "start" met 4 lossen en 1 stokje in de hv van de vorige toer. Eindig en begin zoals beschreven onder TIP VOOR HET HAKEN. Haak in de ronde en lees het telpatroon van rechts naar links. Gr. Tine
04.03.2010 - 13:21
![]() Walgraef Tina escreveu:
Walgraef Tina escreveu:
Kunt u een beetje meer uitleg geven over het Verenpatroon a.u.b.? Welke steken doe je in de eerstee ronde en welke dan in de tweede ronde want daar is toch een verschil tussen?
04.03.2010 - 12:20
|
||||||||||||||||||||||
Maurea#maureabag |
||||||||||||||||||||||
 |
 |
|||||||||||||||||||||
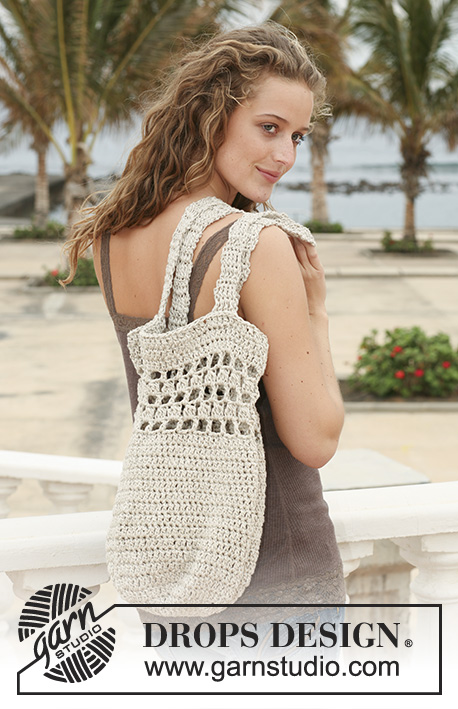
Saco DROPS em croché com ponto rendado em “Bomull-Lin”
DROPS 113-3 |
||||||||||||||||||||||
|
Nota: Existem termos diferentes de tricô e croché em português de Portugal e do Brasil. Malha = Ponto Ponto Jarreteira = Cordões de Tricô Ponto Liga – Ponto Tricô DICA CROCHÉ 1 : Substituir o 1.º pa de cada carreira por 3 pc, unir cada carreira com 1 pbx no 3.º pc do princípio da carreira. DICA CROCHÉ 2 : Substituir o 1.º pa da carreira por 3 pc. PONTO FANTASIA : Ver diagramas M1 e M1B. Fazer 1 vez M1A no princípio da carreira e terminar a carreira com M1B. SACO Com o fio Bomull-Lin e a agulha croché 4 mm montar uma corrente de 6 pc, unir em redondo com 1 pbx no 1.º pc. CARREIRA 1 : 20 pa no aro – VER DICA CROCHÉ 1 ! CARREIRA 2 : *2 pa no pa seguinte, 1 pa no pa seguinte *, repetir de * a * num total de 10 vezes = 30 pa. PENSAR EM MANTER A MESMA TENSÃO DA AMOSTRA ! CARREIRA 3 : *2 pa no pa seguinte, 1 pa em cada um dos 2 pa seguintes *, repetir de * a * num total de 10 vezes = 40 pa. CARREIRA 4 : *2 pa no pa seguinte, 1 pa em cada um dos 3 pa seguintes *, repetir de * a * num total de 10 vezes = 50 pa. CARREIRAS 5-10 : Continuar como antes e, AO MESMO TEMPO, continuar a aumentar 10 pa por carreira como antes = 110 pa na 10:ª carreira. CARREIRA 11 : 1 pa em cada pa e, AO MESMO TEMPO, distribuir 2 aumentos = 112 pa. CARREIRAS 12 – 18 : 1 pa em cada pa (não fazer aumentos). Depois, continuar em ponto de leque, da seguinte maneira : 1 pc, 1 pb no 1.º pa, * saltar 3 pa, no pa seguinte fazer : 9 pad (= 1 leque), saltar 3 pa, 1 pb no pa seguinte *, repetir de * a * 14 vezes, mas, na última repetição, unir com 1 pbx no 1.º pb = 14 leques. Continuar com os motivos M1A e M1B – ver acima. Repetir M1A e M1B até obter 10 leques em altura. Cortar e arrematar o fio. ALÇA : Com o fio Bomull-Lin e a agulha croché 4 mm, montar uma corrente de 8 pc. Fazer 1 pa no 4.º pc a partir da agulha croché, 1 pa em cada um dos 4 pc seguintes = 6 pa. Continuar em idas e voltas com 1 pa em cada pa – VER DICA CROCHÉ 2 ! Continuar desta maneira até a alça ter aproximadamente 60 cm de altura. Fazer outra alça igual. *costurar uma extremidade na parte de cima de um leque, saltar 3 leques, costurar a outra extremidade da alça na parte de cima do leque seguinte *. Saltar 2 leques e repetir de * a * para a outra alça. Rematar os fios soltos. |
||||||||||||||||||||||
Explicações do diagrama |
||||||||||||||||||||||
|
||||||||||||||||||||||
 |
||||||||||||||||||||||
Terminou este projecto?Então, identifique as suas fotos com as tags #dropspattern #maureabag ou mostre-as na galeria #dropsfan. Precisa de ajuda para este modelo?Encontrará 9 turotiais em vídeo, uma rubrica Comentários/Perguntas e muito mais ao visitar a página do modelo em www.garnstudio.com © 1982-2026 DROPS Design A/S. Todos os direitos reservados. Este documento, incluuindo as suas su-secções, tem copyrights. Saia mais o que pode fazer com os nossos modelos no fim de cada uma das páginas do nosso site. |
||||||||||||||||||||||


Com mais de 40 anos no design de modelos de tricô e de croché, a DROPS Design oferece uma das mais vastas colecções demodelos gratuitos na Internet - traduzidos em 17 línguas. Neste dia de hoje, temos 324 catálogos e 12290 modelos - dos quais 12271 estão traduzidos em português.
Trabalhamos com muito empenho para lhe proporcionar o melhor que o tricô e o croché têm para oferecer, para lhe fornecer inspiração e conselhos bem como fios da mais elevada qualidade a preços incríveis! Gostaria de usar os nossos modelos para outros fins que não uso pessoal? Pode ler o que lhe é permitido fazer no Copyright texto que se encontra na parte de baixo de todos os nossos modelos. Bom tricô! Bom croché!
Deixe um comentário acerca do modelo DROPS 113-3
Gostaríamos muito de saber o que tem a dizer-nos acerca deste modelo!
Se deixar uma pergunta acerca do modelo, certifique-se de que escolhe a categoria adequada no formulário abaixo para acelerar o processo relativo à resposta. Os campos obrigatórios estão assinalados com um *.