
Categorias populares
Procura um fio?


Comentários / Perguntas (65)
![]() Annick Mercier escreveu:
Annick Mercier escreveu:
Bonjour, je me demandais quel type de laine utiliser puisque la laine n'est pas disponible ici au Canada. Merci, Annick
02.09.2019 - 16:01DROPS Design respondeu:
Bonjour Mme Mercier, je suis heureuse de vous informer que vous pouvez trouver notre laine au Canada - plus d'infos ici. Bon tricot!
02.09.2019 - 16:47
![]() Patricia Olivia Fuchs escreveu:
Patricia Olivia Fuchs escreveu:
Hallo, liebes Drops-Team. Wenn ich KEIN umgeknicktes Bündchen möchte, kann ich dann anstatt * 2 re., 3 li. * gleich mit Diagrammm M1 beginnen und der weiteren Anleitung folgen, oder muss ich dafür noch etwas anderes beachten?
24.06.2019 - 14:52DROPS Design respondeu:
Liebe Frau Fuchs, also wahrscheinlich können Sie dann mit Zöpfen über die gewünschte Höhe stricken, dann setzt man eine Markierung und der Socken wird ab Markierer gemessen (nicht von der Anschlagskante). Viel Spaß beim stricken!
24.06.2019 - 17:00
![]() Mathilde escreveu:
Mathilde escreveu:
Bonjour, Je souhaiterais savoir ce que veux dire retourner le tricot ? Je ne comprends pas .... J'ai retourner mon ouvrage mais je tricote toujours dans le même sens ... Je vous remercie de bien vouloir l'éclairer Mathilde
14.01.2019 - 19:09DROPS Design respondeu:
Bonjour Mathilde, après les côtes, retournez l'ouvrage sur l'envers = les premiers rangs de côtes seront retournés sur l'endroit à la fin et ont donc été tricotés sur l'envers. Au premier tour après avoir retourné votre ouvrage, vous allez tricoter la dernière maille du tour précédent pour terminer par la première maille, continuez ensuite toujours ainsi, c'est maintenant l'endroit de la chaussette. Bon tricot!
15.01.2019 - 09:02Nicola Stuart escreveu:
Would love to knit these but would have to make them longer and bigger. How would I go about changing size?
11.11.2018 - 22:41DROPS Design respondeu:
Dear Nicola, the pattern goes up to size 44. If you need even bigger by using a slightly bigger needle. Conversly, you can use the yarn Lima isntead of the Karisma =with bgger needles). If you only want it somewhat higher, you can continue knitting straight for a couple more cm-s, and6 or you can increase a stitch on both ides of this middle stitch. You can find the videos, related to this pattern at the left of the page, below the pictures. Also there are detailed explanation of the symbos of the pattern chart. If you need further help you can also ask for it in person in the store where you bought your DROPS yarn from. Happy Crafting!
12.11.2018 - 01:56
![]() Nicole escreveu:
Nicole escreveu:
Vielen Dank für diese tolle Anleitung. Die Strümpfe sehen im Original schöner aus wie auf Eurem Foto und war für mich als Anfänger leicht verständlich nach zu stricken. Inzwischen habe ich schon 3 Paar gestricht und es macht immer wieder Spaß.
08.08.2018 - 17:26
![]() Alexandra escreveu:
Alexandra escreveu:
When i get to this part in the M2 chart do I pearl the 6 after i pearl the first 18 or do i knit them I'm not sure how to determine if I am working on the right side or wrong side now? Knit following round like this: P the first 15-18-21 sts, chart M.2 (= 36 sts), P the last 15-18-21 sts. I hope you understand my question thank you , Alex
08.06.2016 - 21:34DROPS Design respondeu:
Dear Alexandra, when working M.2 you are now working from RS and WS of M.1 is facing you (will be folded at the very end). M.2 is 36 sts in width, work rounds like this: P the first 15-18-21 sts from beg of round, then work the 36 sts in M.2 starting to read at the bottom corner on the right side towards the left and P the last 15-18-21 sts on round. Happy knitting!
09.06.2016 - 08:49
![]() Alexandra escreveu:
Alexandra escreveu:
I'm talking about the Drops long Sock pattern their is M,M2, M3 Diagram it's just a little harder to understand . Thanks, Alex
18.05.2016 - 16:05DROPS Design respondeu:
Dear Alexandra, then follow the legend to diagram, and start reading diagram from the bottom corner on the right side towards the left every round. 1 square = 1 st x 1 round. Read more here. Happy knitting!
18.05.2016 - 17:11
![]() Alexandra escreveu:
Alexandra escreveu:
Okay What about the empty space at the bottom of the diagrams? What is that about? I'm sorry I'm new and to doING and reading diagrams. Thank you, Alexandra
18.05.2016 - 04:38DROPS Design respondeu:
Dear Alexandra, an empty space can be added at the bottom of a diagram when there are less sts on some rows before you inc and get then more sts than on previous rows. Maybe you could ask your question on the pattern you are thinking about, it might help to make an accurate answer. Happy knitting!
18.05.2016 - 09:23
![]() Alexandra Dick escreveu:
Alexandra Dick escreveu:
I am wondering about the pattern for 103-10 are you to read the diagram from top to bottom or bottom to top? And is it read right to left or left to right? And what are the empty space at the bottom of diagram ment for? And are you to repeat pattern like the M1 it was p1,k4,p1,k4 do you continue doing that for a whole round? I tried finding a video to help but was unable to . Thank you
29.04.2016 - 05:27DROPS Design respondeu:
Dear Mrs Dick, diagrams are read from bottom up starting on the corner on the right side, every round from the right towards the left (see here) 1st round in M1 will be workd; (K4, P1,K4, P1) repeat from (to) over all sts on round. Happy knitting!
29.04.2016 - 09:09
![]() Birgitt escreveu:
Birgitt escreveu:
Hallo, danke für die schnelle Antwort. Genau so habe ich die Anleitung auch verstanden, hatte schon bedenken, ich hätte es nicht kapiert. Meinem Mann ist das aber -zu langweilig- (OTon). Da ich für ihn die Maschenzahl ohnehin ändern muss, bekommt er auf der Rückseite M3 gestrickt (bis FerseI und in den linken Maschen zw. beiden Mustern kann ich super die Abnahmen für die Wade vornehmen. Gruß Birgitt
14.03.2016 - 19:03
|
||||||||||||||||||||||
Hilde & Winter |
||||||||||||||||||||||
|
|
||||||||||||||||||||||
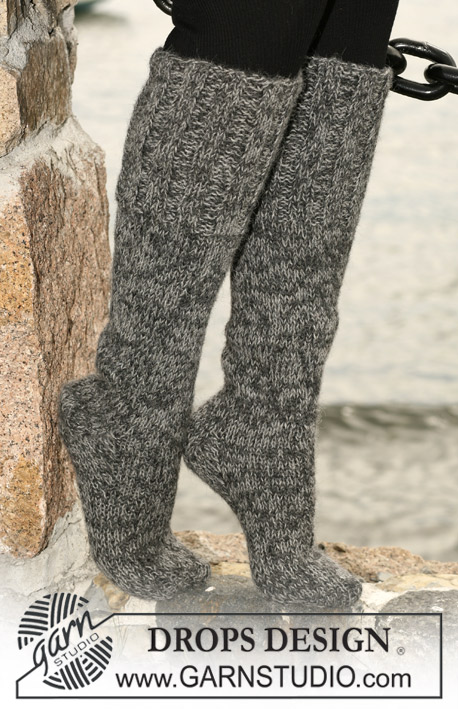
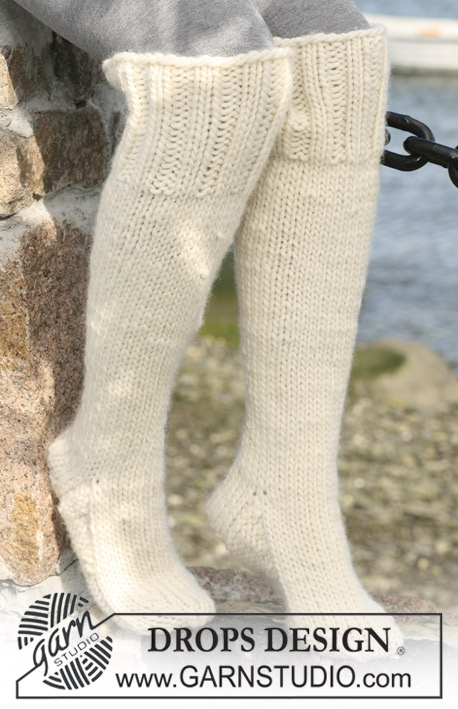
Meias altas DROPS em ponto irlandês, em « Karisma Superwash »
DROPS 103-10 |
||||||||||||||||||||||
|
---------------------------------------------------------- NOTA: Existem termos diferentes de tricô e croché em português de Portugal e do Brasil. TRICÔ : Malha = Ponto Canelado = Barra Ponto Jarreteira = Cordões de Tricô Ponto Liga = Ponto Tricô CROCHÉ : mpa – meio ponto alto pa – ponto alto pad – ponto alto duplo pat – ponto alto triplo pb – ponto baixo pbx – ponto baixíssimo pc – ponto corrente ---------------------------------------------------------- AMOSTRA : 22 ms/pts x 30 carreiras = 10 x 10 cm em ponto meia CANELADO/BARRA : * 2 ms/pts meia, 3 ms/pts liga/tricô * repetir de * a * PONTO FANTASIA : ver diagramas M1, M2 e M3. Os diagramas mostram o ponto fantasia pelo direito. DIMINUIÇÕES CALCANHAR C 1 (= direito): tricotar até restarem 7-8-9 ms/pts, deslizar a m/p seguinte em meia, 1 m/p meia, passar a m/p deslizada por cima da m/p tricotada C 2 (= avesso) : tricotar até restarem 7-8-9 ms/pts, deslizar a m/p seguinte em liga/tricô, 1 m/p liga/tricô, passar a m/p deslizada por cima da m/p tricotada C 3 (= direito): tricotar até restarem 6-7-8 ms/pts, deslizar a m/p seguinte em meia, 1 m/p meia, passar a m/p deslizada por cima da m/p tricotada C 4 (= avesso) : tricotar até restarem 6-7-8 ms/pts, deslizar a m/p seguinte em liga/tricô, 1 m/p liga/tricô, passar a m/p deslizada por cima da m/p tricotada C 5 (= direito): tricotar até restarem 5-6-7 ms/pts, deslizar a m/p seguinte em meia, 1 m/p meia, passar a m/p deslizada por cima da m/p tricotada C 6 (= avesso) : tricotar até restarem 5-6-7 ms/pts, deslizar a m/p seguinte em liga/tricô, 1 m/p liga/tricô, passar a m/p deslizada por cima da m/p tricotada Continuar com 1 m/p a menos, antes de deslizar 1 m/p, até restarem 8-10-12 ms/pts na agulha. MEIA Tricota-se em redondo a partir do meio da parte de trás. Com o fio Karisma e as agulhas de pontas duplas 3,5 mm montar 80-90-100 ms/pts. Tricotar em canelado/barra - ver acima. A 2 cm de altura de canelado/barra, continuar em ponto fantasia M1. A 20 cm de altura total, virar a peça – ou seja, continuar a tricotar pelo avesso (os 20 cm tricotados serrão dobrados no fim = aba). Tricotar 1 carreira meia e, ao mesmo tempo, distribuir 14-18-22 diminuições = 66-72-78 ms/pts. Tricotar 1 carreira liga/tricô. Colocar um marcador e medir a partir do marcador. Tricotar então a carreira seguinte : as 15-18-21 primeiras ms/pts em ponto liga/tricô, M2 (=36 ms/pts), as 15-18-21 últimas ms/pts em ponto liga/tricô. A 5 cm, diminuir 1 m/p de cada lado de M2 11-12-13 vezes a cada 2 cm (tricotando 2 ms/pts juntamente em liga/tricô) = 44-48-52 ms/pts. A 33-36-39 cm de altura total, colocar as 24 ms/pts centrais em espera num fio. Tricotar então 5 -5,5-6 cm em ponto meia nas restantes 20-24-28 ms/pts da parte de trás (= calcanhar). Diminuir então para o calcanhar (ver acima) Quando as diminuições do calcanhar estão feitas, levantar 11-13-15 ms/pts de cada lado do calcanhar, distribui-las pelas agulhas de pontas duplas = 54-60-66 ms/pts. Tricotar M3 nas 24 ms/pts do peito do pé (e as outras ms/pts em ponto meia). AO MESMO TEMPO, diminuir da seguinte maneira : 2 ms/pts tricotadas juntamente em meia antes de M3, e 2 ms/pts tricotadas juntamente em meia torcida (enfiar a agulha na alça de trás das ms/pts) depois de M3 : 6 vezes a cada 2 carreiras = 42-48-54 ms/pts. Tricotar até o pé medir cerca de 18-20-22 cm a partir do rebordo do calcanhar (princípio das diminuições do calcanhar). Continuar então em ponto meia em todas as ms/pts. Colocar 1 marcador de cada lado do pé, ou seja, 22-24-26 ms/pts para o peito do pé e 20-24-28 ms/pts para a planta do pé. Diminuir para a ponta da do pé de cada lado de cada marcador : 2 ms/pts tricotadas juntamente em meia antes do marcador e 2 ms/pts tricotadas juntamente em meia torcida depois do marcador. Diminuir desta maneira 3 vezes a cada 2 carreiras = 30-36-42 ms/pts e, depois, 6-7-9 vezes em todas as carreiras = 6-8-6 ms/pts. Passar o fio pelas restantes ms/pts e costurar. ________________________________________ |
||||||||||||||||||||||
Explicações do diagrama |
||||||||||||||||||||||
|
||||||||||||||||||||||
 |
||||||||||||||||||||||
Terminou este projecto?Então, identifique as suas fotos com as tags #dropspattern ou mostre-as na galeria #dropsfan. Precisa de ajuda para este modelo?Encontrará 15 turotiais em vídeo, uma rubrica Comentários/Perguntas e muito mais ao visitar a página do modelo em www.garnstudio.com © 1982-2026 DROPS Design A/S. Todos os direitos reservados. Este documento, incluuindo as suas su-secções, tem copyrights. Saia mais o que pode fazer com os nossos modelos no fim de cada uma das páginas do nosso site. |
||||||||||||||||||||||


Com mais de 40 anos no design de modelos de tricô e de croché, a DROPS Design oferece uma das mais vastas colecções demodelos gratuitos na Internet - traduzidos em 17 línguas. Neste dia de hoje, temos 324 catálogos e 12290 modelos - dos quais 12271 estão traduzidos em português.
Trabalhamos com muito empenho para lhe proporcionar o melhor que o tricô e o croché têm para oferecer, para lhe fornecer inspiração e conselhos bem como fios da mais elevada qualidade a preços incríveis! Gostaria de usar os nossos modelos para outros fins que não uso pessoal? Pode ler o que lhe é permitido fazer no Copyright texto que se encontra na parte de baixo de todos os nossos modelos. Bom tricô! Bom croché!
Deixe um comentário acerca do modelo DROPS 103-10
Gostaríamos muito de saber o que tem a dizer-nos acerca deste modelo!
Se deixar uma pergunta acerca do modelo, certifique-se de que escolhe a categoria adequada no formulário abaixo para acelerar o processo relativo à resposta. Os campos obrigatórios estão assinalados com um *.