
Categorias populares
Procura um fio?


Comentários / Perguntas (180)
![]() Suzie De Feijter escreveu:
Suzie De Feijter escreveu:
Wat doe ik verkeerd? Ik heb na M1 44 lboogjes ipv 105
20.04.2017 - 21:22DROPS Design respondeu:
Hallo Suzie, Vanaf hier kan ik helaas niet goed meekijken wat er bij jou precies verkeerd is gegaan. Misschien kun je nog een keer heel goed het patroon door lezen. Heb je ook de meerderingen gemaakt die beschreven zijn in de tekst? En heb je telpatroon M1 voor jouw maat genomen?
24.04.2017 - 16:06Janice escreveu:
Thanks for the reply on my question regarding increasing in this pattern at the beginning. I had figured out the part about dividing the stitches by the amount needed to increase but here is my dilemma: I have 54 sc and need to increase by 22. 54 divided by 22 is 2.45 so no matter which way I crochet this I only end up with 18 on the increase. I have tried increasing after every 2nd stitch, with various compilations but nothing works out to 22 on the increase. HELP :)
13.04.2017 - 13:14DROPS Design respondeu:
Dear Janice, you will work 2 sts, inc in next st, and repeat this all the round a total of 18 times (= 18x3= 54 sts), finishing with 4 sc: 18 x 4 + 4= 76 sc. Happy crocheting!
18.04.2017 - 08:50Janice escreveu:
New to crochet and haven't worked in diagrams. I am having a hard time with increasing from 56 stitches to 78 at the beginning of the pattern. How do I work out where I do the increase on the sc.
11.04.2017 - 14:28DROPS Design respondeu:
Dear Janice, you will find here how to increase evenly on a round. Happy crocheting!
12.04.2017 - 12:03Lee escreveu:
Can I please ask how many gms of yarn you use for this pattern. Many thanks Lee
16.03.2017 - 07:02DROPS Design respondeu:
Dear Lee, you will find total amount of yarn required under tab "Materials", ie in size S for example, you need 200 g DROPS Alpaca + 300 g DROPS Cotton Viscose. Happy crocheting!
16.03.2017 - 08:57
![]() Valeria escreveu:
Valeria escreveu:
Buongiorno una piccola domanda... quando inizio la seconda riga del diagramma m1 devo fare una maglia alta e poi 2 maglie alte in catenella a venire, oppure una maglia alta, 2maglie alte nella successiva, una maglia alta, 2nella successiva e così via? Grazie per l'aiuto
15.01.2017 - 22:27DROPS Design respondeu:
Buongiorno Valeria. Lavora il secondo giro come segue: * 1 maglia alta nell’arco di catenelle, 1 catenella, 1 maglia alta nell’arco di cat successivo, 1 catenella, 1 maglia alta nello stesso arco di catenelle, 1 catenella * ; ripete queste istruzioni su tutto il giro. Buon lavoro!
15.01.2017 - 23:09
![]() Katrine Jensen escreveu:
Katrine Jensen escreveu:
Når jeg skal igang med M2, så er der en stm som laves ned i ingenting? Jeg forstår simpelthen ikke de første to omgange. Eller jo - det er luftmaskebuer som jeg har lavet hele vejen, men hvordan starter jeg de to omgange? Når jeg starter med en stm, som jeg har gjort i foregående rækker, så vil jeg vel ende med 144 masker igen, men så tager jeg en ind på næste række, så passer maskeantallet ikke med 8*18 masker. Jeg må have misforstået noget, men hvad? :)
11.10.2016 - 19:54DROPS Design respondeu:
Hej Karin. Jeg er ikke 100%, men jeg vil sige st denne förste st hörer til den sidste st fra sidste omg (se til sidst paa diagrammet - der har du 2 st - og der mangler en st). Dette var nok den nemmeste maade at tegne det paa. Saa jeg vil sige du starter med 1 st i den sidste st fra sidste omg, saa du kan starte en ny omgang med 1 lm, spring förste st over osv.
12.10.2016 - 12:45Barbara escreveu:
Lovely pattern! I need to increase the neck line and underarm. Can I just start with more chains for the neck opening and increase the underarm from 8 stitches to 12?
29.09.2016 - 08:32DROPS Design respondeu:
Dear Barbara, we are unfortunately not able to adjust every pattern to each individual request, you will have to recalculating with your gauge and required finished measurements - Further personnal assistance will be provided by the store where you bought your yarn. Happy crocheting!
29.09.2016 - 09:16Nikki escreveu:
Can I do this pattern with 1 strand as I get too confused with 2?
26.08.2016 - 16:27DROPS Design respondeu:
Dear Nikki, if you want oyu cna work it with one strand, but remember to check your gauge, the gauge indicated in the pattern is for 1 strand of each quality (= 2 strand). Happy crocheting!
28.08.2016 - 14:38
![]() Caroline escreveu:
Caroline escreveu:
Thank you for posting this pretty pattern. In diagram M1, it shows each subsequent row slightly offset to the left.... does that mean to slip stitch to where the dc (or other stitch as indicated) begins? Thank you.
02.08.2016 - 17:28DROPS Design respondeu:
Dear Caroline, that's right, you have to work the dc around the ch from previous round, so sl st to 1st ch and crochet 1st dc ( = 3 ch) over the chain, then ch 1 and continue as in diagram. Happy crocheting!
03.08.2016 - 09:18
![]() Cathleen Wilbourn escreveu:
Cathleen Wilbourn escreveu:
Ok, so i finished this tunic. thank you for posting the pattern. however, i have an issue with the fit. the top fits comfortably but the bottom with the mussels is too loose for my liking. to adjust for this, can i just use a smaller hook size than the top mesh part or are there any other ideas im not aware of? thanks so much
05.07.2016 - 08:17DROPS Design respondeu:
Dear Mrs Wilbourn, for any individual assistance, remember you can get tips & advices from your DROPS store, even per mail or telephone. Happy crocheting!
05.07.2016 - 09:02
|
||||||||||||||||||||||
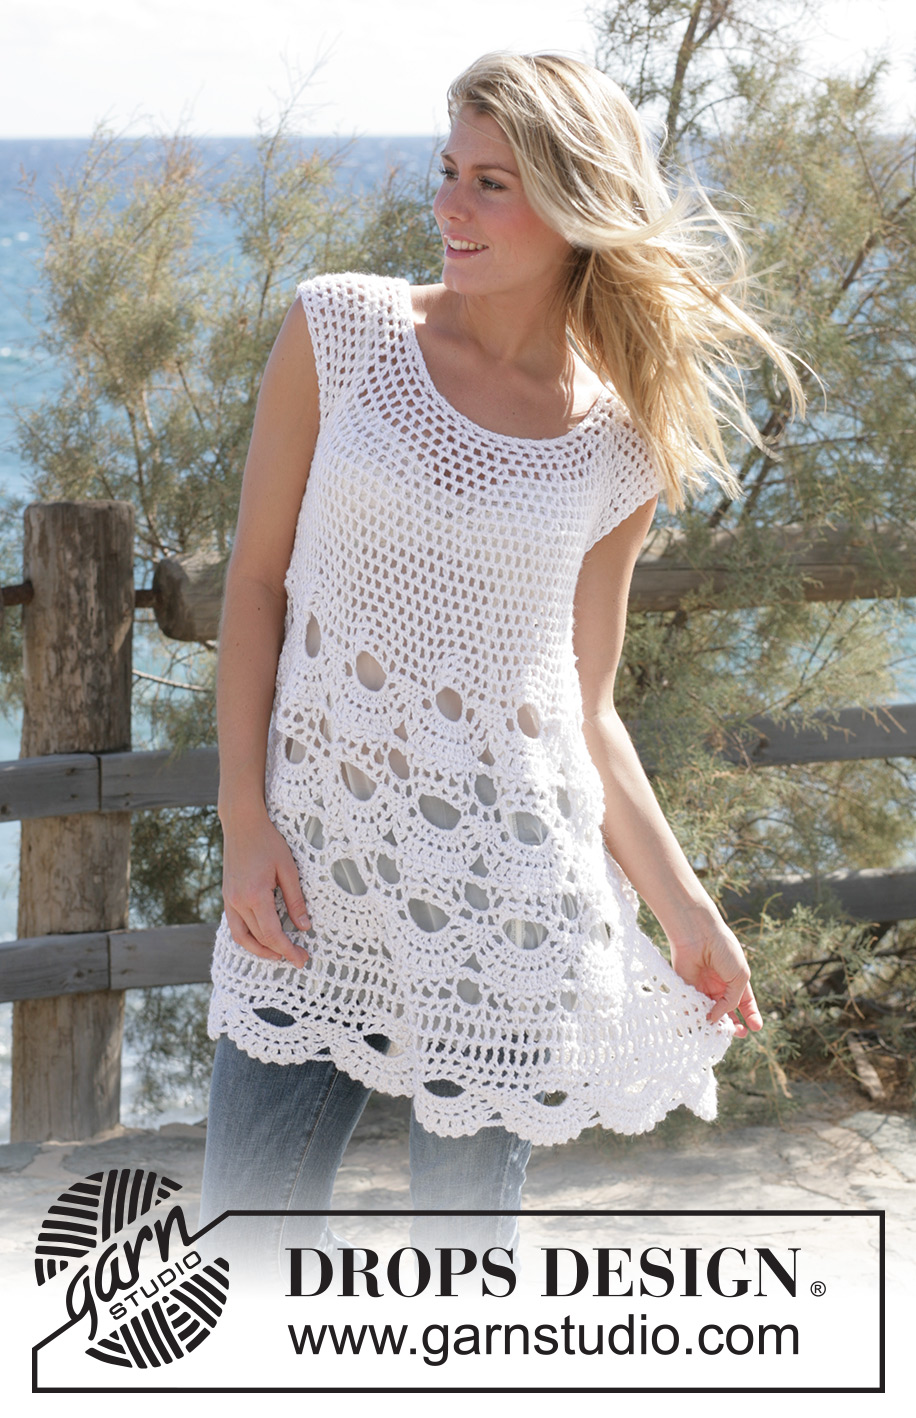
Breath of Summer#breathofsummertunic |
||||||||||||||||||||||
|
|
||||||||||||||||||||||
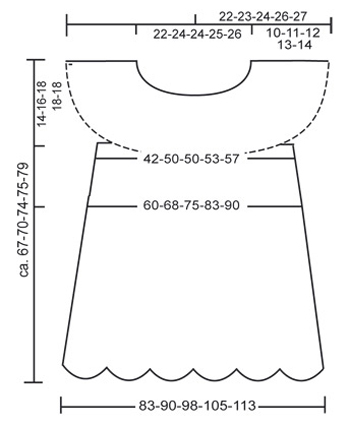
Túnica DROPS em ponto de leques com 1 fio Alpaca e 1 fio Cotton Viscose ou Bomull-Lin. Tamanhos S - XXL
DROPS 99-4 |
||||||||||||||||||||||
|
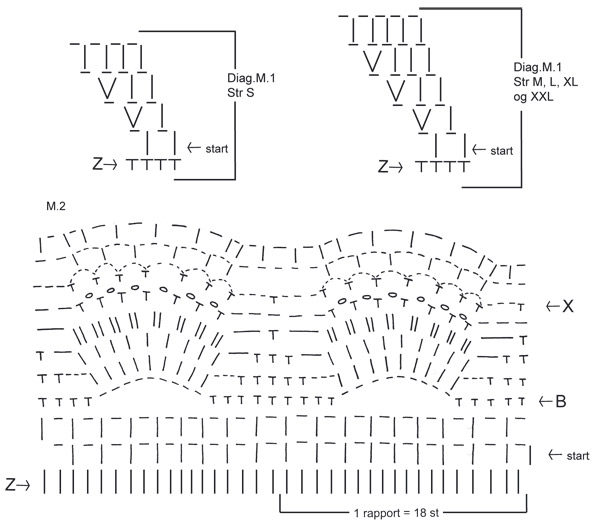
NOTA: Existem termos diferentes de tricô e croché em português de Portugal e do Brasil. TRICÔ : Malha = Ponto Canelado = Barra Ponto Jarreteira = Cordões de Tricô Ponto Liga = Ponto Tricô CROCHÉ : mpa – meio ponto alto pa – ponto alto pad – ponto alto duplo pat – ponto alto triplo pb – ponto baixo pbx – ponto baixíssimo pc – ponto corrente AMOSTRA 12 pa x 7 carreiras = 10 x 10 cm com 1 fio de cada qualidade 1 motivo em ponto de leques = cerca de 12 cm de largura AUMENTOS 1 : aumentar 1 pb : fazer 2 pb num pb AUMENTOS 2 : aumentar 1 pa : fazer 2 pa num pa (e não nos pc entre os pontos) AUMENTOS 3 : aumentar 1 aro : fazer 2 aros no mesmo ponto DICA CROCHÉ No princípio da carreira, substituir o 1.º pa por 3 pc, substituir o 1.º pad por 4 pc No fim da carreira, unir com 1 pbx no 3.º/ 4.º pc do princípio da carreira PONTO FANTASIA Ver diagramas M1 e M2. Os diagramas mostram o ponto fantasia pelo direito. DICA de MEDIÇÃO Devido ao peso do fio, suspender a peça na vertical quando tirar as medidas INSTRUÇÕES COSTAS e FRENTE A túnica crocheta-se em redondo a partir de cima para baixo. Com a agulha de croché 5 mm e 1 fio Drops Alpaca e 1 fio Drops Cotton Viscose (= 2 fios juntos)ou 1 fio Bomull-Lin, montar frouxamente 71-75-75-79-83 pc. Formar um aro com 1 pbx no 1.º pc. Fazer a 1.ª carreira da seguinte maneira : 1 pb em cada um dos 3 primeiros pc, * saltar 1 pc, 1 pb em cada um dos 3 pc seguintes * Repetir de * a * = 54-57-57-60-63 pb. Fazer, depois, 1 carreira de pb, ao mesmo tempo, distribuir 22-15-19-20-21 pb – ver Aumentos 1 = 76-72-76-80-84 pb. Continuar com M1 (ver Dica Croché). Depois de M1, temos 76-90-95-100-105 aros (1aro = 1 pa + 1 pc). Continuar, crochetando pa nos pc e pc acima dos pa até 10-11-12-13-14 cm de altura total. Fazer, depois, a seguinte carreira : Saltar 17-19-21-22-22 aros da carreira precedente (= manga direita), fazer 8 pc (= parte de baixo do braço), fazer 21-26-26-28-30 aros (= frente), saltar 17-19-21-22-22 aros da carreira precedente (= manga esquerda), montar 8 pc (= parte de baixo do braço), fazer 21-26-27-28-31 aros (= costa). Colocar um marcador de cada lado entre os 8 pc da parte de baixo do braço. Continuar com aros. NOTA : na 1.ª carreira, nos 8 pc na parte de baixo do braço da seguinte maneira : 1 pa no 1.º pc, 1 pc, saltar 1 pc, 1 pa no pc seguinte, 1 pc, 1 pa no mesmo pc, 1 pc, saltar 1 pc, 1 pa no pc seguinte, 1 pc, 1 pa no mesmo pc, 1 pc, saltar 1 pc, 1 pa no ponto seguinte, 1 pc, saltar 1 pc (= 6 aros na parte de baixo de cada braço) = 54-64-65-68-73 aros. Continuar em aros e, ao mesmo tempo, aumentar 1 aro – ver aumentos 3 - de cada lado dos 2 marcadores 4-4-6-6-7 vezes a cada 2 carreiras = 70-80-89-92-101 aros. Depois de todos os aumentos feitos, a peça mede cerca de 19-20-23-24-27 cm a partir da corrente de base até ao decote (estamos, agora, a meio do busto. Se quiser aumentar a altura, pode fazer carreiras suplementares de aros depois dos aumentos). Então, fazer 1 carreira de aros e, ao mesmo tempo, aumentar, distribuindo 4-2-2-14-14 pa suplementares – ver aumentos 2 = 144-162-180-198-216 pa/pc Continuar, depois, crochetando M2 (começar pela flecha start no diagrama) = 8-9-10-11-12 motivos na carreira. Fazer 3 motivos de M2 em altura, mas começar o 2.º e o 3.º motivos pela flecha B do diagrama. Depois de M2, fazer 2-3-3-3-4 carreiras de pad da seguinte maneira : C 1 : Ler Dica Croché : Fazer 1 pad em cada aro, com 1 pc entre cada pad, e terminar por 1 pad no último pad = 72-81-90-99-108 pad C 2 : 1 pad em cada pad da carreira precedente, com 2 pc entre cada pad (em vez de 1 pc). Tamanho S : parar aqui antes do último motivo de leques = 72 pad C 3 : 1 pad em cada pad da carreira precedente, com 3 pc entre cada pad Tamanhos M, L e XL : parar aqui antes do último motivo de leques : 81-90-99 pad C 4 : fazer 1 pad em cada pad da carreira precedente com 3 pc entre cada pad Tamanho XXL : parar aqui antes do último motivo de leques : 108 pad Fazer, então, uma carreira de aros : 1 pa e 1 pc (= 1 aro) em cada pad da carreira precedente e, ao mesmo tempo, aumentar 1 aro – ver aumentos 3 – a cada 3-3-4-4-4 pad NOTA : para os tamanhos L e XL, terminar com 1 pa e 1 pc em cada um dos 2-3 últimos pad = 96-108-112-123-135 aros. Fazer 1 carreira de aros e, ao mesmo tempo, aumentar 6-0-10-6-0 pa – ver aumentos 2= 198-216-234-252-270 pa/pc. Depois, continuar novamente com M2 (começar na flecha start do diagrama), mas parar depois da carreira 7. |
||||||||||||||||||||||
Explicações do diagrama |
||||||||||||||||||||||
|
||||||||||||||||||||||
 |
||||||||||||||||||||||
 |
||||||||||||||||||||||
Terminou este projecto?Então, identifique as suas fotos com as tags #dropspattern #breathofsummertunic ou mostre-as na galeria #dropsfan. Precisa de ajuda para este modelo?Encontrará 7 turotiais em vídeo, uma rubrica Comentários/Perguntas e muito mais ao visitar a página do modelo em www.garnstudio.com © 1982-2026 DROPS Design A/S. Todos os direitos reservados. Este documento, incluuindo as suas su-secções, tem copyrights. Saia mais o que pode fazer com os nossos modelos no fim de cada uma das páginas do nosso site. |
||||||||||||||||||||||


Com mais de 40 anos no design de modelos de tricô e de croché, a DROPS Design oferece uma das mais vastas colecções demodelos gratuitos na Internet - traduzidos em 17 línguas. Neste dia de hoje, temos 324 catálogos e 12290 modelos - dos quais 12271 estão traduzidos em português.
Trabalhamos com muito empenho para lhe proporcionar o melhor que o tricô e o croché têm para oferecer, para lhe fornecer inspiração e conselhos bem como fios da mais elevada qualidade a preços incríveis! Gostaria de usar os nossos modelos para outros fins que não uso pessoal? Pode ler o que lhe é permitido fazer no Copyright texto que se encontra na parte de baixo de todos os nossos modelos. Bom tricô! Bom croché!
Deixe um comentário acerca do modelo DROPS 99-4
Gostaríamos muito de saber o que tem a dizer-nos acerca deste modelo!
Se deixar uma pergunta acerca do modelo, certifique-se de que escolhe a categoria adequada no formulário abaixo para acelerar o processo relativo à resposta. Os campos obrigatórios estão assinalados com um *.