
Categorias populares
Procura um fio?


Comentários / Perguntas (180)
![]() Annette escreveu:
Annette escreveu:
I do not understand the increasing from 101 to 216. I found this answer, but I’m still confused. “Dear Mrs Dixon, when you inc 14 tr, you only work tr (no ch in between - see Increasing tip 2), so that you have 101 tr + 101 ch + 14 tr = 216 tr/ch on this round. Happy crocheting!” Am I now crocheting in each STITCH instead of space??
04.04.2018 - 22:56DROPS Design respondeu:
Dear Annette, when you have 101 ch-spaces, there is a total of 202 sts, ie 101 tr + 101 ch. When inc 14 tr, you will crochet in the ch-spaces as before but 2 tr instead of 1 tr evenly spaced = 216 sts (115 tr and 101 ch-spaces). Happy crocheting!
05.04.2018 - 08:55
![]() Annette escreveu:
Annette escreveu:
I’m just starting this pattern. I’m to where I start the M.1, and I don’t understand what “og” means for size XXL. Please help.
19.03.2018 - 01:35DROPS Design respondeu:
Hi Annette, "og" is the Norwegian word for "and" and we have overlooked the translation here. Apologies. Happy crocheting!
19.03.2018 - 08:05
![]() Wendy Ambuhl escreveu:
Wendy Ambuhl escreveu:
I got it! I was counting spaces, not stitches! :)
21.07.2017 - 20:33
![]() Wendy Ambuhl escreveu:
Wendy Ambuhl escreveu:
Ok. So I got 198 stitches by adding 14 stitches. On the next row, do i put a dc and ch between the 2 stitches of my increase? For example, I have made two dc, with no ch between, in one ch-loop. On the next round, do I make a ch-loop between the 2 dc where there is no ch? I cannot get the numbers to come out even to go on from here!
20.07.2017 - 20:38DROPS Design respondeu:
Dear Mrs Ambuhl, there are now 198 sts (= dc and chains), repeat M.2 (= 18 sts) a total of 11 times in the round so that you have 18 sts x 11 = 198 sts. On 1st row in M.2 (= row with arrow "start"), work 1 dc, 1 ch, skip 1 ch (either dc or ch), 1 dc in next st (either dc or ch). Happy crocheting!
21.07.2017 - 08:30
![]() Wendy Ambuhl escreveu:
Wendy Ambuhl escreveu:
I understand the part about 198 ch-loops before the mussel pattern. But what does each symbol stand for on row z? Do they stand for each ch, dc, or both? If so, do I work into every other ch-loop? I find this diagram confusing.
18.07.2017 - 16:17DROPS Design respondeu:
Dear Mrs Ambuhl, each symbol on row Z represents 1 stitch, either 1 dc or 1 ch, M.2 is worked over 18 sts (dc and ch). Happy crocheting!
19.07.2017 - 08:24
![]() Brenda Lee escreveu:
Brenda Lee escreveu:
On the m.2 chart im trying to figure out what that long horizontal line means . its 2 rows under the x if im not mistaken. the rest i understand .
16.07.2017 - 22:17DROPS Design respondeu:
Dear Brenda Lee, as explained earlier, each horizontal bar = 1 chain, the length of this bar is due to the diagram and number of sts in diagram, but either short or long, 1 bar = 1 chain. Happy crocheting!
17.07.2017 - 09:28
![]() Brenda Lee escreveu:
Brenda Lee escreveu:
Could you tell me what the long horizontal bar means on the 2nd row under the x . thats the only part that has me stumped on want this finished so bad to take to the beach with me in aug thank you so much.
16.07.2017 - 00:39DROPS Design respondeu:
Dear Brenda Lee, the horizontal bar either short or long = 1 chain. Happy crocheting
17.07.2017 - 09:08
![]() NieKohle escreveu:
NieKohle escreveu:
Ich habe jetzt nach 8 gescheiterten Versuchen aufgegeben. Im 8. Versuch musste ich schon die Maschenanzahl erhöhen, da diese nicht annähernd auf eine XL zugeschnitten ist. Bereits der Halsausschnitt ist wesentlich enger als auf dem Bild, selbst bei sehr (!) lockeren Lm. Die Anleitung an sich ist gut. Schade nur, dass man selbst noch hin und her rechnen muss.
03.06.2017 - 21:26
![]() NieKohle escreveu:
NieKohle escreveu:
Hallo. Ich verzweifle an M1. ich habe jetzt 5 Mal angefangen und 5 Mal wieder alles aufgeribbelt, weil ich nach M1 nicht auf die angegebene Maschenzahl komme. Bei mir sind es jedes mal 20 maschen weniger als angegeben. Mir ist auch nicht ganz klar, wie ich von Runde zu Runde arbeiten kann, ohne eine sichtbare Kante zwischen Rundenende und Rundenanfang zu erhalten. Außerdem bin ich mir nicht sicher, wie ich M1 zu lesen habe. Von links nach recht in jeder Runde? Vielen Dank schonmal.
01.06.2017 - 13:00DROPS Design respondeu:
Liebe NieKohle, Diagram lesen Sie von unten nach oben und jede Runde von rechts nach links, dh 1. Rd (alle Größe): *1 Stb, 1 Lm, 1 M springen, 1 Stb, 1 Lm, 1 M springen*, von *-* wiederholen. Bei 2. Rd: *1 Stb um die Lm, 1 Lm, um die nächste Lm häkeln Sie: 1 Stb, 1 Lm, 1 Stb*, von *-* wiederholen (= 1 Stb wird in jedem M.1 zugenommen). Viel Spaß beim häkeln!
01.06.2017 - 13:42
![]() Silke escreveu:
Silke escreveu:
Hallo, ich beziehe mich auf die Anleitung nachdem ich M1 gehäkelt haben. Ich verstehe nicht, wie ich eine Luftmasche in Stäbchen häkle? Mir ist klar, Stäbchen in Luftmasche zu häkeln, aber wie häkle ich eine Luftmasche irgendwo hinein? :-) Sorry, bin Anfängerin und vielleicht klingt die Frage etwas ungewöhnlich. Bin aber gerade etwas hilflos!
23.04.2017 - 09:33DROPS Design respondeu:
Liebe Silke, Sie werden jetzt wie im letzten Runde in M.1 häkeln:1 Stb um jeder Luftmasche und 1 Luftmasche über jedes Stb. Viel Spaß beim häkeln!
24.04.2017 - 09:54
|
||||||||||||||||||||||
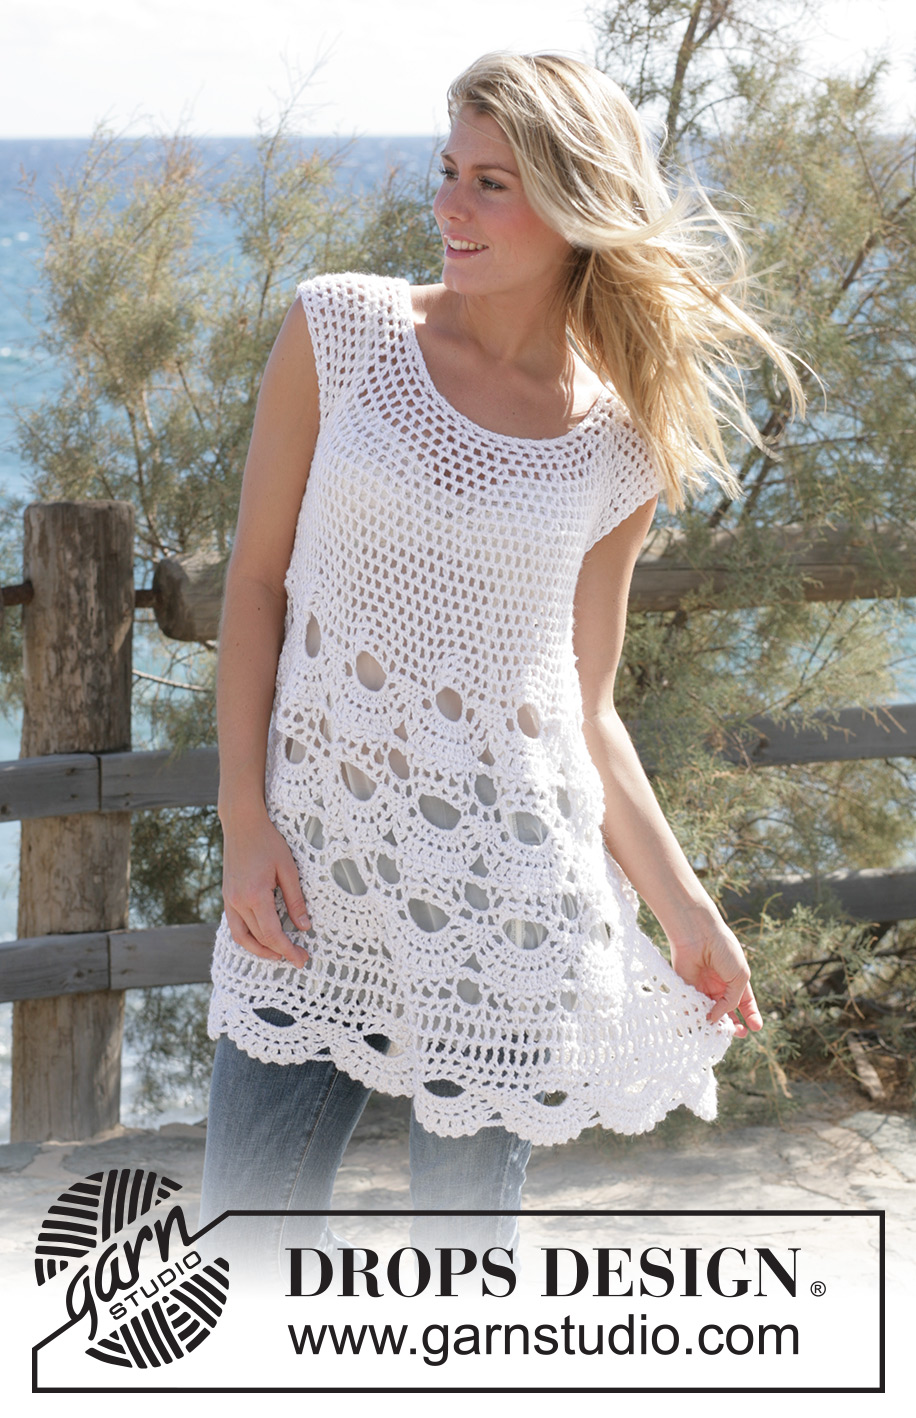
Breath of Summer#breathofsummertunic |
||||||||||||||||||||||
|
|
||||||||||||||||||||||
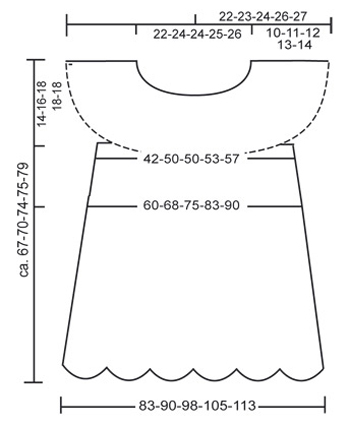
Túnica DROPS em ponto de leques com 1 fio Alpaca e 1 fio Cotton Viscose ou Bomull-Lin. Tamanhos S - XXL
DROPS 99-4 |
||||||||||||||||||||||
|
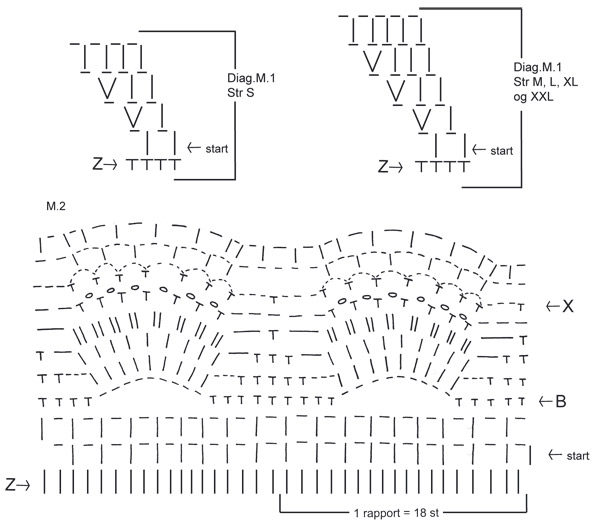
NOTA: Existem termos diferentes de tricô e croché em português de Portugal e do Brasil. TRICÔ : Malha = Ponto Canelado = Barra Ponto Jarreteira = Cordões de Tricô Ponto Liga = Ponto Tricô CROCHÉ : mpa – meio ponto alto pa – ponto alto pad – ponto alto duplo pat – ponto alto triplo pb – ponto baixo pbx – ponto baixíssimo pc – ponto corrente AMOSTRA 12 pa x 7 carreiras = 10 x 10 cm com 1 fio de cada qualidade 1 motivo em ponto de leques = cerca de 12 cm de largura AUMENTOS 1 : aumentar 1 pb : fazer 2 pb num pb AUMENTOS 2 : aumentar 1 pa : fazer 2 pa num pa (e não nos pc entre os pontos) AUMENTOS 3 : aumentar 1 aro : fazer 2 aros no mesmo ponto DICA CROCHÉ No princípio da carreira, substituir o 1.º pa por 3 pc, substituir o 1.º pad por 4 pc No fim da carreira, unir com 1 pbx no 3.º/ 4.º pc do princípio da carreira PONTO FANTASIA Ver diagramas M1 e M2. Os diagramas mostram o ponto fantasia pelo direito. DICA de MEDIÇÃO Devido ao peso do fio, suspender a peça na vertical quando tirar as medidas INSTRUÇÕES COSTAS e FRENTE A túnica crocheta-se em redondo a partir de cima para baixo. Com a agulha de croché 5 mm e 1 fio Drops Alpaca e 1 fio Drops Cotton Viscose (= 2 fios juntos)ou 1 fio Bomull-Lin, montar frouxamente 71-75-75-79-83 pc. Formar um aro com 1 pbx no 1.º pc. Fazer a 1.ª carreira da seguinte maneira : 1 pb em cada um dos 3 primeiros pc, * saltar 1 pc, 1 pb em cada um dos 3 pc seguintes * Repetir de * a * = 54-57-57-60-63 pb. Fazer, depois, 1 carreira de pb, ao mesmo tempo, distribuir 22-15-19-20-21 pb – ver Aumentos 1 = 76-72-76-80-84 pb. Continuar com M1 (ver Dica Croché). Depois de M1, temos 76-90-95-100-105 aros (1aro = 1 pa + 1 pc). Continuar, crochetando pa nos pc e pc acima dos pa até 10-11-12-13-14 cm de altura total. Fazer, depois, a seguinte carreira : Saltar 17-19-21-22-22 aros da carreira precedente (= manga direita), fazer 8 pc (= parte de baixo do braço), fazer 21-26-26-28-30 aros (= frente), saltar 17-19-21-22-22 aros da carreira precedente (= manga esquerda), montar 8 pc (= parte de baixo do braço), fazer 21-26-27-28-31 aros (= costa). Colocar um marcador de cada lado entre os 8 pc da parte de baixo do braço. Continuar com aros. NOTA : na 1.ª carreira, nos 8 pc na parte de baixo do braço da seguinte maneira : 1 pa no 1.º pc, 1 pc, saltar 1 pc, 1 pa no pc seguinte, 1 pc, 1 pa no mesmo pc, 1 pc, saltar 1 pc, 1 pa no pc seguinte, 1 pc, 1 pa no mesmo pc, 1 pc, saltar 1 pc, 1 pa no ponto seguinte, 1 pc, saltar 1 pc (= 6 aros na parte de baixo de cada braço) = 54-64-65-68-73 aros. Continuar em aros e, ao mesmo tempo, aumentar 1 aro – ver aumentos 3 - de cada lado dos 2 marcadores 4-4-6-6-7 vezes a cada 2 carreiras = 70-80-89-92-101 aros. Depois de todos os aumentos feitos, a peça mede cerca de 19-20-23-24-27 cm a partir da corrente de base até ao decote (estamos, agora, a meio do busto. Se quiser aumentar a altura, pode fazer carreiras suplementares de aros depois dos aumentos). Então, fazer 1 carreira de aros e, ao mesmo tempo, aumentar, distribuindo 4-2-2-14-14 pa suplementares – ver aumentos 2 = 144-162-180-198-216 pa/pc Continuar, depois, crochetando M2 (começar pela flecha start no diagrama) = 8-9-10-11-12 motivos na carreira. Fazer 3 motivos de M2 em altura, mas começar o 2.º e o 3.º motivos pela flecha B do diagrama. Depois de M2, fazer 2-3-3-3-4 carreiras de pad da seguinte maneira : C 1 : Ler Dica Croché : Fazer 1 pad em cada aro, com 1 pc entre cada pad, e terminar por 1 pad no último pad = 72-81-90-99-108 pad C 2 : 1 pad em cada pad da carreira precedente, com 2 pc entre cada pad (em vez de 1 pc). Tamanho S : parar aqui antes do último motivo de leques = 72 pad C 3 : 1 pad em cada pad da carreira precedente, com 3 pc entre cada pad Tamanhos M, L e XL : parar aqui antes do último motivo de leques : 81-90-99 pad C 4 : fazer 1 pad em cada pad da carreira precedente com 3 pc entre cada pad Tamanho XXL : parar aqui antes do último motivo de leques : 108 pad Fazer, então, uma carreira de aros : 1 pa e 1 pc (= 1 aro) em cada pad da carreira precedente e, ao mesmo tempo, aumentar 1 aro – ver aumentos 3 – a cada 3-3-4-4-4 pad NOTA : para os tamanhos L e XL, terminar com 1 pa e 1 pc em cada um dos 2-3 últimos pad = 96-108-112-123-135 aros. Fazer 1 carreira de aros e, ao mesmo tempo, aumentar 6-0-10-6-0 pa – ver aumentos 2= 198-216-234-252-270 pa/pc. Depois, continuar novamente com M2 (começar na flecha start do diagrama), mas parar depois da carreira 7. |
||||||||||||||||||||||
Explicações do diagrama |
||||||||||||||||||||||
|
||||||||||||||||||||||
 |
||||||||||||||||||||||
 |
||||||||||||||||||||||
Terminou este projecto?Então, identifique as suas fotos com as tags #dropspattern #breathofsummertunic ou mostre-as na galeria #dropsfan. Precisa de ajuda para este modelo?Encontrará 7 turotiais em vídeo, uma rubrica Comentários/Perguntas e muito mais ao visitar a página do modelo em www.garnstudio.com © 1982-2026 DROPS Design A/S. Todos os direitos reservados. Este documento, incluuindo as suas su-secções, tem copyrights. Saia mais o que pode fazer com os nossos modelos no fim de cada uma das páginas do nosso site. |
||||||||||||||||||||||


Com mais de 40 anos no design de modelos de tricô e de croché, a DROPS Design oferece uma das mais vastas colecções demodelos gratuitos na Internet - traduzidos em 17 línguas. Neste dia de hoje, temos 324 catálogos e 12290 modelos - dos quais 12271 estão traduzidos em português.
Trabalhamos com muito empenho para lhe proporcionar o melhor que o tricô e o croché têm para oferecer, para lhe fornecer inspiração e conselhos bem como fios da mais elevada qualidade a preços incríveis! Gostaria de usar os nossos modelos para outros fins que não uso pessoal? Pode ler o que lhe é permitido fazer no Copyright texto que se encontra na parte de baixo de todos os nossos modelos. Bom tricô! Bom croché!
Deixe um comentário acerca do modelo DROPS 99-4
Gostaríamos muito de saber o que tem a dizer-nos acerca deste modelo!
Se deixar uma pergunta acerca do modelo, certifique-se de que escolhe a categoria adequada no formulário abaixo para acelerar o processo relativo à resposta. Os campos obrigatórios estão assinalados com um *.