
Categorias populares
Procura um fio?


Comentários / Perguntas (13)
![]() Linda Pine escreveu:
Linda Pine escreveu:
I am COMPLETELY confused by the instructions for working the stripe pattern "at the same time inc 1 st each side on every and every other row alternately". After reading the questions and answers in the Comments section - I am even MORE confused. Surely there is a better way to describe what should be done.!!!!
06.01.2023 - 16:39
![]() Kathy Tee escreveu:
Kathy Tee escreveu:
The instructions state “ inc 1 st each side on every and every other row alternately”. What specifically does “every and every other row alternately” mean. Please provide an example in your reply eg. if I have to work a total of 10 rows, on which of those rows do I include the increases.
12.08.2022 - 03:34DROPS Design respondeu:
Dear Mrs Tee, this lesson explains how to decrease or increase on every 3rd and 4th row alternately, maybe it can help you to understand how to decrease here on every row (instead of on every 3rd row in the lesson) and 2nd row (instead of every 4th row in the lesson). Hope it can help you.
12.08.2022 - 09:57
![]() Kathy Tee escreveu:
Kathy Tee escreveu:
In your earlier reply to HCL (05.03.2020 kl. 10:06 ) you advise, ”*1 row with decreases, 1 row with decreases, 1 row without decreases*” which confirms I am to work in the first 2 of every 3 rows, but the decreases would occur on Rows 1, 2, 4, 5, 7, 8, 10, 11, 13 etc. instead. Please confirm which example, either the one shown here or the one in my previous message (12.08.2022 - 00:56.) is correct.
12.08.2022 - 01:33DROPS Design respondeu:
Dear Mrs Tee, you can also work that way, you will have decreased the same number of rows at the end with the same number of rows, decreasing alternately on every row and every other row would be more likely as previous comment. Hope it can help.
12.08.2022 - 09:51
![]() Kathy Tee escreveu:
Kathy Tee escreveu:
Based on your reply to Jane Doe (10.08.2022 kl. 16:14), if for example I worked in pattern for 13 rows, are you indicating the decreases would occur on Rows 1, 3, 4, 6, 7, 9, 10, 12, 13 etc. So, after Rows 1 and 2, I am to then decrease in the first 2 of every next 3 rows. “Row 1 - decrease, Row 2 -no decrease, then *Decrease in next 2 rows, next row (rows 5, 8, 11 etc) no decrease* repeat from *to*”. Is this correct?
12.08.2022 - 00:56DROPS Design respondeu:
Dear Mrs Tee, that's correct. Happy knitting!
12.08.2022 - 09:49
![]() Jane Doe escreveu:
Jane Doe escreveu:
Your answer is incredibly confusing! "you will decrease 1 stitch on both sides of the 2 middle stitches but you should decrease on every row and on every other row alternately, i.e.: *work 1 row with decrease, 1 row without decrease, 1 row with decrease* and repeat from *-*" So, I actually decrease every other row (1 row without decrease, 1 row with decrease). Not every row and every other row alternately.
11.08.2022 - 18:22DROPS Design respondeu:
Dear Mrs Doe, sorry for confusion, let me try again - you have to decrease 2 stitches alternately on every row and every other row, this means the decreases might occure from the right side as well as from the wrong side, after 1 row you have decreased 2 sts, after these 3 rows you will have decreased 4 sts. Hope it can help.
12.08.2022 - 09:56
![]() Kathy Tee escreveu:
Kathy Tee escreveu:
Please provide detailed explanation as to which rows inc’s and dec’s are worked in the following instructions: “inc 1 st each side on every and every other row alternately”, “Continue inc each side, at the same time dec 1 st on both sides of the 2 middle sts on every and every other row alternately”, “discontinue dec in the middle of piece and now dec each side as inc before on every and every row alternately”
10.08.2022 - 16:33
![]() Jane Doe escreveu:
Jane Doe escreveu:
After joining the two top pieces on the front, I understand that you increase at either end of every row and decrease every other row 2 stitches in the center ? Is this correct?
10.08.2022 - 13:22DROPS Design respondeu:
Dear Mrs Doe, not exactly, you will decrease 1 stitch on both sides of the 2 middle stitches but you should decrease on every row and on every other row alternately, i.e.: *work 1 row with decrease, 1 row without decrease, 1 row with decrease* and repeat from *-*. Happy knitting!
10.08.2022 - 16:14
![]() Wilma Keighley escreveu:
Wilma Keighley escreveu:
Sorry, it’s me again. I’m at the stage where the central deceased have been discontinued and decreases at the edges are happening. I can see that the side decreases are forming the shoulder but it really looks like the central decreases should continue. I am definitely correct that the central decreases should have stopped ;as the pattern says). Even the picture of the jersey looks like the central decreases continue the the end.
16.03.2022 - 15:59
![]() Wilma Keighley escreveu:
Wilma Keighley escreveu:
Re your reply. Yes tension is fine. What should mid front (where the decrease line is) measure when side measures 52cm?
08.03.2022 - 14:58DROPS Design respondeu:
Hi Wilma, When you now continue and start to decrease in each side, the sides will not get any longer, but the mid front will. When piece measures 39-40-42 cm mid front, put piece aside. :)
09.03.2022 - 09:11
![]() Wilma Keighley escreveu:
Wilma Keighley escreveu:
I am working on the front and the side now measures 52 cm. Looking at the diagram, I think the mid front ought to be about 26 cm but it is much less than this. Have I misunderstood where to measure the side or done something else wrong? Thanks.
07.03.2022 - 23:18DROPS Design respondeu:
Dear Mrs Keighley, do you have correct tension? ie 36 rows stocking stitch = 10 cm?
08.03.2022 - 11:09
|
|
City Jungle |
|
 |
 |
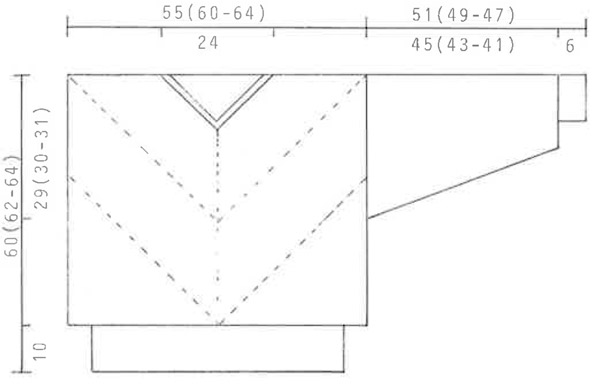
Pulôver tricotado em diagonal em DROPS Alpaca. Do S ao L.
DROPS 9-18 |
|
|
Explicações RISCAS: Tricotam-se em ponto meia: * 2 carreiras preto, 2 carreiras bege *, repetir de * a *. CANELADO: * 1 malha torcida em meia, 1 malha liga *. Repetir de * a *. DIMINUIÇÕES MEIO FRENTE: Pelo direito: Tricotar 2 malhas juntamente torcidas em meia antes das 2 malhas centrais, 2 malhas tricotadas juntamente em meia depois das 2 malhas centrais. Pelo avesso: Tricotar respectivamente 2 malhas juntamente torcidas em liga e 2 malhas tricotadas juntamente em liga. FRENTE: Tricota-se em idas e voltas em 2 partes unidas depois. Montar 3 malhas com as agulhas 3 mm em preto e tricotar em ponto meia às riscas e, AO MESMO TEMPO, aumentar 1 malha de cada lado da peça alternadamente em todas as carreiras e a cada 2 carreiras. Manter a mesma tensão da indicada para a amostra! Quando temos um total de 99-107-115 malhas, colocar em espera. O lado mede cerca de 28-30-32 cm. Tricotar 1 outra peça igual e retomar então todas as malhas das 2 peças para a mesma agulha 3 mm = 198-214-230 malhas. Continuar a aumentar de cada lado da peça e, AO MESMO TEMPO, diminuir 1 malha de cada lado das 2 malhas centrais alternadamente em todas as carreiras e a cada 2 carreiras – ver acima. Quando o lado da peça medir 50-52-54 cm, arrematar as diminuições a meio de a peça e diminuir, então, de cada lado da peça como os aumentos precedentes: alternadamente em todas as carreiras e a cada 2 carreiras. A 39-40-42 cm de altura total a meio da frente, colocar em espera. COSTAS: Tricota-se como a frente. MANGAS: Montar 50-52-54 malhas em preto nas agulhas de pontas duplas 2,5 mm e tricotar 6 cm de canelado. Continuar com as agulhas de pontas duplas 3 mm em ponto meia às riscas e, AO MESMO TEMPO, distribuir 25 aumentos na 1.ª carreira = 75-77-79 malhas. AO MESMO TEMPO depois do canelado, aumentar 2 malhas sob a manga 35-37-38 vezes a cada 4 carreiras no tamanho S e alternadamente a cada 3 e 4 carreiras nos tamanhos M + L = 145-151-155 malhas. Arrematar quando a manga medir 51-49-47 cm. MONTAGEM: Costurar os ombros. Recolocar as malhas em espera das costas e da frente nas agulhas de pontas duplas 2,5 mm e tricotar 2 cm de canelado em preto e, AO MESMO TEMPO, diminuir a meio da frente e a meio das costas da seguinte maneira: tricotar a carreira até 3 malhas a meio da frente/das costas, colocar a malha central na agulha auxiliar à frente da peça, tricotar juntamente em meia a 1.ª e a 3.ª malha e passar a malha central por cima da malha tricotada. Diminuir desta maneira a cada 4 carreiras. Arrematar depois de 2 cm. Fazer a costura dos lados. Levantar cerca de 214-222-230 malhas ao longo da parte de baixo do pulôver com as agulhas 2,5 mm em preto e tricotar 10 cm de canelado e arrematar. Unir as mangas. |
|
 |
|
Terminou este projecto?Então, identifique as suas fotos com as tags #dropspattern ou mostre-as na galeria #dropsfan. Precisa de ajuda para este modelo?Encontrará 27 turotiais em vídeo, uma rubrica Comentários/Perguntas e muito mais ao visitar a página do modelo em www.garnstudio.com © 1982-2026 DROPS Design A/S. Todos os direitos reservados. Este documento, incluuindo as suas su-secções, tem copyrights. Saia mais o que pode fazer com os nossos modelos no fim de cada uma das páginas do nosso site. |
|


Com mais de 40 anos no design de modelos de tricô e de croché, a DROPS Design oferece uma das mais vastas colecções demodelos gratuitos na Internet - traduzidos em 17 línguas. Neste dia de hoje, temos 324 catálogos e 12290 modelos - dos quais 12271 estão traduzidos em português.
Trabalhamos com muito empenho para lhe proporcionar o melhor que o tricô e o croché têm para oferecer, para lhe fornecer inspiração e conselhos bem como fios da mais elevada qualidade a preços incríveis! Gostaria de usar os nossos modelos para outros fins que não uso pessoal? Pode ler o que lhe é permitido fazer no Copyright texto que se encontra na parte de baixo de todos os nossos modelos. Bom tricô! Bom croché!
Deixe um comentário acerca do modelo DROPS 9-18
Gostaríamos muito de saber o que tem a dizer-nos acerca deste modelo!
Se deixar uma pergunta acerca do modelo, certifique-se de que escolhe a categoria adequada no formulário abaixo para acelerar o processo relativo à resposta. Os campos obrigatórios estão assinalados com um *.