
Categorias populares
Procura um fio?


Comentários / Perguntas (28)
![]() Christine Di Iorio escreveu:
Christine Di Iorio escreveu:
Bonjour Les couleurs des laines sont beaucoup beaucoup plus foncées que sur la photo!!
10.01.2026 - 15:03
![]() Claudia escreveu:
Claudia escreveu:
Hallöchen zusammen. Mein Mann möchte gerne den Pollover von mir gestrickt haben. Er hat aber die Konfektionsgrösse XXL, was kann ich tun?
11.11.2025 - 16:53DROPS Design respondeu:
Liebe Claudia, die Größen damals waren etwas "oversize" so am besten ¨schauen Sie diese Seite, dh ein Pullover (den er gerne trägt) messen und mit der Maßnahmen in der Skizze vergleichen, das kann Ihnen helfen die Größe zu wählen bzw anzupassen (schauen Sie mal ein ähnliches Modell in der gewünschten Größe als Inspiration). Viel Spaß beim Stricken!
21.11.2025 - 14:45
![]() Katarina escreveu:
Katarina escreveu:
Hej, förstår inte hur jag ska starta v2 vid helpatent! Står att det varvet startar med "sticka omsl och lyfta m" direkt men jag har en rätmaska först från v1? Vad ska jag göra med den?
17.04.2025 - 12:11DROPS Design respondeu:
Hej Katarina, kantmaskerne strikkes ret, vi har videoer som viser hvordan du strikker helpatent frem og tilbage og helpatent rundt. Se på dem ved at klikke på videoer øverst i opskriften :)
30.04.2025 - 10:24
![]() Luigina Grilli escreveu:
Luigina Grilli escreveu:
Non ho trovato spiegazione su come fare una cucitura invisibile su come unire le spalle in un capo lavorato a costa inglese o brioche. Grazie!
20.10.2024 - 08:49
![]() Carina escreveu:
Carina escreveu:
Hej, jag får inte ihop det med att börja med en rät maska på första varvet ”helpatent med omslag på rundsticka ”. Tittar jag på videon hur man stickar helpatent med omslag på rundsticka så börjar de med ett omslag!!! Är det fel i mönstret?
04.09.2024 - 00:53DROPS Design respondeu:
Hej Carina, i helpatent skal hver 2.maske strikkes ret sammen med omslaget og hver 2.maske løftes løst af sammen med omslaget på hver pind. På første pind i opskriften er omslaget ikke lavet endnu, så følg opskriften og fortsæt ifølge forklaringen :)
06.09.2024 - 13:52
![]() Carina escreveu:
Carina escreveu:
Hej! Jag får inte ihop det med att börja första varvet med 1 rät maska på ”helpatent med omslag på rundsticka”. Tittar jag på videon för att sticka helpatent med omslag på rundsticka så börjar man där med ett omslag!!! Är det fel i mönstret.
04.09.2024 - 00:48
![]() Liz escreveu:
Liz escreveu:
I am wanting to make this for my husband and am just doing a test square for tension. But I am a little confused with the english rib which doesn't seem to be working out right. In your description in the pattern it says to slip a stitch as if to K but in the lesson and video all the slipped stitches are done pearlwise. Is this a mistake in the pattern description? Also are there any measurements for what the sizes are - the M-L in particular --- or do I just have to use the diagram / chart
04.07.2024 - 08:48DROPS Design respondeu:
Dear Liz, you are right, you should slip 1 stitch as if to purl, just as shown in the video, English pattern will be fixed, thanks for noticing. You will find all finished measurements in the chart at the bottom of the pattern. REad more here. Happy knitting!
04.07.2024 - 09:25
![]() Claudia escreveu:
Claudia escreveu:
Hallo, sehr schöner Pulli, bin bis jetzt auch gut klargekommen, verstehe aber leider nicht recht wie ich am Halsrand abketteln soll. Also erst 1x 2M gleichzeitig, und dann jede 2. R 3x 1M? Viel Dank schon mal im Voraus :) Claudia
06.12.2023 - 15:00DROPS Design respondeu:
Liebe Claudia, am Anfang jeder Reihe vom Hals (Hin-Reihe beim rechten Vorderteil/Rückreihe beim linken Vorderteil) ketten Sie die Maschen für den Hals ab, so 2 Maschen 1 Mal und 1 Masche 3 Mal. Viel Spaß beim stricken!
06.12.2023 - 16:11
![]() Bob escreveu:
Bob escreveu:
For size Large, the body is 184 stitches. The English rib is 3 stitches (K2TOG, YO, Slip). 184 is not divisible by 3 so wouldn't this get misaligned quickly? I must be missing something.
12.11.2023 - 03:29DROPS Design respondeu:
Dear Bob, the yarn overs are not counted in the stitches. For example, after decreasing in the first round, you will have 184 stitches and 92 yarn overs. Then, you will knit one stitch together with its yarn over, make another yarn over and slip the next stitch as to knit. So, in truth, you need to divide 184 stitches by 2 and not 3, because the yarn overs are not counted here. One side note, there seems to be a mistake in the pattern. When working the English rib in the round, the stitches are purled on the 2nd round and the stitches are knitted in the 3rd round: https://www.garnstudio.com/video.php?id=188&lang=en. Happy knitting!
12.11.2023 - 22:41
![]() Beate escreveu:
Beate escreveu:
Når jeg forstørrer bildet ser det ut som om vrangborder er i vridd rett.. Kan det stemme? Beklager feil i tidligere spørsmål ! Jeg mente å skrive ‘38’ og fant at den fargen nå het Drue 😊
17.10.2023 - 14:57DROPS Design respondeu:
Hej Beate, fint at du fandt farven :) Den er strikket med almindelig ribkant
18.10.2023 - 07:24
|
|||||||||||||
DROPS 14-15 |
|||||||||||||
|
|
|||||||||||||
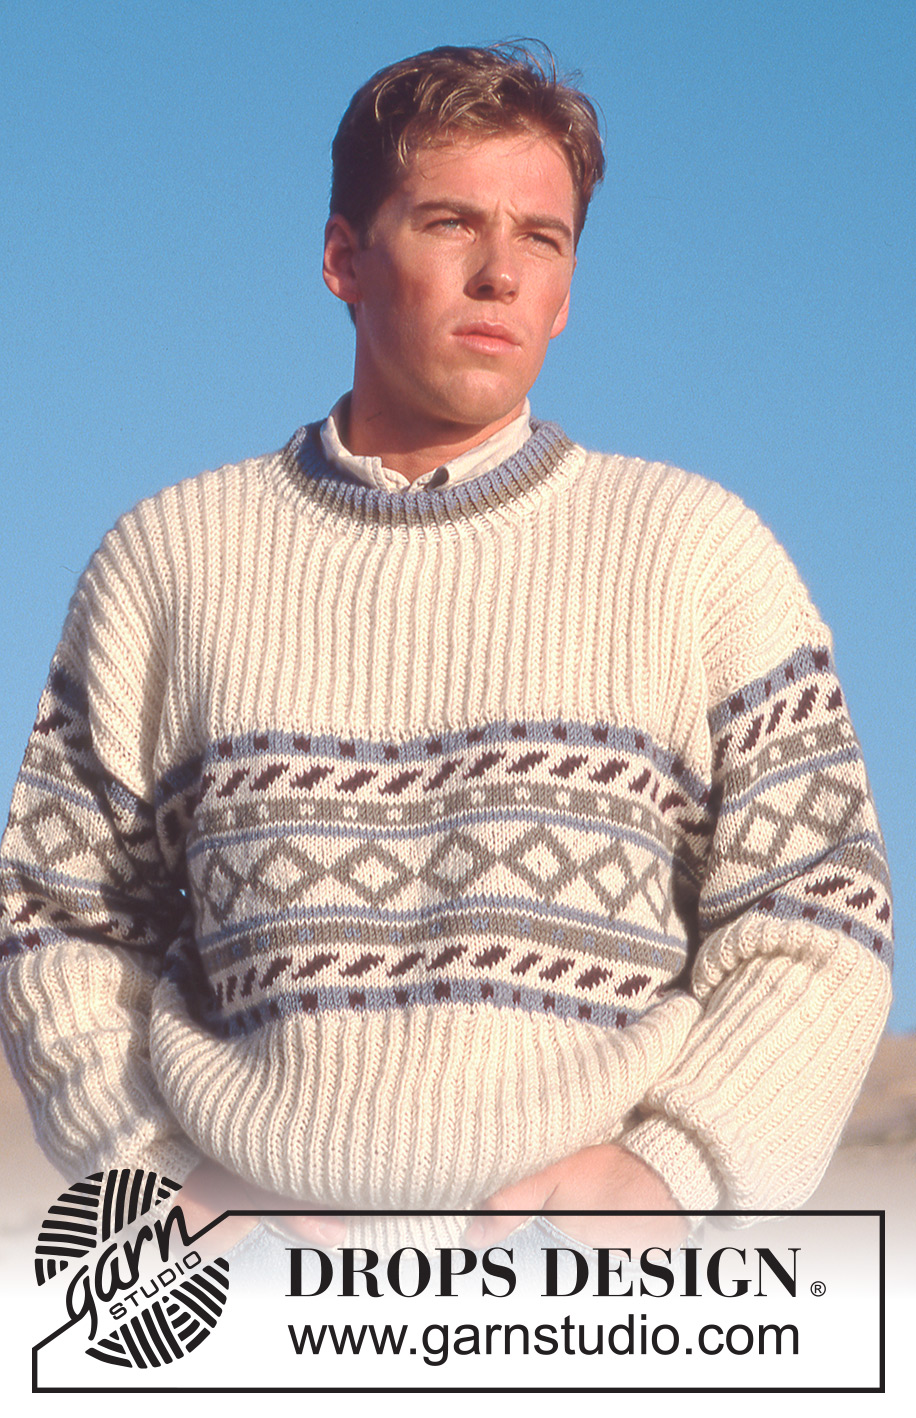
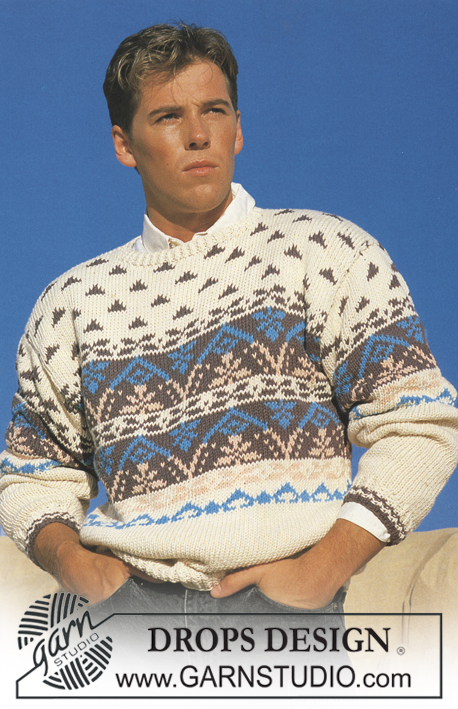
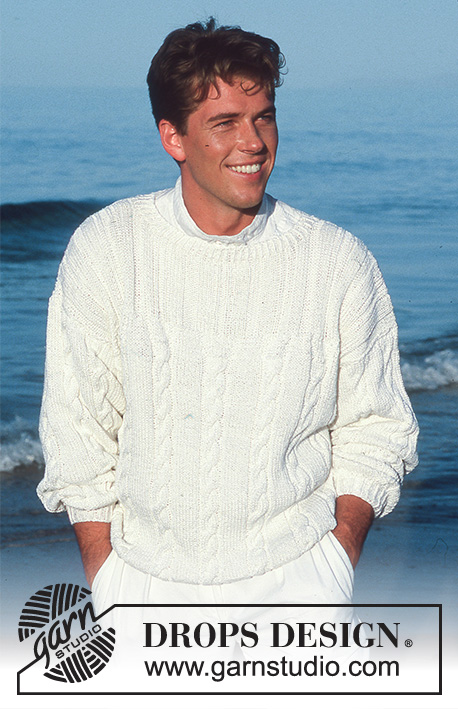
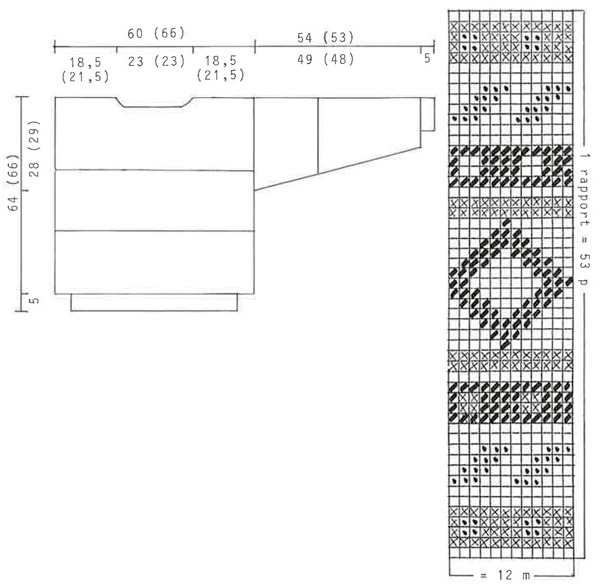
Pulôver homem tricotado com canelado inglês e jacquard norueguês em DROPS Karisma Superwash. Do S ao L.
DROPS 14-15 |
|||||||||||||
|
Explicações JACQUARD: Ver diagrama abaixo. O diagrama mostra o motivo pelo direito e tricota-se em ponto meia. CANELADO INGLÊS, em idas e voltas: Carreira 1: 1 malha ourela, *1 malha meia, 1 laçada, passar 1 malha em liga*, repetir de * a *, 2 malha ourela. Carreira 2: 1 malha ourela, *tricotar juntamente em meia a laçada e a malha passada, 1 laçada, passar 1 malha em liga*, 1 malha ourela. Repetir as carreiras 1 e 2. CANELADO INGLÊS, em redondo: Carreira 1: *1 malha meia, 1 laçada, passar 1 malha em liga*, repetir de * a *. Carreira 2: *tricotar juntamente em meia a laçada e a malha passada, 1 laçada, passar 1 malha em liga*. Carreira 3: * 1 laçada, passar 1 malha em liga, tricotar juntamente em meia a laçada e a malha passada*. Repetir as carreiras 2 e 3. CANELADO: *1 malha meia, 1 malha liga*, repetir de * a *. COSTAS & FRENTE: O pulôver tricota-se em redondo na agulha circular. Montar 220-240 malhas com a agulha circular 3 mm em branco e tricotar 5 cm de canelado. Continuar com a agulha circular 5 mm em canelado inglês, em redondo – ver acima - AO MESMO TEMPO distribuir 52-56 diminuições na 1.ª carreira = 168-184 malhas. Manter a mesma tensão da indicada para a amostra. A 23-24 cm de altura total, mudar para as agulhas 4.5 mm e tricotar 1 carreira em ponto meia e, AO MESMO TEMPO, distribuir 60-68 aumentos na carreira = 228-252 malhas. Continuar com o diagrama e, AO MESMO TEMPO, a 36-37 cm de altura total, dividir a peça em 2 e terminar a frente e as costas separadamente. Frente: = 114-126 malhas. Continuar seguindo o jacquard. Depois da última carreira do diagrama, tricotar 1 carreira em branco e, AO MESMO TEMPO, distribuir 30-34 diminuições = 84-92 malhas. Continuar com as agulhas 5 mm e continuar em canelado inglês. A 60-62 cm de altura total, arrematar as 22-22 malhas centrais para o decote e terminar cada lado separadamente. Arrematar para o decote a cada 2 carreiras: 1 vez 2 malhas e 3 vezes 1 malha. Arrematar as restantes malhas para o ombro a 64-66 cm de altura total. Costas: = 114-126 malhas. Continuar em jacquard e canelado inglês como se fez para a frente. A 62-64 cm de altura total, arrematar as 28-28 malhas centrais para o decote e arrematar 2 malhas no lado do decote na carreira seguinte. Arrematar as restantes malhas como se fez para a frente. MANGAS: Montar 46-50 malhas com as agulhas de pontas duplas 3 mm em branco e tricotar 5 cm de canelado. Continuar com as agulhas de pontas duplas 5 mm em canelado inglês e, AO MESMO TEMPO, distribuir 6-10 diminuições na 1.ª carreira = 40-40 malhas. Aumentar então 2 malhas sob a manga 12 vezes ao todo, a cada 8 carreiras = 64-64 malhas. A 33-32 cm de altura total, mudar para as agulhas 4.5 mm, tricotar 1 carreira em ponto meia e, AO MESMO TEMPO, distribuir aumentos para ajustar para 85- 85 malhas e continuar em jacquard. Aumentar 2 malhas sob a manga, 11-13 vezes ao todo alternadamente a cada 4 e 5 carreiras no tamanho S/M e a cada 4 carreiras no tamanho M/L = 107-111 malhas. Depois de a última carreira do diagrama, a manga mede cerca de 54-53 cm. Arrematar. MONTAGEM: Costurar os ombros. Levantar cerca de 120 malhas à volta do decote com as agulhas 3 mm em branco e tricotar em canelado da seguinte maneira: 1 cm em branco, 1.5 cm em bege, 5.5 cm em azul, arrematar. Dobrar ao meio pelo avesso e costurar. Unir as mangas. |
|||||||||||||
Explicações do diagrama |
|||||||||||||
|
|||||||||||||
 |
|||||||||||||
Terminou este projecto?Então, identifique as suas fotos com as tags #dropspattern ou mostre-as na galeria #dropsfan. Precisa de ajuda para este modelo?Encontrará 28 turotiais em vídeo, uma rubrica Comentários/Perguntas e muito mais ao visitar a página do modelo em www.garnstudio.com © 1982-2026 DROPS Design A/S. Todos os direitos reservados. Este documento, incluuindo as suas su-secções, tem copyrights. Saia mais o que pode fazer com os nossos modelos no fim de cada uma das páginas do nosso site. |
|||||||||||||


Com mais de 40 anos no design de modelos de tricô e de croché, a DROPS Design oferece uma das mais vastas colecções demodelos gratuitos na Internet - traduzidos em 17 línguas. Neste dia de hoje, temos 324 catálogos e 12290 modelos - dos quais 12271 estão traduzidos em português.
Trabalhamos com muito empenho para lhe proporcionar o melhor que o tricô e o croché têm para oferecer, para lhe fornecer inspiração e conselhos bem como fios da mais elevada qualidade a preços incríveis! Gostaria de usar os nossos modelos para outros fins que não uso pessoal? Pode ler o que lhe é permitido fazer no Copyright texto que se encontra na parte de baixo de todos os nossos modelos. Bom tricô! Bom croché!
Deixe um comentário acerca do modelo DROPS 14-15
Gostaríamos muito de saber o que tem a dizer-nos acerca deste modelo!
Se deixar uma pergunta acerca do modelo, certifique-se de que escolhe a categoria adequada no formulário abaixo para acelerar o processo relativo à resposta. Os campos obrigatórios estão assinalados com um *.