
Categorias populares
Procura um fio?


Comentários / Perguntas (62)
Lusi escreveu:
Continue to crochet around the edge of the leg in Puddel as follows. 1st round: 1 sc in each sc around all of the leg (incl the slit at the centre front). Finish with a sl st in the first sc. 2nd round: *3 ch, 1 sc in the following sc*, repeat from *-*, and finish with a sl st in the first ch from beg of round. Cut the thread. can you explain this i dont quite understand
19.03.2014 - 12:13DROPS Design respondeu:
Dear Lusi, with Puddel, you will work first 1 round sc all around of the leg (=1 sc in each sc around), then on 2nd round work a ch-loop edge: *ch 3, 1 sc in next sc*, repeat from *-* around. Happy crocheting!
19.03.2014 - 13:47Luci escreveu:
What does it mean to crochet back until 1sc left?
19.03.2014 - 11:48DROPS Design respondeu:
Dear Lucy, work 1 row sc leaving 1 sc unworked at the end of row. Happy crocheting!
19.03.2014 - 11:55Luci escreveu:
What does it mean to crochet back until 1sc left?
19.03.2014 - 11:46
![]() Lucia Green escreveu:
Lucia Green escreveu:
When I join at the back of the heel I end up with a weird little point at the bottom. It's not rounded like the slipper in the picture appears. I've gone over and over the pattern and don't see that I'm missing a step. It seems like to have a pretty rounded heel I'm going to have to alter the pattern. Did I miss something?
31.10.2013 - 13:32DROPS Design respondeu:
Dear Mrs Green, a little point may appear when crocheting heel together, but when wearing them, it shouldn't be that visible. Happy crocheting!
31.10.2013 - 15:49
![]() Soraya Va A Compartir 300 Monedas! escreveu:
Soraya Va A Compartir 300 Monedas! escreveu:
Este patron tiene una forma elegante y la figura del pie se ve bonita quiero probar haber como queda!
05.08.2013 - 22:55
![]() Maria escreveu:
Maria escreveu:
Hallo, wenn in Runde 2 steht: "5 fM häkeln", heißt das dann 1 LM + 4 fM oder 1 LM + 5 fM? Wie wird das generell in Ihren Anleitungen gehandhabt? Vielen Dank im Voraus
17.01.2013 - 12:05DROPS Design respondeu:
Liebe Maria, in der Häkelinfo finden Sie die Information dazu: „Die erste fM jeder R. wird mit 1 Lm ersetzt“, es wird also nicht in jeder Runde nochmals speziell erwähnt. Viel Spaß beim Häkeln!
17.01.2013 - 13:16Guadalupe Suárez escreveu:
Según puedo entender falta la vuelta 9 ya que si continuamos tejiendo con 20 puntos quedará un cono pequeño que no da aumento al pie en la parte del empeine...corríganme si estoy mal, gracias
15.12.2012 - 19:28
![]() DROPS Design escreveu:
DROPS Design escreveu:
Til hele tøffelen måler ca 22-25-28 cm.
19.01.2012 - 09:18
![]() Lovise escreveu:
Lovise escreveu:
Hvor mange masker skal jeg hekle frem og tilbake på hælen?
19.01.2012 - 00:03Shaima escreveu:
I couldn't make the end of this sock .. i mean this final row that have mini sagged threads .. could anyone help me ??
21.12.2011 - 22:18
|
|
Pom Pom Adore Slippers |
|
|
|
|
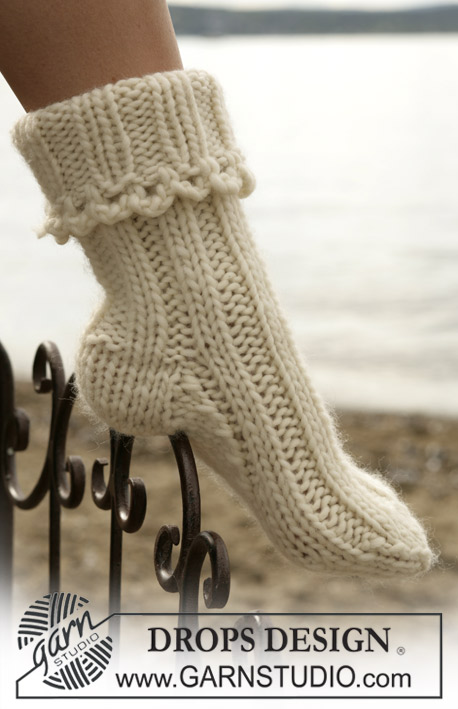
Pantufa de Natal DROPS em “Snow”
DROPS 98-7 |
|
|
Nota: Existem termos diferentes de tricô e croché em português de Portugal e do Brasil. Malha = Ponto Canelado = Barra Ponto Jarreteira = Cordões de Tricô Ponto Liga – Ponto Tricô Croché : mpa – meio ponto alto pa – ponto alto pad – ponto alto duplo pat – ponto alto triplo pb – ponto baixo pbx – ponto baixíssimo pc – ponto corrente AMOSTRA 17 pb = 10 cm de largura DICA CROCHÉ : Substituir o 1.º pa de cada carreira por 1 pc. No fim da carreira, unir com 1 pbx no pc do princípio de cada carreira. (1 pbx no pc do princípio da carreira precedente quando se crocheta em idas e voltas). PANTUFA : Este é um modelo de base que é utilizado para as outras 4 pantufas apresentadas neste catálogo. PÉ : Começar pela ponta do pé com a agulha de croché 8 mm e o fio SNOW, C 1 : montar 3 pc e fechar com 1 pbx no 1.º pc para formar um aro C 2 : fazer 5-5-6 pb no aro C 3 : 2 pb em cada ponto : 10-10-12 pb C 4 : *1 pb no ponto seguinte, 2 pb no ponto seguinte * repetir de * a * em toda a carreira : 15-15- 18 pb C 5-7 : 1 pb em cada ponto em toda a carreira C 8 : *1 pb nos 2 pontos seguintes, 2 pb no ponto seguinte * , repetir de * a * em toda a carreira : 20-20-24 pb Continuar a crochetar pb até cerca de 11-13-14 cm de altura total. CALCANHAR : A partir daqui, passar a crochetar em idas e voltas. A cerca de 22-25-28 cm de altura total, achatar e crochetar o meio da parte de trás do pé, fazendo 1 carreira de pb através das 2 partes. Cortar o fio e costurá-lo. TORNOZELO : Fazer 1 carreira de pb à volta da abertura da pantufa (começar pelo meio da frente) e unir. Continuar a crochetar em redondo, fazendo 1 pb em cada ponto em toda a carreira até ter 11 cm de altura de tornozelo. Continuar em idas e voltas a partir do meio da frente da seguinte maneira : C 1 : virar, 1 pb em cada ponto em toda a carreira, não fazer o último ponto R 2 : virar, 1 pb em cada ponto em toda a carreira, não fazer o último ponto R 3 : virar, 1 pb em cada ponto em toda a carreira, cortar o fio Fazer a orla com o fio PUDDEL : C 1 : 1 pb em cada pb a toda a volta do tornozelo (incluindo a toda a volta da fenda da frente) e unir com 1 pbx no 1.º pb C 2 : * 3 pc, 1 pb no ponto seguinte * repetir de * a * e unir com 1 pbx no 1.º ponto da carreira, cortar o fio MONTAGEM : Fazer um pompom com 5 cm de diâmetro com o fio PUDDEL e costurar o pompom a meio da frente do pé. |
|
Terminou este projecto?Então, identifique as suas fotos com as tags #dropspattern ou mostre-as na galeria #dropsfan. Precisa de ajuda para este modelo?Encontrará 9 turotiais em vídeo, uma rubrica Comentários/Perguntas e muito mais ao visitar a página do modelo em www.garnstudio.com © 1982-2026 DROPS Design A/S. Todos os direitos reservados. Este documento, incluuindo as suas su-secções, tem copyrights. Saia mais o que pode fazer com os nossos modelos no fim de cada uma das páginas do nosso site. |


Com mais de 40 anos no design de modelos de tricô e de croché, a DROPS Design oferece uma das mais vastas colecções demodelos gratuitos na Internet - traduzidos em 17 línguas. Neste dia de hoje, temos 324 catálogos e 12290 modelos - dos quais 12271 estão traduzidos em português.
Trabalhamos com muito empenho para lhe proporcionar o melhor que o tricô e o croché têm para oferecer, para lhe fornecer inspiração e conselhos bem como fios da mais elevada qualidade a preços incríveis! Gostaria de usar os nossos modelos para outros fins que não uso pessoal? Pode ler o que lhe é permitido fazer no Copyright texto que se encontra na parte de baixo de todos os nossos modelos. Bom tricô! Bom croché!
Deixe um comentário acerca do modelo DROPS 98-7
Gostaríamos muito de saber o que tem a dizer-nos acerca deste modelo!
Se deixar uma pergunta acerca do modelo, certifique-se de que escolhe a categoria adequada no formulário abaixo para acelerar o processo relativo à resposta. Os campos obrigatórios estão assinalados com um *.