
Categorias populares
Procura um fio?


Comentários / Perguntas (52)
![]() 周岐蓁 escreveu:
周岐蓁 escreveu:
ThankS ! Nice pattern!
16.05.2025 - 11:53
![]() Györki Mária escreveu:
Györki Mária escreveu:
Szeretném megkérdezni az xxxl méret milyen mellbőséghez van? Köszö nöm
10.05.2025 - 08:16
![]() MARIA MARGARITA CABRERA CAVIERES escreveu:
MARIA MARGARITA CABRERA CAVIERES escreveu:
Agradezco la oportunidad para felicitar a los creadores de esta página porque permite aprender de las personas que saben tanto y que son desinteresadas y muestran y comparten sus conocimientos.
10.04.2025 - 15:57
![]() Ingrid Neven escreveu:
Ingrid Neven escreveu:
Beste,ivm de steken meerderen,dat is nu heel goed gelukt,zonder gaatjes,nu zie je de rij waar je de steken hebt moeten meerderen,wat kan ik daaraan doen om dat verschil niet te hart laten opvallen,heb al een paar keer uitgetrokken,maar blijf het zien,wat zou jij doen of wat is uw idee,gr
07.04.2025 - 14:02DROPS Design respondeu:
Dag Ingrid,
Het is helaas niet helemaal te voorkomen dat je dit een beetje ziet.
09.04.2025 - 10:33
![]() M Gulen escreveu:
M Gulen escreveu:
Als je naald 11 gebreid hebt van A2 moet je de steken dan weer terugzetten bij de volgende naald
07.04.2025 - 11:53DROPS Design respondeu:
Dag M Gulen,
Nee, je hoeft geen steken terug te zetten. Er zit een verspring in waar de steken worden samen gebreid en waar de omslagen komen, maar je kunt gewoon door breien, je hoeft nergens steken terug te zetten in het telpatroon.
09.04.2025 - 10:35
![]() Christine Lynch escreveu:
Christine Lynch escreveu:
If you drop down to a US4 needle on the Green Grove Sweater to meet gauge would you drop down to a US0 for the neck or slightly larger?
31.03.2025 - 19:58DROPS Design respondeu:
Dear Mrs Lynch, you can probably go down to a needle size US0, just make sure it's not too tight when you work neck. Happy knitting!
01.04.2025 - 08:50
![]() Christine Lynch escreveu:
Christine Lynch escreveu:
In the Green Grove Sweater, when knitting the graph pattern there are yarn overs. In the tips it refers to a kint in the back loop on increase stitches, would you bo the same in the design pattern listed on the graph? Than you!
31.03.2025 - 19:48DROPS Design respondeu:
Hi Christine, No, the yarn overs in the diagrams are part of the lace pattern, so are worked through the front loop to leave holes. Happy knitting!
01.04.2025 - 06:45
![]() Christine Lynch escreveu:
Christine Lynch escreveu:
I did a swatch for gage and it come up with 18 stitches by 29 rows for the Green Grove Sweater. I went up a needle size and I blocked the piece. I read you don't block I was wondering why. And if I just went by the measurements using the size 6 instead of 7 because I prefer the tighter weave would it work? Thank you
28.03.2025 - 18:21DROPS Design respondeu:
Dear Christine, if you have a 18 stitches x29 rows gauge you would need to use a smaller needle (you have too few stitches), not a larger needle, to work the pattern tighter. You'd need to try with a US4 needle instead to try a get the correct gauge. This way the weave should look even tighter and the gauge would also be closer to the actual one probably, so you could work the pattern as it is. The gauge should not be blocked if the final piece isn't blocked; otherwise it wouldn't reflect the gauge that you'll have as you work the pattern, so the garment might not have the correct shape/measurements at the end. Happy knitting!
30.03.2025 - 20:28
![]() Ingrid Neven escreveu:
Ingrid Neven escreveu:
Beste,ik zij aan het begin van de halsrand met 180 steken,en 5 cm,nu moet ik 36 steken meerderen,waardoor ik gaatjes heb en mog nog 2cm breien, vindt het zo vreselijk,heb al vanalles gedaan maar krijg het niet mooi,,heb uw hulp nodig,gr
18.03.2025 - 11:44DROPS Design respondeu:
Dag Ingrid,
Bij het meerderen maak je omslagen en deze brei je op de volgende naald gedraaid om een gaatje te voorkomen. Wat je in plaats van omslagen maken ook kunt doen om te meerderen is de draad tussen twee steken opnemen en deze gedraaid recht breien. Zie deze video.
18.03.2025 - 20:08
![]() Anne escreveu:
Anne escreveu:
Bonjour, je me demande s'il n'y a pas une erreur sur cette partie du patron : Quand la manche mesure 4-3-3-2 cm depuis la division, diminuer 2 mailles au milieu sous la manche - voir DIMINUTIONS. Diminuer ainsi 2-3-3-3 fois au total tous les 4-3-3-2 cm = 78-84-88-92 mailles. Comment peut-on arriver à 88 mailles pour la taille L après diminution en partant de 82 mailles ? 🤔
17.03.2025 - 14:02DROPS Design respondeu:
Bonjour, notez que la taille L est la 1ère des 4 tailles dans ce paragraphe (L à XXXL), autrement dit, vous allez diminuer en taille L à partir de 4 cm et 2 fois au total tous les 4 cm = il reste 78 mailles. Bon tricot!
17.03.2025 - 15:36
|
||||||||||||||||||||||
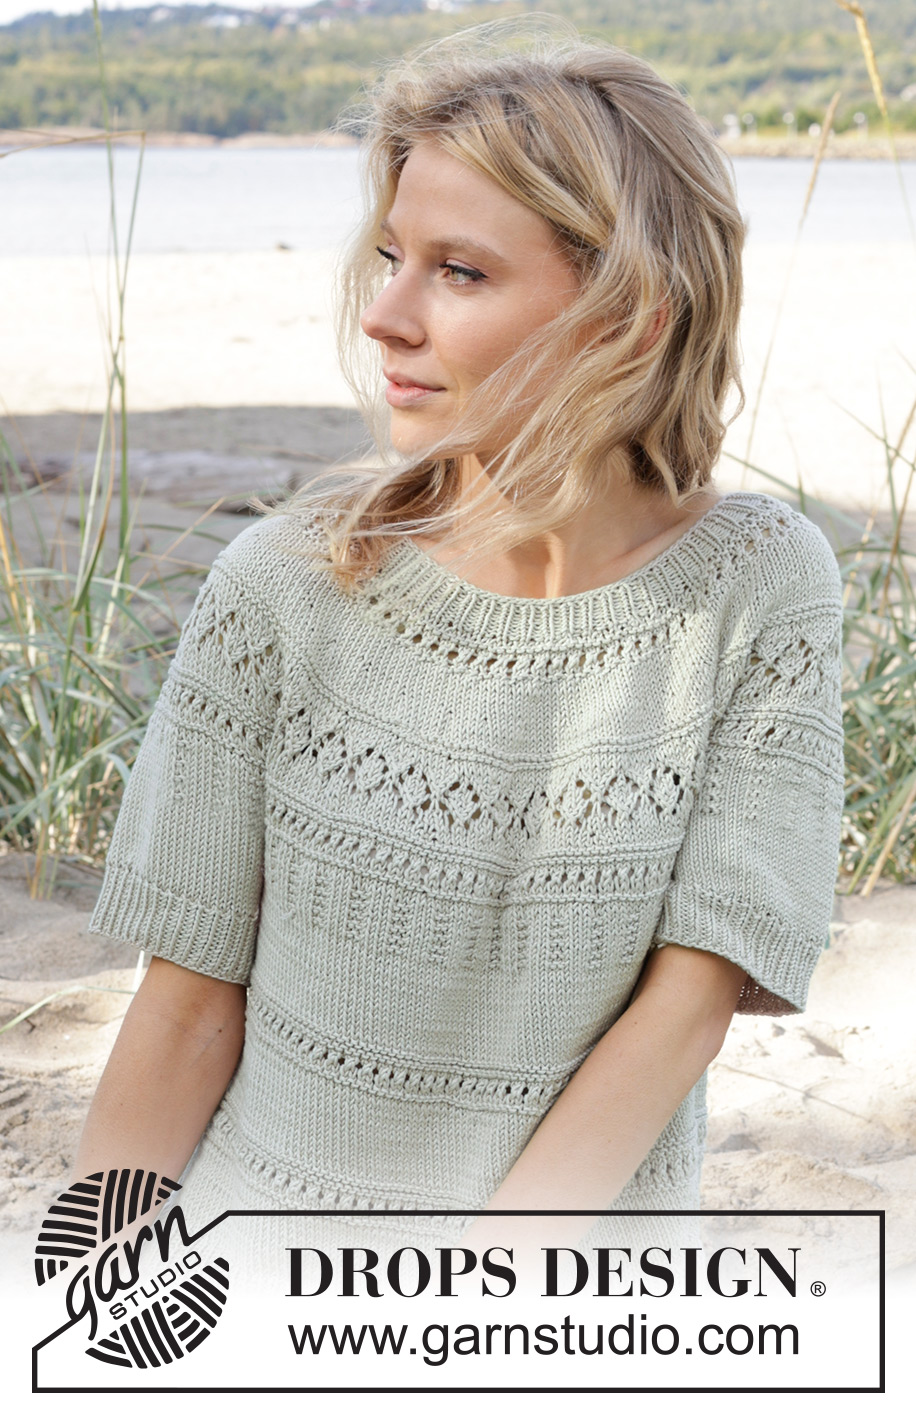
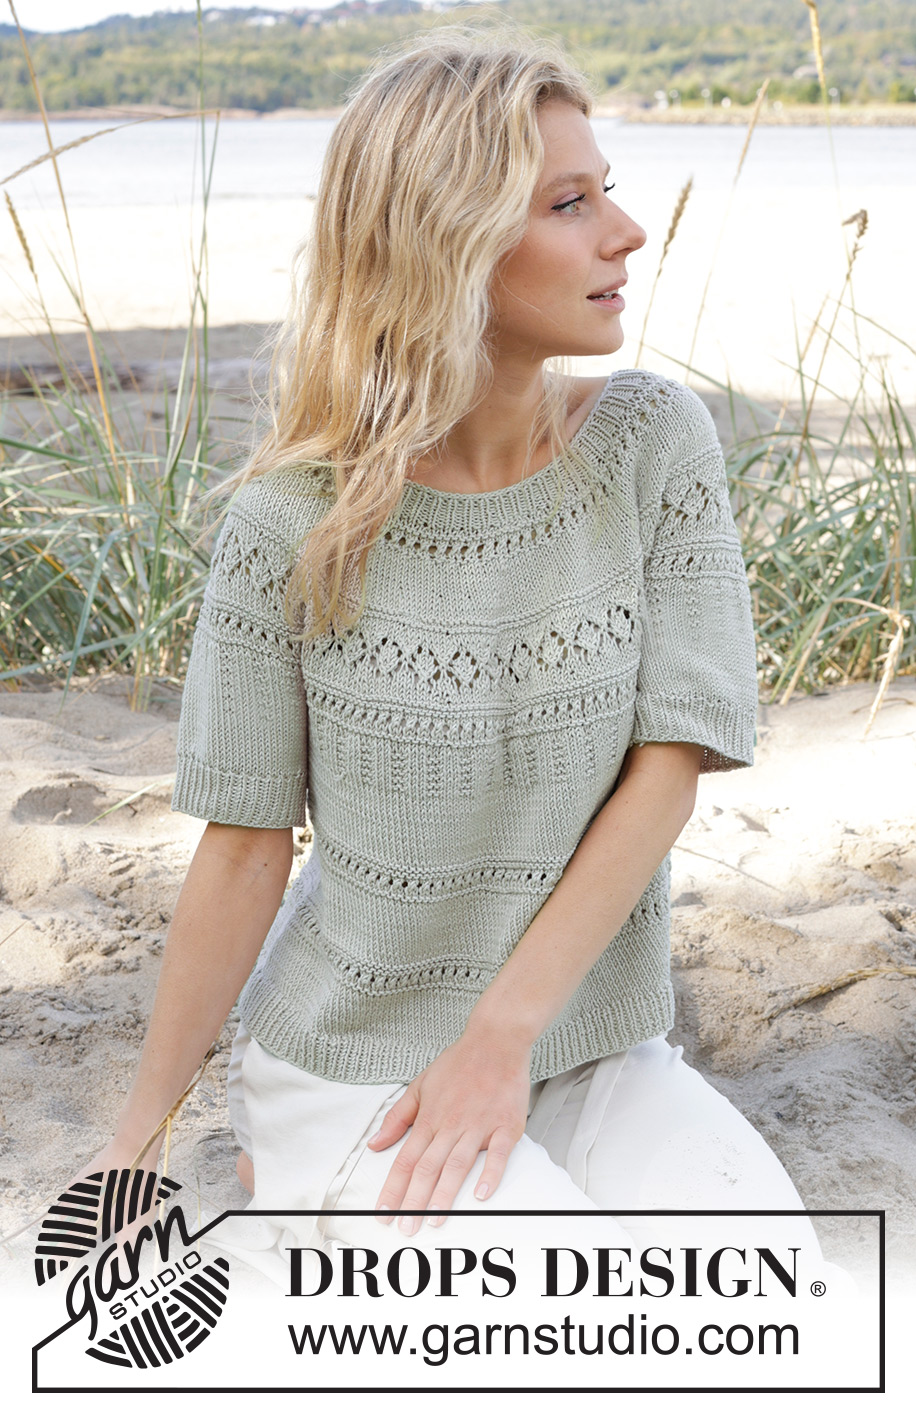
Green Grove Tee#greengrovetee |
||||||||||||||||||||||
 |
 |
|||||||||||||||||||||
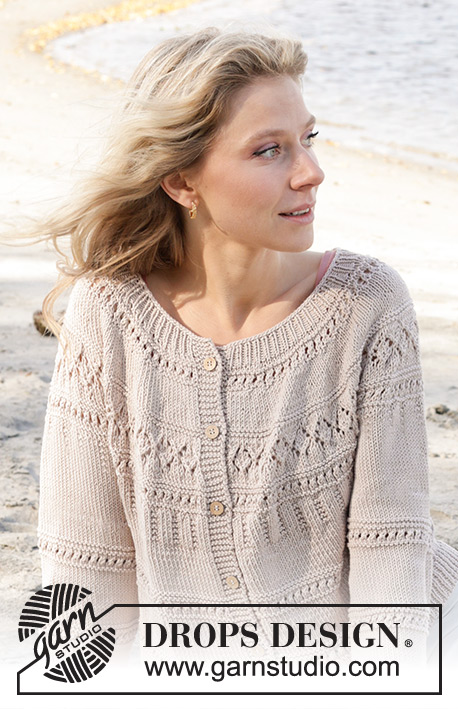
Pulôver tricotado de cima para baixo com mangas curtas, encaixe arredondado e ponto rendado, em DROPS Muskat ou DROPS Cotton Merino. Do S ao XXXL
DROPS 239-26 |
||||||||||||||||||||||
|
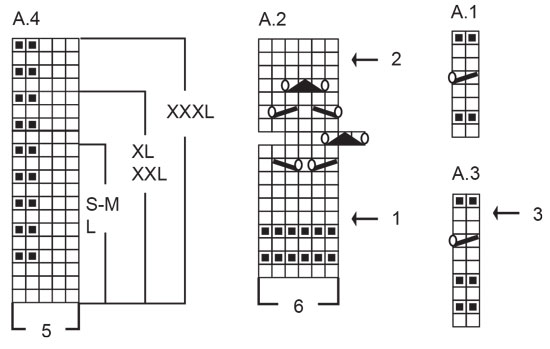
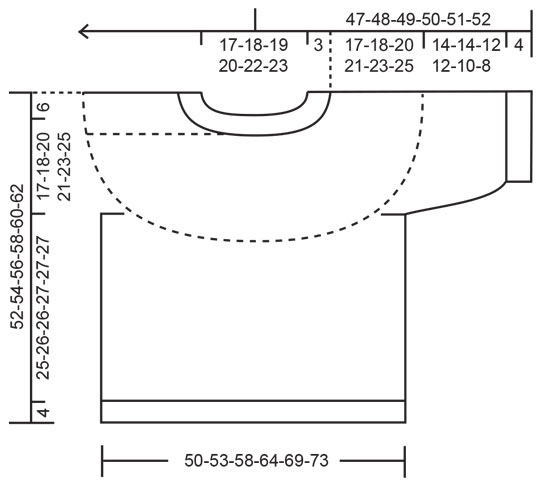
---------------------------------------------------------- TÉCNICAS USADAS: ---------------------------------------------------------- AUMENTOS: Para aumentar 1 malha, fazer 1 laçada. Na carreira seguinte, tricotar as laçadas torcidas para evitar buracos. PONTO FANTASIA: Ver diagramas A.1 a A.4. Os diagramas mostram todas as carreiras, vistas pelo direito. DIMINUIÇÕES (mangas, nos tamanhos L, XL, XXL e XXXL): Diminuir 1 malha de cada lado do fio marcador da seguinte maneira: Tricotar até restarem 3 malhas antes do fio marcador, tricotar 2 malhas juntamente em meia, 2 malhas meia (o fio marcador fica entre estas 2 malhas), passar 1 malha como se fosse para a tricotar em meia, tricotar 1 malha meia, passar a malha que se passou por cima da malha tricotada (diminuiu-se 2 malhas). ---------------------------------------------------------- A PEÇA COMEÇA AQUI: ---------------------------------------------------------- PULÔVER - SUMÁRIO: A gola e o encaixe tricotam-se em redondo na agulha circular a partir da meio das costas e de cima para baixo. Divide-se então o encaixe para as costas/a frente e as mangas. Tricotam-se as costas/a frente em redondo na agulha circular. Tricotam-se as mangas em redondo nas agulhas de pontas duplas/na pequena agulha circular. GOLA: Montar 122-126-130-136-142-148 malhas com a pequena agulha circular 3 mm em DROPS Muskat ou DROPS Cotton Merino. Tricotar 1 volta meia. Tricotar então em canelado (= 1 malha meia/1 malha liga) durante 3 cm. Quando o canelado estiver terminado, tricotar 1 volta meia aumentando ao mesmo tempo 36-38-40-44-48-52 malhas a intervalos regulares - ver AUMENTOS = 158-164-170-180-190-200 malhas. Colocar 1 marcador a meio da carreira - vai-se medir a partir deste marcador. ENCAIXE: Mudar para a agulha circular 4 mm e tricotar A.1 em redondo. Quando A.1 estiver terminado, continuar em redondo, em ponto meia. MANTER A MESMA TENSÃO DA INDICADA PARA A AMOSTRA! Quando a peça medir 4-4-5-5-6-6 cm a partir do marcador, aumentar 40-44-50-56-60-64 malhas a intervalos regulares – não esquecer AUMENTOS = 198-208-220-236-250-264 malhas. Quando a peça medir 7-7-8-8-9-10 cm a partir do marcador, tricotar A.2 em redondo. NOTA! Na 11.ª carreira do diagrama, desviar o princípio da carreira 2 malhas para a direita para que o motivo seja contínuo em toda a carreira. Começar então a carreira seguinte novamente como antes. AO MESMO TEMPO, em cada uma das carreiras com uma flecha no diagrama, aumentar a intervalos regulares da seguinte maneira: Flecha-1: Aumentar 42-44-50-58-62-66 malhas a intervalos regulares = 240-252-270-294-312-330 malhas (temos, então, malhas suficientes para 40-42-45-49-52-55 motivos de A.2). Flecha-2: Aumentar 38-42-48-56-58-58 malhas a intervalos regulares = 278-294-318-350-370-388 malhas. Quando A.2 estiver terminado, tricotar A.3 em redondo. AO MESMO TEMPO, em cada uma das carreiras com uma flecha, aumentar a intervalos regulares da seguinte maneira: Flecha-3: Aumentar 32-36-42-50-50-52 malhas a intervalos regulares = 310-330-360-400-420-440 malhas. Quando A.3 estiver terminado, tricotar A.4 em redondo. Quando A.4 estiver terminado no seu tamanho, tricotar em ponto meia mas ter em atenção que, em certos tamanhos, a divisão se faz antes do fim de A.4. DIVISÃO COSTAS/FRENTE E MANGAS: Quando a peça medir 17-18-20-21-23-25 cm a partir do marcador, dividir o encaixe para as costas/a frente e as mangas. Se A.4 não estiver terminado no seu tamanho, tem de o terminar nas costas/na frente e nas mangas. Tricotar 47-51-55-61-65-69 malhas como antes (metade das costas), colocar as 60-64-70-78-80-82 malhas seguintes em espera num fio para a manga, montar 10-10-12-12-14-16 novas malhas (lado, sob a manga), tricotar 95-101-110-122-130-138 malhas em ponto meia (frente), colocar as 60-64-70-78-80-82 malhas seguintes em espera num fio para a manga, montar 10-10-12-12-14-16 novas malhas na agulha (lado, sob a manga), e tricotar as 48-50-55-61-65-69 últimas malhas como antes (metade das costas). Terminar as costas/ a frente e as mangas separadamente. Passar a medir a partir daqui. COSTAS & FRENTE: = 210-222-244-268-288-308 malhas. Se A.4 não estiver terminado no seu tamanho, terminar o diagrama (o ponto fantasia não fica completo a meio sob cada manga, mas ter atenção para o continuar correctamente no encaixe e tricotar o ponto fantasia tanto quanto possível sob cada manga e tricotar as restantes malhas em ponto meia). Quando A.4 estiver terminado, continuar em ponto meia. Quando se tricotou 6-6½-7-7-7½-7½ cm em ponto meia depois de A.4, tricotar A.3 em redondo. Quando A.3 estiver terminado, tricotar em ponto meia durante 6-6½-7-7-7½-7½ cm. Tricotar então novamente A.3 em redondo. Quando A.3 estiver terminado, continuar em ponto meia. Quando a peça medir 25-26-26-27-27-27 cm a partir da divisão, tricotar 1 volta meia aumentando ao mesmo tempo 20-22-22-26-28-30 malhas a intervalos regulares = 230-244-266-294-316-338 malhas. Mudar para a agulha circular 3 mm e tricotar em canelado (1 malha meia/ 1 malha liga) durante 4 cm. Arrematar frouxamente. O pulôver mede cerca de 52-54-56-58-60-62 cm de altura total a partir do ombro. MANGAS: Colocar as 60-64-70-78-80-82 malhas em espera de um lado da peça nas agulhas de pontas duplas ou na pequena agulha circular 4 mm e levantar mais 1 malha em cada uma das 10-10-12-12-14-16 malhas montadas sob a manga = 70-74-82-90-94-98 malhas. Colocar 1 fio marcador a meio sob a manga (a meio das 10-10-12-12-14-16 novas malhas). Começar a carreira no fio marcador. Se A.4 não estiver terminado no seu tamanho, terminar o diagrama (o ponto fantasia não fica completo a meio sob a manga, mas ter atenção para o continuar depois do encaixe, tricotar em ponto fantasia tantas malhas quanto possível sob a manga, e tricotar as restantes malhas em ponto meia). Quando A.4 estiver terminado, continuar em redondo, em ponto meia. Nos tamanhos L, XL e XXXL, vai-se diminuir a meio sob a manga como explicado abaixo (não há diminuições nos tamanhos S e M). TAMANHOS L, XL, XXL E XXXL: Quando a manga medir 4-3-3-2 cm a partir da divisão, diminuir 2 malhas a meio sob a manga - ver DIMINUIÇÕES. Diminuir desta maneira 2-3-3-3 vezes ao todo a cada 4-3-3-2 cm = 78-84-88-92 malhas. TODOS OS TAMANHOS: Quando a manga medir 14-14-12-11-10-8 cm a partir da divisão, tricotar 1 volta meia diminuindo ao mesmo tempo 4-6-8-10-10-10 malhas a intervalos regulares = 66-68-70-74-78-82 malhas. Mudar para as agulhas de pontas duplas 3 mm e tricotar em canelado (1 malha meia/ 1 malha liga) durante 4 cm. Arrematar frouxamente. A manga mede cerca de 18-18-16-16-14-12 cm a partir da divisão. Tricotar a outra manga da mesma maneira. |
||||||||||||||||||||||
Explicações do diagrama |
||||||||||||||||||||||
|
||||||||||||||||||||||
 |
||||||||||||||||||||||
 |
||||||||||||||||||||||
Terminou este projecto?Então, identifique as suas fotos com as tags #dropspattern #greengrovetee ou mostre-as na galeria #dropsfan. Precisa de ajuda para este modelo?Encontrará 28 turotiais em vídeo, uma rubrica Comentários/Perguntas e muito mais ao visitar a página do modelo em www.garnstudio.com © 1982-2026 DROPS Design A/S. Todos os direitos reservados. Este documento, incluuindo as suas su-secções, tem copyrights. Saia mais o que pode fazer com os nossos modelos no fim de cada uma das páginas do nosso site. |
||||||||||||||||||||||


Com mais de 40 anos no design de modelos de tricô e de croché, a DROPS Design oferece uma das mais vastas colecções demodelos gratuitos na Internet - traduzidos em 17 línguas. Neste dia de hoje, temos 324 catálogos e 12290 modelos - dos quais 12271 estão traduzidos em português.
Trabalhamos com muito empenho para lhe proporcionar o melhor que o tricô e o croché têm para oferecer, para lhe fornecer inspiração e conselhos bem como fios da mais elevada qualidade a preços incríveis! Gostaria de usar os nossos modelos para outros fins que não uso pessoal? Pode ler o que lhe é permitido fazer no Copyright texto que se encontra na parte de baixo de todos os nossos modelos. Bom tricô! Bom croché!
Deixe um comentário acerca do modelo DROPS 239-26
Gostaríamos muito de saber o que tem a dizer-nos acerca deste modelo!
Se deixar uma pergunta acerca do modelo, certifique-se de que escolhe a categoria adequada no formulário abaixo para acelerar o processo relativo à resposta. Os campos obrigatórios estão assinalados com um *.