
Categorias populares
Procura um fio?


Comentários / Perguntas (17)
![]() Marlene Bernardi escreveu:
Marlene Bernardi escreveu:
Your patterns are beautiful, but not workable for me unless you can put them into a written pattern. At 80 I find the charts too challenging. Will have to pass on these lovely patterns.
17.04.2025 - 13:46
![]() Zoi Mastoridou escreveu:
Zoi Mastoridou escreveu:
Guten Tag, Bin zwar keine Anfängerin, aber ich verzweifle an der Anleitung A.1 ist gehäkelt aber mit A.2 komme ich nicht weiter, da ist auch die Spitze nicht dabei, Breite ich da auch mit 4 Luftmaschen?
12.02.2025 - 14:43DROPS Design respondeu:
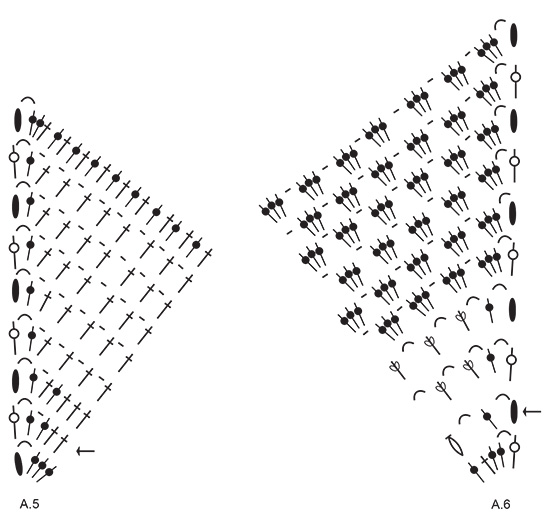
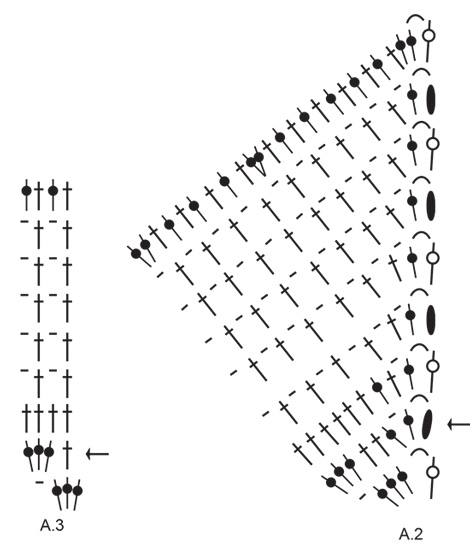
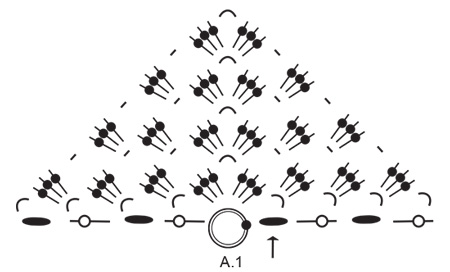
Liebe Frau Mastoridou, wenn A.1 fertig ist mus mann dann A.2 bis A.5 so häkeln: A.2 am Anfang von den Hin-Reihen, dann wiederholen Sie A.3 insgesamt 4 Mal, dann häkeln Sie A.4 in der Mitte von A.1, dann wiederholen Sie A.3 insgesamt 4 Mal und enden Sie mit A.5. Bei den Rückreihen lesen Sie die Diagramme links bei rechts und häkeln Sie A.5, A.3, A.4, A.3 und A.2. Viel Spaß beim Häkeln!
12.02.2025 - 16:08
![]() Lori escreveu:
Lori escreveu:
Is there a site you have that teaches me how to use your patterns? I just can't seem to wrap my head around the A1, A2, etc. parts. I need some help in learning how to read your patterns. Your patterns are beautiful and I so want to make this items. Maybe a tutorial on Drops Design pattern reading. Thank you
02.08.2024 - 18:24DROPS Design respondeu:
Dear Lori, we have a tutorial on how to read our knitting diagrams HERE. It is well worth to try a simpler piece first to understand our way of writing knitting patterns, and then start on a more difficult one. Also, don't forget, that you can always ask for help (either in person, or over the phone) in the store where you bought your DROPS yarn from. Happy Knitting!
04.08.2024 - 18:27
![]() Shirley Messerschmidt escreveu:
Shirley Messerschmidt escreveu:
I cant do this. Do you have a regularly pattern. Thanks! this is greek to me.
14.07.2024 - 10:04DROPS Design respondeu:
Dear Shirley, this pattern is only available in the format shown in this webpage, we don't make custom patterns. You can ask us if there is any section that you have difficulty understanding. Happy crochetting!
15.07.2024 - 01:15
![]() Céline V escreveu:
Céline V escreveu:
Bonjour, Après avoir réalisé A2, j ai donc terminé par 2 brides puis 1 arceau et une double bride dans l arceau ; comment commencer le schéma A3 ? Le schéma A3 indique 3 brides dans un arceau puis une maille en l air sur le rang précédent…ce que je n ai pas sur le dernier rang de A2. Pouvez-vous m aider ? Merci
24.05.2024 - 22:34DROPS Design respondeu:
Bonjour Céline, au 1er rang de A.2 vous terminez par 3 brides autour de l'arceau d'1 maille en l'air, puis vous répétez A.3 ainsi: (1 bride dans la 2ème des 3 brides du groupe de brides du rang précédent, 3 bride dans l'arceau d'1 maille en l'air), répétez de *à*. Bon crochet!
27.05.2024 - 09:05
![]() Bettina escreveu:
Bettina escreveu:
I'm not sure but I think there are too much stitches in diagrams A2 and A4. 4 times in the top row there is an extra double crochet which isn't on the other half of the shawl in diagrams A4 and A5. If you crochet it like in the diagram there would be 64 instead of 60 stitches on one side. Could it be a mistake in the diagrams?
03.03.2024 - 13:00DROPS Design respondeu:
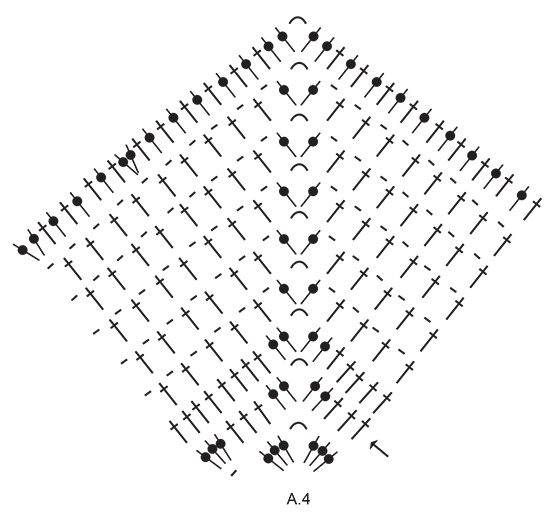
Dear Bettina, on the last row in diagrams, there are 25 sts + 1 ch-space in A.2 + 4 x 4 sts in A.3 + 19 sts before middle ch-space in A.4 = 60 sts; then 24 sts after ch-space in A.4 + 4 x 4 sts in A.4 + 20 sts in A.5 = 60 sts after the middle ch-space. Hope it can help. Happy crocheting!
04.03.2024 - 09:32
![]() Rochas Julie escreveu:
Rochas Julie escreveu:
Bonjour je viens de faire le diagramme 1 mais je ne comprend pas d'où on part pour commencer le n°2. Merci de votre aide c'est un cadeau de Noël qui va finir en cadeau d'anniversaire enfin si j'arrive à le finir
27.02.2024 - 18:29DROPS Design respondeu:
Bonjour Mme Rochas, quand A.1 est terminé, vous devez encore crocheter 1 fois les 2 derniers rangs pour avoir un total de 6 rangs et 12 groupes de brides, crochetez ensuite ainsi, sur l'endroit et en commençant par le rang avec la flèche: A.2 (côté droit du châle, vu sur l'endroit), répétez 4 fois A.3 (jusqu'au dernier groupe de brides avant l'arceau du milieu), crochetez A.4, répétez 4 fois A.3 et terminez par A.5 dans le dernier groupe de brides. Sur l'endroit, crochetez en lisant de gauche à droite: A.5, A.3, A.4, A.3, A.2. Bon crochet!
28.02.2024 - 09:12
![]() Ran escreveu:
Ran escreveu:
Thank you so much for sharing this beautiful pattern. I worked this shawl for 3days and now ready to give my mother-in-law as a new year's gift. Happy new year!
01.02.2024 - 09:58
![]() Julie Dufaj escreveu:
Julie Dufaj escreveu:
I wish you had a diagram showing all of the diagrams put together like a jigsaw puzzle. I don't find this method intuitive at all. But it's what you have experienced, I guess.
27.01.2024 - 22:11
![]() Doris Ouellet escreveu:
Doris Ouellet escreveu:
It was not clear how to do the edges. Very confusing. Why doesn’t it show how to increase
19.09.2023 - 07:58DROPS Design respondeu:
Dear Mrs Ouellet, the increases on the sides as well as on the middle of the shawl are included in the diagrams, so that at the very beg you increase on each side + in the middle as shown in A.1, then increase at the beg of row from RS/end of row from WS as shown in A.2, increase in the middle as shown in A.4 and increase at the end of row from RS/beg of row from WS as shown in A.5. This lesson might help you understanding how to read crochet diagrams. Happy crocheting!
19.09.2023 - 09:31
|
|||||||||||||||||||||||||||||||
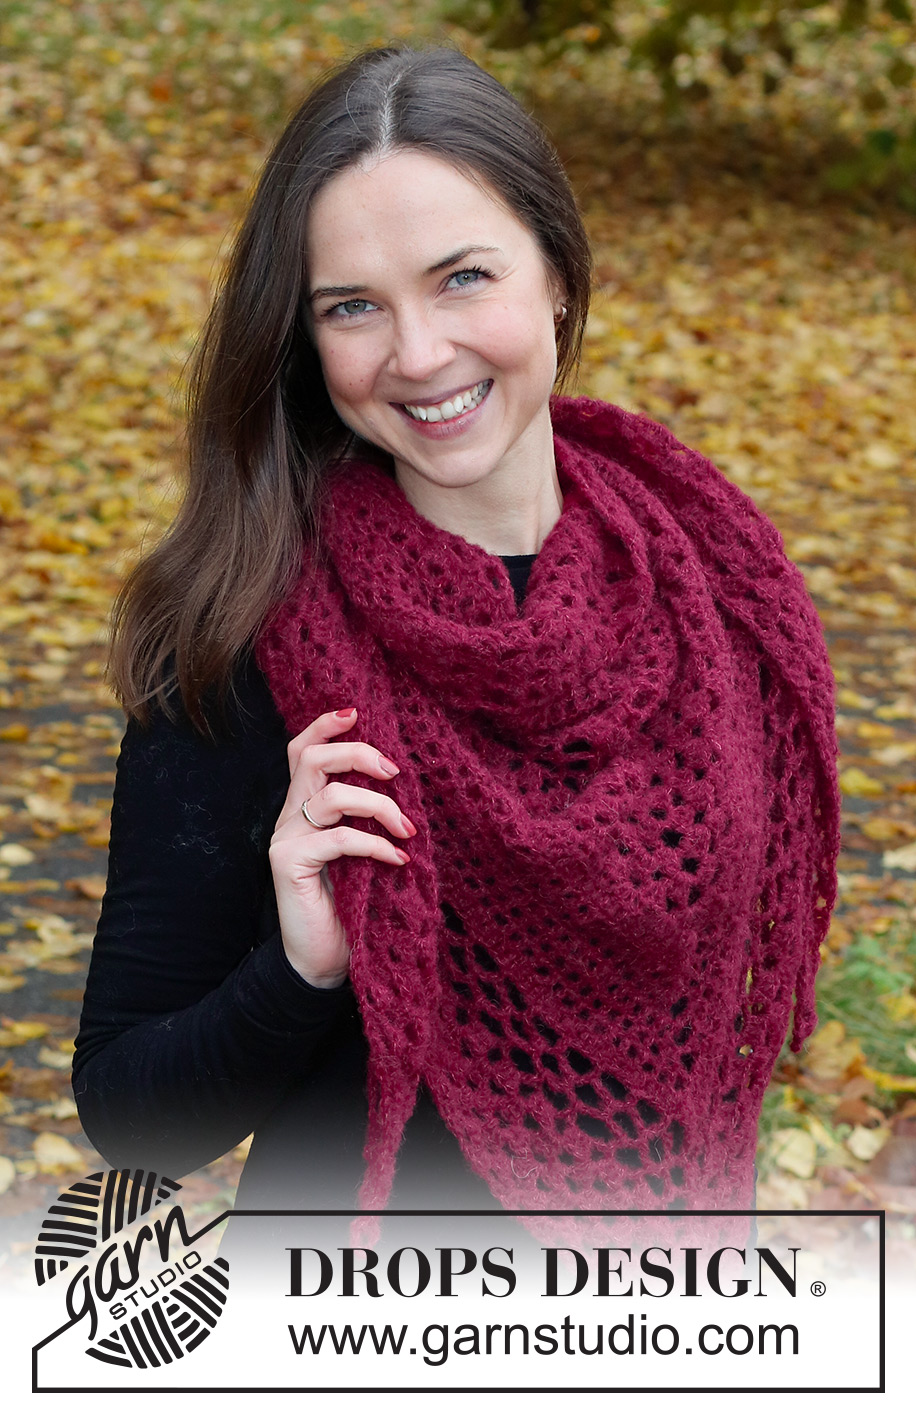
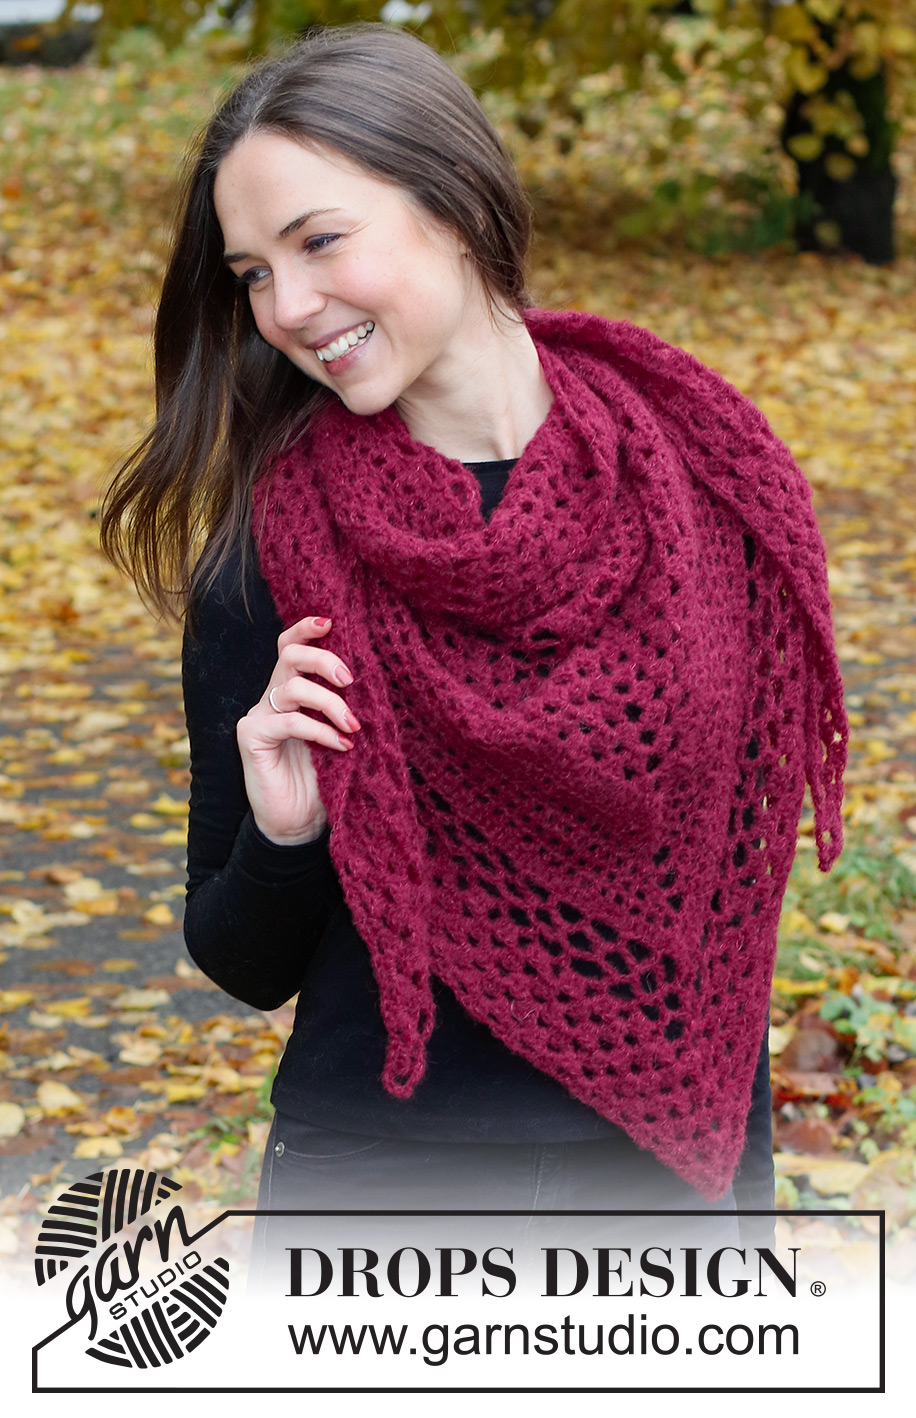
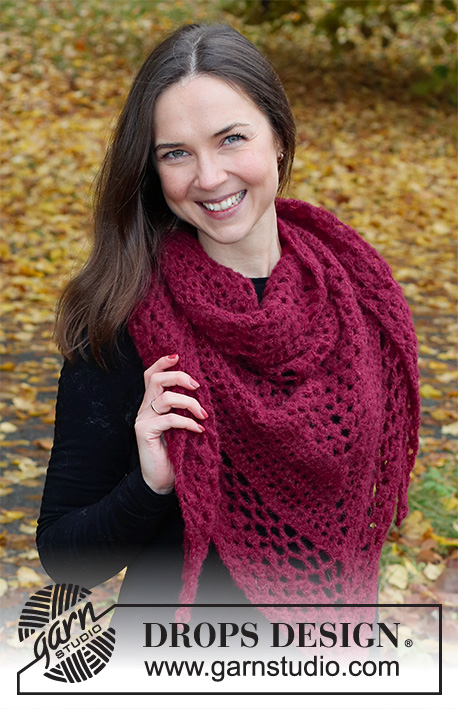
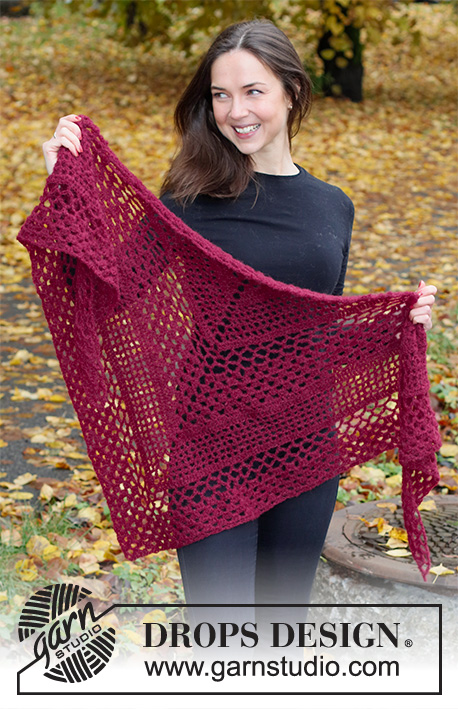
Cranberry Shawl#cranberryshawl |
|||||||||||||||||||||||||||||||
 |
 |
||||||||||||||||||||||||||||||
Xaile crochetado de cima para baixo, em ponto rendado, em DROPS Brushed Alpaca Silk.
DROPS 226-47 |
|||||||||||||||||||||||||||||||
|
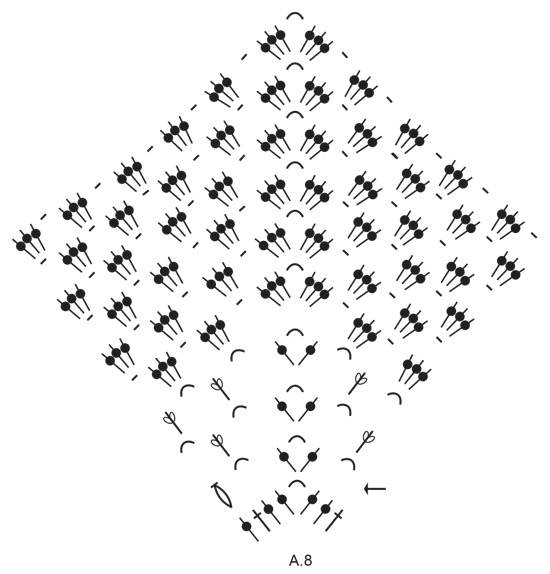
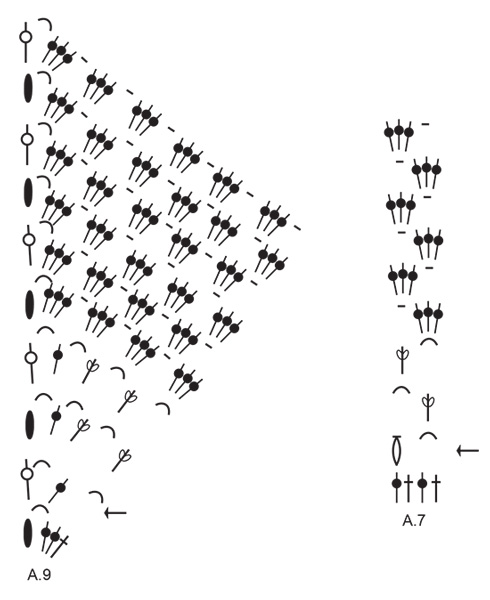
---------------------------------------------------------- TÉCNICAS USADAS: ---------------------------------------------------------- PONTO FANTASIA: Ver diagramas A.1 a A.9. PONTOS CORRENTE: Se crocheta apenas com a ponta da agulha de croché, os pontos corrente serão, na maior parte das vezes, muito baixos; 1 ponto corrente deve ter a mesma altura do que a largura de 1 meio ponto alto/ponto alto/ponto alto duplo. ---------------------------------------------------------- A PEÇA COMEÇA AQUI: ---------------------------------------------------------- XAILE – SUMÁRIO DA PEÇA: Crocheta-se em idas e voltas, de cima para baixo em ponto rendado. XAILE: Crochetar 5 PONTOS CORRENTE – ver acima - com a agulha de croché 5 mm em DROPS Brushed Alpaca Silk, formar um aro com 1 ponto baixíssimo no 1.º ponto corrente. Crochetar o diagrama A.1. Quando A.1 estiver terminado, temos 8 grupos de pontos altos na última carreira. Repetir mais 1 vez as 2 últimas carreiras. Crochetou-se um total de 6 carreiras e temos 12 grupos de pontos altos na última carreira. MANTER A MESMA TENSÃO DA INDICADA PARA A AMOSTRA! Crochetar, então, da seguinte maneira: A.2 (= aumento no lado), repetir 4 vezes A.3 em largura, A.4 (= aumento ao meio), repetir 4 vezes A.3 em largura, A.5 (= aumento no lado). Continuar em idas e voltas desta maneira até A.2 a A.5 estarem terminados. Temos 60 pontos de cada lado do aro a meio do xaile (incluindo os 4 primeiros pontos corrente do princípio da carreira / o ponto alto duplo no fim da carreira – estes pontos contam como 1 ponto de cada lado da peça). Crochetar, então, da seguinte maneira: A.6 (= aumento no lado), repetir 13 vezes A.7 em largura, A.8 (= aumento ao meio), repetir 13 vezes A.7 em largura ao todo, A.9 (= aumento no lado). Quando os diagramas estão terminados, temos 25 grupos de pontos altos de cada lado do aro do meio. Repetir, então, os diagramas a partir da carreira com a flecha em A.2, A.3, A.4 e A.5 da mesma maneira que antes (crochetar tantas vezes A.3 quanto temos pontos entre os diagramas com os aumentos). Crochetar então a partir da carreira com a flecha em A.6, A.7, A.8, A.9 da mesma maneira que antes (crochetar tantas vezes A.7 quantos pontos temos entre os diagramas com os aumentos). Continuar desta maneira até a peça medir cerca de 70 cm ao longo do aro do meio, ou até ao comprimento desejado. Cortar e entretecer o fio. |
|||||||||||||||||||||||||||||||
Explicações do diagrama |
|||||||||||||||||||||||||||||||
|
|||||||||||||||||||||||||||||||
 |
|||||||||||||||||||||||||||||||
 |
|||||||||||||||||||||||||||||||
 |
|||||||||||||||||||||||||||||||
 |
|||||||||||||||||||||||||||||||
 |
|||||||||||||||||||||||||||||||
 |
|||||||||||||||||||||||||||||||
Terminou este projecto?Então, identifique as suas fotos com as tags #dropspattern #cranberryshawl ou mostre-as na galeria #dropsfan. Precisa de ajuda para este modelo?Encontrará 7 turotiais em vídeo, uma rubrica Comentários/Perguntas e muito mais ao visitar a página do modelo em www.garnstudio.com © 1982-2026 DROPS Design A/S. Todos os direitos reservados. Este documento, incluuindo as suas su-secções, tem copyrights. Saia mais o que pode fazer com os nossos modelos no fim de cada uma das páginas do nosso site. |
|||||||||||||||||||||||||||||||


Com mais de 40 anos no design de modelos de tricô e de croché, a DROPS Design oferece uma das mais vastas colecções demodelos gratuitos na Internet - traduzidos em 17 línguas. Neste dia de hoje, temos 324 catálogos e 12290 modelos - dos quais 12271 estão traduzidos em português.
Trabalhamos com muito empenho para lhe proporcionar o melhor que o tricô e o croché têm para oferecer, para lhe fornecer inspiração e conselhos bem como fios da mais elevada qualidade a preços incríveis! Gostaria de usar os nossos modelos para outros fins que não uso pessoal? Pode ler o que lhe é permitido fazer no Copyright texto que se encontra na parte de baixo de todos os nossos modelos. Bom tricô! Bom croché!
Deixe um comentário acerca do modelo DROPS 226-47
Gostaríamos muito de saber o que tem a dizer-nos acerca deste modelo!
Se deixar uma pergunta acerca do modelo, certifique-se de que escolhe a categoria adequada no formulário abaixo para acelerar o processo relativo à resposta. Os campos obrigatórios estão assinalados com um *.