
Categorias populares
Procura um fio?


Comentários / Perguntas (125)
![]() Pirkko Karjalainen escreveu:
Pirkko Karjalainen escreveu:
En saa näkyviin mallineuleen piirroksia. Norjankielisessä ohjeessa ne näkyvät, mutta kääntäminen olisi työlästä. Mikä neuvoksi?
07.07.2021 - 09:01DROPS Design respondeu:
Nyt piirrokset avautuvat taas.
09.07.2021 - 14:16
![]() Susanne Bang Hansen escreveu:
Susanne Bang Hansen escreveu:
Strikker str xl. Efter mønstret har jeg 351 masker( som jeg skal have), når jeg så deler i forstyk, ærmer og ryg, så har jeg 13 masker for meget????
03.07.2021 - 23:52DROPS Design respondeu:
Hei Susanne. Litt usikker på hvor det blir feil hos deg, men du skal strikke 50 masker rett (= ½ bakstykket), sett de neste 76 maskene på en tråd til erme, legg opp 12 nye masker på pinnen (= i siden under ermet), strikk 99 masker rett (= forstykke), sett de neste 76 maskene på en tråd til erme, legg opp 12 nye masker på pinnen (= i siden under ermet), strikk de siste 50 masker rett (= ½ bakstykket). Om man ser bort fra de 24 ny maskene stemmer maskeantallet. 50+76+99+76+50= 351 masker. Kankje du har blandet noen størrelser? mvh DROPS design
05.07.2021 - 14:54
![]() Astrid escreveu:
Astrid escreveu:
Det står ingen plass i mønstret at kastene skal strikkes vridd,dette bør stå hvis det erslik det skal være
03.07.2021 - 15:31
![]() Bodil escreveu:
Bodil escreveu:
Så hvis jeg forstår det riktig da, skal omgang 6 strikkes bare rettmasker.
29.06.2021 - 10:56DROPS Design respondeu:
Hej Bodil. Ja det stämmer. Mvh DROPS Design
29.06.2021 - 11:15
![]() Bodil escreveu:
Bodil escreveu:
Hei. Jeg har kommet til omgang 6 hvor den mørke trekant-symbolet er. Er det over 2 omganger, eller er det på omgang 7? Skjønner ikke helt dette.
29.06.2021 - 07:07DROPS Design respondeu:
Hej Bodil. Det er på omgang 7. Mvh DROPS Design
29.06.2021 - 08:01
![]() Lene escreveu:
Lene escreveu:
A2, etter siste stjerne(som skal være 7m) viser diagrammet 3m på linjene over. Hvordan? Jeg sitter med altfor mye masker!!! Ser ut som dette er et problem som gjentar seg, er det noen som ser på dette?
27.06.2021 - 11:37DROPS Design respondeu:
Hei Lene, Stjerne symbol betyr at du skal strikke 7-7-7-9-9-9 masker i samme masken, som gir deg de økte maskene på linjen over (se symbolforklaring over diagrammene). Håper dette hjelper og god fornøyelse!
28.06.2021 - 09:07
![]() Bodil escreveu:
Bodil escreveu:
Jeg lurer på om kastene skal strikkes vridd vrang eller vridd rett?
27.06.2021 - 01:22DROPS Design respondeu:
Hei Bodil, Hvis du har en åpen rute i linje over kastet skal det strikkes vridd rett, hvis det er en rute med kors, skal det strikkes vridd vrang. God fornøyelse!
28.06.2021 - 09:10
![]() Ida Eline Sørensen escreveu:
Ida Eline Sørensen escreveu:
Hei. Jeg forstår ikke hvordan jeg skal lese diagram A2. Skal en og en av rapportene strikkes? Hvordan henger de sammen? Skal det være noen masker med kun rett, strikkes ett og ett diagram eller flere samtidig? Dette var en forvirrende oppskrift. Takk for svar på forhånd. Strikker forresten str.s.
17.06.2021 - 21:48DROPS Design respondeu:
Hei Ida Eline, Du strikker A.2 i ett, så første omgang: 3 vrang, 1 rett, 3 vrang og 1 rett. Gjenta dette på omgangen. Når du er på omgang 3, skal du strikke 3 masker i stjernemasken (som forklart rett over diagrammene) slik at du kan strikke alle maskene i omgang 4. Håper dette hjelper og god fornøyelse!
18.06.2021 - 07:17
![]() Roswitha Zu Dritten escreveu:
Roswitha Zu Dritten escreveu:
Die letzte Frage habe ich mir selbst bewntworten können. Hab zu schnell aufgegeben. Jetzt läuft es. Aber trotzdem herzlichen Dank für die schnelle Hilfe. Habt einen schönen Freitag
11.06.2021 - 15:22
![]() Roswitha escreveu:
Roswitha escreveu:
Herzlichen Dank für die schnelle Antwort. Uns schon hab ich ein neues Problem. Wie stricke ich weiter? Ich beginne nach Vorlage 1re-2li-1re-2 li-1re. So, dann stricke ich aus der einen Masche 9 Maschen. Dann bleiben aber noch so viele Maschen übrig. Ignoriere ich die und fahre mit dem Muster einfach weiter? Entschuldigung, wenn ich so viel nachfrage hab bestimmt 30 Jahre nicht mehr richtig gestrickt.
11.06.2021 - 15:05DROPS Design respondeu:
Liebe Roswitha, nach der 3. Reihe in A.2 haben Sie 8 Maschen zugenommen und 2 Maschen abgenommen (= 10 M - 2 + 8= 16 M in jedem A.2), bei der 4. Reihe in A.2 stricken Sie: 1 re, 2 li, 1 re, 2 li, 1 re (= die 1. Hälfte von A.2) und jetzt stricken Sie die 9 Maschen rechts = 16 Maschen. Bei der 5. Reihe nehmen Sie 2 M in die 1. Hälfte ab = 14 M, bei der 7. Reihe nehmen Sie noch 2 M ab = 12 M und bei der 9. Reihe nochmal = 10 M, bei der 11. Reihe nehmen Sie dieses Mal in die 1. Hälfte (Sternchen) zu und in die 2. Hälfte ab. Hoffentlich kann es Ihnen helfen. Viel Spaß beim stricken!
11.06.2021 - 17:18
|
|||||||||||||||||||||||||
Swing by Spring Top#swingbyspringtop |
|||||||||||||||||||||||||
 |
 |
||||||||||||||||||||||||
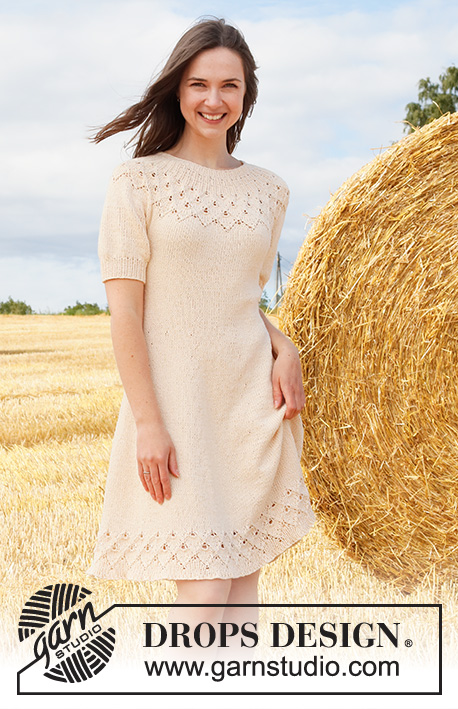
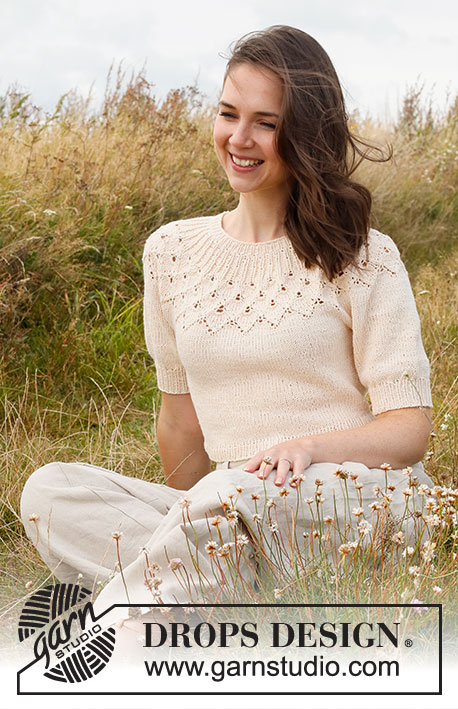
Pulôver tricotado de cima para baixo com encaixe arredondado, ponto rendado, ponto de folhas e mangas balão curtas, em DROPS Belle. Do S ao XXXL
DROPS 222-32 |
|||||||||||||||||||||||||
|
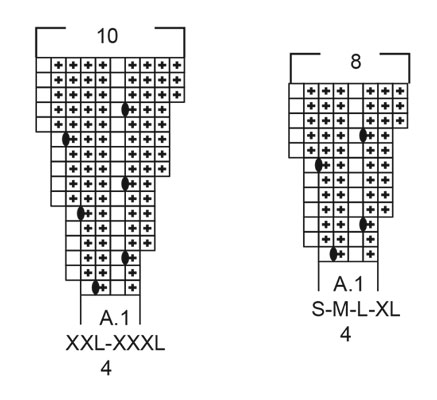
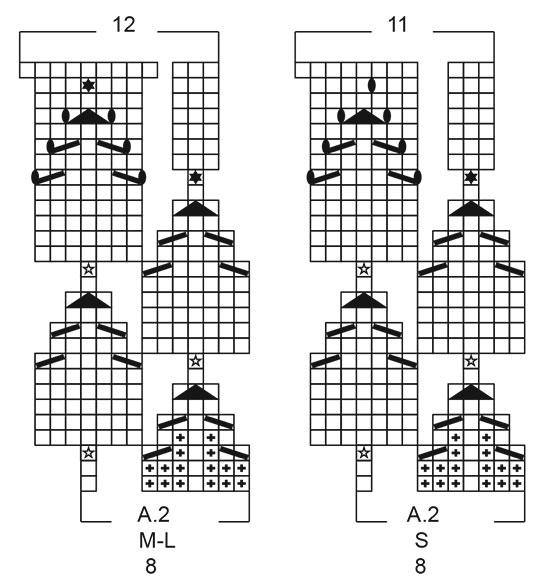
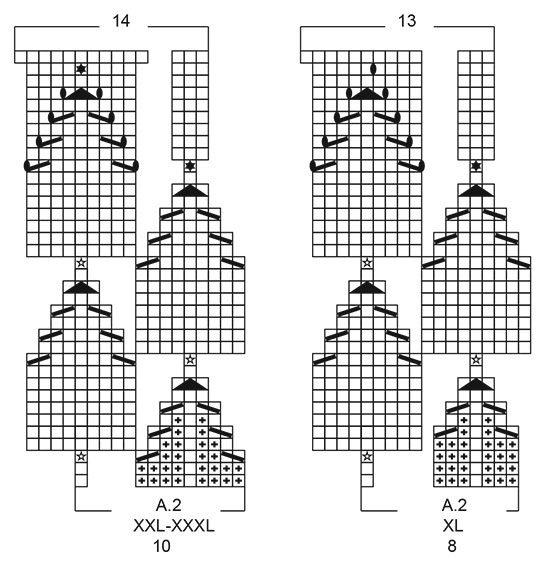
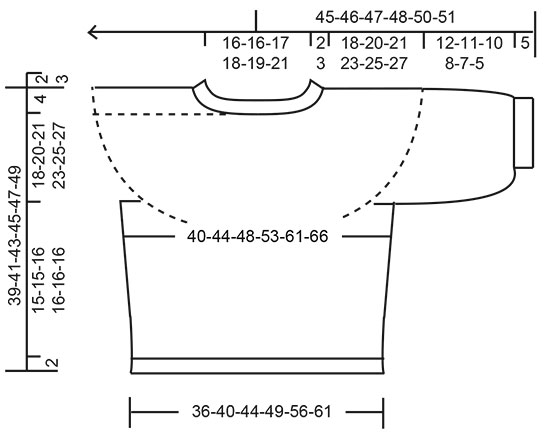
------------------------------------------------------- TÉCNICAS USADAS: ------------------------------------------------------- PONTO FANTASIA: Ver os diagramas A.1 e A.2. Ver diagrama indicado para cada tamanho. DIMINUIÇÕES (lados do top): Diminuir 1 malha de cada lado do fio marcador da seguinte maneira: Tricotar até restarem 3 malhas antes do fio marcador e tricotar 2 malhas juntamente em meia, 2 malhas meia (o fio o marcador fica entre estas 2 malhas), deslizar 1 malha em meia, 1 malha meia, passar a malha deslizada por cima da malha tricotada. DICA PARA ARREMATAR: Para evitar que as malhas arrematadas fiquem demasiado apertadas, pode-se arrematar com uma agulha um tamanho acima. Se as malhas arrematadas continuarem apertadas, fazer 1 laçada depois de cerca de cada 4.ª malha e arrematar as laçadas como malhas normais. ------------------------------------------------------- A PEÇA COMEÇA AQUI: ------------------------------------------------------- PULÔVER – SUMÁRIO DA PEÇA: A gola e o encaixe tricotam-se de cima para baixo, em redondo a partir do meio das costas. Divide-se então o encaixe para as costas/a frente e as mangas. As costas/a frente tricotam-se de cima para baixo, em redondo na agulha circular. As mangas tricotam-se em redondo nas agulhas de pontas duplas/a pequena agulha circular, de cima para baixo. GOLA: Montar 100-100-104-108-112-120 malhas com a agulha circular 3 mm em Belle. Tricotar 1 volta meia. Tricotar então em canelado = 1 malha meia/1 malha liga. Quando o canelado medir 2-2-3-3-3-3 cm, continuar com a agulha circular 4 mm. Colocar 1 marcador no princípio da carreira, a meio das costas - vai-se medir o encaixe a partir deste marcador! ENCAIXE: Tricotar A.1 em redondo (= 25-25-26-27-28-30 motivos de 4 malhas). Depois de A.1, temos 200-200-208-216-280-300 malhas. A peça mede, então, 4-4-4-4-6-6 cm a partir do marcador. Tricotar então A.2 em redondo (= 25-25-26-27-28-30 motivos de 8-8-8-8-10-10 malhas). MANTER A MESMA TENSÃO DA INDICADA PARA A AMOSTRA! Depois de A.2, temos 275-300-312-351-392-420 malhas e a peça mede cerca de 14-14-14-17-19-19 cm a partir do marcador (ou seja, 16-16-17-20-22-22 cm a partir da carreira de montagem). Tricotar em ponto meia até a peça medir 18-20-21-23-25-27 cm a partir do marcador. Dividir, então, a peça para as costas/a frente e as mangas. Tricotar a carreira seguinte da seguinte maneira: Tricotar 38-42-44-50-58-63 malhas meia (= ½ costas), colocar as 62-66-68-76-80-84 malhas seguintes num alfinete de malhas para a manga, montar 8-8-12-12-12-12 malhas (= lado, sob a manga), tricotar 75-84-88-99-116-126 malhas meia (= frente), colocar as 62-66-68-76-80-84 malhas seguintes num alfinete de malhas para a manga, montar 8-8-12-12-12-12 malhas (= lado, sob a manga), tricotar as 38-42-44-50-58-63 últimas malhas em meia (= ½ costas). Terminar as costas/a frente e as mangas separadamente. MEDIR A PARTIR DAQUI! COSTAS & FRENTE: = 167-184-200-223-256-276 malhas. Colocar 1 fio marcador a meio das 8-8-12-12-12-12 novas malhas sob cada manga (= referências para os lados do top). Temos, então, 83-92-100-111-128-138 malhas para a frente e 84-92-100-112-128-138 malhas para as costas. Fazer seguir os fios marcadores à medida que for tricotando; servem para marcar as diminuições. Tricotar em redondo, em ponto meia. Quando a peça medir 3 cm a partir da separação, diminuir 1 malha de cada lado de cada fio marcador – ver DIMINUIÇÕES (= diminui-se 4 malhas). Diminuir desta maneira 4-4-4-4-5-5 vezes ao todo a cada 2 cm = 151-168-184-207-236-256 malhas. Tricotar em redondo, em ponto meia, até a peça medir 15-15-16-16-16-16 cm a partir da separação – ou até ao comprimento desejado (restam cerca de 2 cm antes ao fim). Tricotar 1 volta meia aumentando ao mesmo tempo 23-26-28-31-36-38 malhas a intervalos regulares = 174-194-212-238-272-294 malhas. Continuar com a agulha circular 3 mm em canelado (1 malha meia/1 malha liga) em redondo durante 2 cm. Arrematar as malhas como elas se apresentam – Ver DICA PARA ARREMATAR. O pulôver mede cerca de 39-41-43-45-47-49 cm de altura total a partir do ombro. MANGAS: Retomar as 62-66-68-76-80-84 malhas do alfinete de malhas de um lado da peça para as agulhas de pontas duplas/a pequena agulha circular 4 mm, e levantar 1 malha em cada uma das 8-8-12-12-12-12 novas malhas montadas no lado sob a manga = 70-74-80-88-92-96 malhas. Tricotar em redondo, em ponto meia até a manga medir 12-11-10-8-7-5 cm a partir da separação (restam cerca de 5 cm antes do fim - experimentar o pulôver e tricotar até ao comprimento desejado. Tricotar 1 volta meia diminuindo ao mesmo tempo 16-16-14-14-14-14 malhas a intervalos regulares = 54-58-66-74-78-82 malhas. Continuar com as agulhas de pontas duplas 3 mm. Tricotar em redondo, em canelado = 1 malha meia/1 malha liga durante 5 cm. Arrematar as malhas como elas se apresentam – não esquecer DICA PARA ARREMATAR! A manga mede cerca de 17-16-15-13-12-10 cm a partir da separação. Tricotar a outra manga da mesma maneira. |
|||||||||||||||||||||||||
Explicações do diagrama |
|||||||||||||||||||||||||
|
|||||||||||||||||||||||||
 |
|||||||||||||||||||||||||
 |
|||||||||||||||||||||||||
 |
|||||||||||||||||||||||||
 |
|||||||||||||||||||||||||
Terminou este projecto?Então, identifique as suas fotos com as tags #dropspattern #swingbyspringtop ou mostre-as na galeria #dropsfan. Precisa de ajuda para este modelo?Encontrará 31 turotiais em vídeo, uma rubrica Comentários/Perguntas e muito mais ao visitar a página do modelo em www.garnstudio.com © 1982-2026 DROPS Design A/S. Todos os direitos reservados. Este documento, incluuindo as suas su-secções, tem copyrights. Saia mais o que pode fazer com os nossos modelos no fim de cada uma das páginas do nosso site. |
|||||||||||||||||||||||||


Com mais de 40 anos no design de modelos de tricô e de croché, a DROPS Design oferece uma das mais vastas colecções demodelos gratuitos na Internet - traduzidos em 17 línguas. Neste dia de hoje, temos 324 catálogos e 12290 modelos - dos quais 12271 estão traduzidos em português.
Trabalhamos com muito empenho para lhe proporcionar o melhor que o tricô e o croché têm para oferecer, para lhe fornecer inspiração e conselhos bem como fios da mais elevada qualidade a preços incríveis! Gostaria de usar os nossos modelos para outros fins que não uso pessoal? Pode ler o que lhe é permitido fazer no Copyright texto que se encontra na parte de baixo de todos os nossos modelos. Bom tricô! Bom croché!
Deixe um comentário acerca do modelo DROPS 222-32
Gostaríamos muito de saber o que tem a dizer-nos acerca deste modelo!
Se deixar uma pergunta acerca do modelo, certifique-se de que escolhe a categoria adequada no formulário abaixo para acelerar o processo relativo à resposta. Os campos obrigatórios estão assinalados com um *.