
Categorias populares
Procura um fio?


Comentários / Perguntas (125)
![]() Mette Bodin escreveu:
Mette Bodin escreveu:
Spurgte den 16.04. Nu er hjernen begyndt at fungere, og jeg har fundet ud af opskriften. Undskyld ulejligheden.
18.04.2025 - 17:00
![]() Mette Bodin escreveu:
Mette Bodin escreveu:
Strikker str L. I diagram A.2 efter pind 8 har jeg 208 masker. Pind 9 ender med 12 masker ved udt 7 m og 5 m. 12 masker går ikke op i 208 masker, men giver 17,33 mønsterstrik. her er noget jeg slet ikke forstår-
16.04.2025 - 16:33DROPS Design respondeu:
Hei Mette. Om du setter maskemarkører mellom hvert diagram har du en bedre oversikt. Du strikker 9. rad over 8. rad hele omgangen rundt og det økes med 4 masker per gang du strikker A.2. Så når omgangen er ferdig strikket a 26 rapporter av A.2 x 4 økte masker = 104 masker + 208 masker = 312 masker, som står i oppskriften. Du må ikke tenkte at pinne 9 ender med 12 masker, du må tenkte at du strikker 9. pinne over 8 masker og når 9. pinne er ferdig /10. pinne skal strikkes er det 12 masker. mvh DROPS Design
28.04.2025 - 12:03
![]() Jan escreveu:
Jan escreveu:
I’m a sock knitter but now venturing into knitwear. Knitting size M A1… I’ve knitted around row 1 and done the yarn over increases, on the next round the pattern says to ‘twist’ the yarn over to avoid a large hole. Not sure how you twist that stitch as it falls between two purl stitches.
14.04.2025 - 22:20DROPS Design respondeu:
Hi Jan, The yarn overs are twisted by working through the back loop. Happy Easter!
16.04.2025 - 12:13
![]() Anne-Karin Lihaug Grimstad escreveu:
Anne-Karin Lihaug Grimstad escreveu:
Hvorfor har jeg 100 m mer enn jeg skal ha når A2 er ferdig
27.03.2025 - 11:16DROPS Design respondeu:
Hej Anne-Karin, følger du diagrammet for din størrelse? Hvilken størrelse strikker du? Hvor mange masker har du når du starter diagrammet?
27.03.2025 - 14:09
![]() Kirsten Schou escreveu:
Kirsten Schou escreveu:
Hvordan laver jeg starten på trøjen, hvor den starter med 3vrang 1 ret 3vrang og så er der et hul og1ret hvad skal jeg strikke i "hullet" venlig hilsen Kirsten Schou
18.03.2025 - 15:44DROPS Design respondeu:
Hei Kristen. Du strikker de maskene du ser i diagrammet. Der det er "hull" er det ingen masker. Om du ser på 3. rad (A.2) og masken med stjerne ikonet, så økes det med 6 masker og da fylles "hullet". Se gjerne på hjelpevideoen til blusen: Hvordan strikkes diagram A.2 til DROPS 222-32 og DROPS 223-2 – Del 1 og Hvordan strikkes diagram A.2 til DROPS 222-32 og DROPS 223-2 – Del 2. DU finner videoene til høyre eller under bildene. mvh DROPS Design
24.03.2025 - 10:06
![]() Gullevi Ljungström escreveu:
Gullevi Ljungström escreveu:
Var laddar jag ner mönstret
11.03.2025 - 11:21DROPS Design respondeu:
Hej Gullevi, det ligger her, det er bare at scrolle lidt længere ned :)
14.03.2025 - 12:08
![]() Ute Mehnert escreveu:
Ute Mehnert escreveu:
Ich verstehe das Diagramm A2 nicht, bezüglich der 8 Maschen, wobei der Rapport 11 Maschen beträgt. Ich bitte um Hilfe Lg Ute
21.02.2025 - 17:40DROPS Design respondeu:
Liebe Frau Mehnert, vielleicht können diese beide Videos helfen? Wir zeigen, wie man das Diagram A.2 strickt: Runde 1-9 und Runde 10-28. Viel Spaß beim Stricken!
24.02.2025 - 07:37
![]() Hazel Wilson escreveu:
Hazel Wilson escreveu:
I don't see any free patterns! It goes to a link that does not show any pattern.
24.08.2024 - 21:40DROPS Design respondeu:
Dear Hazel, all of our patterns are free! You can find this one right here in this page; remember to select pattern right under the title of the model to see the full pattern instructions. When you select "FREE PATTERNS" at the top of the page, it should display several pattern types to choose from. Happy knitting!
25.08.2024 - 23:04
![]() Pollie escreveu:
Pollie escreveu:
Ik begrijp niet goed welke scheiding er wordt bedoelt bij het lijf, er staat 3 cm na de scheiding, is dat de scheiding waar 12 steken zijn opgezet en dan die markeerdraad?
04.08.2024 - 15:57
![]() NS escreveu:
NS escreveu:
Further to Randi Rycroft’s question and your answer, Shouldn’t Row 1 of A1 be Purl, knit,purl, yarn over, knit? So then you have 5 stitches, not four? So 10 stitches, not 8 when A1 is done x 27 repeats? I’m confused.
06.06.2024 - 16:55DROPS Design respondeu:
Dear NS, you will work each A.1 over 4 sts (P,K,P,K) but on the very first row you already increase one stitch, so that you have 5 sts in each A.1 at the end of the first row, so in 4th size you have 216 sts and work first row (27 times 4 sts increasing 1 stitch in each of the 27 repeats), so you had 108 sts and have increased 27 sts on the first round = 135 sts and 5 sts in each repeat. Happy knitting!
07.06.2024 - 07:34
|
|||||||||||||||||||||||||
Swing by Spring Top#swingbyspringtop |
|||||||||||||||||||||||||
 |
 |
||||||||||||||||||||||||
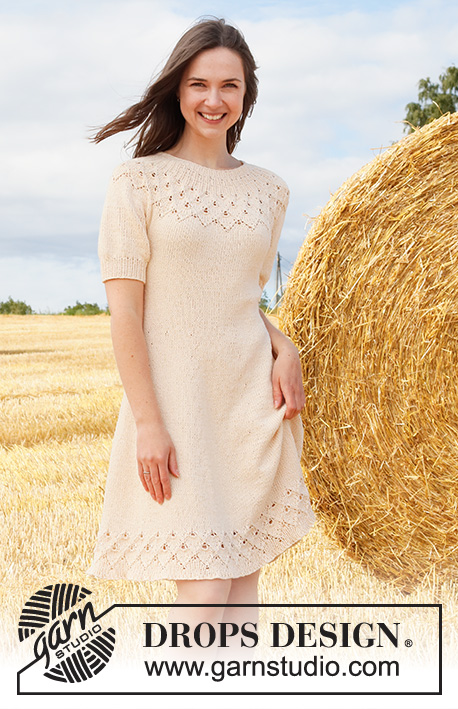
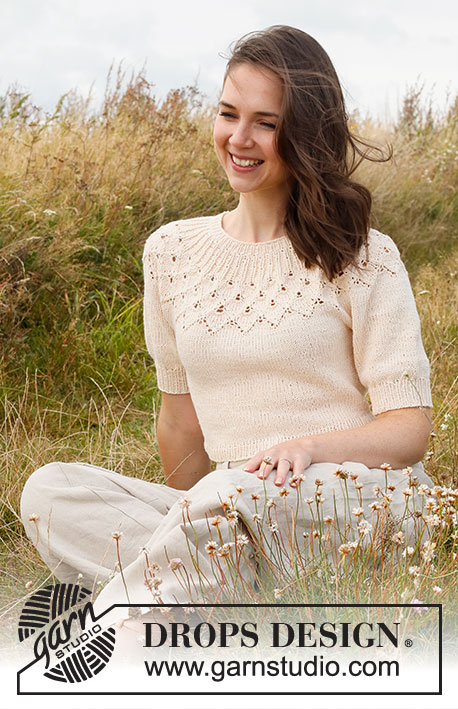
Pulôver tricotado de cima para baixo com encaixe arredondado, ponto rendado, ponto de folhas e mangas balão curtas, em DROPS Belle. Do S ao XXXL
DROPS 222-32 |
|||||||||||||||||||||||||
|
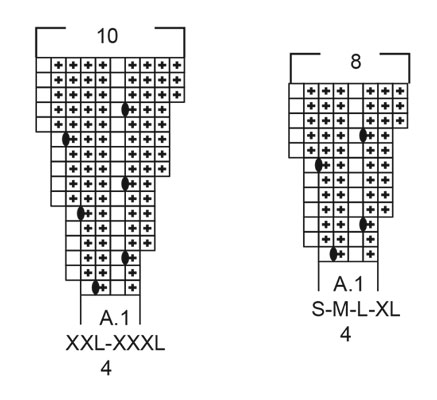
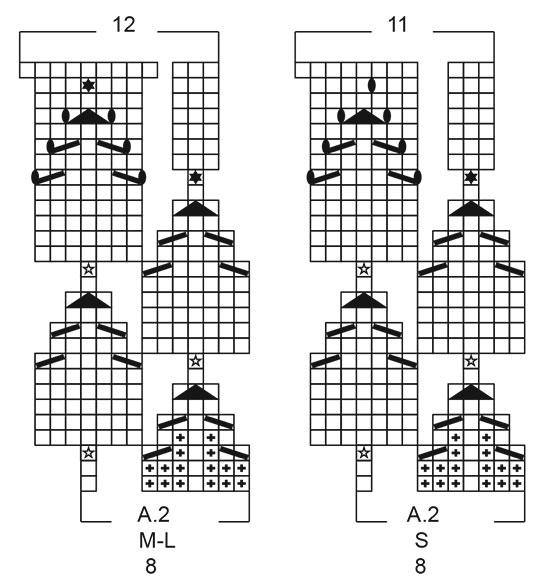
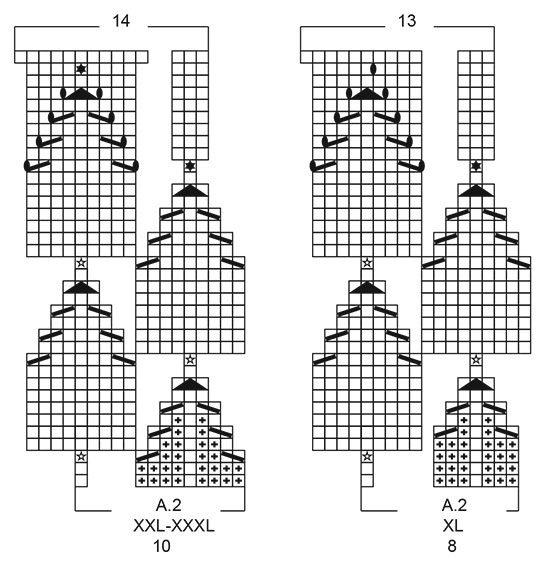
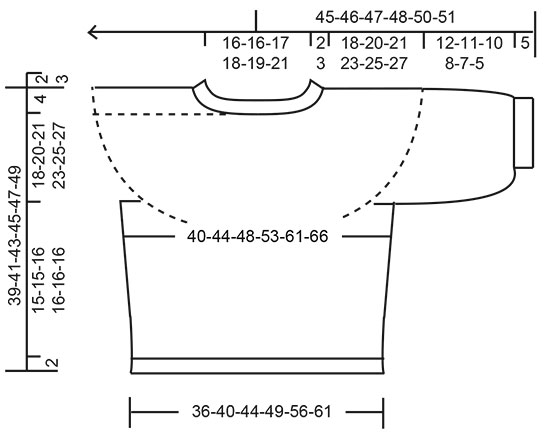
------------------------------------------------------- TÉCNICAS USADAS: ------------------------------------------------------- PONTO FANTASIA: Ver os diagramas A.1 e A.2. Ver diagrama indicado para cada tamanho. DIMINUIÇÕES (lados do top): Diminuir 1 malha de cada lado do fio marcador da seguinte maneira: Tricotar até restarem 3 malhas antes do fio marcador e tricotar 2 malhas juntamente em meia, 2 malhas meia (o fio o marcador fica entre estas 2 malhas), deslizar 1 malha em meia, 1 malha meia, passar a malha deslizada por cima da malha tricotada. DICA PARA ARREMATAR: Para evitar que as malhas arrematadas fiquem demasiado apertadas, pode-se arrematar com uma agulha um tamanho acima. Se as malhas arrematadas continuarem apertadas, fazer 1 laçada depois de cerca de cada 4.ª malha e arrematar as laçadas como malhas normais. ------------------------------------------------------- A PEÇA COMEÇA AQUI: ------------------------------------------------------- PULÔVER – SUMÁRIO DA PEÇA: A gola e o encaixe tricotam-se de cima para baixo, em redondo a partir do meio das costas. Divide-se então o encaixe para as costas/a frente e as mangas. As costas/a frente tricotam-se de cima para baixo, em redondo na agulha circular. As mangas tricotam-se em redondo nas agulhas de pontas duplas/a pequena agulha circular, de cima para baixo. GOLA: Montar 100-100-104-108-112-120 malhas com a agulha circular 3 mm em Belle. Tricotar 1 volta meia. Tricotar então em canelado = 1 malha meia/1 malha liga. Quando o canelado medir 2-2-3-3-3-3 cm, continuar com a agulha circular 4 mm. Colocar 1 marcador no princípio da carreira, a meio das costas - vai-se medir o encaixe a partir deste marcador! ENCAIXE: Tricotar A.1 em redondo (= 25-25-26-27-28-30 motivos de 4 malhas). Depois de A.1, temos 200-200-208-216-280-300 malhas. A peça mede, então, 4-4-4-4-6-6 cm a partir do marcador. Tricotar então A.2 em redondo (= 25-25-26-27-28-30 motivos de 8-8-8-8-10-10 malhas). MANTER A MESMA TENSÃO DA INDICADA PARA A AMOSTRA! Depois de A.2, temos 275-300-312-351-392-420 malhas e a peça mede cerca de 14-14-14-17-19-19 cm a partir do marcador (ou seja, 16-16-17-20-22-22 cm a partir da carreira de montagem). Tricotar em ponto meia até a peça medir 18-20-21-23-25-27 cm a partir do marcador. Dividir, então, a peça para as costas/a frente e as mangas. Tricotar a carreira seguinte da seguinte maneira: Tricotar 38-42-44-50-58-63 malhas meia (= ½ costas), colocar as 62-66-68-76-80-84 malhas seguintes num alfinete de malhas para a manga, montar 8-8-12-12-12-12 malhas (= lado, sob a manga), tricotar 75-84-88-99-116-126 malhas meia (= frente), colocar as 62-66-68-76-80-84 malhas seguintes num alfinete de malhas para a manga, montar 8-8-12-12-12-12 malhas (= lado, sob a manga), tricotar as 38-42-44-50-58-63 últimas malhas em meia (= ½ costas). Terminar as costas/a frente e as mangas separadamente. MEDIR A PARTIR DAQUI! COSTAS & FRENTE: = 167-184-200-223-256-276 malhas. Colocar 1 fio marcador a meio das 8-8-12-12-12-12 novas malhas sob cada manga (= referências para os lados do top). Temos, então, 83-92-100-111-128-138 malhas para a frente e 84-92-100-112-128-138 malhas para as costas. Fazer seguir os fios marcadores à medida que for tricotando; servem para marcar as diminuições. Tricotar em redondo, em ponto meia. Quando a peça medir 3 cm a partir da separação, diminuir 1 malha de cada lado de cada fio marcador – ver DIMINUIÇÕES (= diminui-se 4 malhas). Diminuir desta maneira 4-4-4-4-5-5 vezes ao todo a cada 2 cm = 151-168-184-207-236-256 malhas. Tricotar em redondo, em ponto meia, até a peça medir 15-15-16-16-16-16 cm a partir da separação – ou até ao comprimento desejado (restam cerca de 2 cm antes ao fim). Tricotar 1 volta meia aumentando ao mesmo tempo 23-26-28-31-36-38 malhas a intervalos regulares = 174-194-212-238-272-294 malhas. Continuar com a agulha circular 3 mm em canelado (1 malha meia/1 malha liga) em redondo durante 2 cm. Arrematar as malhas como elas se apresentam – Ver DICA PARA ARREMATAR. O pulôver mede cerca de 39-41-43-45-47-49 cm de altura total a partir do ombro. MANGAS: Retomar as 62-66-68-76-80-84 malhas do alfinete de malhas de um lado da peça para as agulhas de pontas duplas/a pequena agulha circular 4 mm, e levantar 1 malha em cada uma das 8-8-12-12-12-12 novas malhas montadas no lado sob a manga = 70-74-80-88-92-96 malhas. Tricotar em redondo, em ponto meia até a manga medir 12-11-10-8-7-5 cm a partir da separação (restam cerca de 5 cm antes do fim - experimentar o pulôver e tricotar até ao comprimento desejado. Tricotar 1 volta meia diminuindo ao mesmo tempo 16-16-14-14-14-14 malhas a intervalos regulares = 54-58-66-74-78-82 malhas. Continuar com as agulhas de pontas duplas 3 mm. Tricotar em redondo, em canelado = 1 malha meia/1 malha liga durante 5 cm. Arrematar as malhas como elas se apresentam – não esquecer DICA PARA ARREMATAR! A manga mede cerca de 17-16-15-13-12-10 cm a partir da separação. Tricotar a outra manga da mesma maneira. |
|||||||||||||||||||||||||
Explicações do diagrama |
|||||||||||||||||||||||||
|
|||||||||||||||||||||||||
 |
|||||||||||||||||||||||||
 |
|||||||||||||||||||||||||
 |
|||||||||||||||||||||||||
 |
|||||||||||||||||||||||||
Terminou este projecto?Então, identifique as suas fotos com as tags #dropspattern #swingbyspringtop ou mostre-as na galeria #dropsfan. Precisa de ajuda para este modelo?Encontrará 31 turotiais em vídeo, uma rubrica Comentários/Perguntas e muito mais ao visitar a página do modelo em www.garnstudio.com © 1982-2026 DROPS Design A/S. Todos os direitos reservados. Este documento, incluuindo as suas su-secções, tem copyrights. Saia mais o que pode fazer com os nossos modelos no fim de cada uma das páginas do nosso site. |
|||||||||||||||||||||||||


Com mais de 40 anos no design de modelos de tricô e de croché, a DROPS Design oferece uma das mais vastas colecções demodelos gratuitos na Internet - traduzidos em 17 línguas. Neste dia de hoje, temos 324 catálogos e 12290 modelos - dos quais 12271 estão traduzidos em português.
Trabalhamos com muito empenho para lhe proporcionar o melhor que o tricô e o croché têm para oferecer, para lhe fornecer inspiração e conselhos bem como fios da mais elevada qualidade a preços incríveis! Gostaria de usar os nossos modelos para outros fins que não uso pessoal? Pode ler o que lhe é permitido fazer no Copyright texto que se encontra na parte de baixo de todos os nossos modelos. Bom tricô! Bom croché!
Deixe um comentário acerca do modelo DROPS 222-32
Gostaríamos muito de saber o que tem a dizer-nos acerca deste modelo!
Se deixar uma pergunta acerca do modelo, certifique-se de que escolhe a categoria adequada no formulário abaixo para acelerar o processo relativo à resposta. Os campos obrigatórios estão assinalados com um *.