
Categorias populares
Procura um fio?


Comentários / Perguntas (18)
![]() Ellen escreveu:
Ellen escreveu:
Jeg er usikker på hva dere mener med størrelsene når det står: STØRRELSE: 2 - 3/5 - 6/9 - 10/12 år Betyr det størrelse 2-3 år, 5-6 år, 9-10 år og 12 år. Eller betyr det 2 år, 3/5 år, 6/9 år og 10/12 år. Jeg oppfattet det første, så jeg tenker å strikke 5-6 år. Blir det riktig?
16.03.2026 - 15:23DROPS Design respondeu:
Hei Ellen, Minste størrelse er til 2 år, neste størrelse 3-5 år, så 6-9 år og største størrelse 10-12 år. Vennlig hilsen, Drops Team.
17.03.2026 - 06:40
![]() Birgit escreveu:
Birgit escreveu:
Udtagning, er det 7 masker på hver side af midten
18.10.2025 - 10:11DROPS Design respondeu:
Hei Birgit. Det økes på innsiden av de ytterste 7 maskene mot midt foran. Når arbeidet måler 8-8-9-9 cm fra der merketråden ble satt, økes det 1 maske i hver side mot midt foran – les ØKETIPS (= 2 masker økt). Øk slik på hver 4.pinne (dvs på annenhver pinne fra retten) totalt 8 ganger i hver side = 8 masker i hver side = 16 økte masker. mvh DROPS Design
20.10.2025 - 14:34
![]() Alicia escreveu:
Alicia escreveu:
Fabulous pattern but I am struggling with the increases. My first yo is between p stitches - p, yo, p On the next knit row how do I manage these? I’ve read the comments and I’m still not getting it. At some point there has to be 3 p and 3 k stitches to maintain the pattern. Is that right? Or is the whole pattern moved over by 1 stitch ? thanks for your help.
01.08.2025 - 01:35DROPS Design respondeu:
Dear Alicia, you are working the pattern with 1 edge stitch on each side, so that increasing inside 7 sts will be between the 3rd and 4th stitch in A.1; the new stitches will be worked as en extension of the pattern to the right at the beg of the row and to the left at the end of the row, so that the first 2 sts increased will be worked as 2nd then 1st stitch at the beg of row / 1st and 2nd stitch at the end of the row, and the 6 sts in pattern after/before the edge stitch continue as before. Happy knitting!
01.08.2025 - 08:18
![]() Deni escreveu:
Deni escreveu:
Hi,In regards to increasing,is it done right after the first(garter)stitch at the beginning of the row and right before the garter stitch at the end of the row? Thank you.
23.05.2025 - 07:45DROPS Design respondeu:
Dear Deni, the increases are worked inside the first and last 7 sts - see INCREASE TIP. So work the first 7 sts as before, increase 1 stitch, work remaining sts as before until 7 sts remain, increase 1 stitch, work the last 7 sts as before. Happy knitting!
23.05.2025 - 09:12
![]() K And K escreveu:
K And K escreveu:
Hi. Thanks for answering. I noticed that I had wrong cast on. I'm trying again. Another question. At INCREASES ON EACH SIDE TOWARDS MID FRONT, should I yarn over at the very first stitch? I'm making size-4 so I have 88 stitches(29 at right side, 30 at mid, 29 at left side) now. Do I have to yarn over at the stitch 1, or stitch 30(first stitch of MID-SECTION)? And, if I yarn over 1st stitch, do I have to yarn over the same stitch? Or at 3rd stitch(knit the 1st and new stitch).
07.02.2025 - 05:33DROPS Design respondeu:
Dear K and K, increase as explained under INCREASE TIP (for sides of face-opening): at the beg of the pattern, this means increase from RS after the first 7 sts and before the last 7 sts and incorporate the new stitches in pattern as explained. Happy knitting!
07.02.2025 - 15:48
![]() K And K escreveu:
K And K escreveu:
Hi again. If the first row(the purl row) is not included in pattern, should I skip the first row when I knit up the stitches? And I knitted over 40 rows, 9cm. But if I have to knit up the stitches only 25, should I skip some rows?
23.01.2025 - 12:21DROPS Design respondeu:
Dear K and K, we don't pick up stitches in every row, since the opening will be too tight then. If you have 40 rows in 9 cm you are working very tight (since the gauge is 30 rows = 10cm) so you will need to adjust the number of stitches to knit up accordingly. So pick up in approx. 3 of every 4 rows or something similar, so that the number of stitches is correct for working A.1 later on. You don't need to skip the first row. Happy knitting!
25.01.2025 - 20:20
![]() Peppi escreveu:
Peppi escreveu:
En ymmärrä, miten lisäykset neulotaan mukaan kuvioon?
22.01.2025 - 20:47DROPS Design respondeu:
Hei, lisätyillä silmukoilla neulotaan piirroksen A.1 mallineuletta seuraavasti: Neulo 2 ensimmäisellä lisätyllä silmukalla sileää neuletta, neulo seuraavilla 2 lisätyllä silmukalla ainaoikeaa, neulo seuraavilla 2 lisätyllä silmukalla sileää neuletta jne.
24.01.2025 - 18:33
![]() K And K escreveu:
K And K escreveu:
Hi. Thanks for the nice pattern. I have a few questions. 1. At the beginning, is the very first row not included in pattern? Should I purl all stitches including the edge? 2. For the 1 edge stitch in GARTER STITCH - do I have to knit all the edge stitches? 3. When I knit the edges, knit rows have holes but purl rows don\'t. Should I knit up stitches only odd rows(except the first purl row)? 4. When should I knit up stitches? At the right side, or the wrong side?
21.01.2025 - 07:48DROPS Design respondeu:
Dear K And K, the very first row purled from WS is worked before starting pattern ie not included in diagram and worked extra. When working 1 edge stitch in garter stitch, knit this stitch from both right and wrong side. Pattern A.1 is like broken rib, ie, seen from RS, 2 sts in stocking stitch (first 2 sts A.1), 2 sts in garter stitch (last 2 sts A.1). Happy knitting!
21.01.2025 - 16:21
![]() Ouahida escreveu:
Ouahida escreveu:
Hi please I don’t understand how to do the increases 😴
28.12.2024 - 10:23DROPS Design respondeu:
Dear Ouahida, as you work back and forth, you should see the edges that form the opening of the balaclava. The stitches closest to this face opening (or mid-front) would be the outermost stitches (from the mid back of the piece). So before /after the last and first 7 stitches in the row, you will increase 1 stitch (= 2 in total in the row). This increase is worked 8 times in total on alternate right side rows (you never increase on the wrong side and only increase in one of every two right side rows). The yarn overs are worked twisted and then worked in the pattern: alternating between stocking stitch or garter stitch depending on the stitches before/after them. Happy knitting!
30.12.2024 - 01:29
![]() Argene Revelant escreveu:
Argene Revelant escreveu:
Bonjour, j'aime beaucoup vos modèles, mais, pour celui-ci, je ne vois pas le diagramme. Merci
28.01.2024 - 15:32DROPS Design respondeu:
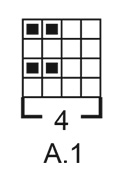
Bonjour Mme Revelant et merci. Le diagramme A.1 se trouve tout à la fin des explications, il se tricote sur 4 mailes et 4 rangs. Bon tricot!
29.01.2024 - 12:14
|
|||||||
Northern Spirit Kids#northernspiritbalaclava |
|||||||
 |
 |
||||||
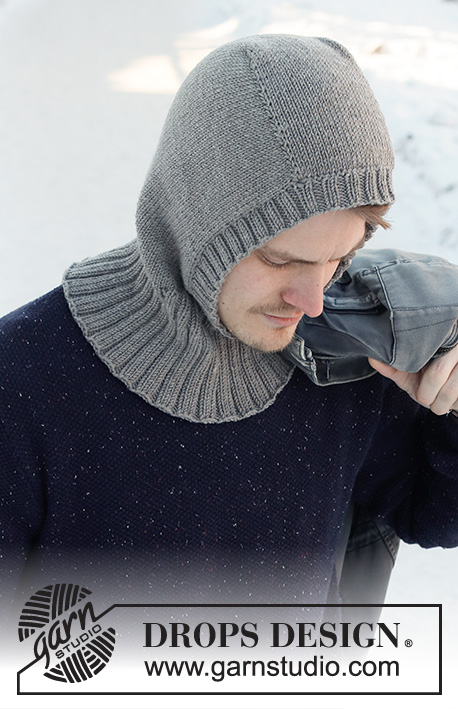
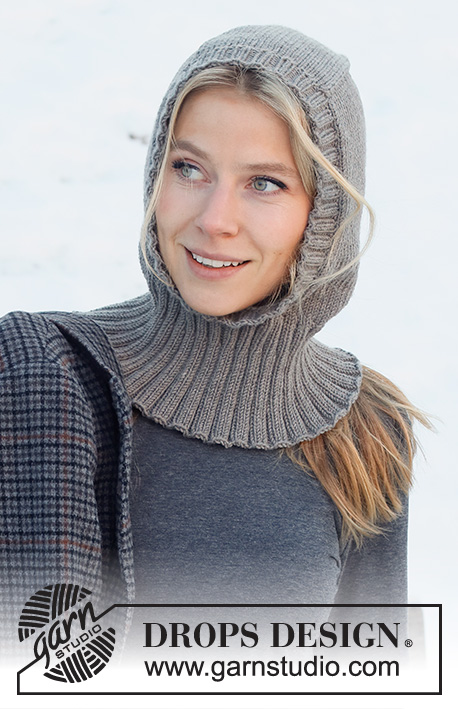
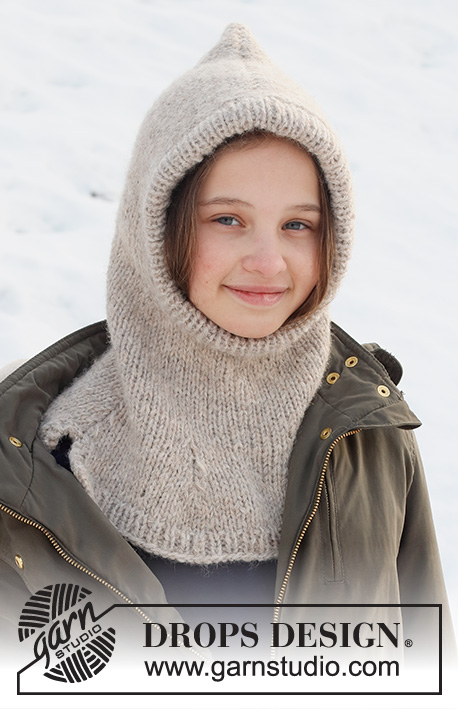
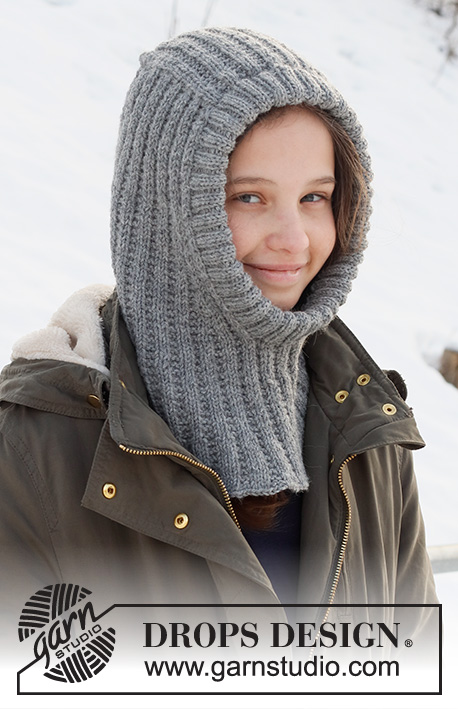
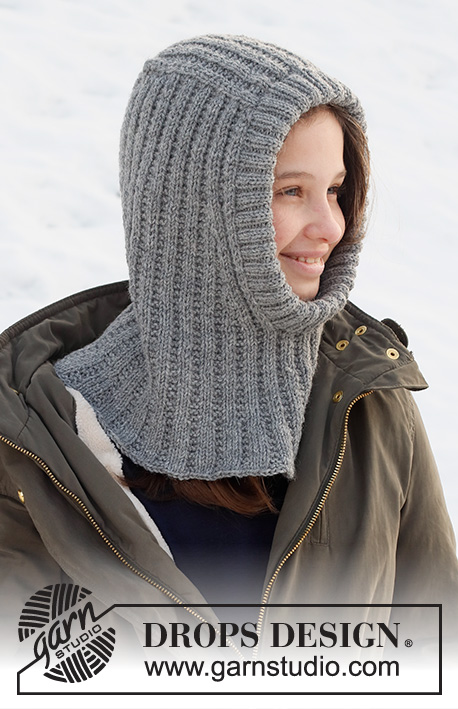
Capuz / Balaclava tricotado para criança em DROPS Lima, com ponto texturado e orla em canelado. Tamanhos : 2 - 12 anos.
DROPS Children 37-28 |
|||||||
|
------------------------------------------------------- TÉCNICAS USADAS: ------------------------------------------------------- PONTO JARRETEIRA (em idas e voltas): Tricotar todas as carreiras em meia. 1 barra jarreteira = Tricotar 2 carreiras meia. PONTO FANTASIA: Ver diagrama A.1. O diagrama mostra todas as carreiras, vistas pelo direito. AUMENTOS (de cada lado da peça da abertura para a cara): Aumentar a 7 malhas do rebordo de cada lado da peça. Todos os aumentos são feitos pelo direito! Para aumentar 1 malha, fazer 1 laçada. Na carreira seguinte (pelo avesso), tricotar as laçadas torcidas para evitar buracos. Tricotar as malhas seguindo A.1, ou seja tricotar as 2 primeiras malhas em ponto meia, as 2 seguintes em ponto jarreteira, as 2 seguintes em ponto meia, etc…. DIMINUIÇÕES (meio da parte de trás): Todas as diminuições são feitas pelo direito! Começando 4 malhas antes do fio marcador da meio da parte de trás, tricotar 2 malhas juntamente em meia, 4 malhas meia (o fio marcador fica entre estas 4 malhas), deslizar 1 malha em meia, 1 malha meia e passar a malha deslizada por cima a malha tricotada (= diminui-se 2 malhas). DICA PARA ARREMATAR: Para evitar que as malhas arrematadas fiquem demasiado apertadas, pode-se arrematar com uma agulha um tamanho acima. Se as malhas arrematadas continuarem apertadas, fazer 1 laçada depois de cerca de cada 8.ª malha e arrematar as laçadas como malhas normais. ------------------------------------------------------- A PEÇA COMEÇA AQUI: ------------------------------------------------------- CAPUZ – SUMÁRIO DA PEÇA: Começar por tricotar a parte do meio do alto da cabeça, em idas e voltas na agulha circular, a partir do meio da frente. Levantam-se então malhas de cada lado dessa parte e continua-se em idas e voltas, depois, montam-se malhas a meio da frente. Tricota-se então o fim do capuz em redondo na agulha circular. Termina-se com uma orla em canelado à volta da abertura para a cara. PARTE DO MEIO: Montar 24-28-32-32 malhas (incluindo 1 malha ourela de cada lado da peça) com a agulha circular 3,5 mm em Lima. Tricotar 1 carreira liga pelo avesso. Tricotar então a carreira seguinte pelo direito da seguinte maneira: 1 malha ourela em ponto jarreteira – ver acima -, tricotar seguindo A.1 até restarem 3 malhas, tricotar as 2 primeiras malhas de A.1 (o ponto fantasia começa e termina da mesma maneira) e terminar com 1 malha ourela em ponto jarreteira. Continuar desta maneira. MANTER A MESMA TENSÃO DA INDICADA PARA A AMOSTRA! Quando a peça medir 9-11-11-13 cm, arrematar 1 malha ourela de cada lado da peça = 22-26-30-30 malhas. Cortar o fio. Tricotar então o capuz como indicado abaixo. CAPUZ: Levantar , então, pelo direito de cada lado da parte do meio da seguinte maneira: Levantar, a 1 malha ourela do rebordo, 21-25-25-29 ao longo do lado da primeira parte, continuar A.1 como antes por cima das 22-26-30-30 malhas na agulha e levantar, a 1 malha ourela do rebordo, 21-25-25-29 malhas ao longo do outro lado da primeira parte = 64-76-80-88 malhas. Colocar 1 fio marcador a meio da carreira (= meio da parte de trás). Fazer seguir o fio marcador à medida que for tricotando. Irá servir mais tarde quando se diminuir a meio da parte de trás. MEDIR A PARTIR DAQUI ONDE ESTE FIO MARCADOR FOI COLOCADO. Continuar A.1 em idas e voltas com 1 malha ourela em ponto jarreteira de cada lado da peça – o ponto fantasia deve ajustar-se e ficar por cima das malhas da primeira parte. Aumentar então de cada lado da peça e diminuir a meio da parte de trás como indicado abaixo – ler as duas secções seguintes antes de continuar! AUMENTAR DE CADA LADO DA PEÇA: Quando a peça medir 8-8-9-9 cm a partir do fio marcador, aumentar 1 malha de cada lado da peça – ver AUMENTOS (= aumenta-se 2 malhas). Aumentar desta maneira 8 vezes ao todo de cada lado da peça a cada 4 carreiras (ou seja, a cada 2 carreiras pelo direito). DIMINUIR A MEIO DA PARTE DE TRÁS: AO MESMO TEMPO, quando se deve aumentar para a 5.ª vez, diminuir 2 malhas a meio da parte de trás – ver DIMINUIÇÕES. Diminuir desta maneira 4 vezes ao todo a cada 4 carreiras (aumenta-se e diminui-se ao mesmo tempo até ao fim). Quando todos os aumentos e diminuições estiverem feitos, temos 72-84-88-96 malhas. Quando a peça medir 18-18-19-19 cm a partir do fio marcador, montar as malhas para o meio da frente da seguinte maneira – pode-se enfiar o capuz e tricotar até ao comprimento desejado. Montar 12-12-16-16 malhas no fim da carreira seguinte pelo direito = 84-96-104-112 malhas. Retirar o fio marcador e colocar 1 marcador NESTA CARREIRA. MEDIR A PARTIR DESTE FIO MARCADOR. Tricotar a gola como indicado abaixo. PARTE DE BAIXO DO CAPUZ: Continuar em redondo, seguindo A.1 em todas as malhas – ter atenção para ajustar o ponto fantasia de forma a que seja contínuo em toda a carreira. Quando a peça medir 5-6-7-8 cm a partir do marcador da gola, aumentar 1 malha meia em todas as secções de 2 malhas meia fazendo 1 laçada depois de 2 malhas meia (tricotar as laçadas torcidas em meia na carreira seguinte) = 105-120-130-140 malhas. Continuar (= temos, então, 3 malhas meia/2 malhas ponto jarreteira) até a peça medir 8-9-10-11 cm a partir do marcador. Aumentar, então, 1 malha em todas as secções de 2 malhas em ponto jarreteira fazendo 1 laçada depois de 2 malhas ponto jarreteira = 126-144-156-168 malhas. Na carreira seguinte, tricotar 3 malhas meia, 3 malhas em ponto jarreteira em toda a carreira (tricotar as laçadas torcidas para evitar buracos). Tricotar então 1 volta liga, e arrematar frouxamente em meia – Ver DICA PARA ARREMATAR. A peça medir cerca de 32-34-36-38 cm a partir do meio da parte de cima da cabeça. ORLA À VOLTA DA ABERTURA PARA A CARA: Começando pelo direito, na parte de baixo, ao nível das malhas montadas a meio da frente, levantar, a 1 malha ourela do rebordo, 136-140-148-152 malhas a toda a volta da abertura, com a pequena agulha circular 3 mm em Lima. O número de malhas deve ser múltiplo de 4. Tricotar em redondo, em canelado (2 malhas meia, 2 malhas liga) durante 5-6-6-6 cm – ter atenção para que o canelado siga as malhas da parte central e das malhas montadas a meio da frente. Arrematar frouxamente as malhas como elas se apresentam – Ver DICA PARA ARREMATAR. Dobrar o canelado ao meio pelo avesso e costurar. Para evitar que a gola fique demasiado apertada e para evitar que vire, a costura deve ter elasticidade. |
|||||||
Explicações do diagrama |
|||||||
|
|||||||
 |
|||||||
Terminou este projecto?Então, identifique as suas fotos com as tags #dropspattern #northernspiritbalaclava ou mostre-as na galeria #dropsfan. Precisa de ajuda para este modelo?Encontrará 25 turotiais em vídeo, uma rubrica Comentários/Perguntas e muito mais ao visitar a página do modelo em www.garnstudio.com © 1982-2026 DROPS Design A/S. Todos os direitos reservados. Este documento, incluuindo as suas su-secções, tem copyrights. Saia mais o que pode fazer com os nossos modelos no fim de cada uma das páginas do nosso site. |
|||||||


Com mais de 40 anos no design de modelos de tricô e de croché, a DROPS Design oferece uma das mais vastas colecções demodelos gratuitos na Internet - traduzidos em 17 línguas. Neste dia de hoje, temos 324 catálogos e 12290 modelos - dos quais 12271 estão traduzidos em português.
Trabalhamos com muito empenho para lhe proporcionar o melhor que o tricô e o croché têm para oferecer, para lhe fornecer inspiração e conselhos bem como fios da mais elevada qualidade a preços incríveis! Gostaria de usar os nossos modelos para outros fins que não uso pessoal? Pode ler o que lhe é permitido fazer no Copyright texto que se encontra na parte de baixo de todos os nossos modelos. Bom tricô! Bom croché!
Deixe um comentário acerca do modelo DROPS Children 37-28
Gostaríamos muito de saber o que tem a dizer-nos acerca deste modelo!
Se deixar uma pergunta acerca do modelo, certifique-se de que escolhe a categoria adequada no formulário abaixo para acelerar o processo relativo à resposta. Os campos obrigatórios estão assinalados com um *.