
Popular categories
Looking for a yarn?


Comments / Questions (6)
![]() JACQUELINE LAURENT wrote:
JACQUELINE LAURENT wrote:
Une autre question est ce que les 2 mailles ensemble se tricotent tjrs à l'endroit? bonne soirée
14.03.2025 - 19:49DROPS Design answered:
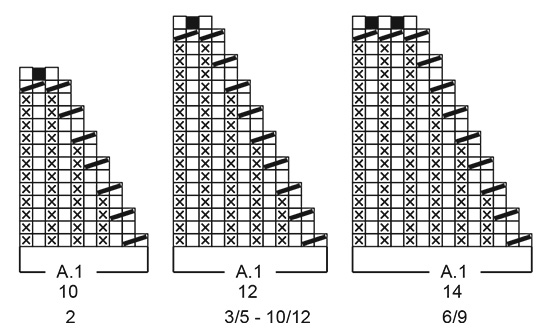
Bonjour Mme Laurent, tout à fait, au début de A.1 et à l'avant-dernier rang, vous tricotez 2 mailles ensemble à l'endroit - cf 3ème symbole de la légende des diagrammes. Bon tricot!
17.03.2025 - 07:18
![]() JACQUELINE LAURENT wrote:
JACQUELINE LAURENT wrote:
Merci pour votre réponse. je crois avoir compris. par contre pour le 17e rang je vois 2 fois 2 mailles ensemble mais que fait on des 10 premières mailles ? merci pour votre réponse
14.03.2025 - 19:47DROPS Design answered:
Bonjour Mme Laurent, aussitôt que vous avez le même nombre de mailles partout dans chaque motif de A.1, vous devez diminuer aussi dans le premier (celui où vous n'avez pas diminué); autrement dit, seules les 2 premières diminutions ne se font pas dans les 10 premières mailles, mais dès que vous avez 10 mailles partout, tricotez et diminuez comme dans A.1 tout le tour. Bon tricot!
17.03.2025 - 07:17
![]() JACQUELINE LAURENT wrote:
JACQUELINE LAURENT wrote:
Bonjour, je suis désolée de vous ennuyer encore fois. pour info je fais la taille 6/9 diagramme A.1 12 je ne comprends pas votre explication ? pouvez vous me réexpliquer en me détaillant. je vous remercie infiniment et j'espère ne plus vous ennuyer. bonne journée
14.03.2025 - 07:53DROPS Design answered:
Bonjour Mme Laurent, en taille 6/9 ans vous devriez avoir 112 au lieu de 106 mailles, vous pouvez ainsi suivre les indications/le diagramme de la taille en dessous, par ex au 1er tour, tricotez 10 m de côtes sans diminuer, puis répétez 8 fois les 12 mailles du diagramme A.1, 3/5+10/12 ans (vous avez ainsi: 10+(8x12)=106 m. Vous diminuez 8 m au 1er tour. Au tour suivant, tricotez les mailles comme elle se présentent. Au 3ème tour, procédez comme au 1er tour = vous avez maintenant 10 m dans chaque diagramme. Tricotez maintenant les diagrammes jusqu'à la fin (y compris les 10 premières mailles). Bon tricot!
14.03.2025 - 15:59
![]() Jacqueline Laurent wrote:
Jacqueline Laurent wrote:
Merci pour votre réponse. Je ne comprends pas très bien Pouvez vous me montrer quoi faire avec le premier rang du diagramme pour les 2 mailles qui manque ? Merci d'avance. Cordialement
13.03.2025 - 16:27DROPS Design answered:
Bonjour Mme Laurent, avec 106 mailles, il vous manque 2 mailles pour coller aux explications, vous allez tricoter quand même 9 fois A.2, mais par exemple, la 1ère fois, tricotez A.2 sans diminuer sur 11 mailles (en commençant par 2 m end au lieu d'1 m end, 1 m env), puis tricotez 4 fois A.2 comme dans le diagramme, tricotez A.2 sans diminuer comme la 1ère fois, et terminez avec A.2 jusqu'à la fin sur 12 m à chaque fois; vous avez ainsi diminué 7 mailles seulement (dans 2 A.2 au lieu des 9), continuez A.2 exactement comme dans le diagramme. Bon tricot!
14.03.2025 - 07:15
![]() JACQUELINE LAURENT wrote:
JACQUELINE LAURENT wrote:
Bonjour, je vous remercie pour votre réponse. en recomptant mes mailles je m'aperçois qu'au lieu d'en avoir 108 j'en ai 106? comment faire le diagramme avec 106 mailles? merci pour votre aide précieuse.
13.03.2025 - 09:06DROPS Design answered:
Bonjour Mme Laurent, si vous avez 2 mailles en moins dès le début, vous pouvez par exemple sauter 2 des diminutions (à 2 reprises tout le tour, ne faites pas la diminutions au début du diagramme) - ainsi vous retomberez sur le bon nombre de mailles. Bon tricot!
13.03.2025 - 15:58
![]() JACQUELINE LAURENT wrote:
JACQUELINE LAURENT wrote:
Bonjour , je ne comprends pas comment lire le diagramme a.1 12. je dois répéter dans le même rang 9 fois le même diagramme ? est ce que la ligne au dessus du deuxieme rang est bien l'envers du tricot? au total cela fait 18 rangs endroit et envers confondus ?
11.03.2025 - 20:06DROPS Design answered:
Bonjour Mme Laurent, lisez tous les rangs de A.1 de droite à gauche (car vous tricotez sur l'endroit tous les tours). Vous diminuez ainsi 1 maille au début de chaque A.1. Au 1er rang, il vous reste 11 mailles dans chaque A.1, puis après le 3ème rang, il reste 10 mailles dans chaque A.1 et ainsi de suite jusqu'à ce qu'il ne reste que 2 mailles au dernier rang. A.1 se tricote bien sur 18 rangs au total en taille 3/5 et 10/12 ans. Bon tricot!
12.03.2025 - 09:41
|
|||||||||||||
Sweet Attitude#sweetattitudehat |
|||||||||||||
 |
 |
||||||||||||
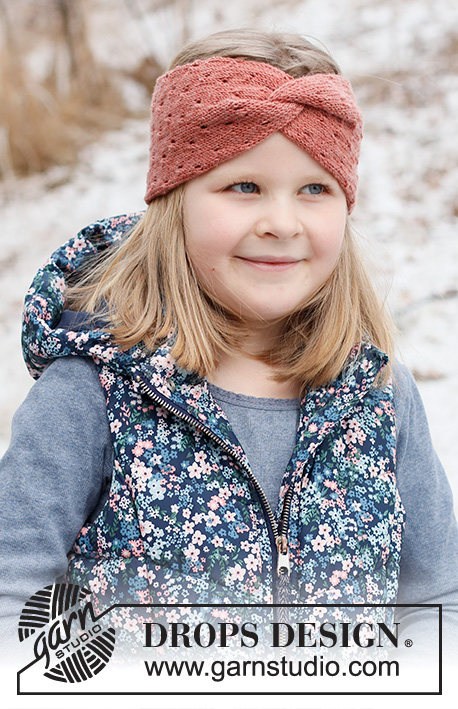
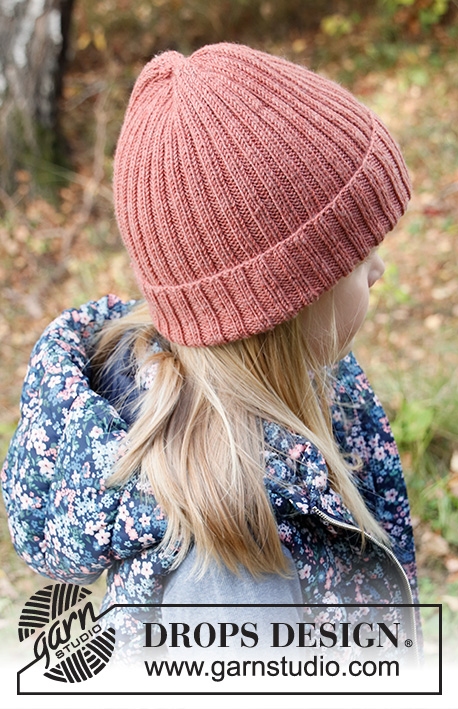
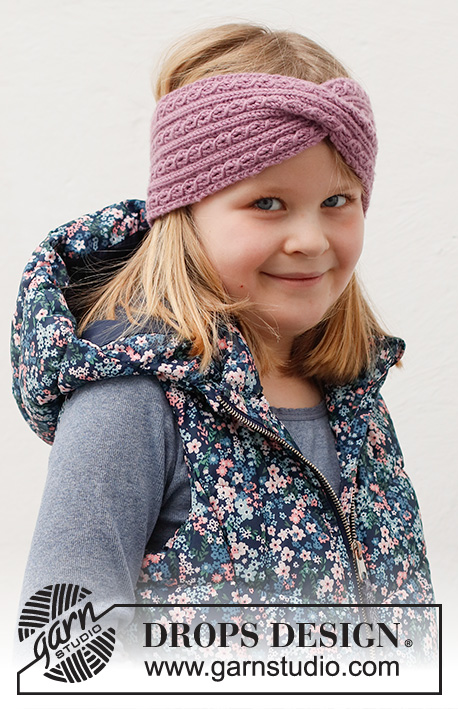
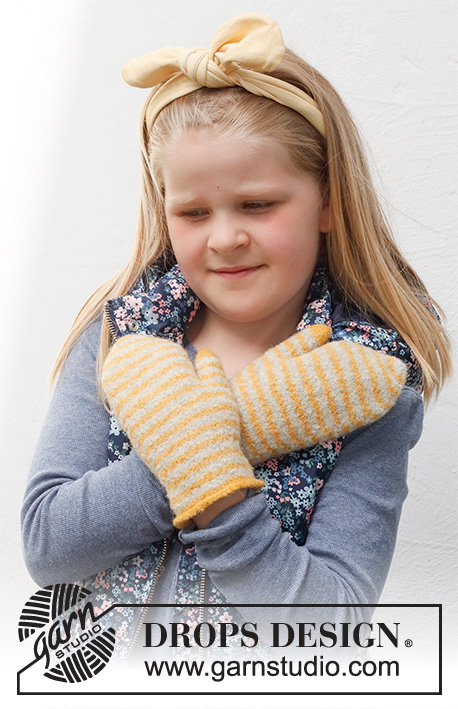
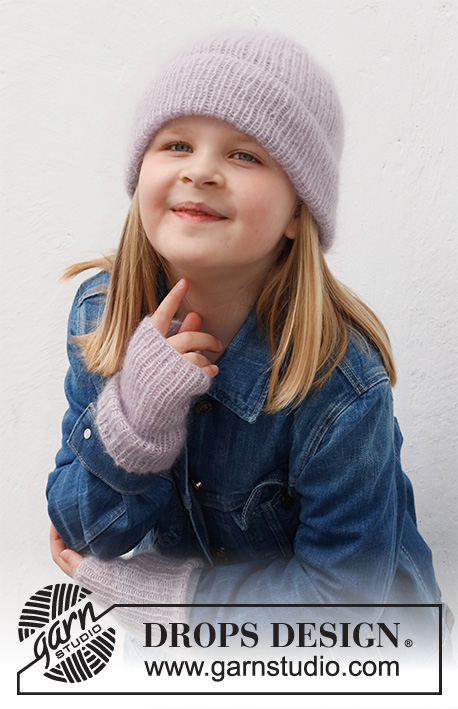
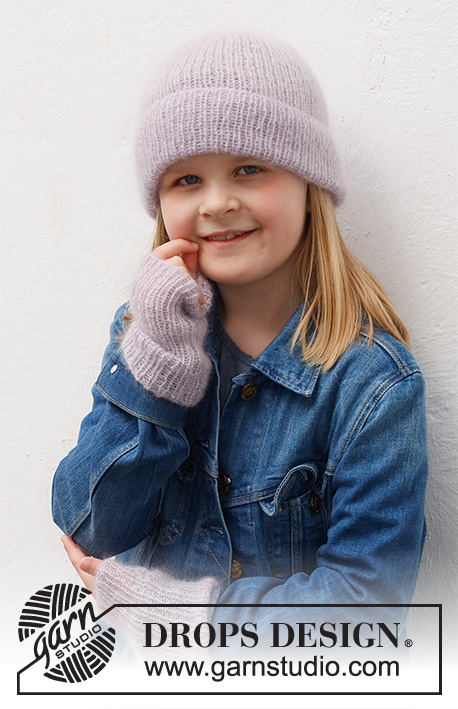
Knitted hat and wrist-warmers for children, with rib in 2 strands DROPS Kid-Silk. Sizes 2 - 12 years.
DROPS Children 40-27 |
|||||||||||||
|
------------------------------------------------------- EXPLANATIONS FOR THE PATTERN: ------------------------------------------------------- PATTERN (for hat): See diagram A.1. Choose diagram for your size. ------------------------------------------------------- START THE PIECE HERE: ------------------------------------------------------- HAT – SHORT OVERVIEW OF THE PIECE: The piece is worked in the round with circular needle, bottom up. Change to double pointed needles when necessary. HAT: Cast on 100-108-112-120 stitches with circular needle size 3.5 mm and 2 strands DROPS Kid-Silk. Purl 1 round, then work rib in the round (knit 1, purl 1). REMEMBER THE KNITTING TENSION! When the piece measures 19-19-20-21 cm (or to desired length, there is approx. 6-7-7-7 cm left), work A.1 (= 10-12-14-12 stitches) over all stitches (10-9-8-10 repeats in width). When A.1 has been completed in height there are 20-18-24-20 stitches. Knit all stitches together 2 and 2 = 10-9-12-10 stitches. Cut the strands, thread them through the remaining stitches, tighten and fasten well. The hat measures approx. 25-26-27-28 cm. Fold up the bottom 7 cm. ------------------------------------------------------- WRIST-WARMERS - SHORT OVERVIEW OF THE PIECE: The piece is worked in the round with double pointed needles. WRIST-WARMERS: Cast on 36-38-40 stitches with double pointed needles size 3.5 mm and 2 strands DROPS Kid-Silk. Work rib in the round (knit 1, purl 1) for 10-11-12 cm (or to desired length). REMEMBER THE KNITTING TENSION! Cast off with knit over knit and purl over purl. Work the other wrist-warmer in the same way. |
|||||||||||||
Diagram explanations |
|||||||||||||
|
|||||||||||||
 |
|||||||||||||
Have you finished this pattern?Tag your pictures with #dropspattern #sweetattitudehat or submit them to the #dropsfan gallery. Do you need help with this pattern?You'll find 14 tutorial videos, a Comments/Questions area and more by visiting the pattern on garnstudio.com. © 1982-2026 DROPS Design A/S. We reserve all rights. This document, including all its sub-sections, has copyrights. Read more about what you can do with our patterns at the bottom of each pattern on our site. |
|||||||||||||


With over 40 years in knitting and crochet design, DROPS Design offers one of the most extensive collections of free patterns on the internet - translated to 17 languages. As of today we count 324 catalogues and 12290 patterns translated into English (UK/cm). 12290
We work hard to bring you the best knitting and crochet have to offer, inspiration and advice as well as great quality yarns at incredible prices! Would you like to use our patterns for other than personal use? You can read what you are allowed to do in the Copyright text at the bottom of all our patterns. Happy crafting!
Post a comment to pattern DROPS Children 40-27
We would love to hear what you have to say about this pattern!
If you want to leave a question, please make sure you select the correct category in the form below, to speed up the answering process. Required fields are marked *.