
Oblíbené kategorie
Hledáte přízi?


Komentáře / Otázky (25)
![]() Carol Maitland napsala:
Carol Maitland napsala:
Hi thank you for your response.I am not understanding completely so I will ask the question another way. Do we increase on both rows round 1and round 2 before and after the marker.2nd round has the yo do I increase on this row. Sorry,thks so much Carol.
02.03.2026 - 16:59Odpověď DROPS Design :
Hi Carol, Yes you increase every round 6-7 times (depending on the size you are working), then every 2nd round 11 times. Regards, Drops Team.
03.03.2026 - 06:49
![]() Carol Maitland napsala:
Carol Maitland napsala:
Hi I am not understanding the pattern and just want to verify that I am reading it correctly. After putting on the 18 stitches,I start knitting the first round incl 1 stitch on each side of the marker.Then round two I knit the yarn overs twisted.My question is do I still include 1 stitch on each side of the markeralong with knitting the yarn overs twisted on the second round only.Thks Carol.
01.03.2026 - 20:07Odpověď DROPS Design :
Hi Carol, After working the yarn overs twisted, on round 3 you increase right before and straight after the marker-stitches in the same way as on round 1 (the first yarn overs are now incorporated into the stocking stitch). Regards, Drops Team.
02.03.2026 - 06:51
![]() Carol Maitland napsala:
Carol Maitland napsala:
Hi I am a bit confused.I knit the first 3 stitches putting a marker on the middle stitch which would be the second stitch.Then I do a yo then knit 1 then it asked for another yo then what.I keep redoing and redoing and end up always with 17 stitches instead of 18.Thks Carol.
04.01.2026 - 17:28Odpověď DROPS Design :
Hi Carol, You repeat from the first asterix to the second x 3: Knit 3 and insert the marker in the second stitch. 1 YO, knit 1, 1 YO, knit 3 and insert marker in 2nd stitch, 1 YO, knit 1, 1 YO, knit 3 and insert marker in 2nd stitch, 1 YO, knit 1, 1 YO. You have made 6 YOs and your original 12 stitches are now 18. Regards, Drops Team.
05.01.2026 - 06:53
![]() Judi napsala:
Judi napsala:
I have a question about the location of marking when the hat is half finished. For the first half, if I read correctly, for size XL I knit 10 cm over the increases, then an additional 9 cm with no increase or decreases, for a total of 33 cm from the cast on (23 cm from end of increases). However the instructions state to knit only 17 cm before starting to decrease. Is there a misprint in where to mark the midpoint? Also do you have a video on how to invisably fasten the end yarn on right side?
21.12.2025 - 13:59Odpověď DROPS Design :
Hi Judi, the marker in size XL will be after 27 cm from the cast-on edge - half the hat is finished. How to invisably fasten the end yarn you will find HERE. Happy knitting!
29.01.2026 - 15:32
![]() Bogi napsala:
Bogi napsala:
Eine schöne und gut verständliche Anleitung, dies war die allererste Mütze, die ich je gestrickt habe. Allerdings habe ich mich darüber geärgert, dass ich nur 2 Knäuel also 100g verbraucht habe. In der Anleitung sind als Verbrauch jedoch 3 Knäuel (150g) angegeben. Vielleicht korrigieren Sie diese Angabe 😊
01.12.2025 - 14:09
![]() Kath napsala:
Kath napsala:
Bonjour, j'aurais 2 questions de clarification: 1) A quel rang commence t-on à tricoter en rond? 2) Je ne comprends pas comment il est possible de terminer un rang avec un jeté plutôt qu'entre 2 mailles? Merci
02.11.2025 - 21:55Odpověď DROPS Design :
Bonjour Kath, le bonnet se tricote en rond dès le début; vous allez donc pouvoir terminer par 1 jeté vu que vous tricotez en rond. Si vous voulez tricoter ce bonnet en allers et retours, cette leçon pourra vous aider. Bon tricot!
03.11.2025 - 08:50
![]() Lisa Lebrija napsala:
Lisa Lebrija napsala:
For at udtagningerne skal lige dem på billedet, skal der tages ud på følgende måde efter der er slået 12 masker op. Strik 2 m ret, slå om, strik 2 m ret, slå om, Dette gøres 2 gange endnu. 2. omgang strikkes på følgende måde: 2 m ret, omslaget strikkes drejet ret til højre, 2 m ret, næste omslag strikkes ret til venstre. Så kommer det til at ligne udtagningerne på billedet af huen.
05.07.2025 - 17:45
![]() Lisa Lebrija napsala:
Lisa Lebrija napsala:
Jeg kan ikke få udtagningerne til at passe med udtagningerne på billedet. På billedet er der udtagninger på hver side af 2 masker. I opskriften er der kun 1 maske imellem hver udtagning. Så hvor er fejlen? Der står efter 2. omgang der nu skal tages ud på HVER pind. Vil det sige 2. omgang ikke skal strikkes før der er 18 masker ialt? Det bliver jo meget "hullet" med udtagninger på hver pind, uden en omgang ret uden udtagninger.
05.07.2025 - 11:14Odpověď DROPS Design :
Hei Lisa. Husk å lese UDTAGNINGSTIPS: Der tages ud på hver side af hver maske med mærke således: Strik til der er 1 maske tilbage før masken med mærke, slå om, strik 3 masker ret (mærket sidder i den midterste af disse masker), slå om (= 2 masker taget ud). Så det er 3 masker mellom hver kast. Strikk slik det er forklart på 1. og 2. pinne. Når du skal strikke 3. pinne (og videre), strikkes det glattstrikk og økninger (les udtagningstips), det økes på hver omgang totalt 6-7 ganger, før det skal økes på hver 2. omgang. mvh DROPS Design
07.07.2025 - 13:14
![]() Lalita napsala:
Lalita napsala:
Please let me ask about increasing and decreasing. After increasing 1 set, there will be 3 knitted stitches between the yarn over each side, but for decreasing, after knitting 2 together, knit 1 at the marker stitch, slip 1 knit 1 and pass the slipped knit over, the will be only 2 stitches between the decreased knit. Shouldn't we knit 2 (including the maker-stitch) before slipping 1 stitch?
08.04.2025 - 04:12Odpověď DROPS Design :
Dear Lalita, feel free to adjust where you will work the last (K2 tog) to get either K2 tog, K1 all the round or rather K1, K2 tog all the round, as you think it will look better, this round is the last one and this shouldn't be that visible. Happy knitting!
08.04.2025 - 09:47
![]() Tina napsala:
Tina napsala:
Hej Drops. Jeg vil gerne strikke denne her i 2 farver, hvor mange centimeter er der til midten?
13.02.2025 - 16:34Odpověď DROPS Design :
Hej Tina, Hele huen måler 26 eller 27 cm og så bukker du 6 cm op :)
18.02.2025 - 10:01
|
|
Blank Slate Hat#blankslatehat |
|
 |
 |
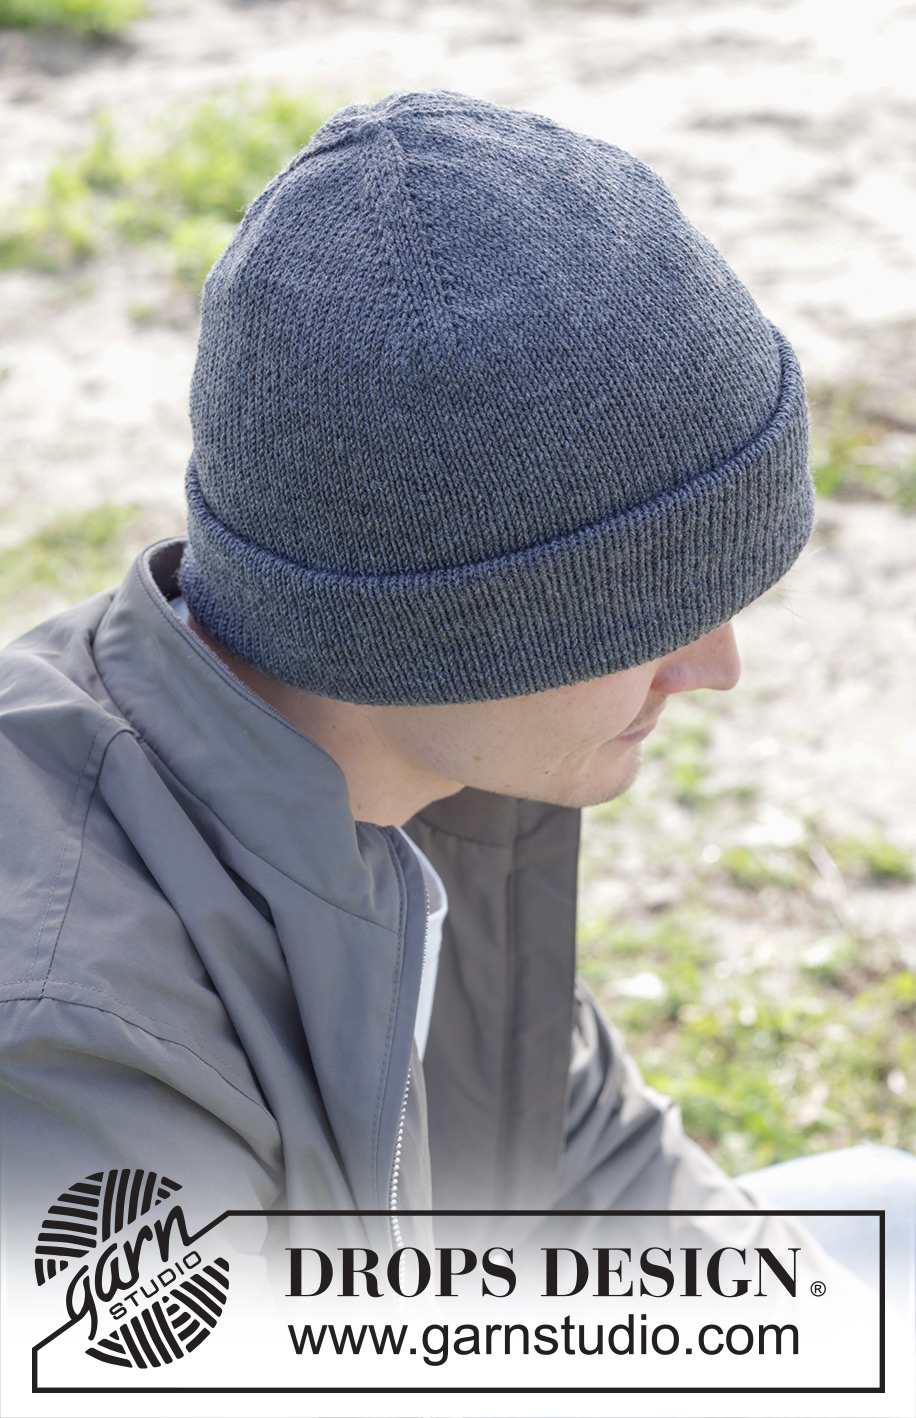
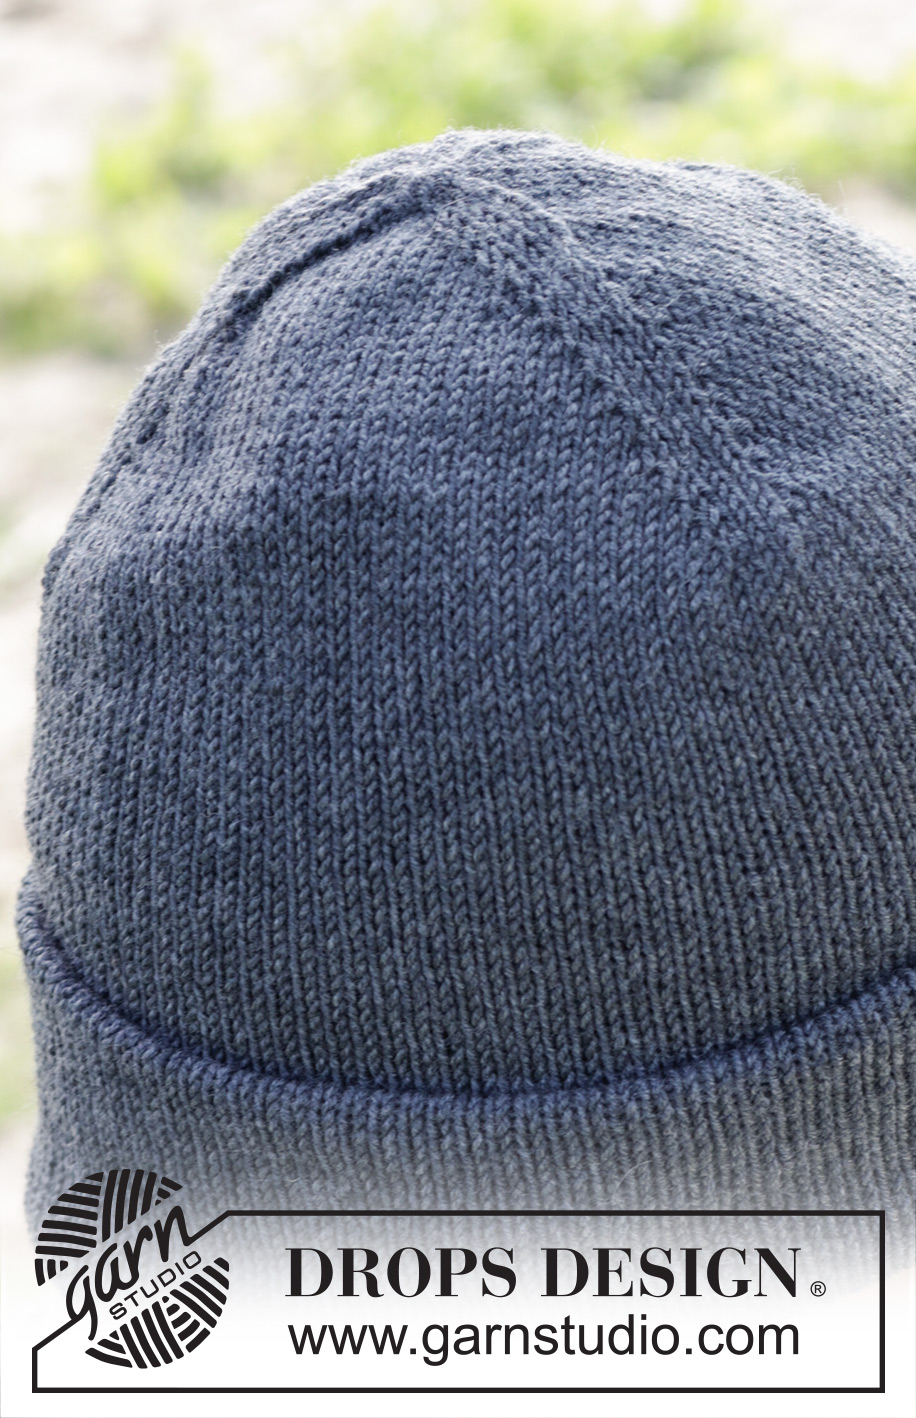
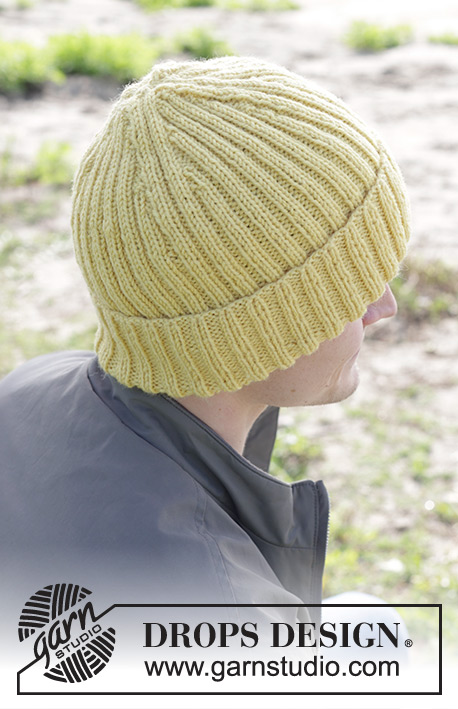
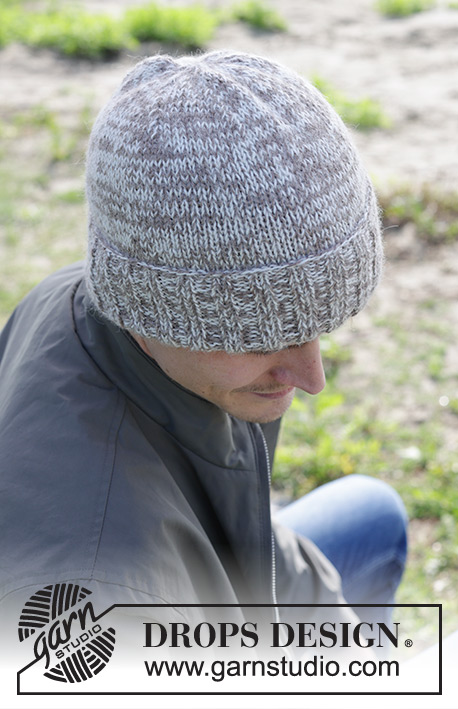
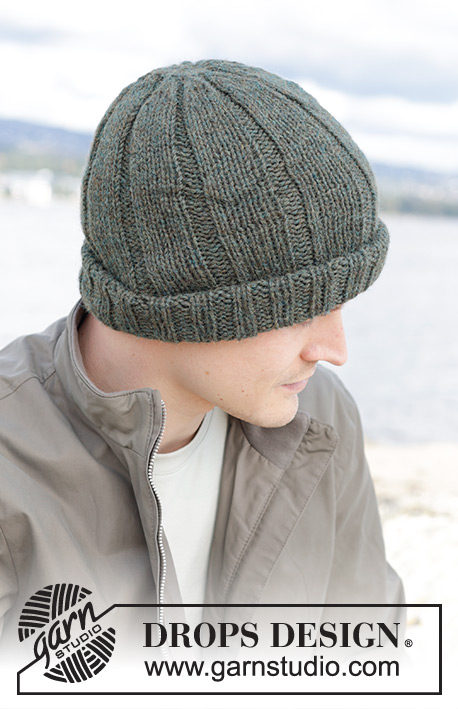
Pánská oboustranná čepice pletená z příze DROPS BabyMerino. Velikost M – XL.
DROPS 246-27 |
|
|
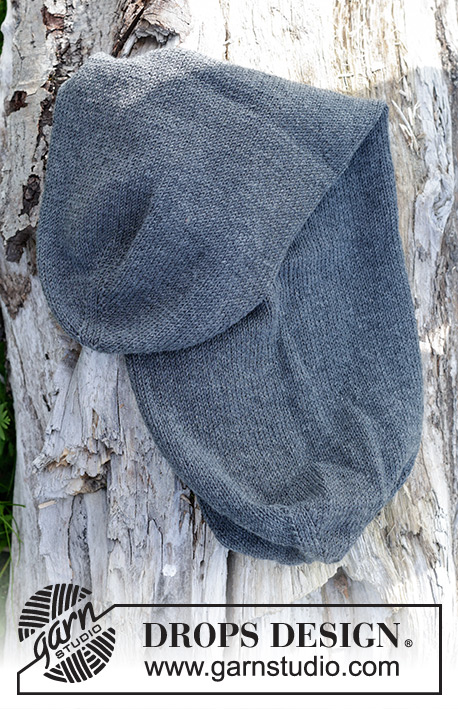
------------------------------------------------------- VYSVĚTLIVKY: ------------------------------------------------------- TIP - PŘIDÁVÁNÍ: Přidáváme na obou stranách každého označeného oka, takto: pleteme až po poslední 1 oko před označeným okem, 1x nahodíme, 3 oka upleteme hladce (označené oko leží uprostřed), 1x nahodíme (= přidali jsme 2 oka). V následující kruhové řadě pleteme nahození hladce za zadní nit, aby se v pletenině netvořily dírky. TIP - UJÍMÁNÍ: Ujímáme na obou stranách každého označeného oka, takto: pleteme až po poslední 2 oka před označeným okem, 2 oka spleteme hladce, 1 oko upleteme hladce (= označené oko), 1 oko sejmeme hladce, 1 upleteme hladce a sejmuté přes ně přetáhneme (= ujmuli jsme 2 oka). ---------------------------------------------------------- POPIS PRÁCE: ---------------------------------------------------------- ČEPICE – JAK BUDEME POSTUPOVAT: Pleteme v kruhových řadách na ponožkových jehlicích; podle potřeby převedeme s přibývajícím počtem ok na krátkou kruhovou jehlici. Začínáme přidáváním a pleteme první půlku shora dolů, pak navážeme druhou půlkou čepice, kterou pleteme zdola nahoru a končíme ujímáním - pletenina vypadá jako tubus, který je na každém konci stažený. Tento tubus zasuneme do sebe, takže výsledná čepice bude dvojitá, oboustranná. ČEPICE: Na ponožkové jehlice č.3,5 nahodíme přízí DROPS Baby Merino 12-12 ok. 1. KRUHOVÁ ŘADA: *3 oka upleteme hladce a 2. (prostřední) z nich si označíme, 1x nahodíme, 1 oko upleteme hladce, 1x nahodíme*, *-* opakujeme v průběhu celé kruhové řady (= 3 označená oka). 2. KRUHOVÁ ŘADA: hladce, nahození pleteme za zadní nit = 18-18 ok. Pokračujeme lícovým žerzejem a SOUČASNĚ přidáváme 1 oko na každé straně všech 3 označených ok – viz TIP – PŘIDÁVÁNÍ (= přidáme 6 ok). Toto přidávání opakujeme v každé kruhové řadě, celkem 6-7x, pak přidáváme v každé 2. kruhové řadě, celkem 11x. Po dokončení veškerého přidávání máme na jehlicích 120-126 ok a díl měří asi 9-10 cm (od počáteční, nahozené řady). Značky v pletenině ponecháme – během práce je snímáme vždy do aktuálně pletené kruhové řady; využijeme je později při ujímání. POZOR! Teď je ta pravá chvíle uzavřít otvor po počátečním nahození! Pomocí jehly protáhneme konec příze oky ve špičce čepice, stáhneme a zapošijeme. Pak pokračujeme lícovým žerzejem v kruhových řadách až do výše 26-27 cm. Polovinu čepice máme hotovou. Do pleteniny vložíme značku – od ní budeme měřit druhou polovinu čepice. Dál pleteme lícovým žerzejem v kruhových řadách, a to až do výše 17-17 cm od značky. Nyní ujmeme 1 oko na obou stranách všech 3 označených ok – viz TIP – UJÍMÁNÍ (= ujmuli jsme 6 ok). Takto ujímáme v každé 2. kruhové řadě, celkem 11x, pak ujmeme v každé kruhové řadě, celkem 6-7x. Po dokončení veškerého ujímání zbývá na jehlicích 18 ok. Následující kruhovou řadu pleteme takto: *2 oka spleteme hladce, 1 upleteme hladce*, *-* opakujeme v průběhu celé kruhové řady = 12-12 ok. Přízi odstřihneme, protáhneme ji zbylými oky, stáhneme a zapošijeme. Čepici přeložíme v označeném místě a jeden konec zasuneme do druhého Čepice je dvojitá, na vnější i na vnitřní straně je lícová – hladká – strana lícového žerzeje; můžeme ji nosit i „naruby". Dolní část ohrneme na lícovou stranu – záložka je široká 6 cm. |
|
Dokončili jste tento model?Pak označte své fotky tagem #dropspattern #blankslatehat nebo je pošlete do galerie #dropsfan. Potřebujete s tímto návodem poradit?Otevřete-li si návod na stránce garnstudio.com, najdete tam 12 výukových video-ukázek, Komentáře/Dotazy a další užitečné informace. © 1982-2026 DROPS Design A/S. Vyhrazujeme si veškerá práva. Tento dokument, včetně všech jeho dílčích částí, podléhá autorským právům. Podrobnější komentář k možnostem užití našich návodů najdete dole pod každým návodem na našich stránkách. |
|


V oblasti pletené a háčkované módy působí DROPS Design více než 40 let. Díky tomu vám můžeme nabídnout jednu z nejrozsáhlejších kolekcí modelů s bezplatnými návody dostupnými na internetu - navíc v 17 jazycích. K dnešnímu dni máme na 324 katalogů a 12239 návodů celkem - z nich je už 7525 dostupných v [češtině].
Přidejte komentář k návodu DROPS 246-27
Rádi bychom věděli, co si o tomto modelu myslíte!
Pokud se chcete na něco zeptat, dbejte prosím na to, abyste ve formuláři níže vybrali správnou kategorii - díky tomu se dříve dozvíte, co potřebujete vědět. Povinná pole jsou označena *.