
Leder du efter et garn?


Kommentarer / Spørgsmål (73)
![]() SandraB skrev:
SandraB skrev:
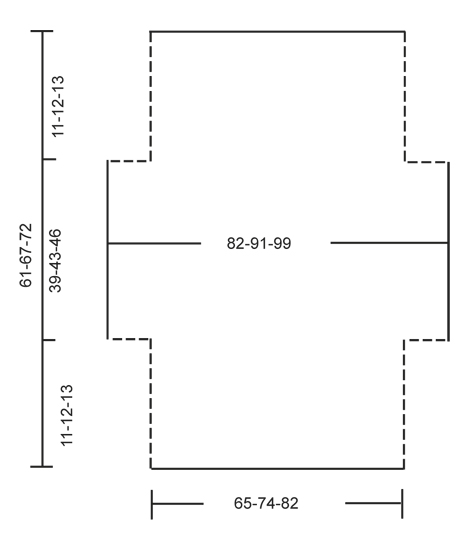
Hallo! Ik wil graag dit patroon maken. Heb nog niet zovaak kleren gehaakt. Daarom begrijp ik de tweede tekening met de maten niet zo goed. Hoe moet ik die zien?
01.07.2017 - 08:37DROPS Design svarede:
Hoi Sandra, In de tweede tekening zie je het werk wanneer je klaar bent met haken, maar nog niet in elkaar genaaid hebt. Het kledingstuk wordt op de horizontale lijn dubbel gevouwen en op op de stippellijnen aan elkaar gehaakt.
01.07.2017 - 12:01
![]() Elizabeth Baker skrev:
Elizabeth Baker skrev:
I have finished my 21 1/2 inches and pattern says to not work 12 stitches on either side how then do I start my next row
21.05.2017 - 19:07DROPS Design svarede:
Dear Mrs Baker, work next row until 12 sts remain, turn and work next row until 12 sts remain, turn and work next row. You will have now 12 sts unworked on each side. Happy crocheting!
22.05.2017 - 09:54
![]() Elizabeth Baker skrev:
Elizabeth Baker skrev:
I have finished my 21 1/2 inches and pattern says to not work 12 stitches on either side, how do I start next row?
20.05.2017 - 19:02
![]() Elizabeth Baker skrev:
Elizabeth Baker skrev:
After I have finished row 8 to continue do I start with A1 or A2 to repeat
01.05.2017 - 16:43DROPS Design svarede:
Dear Mrs Baker, after you have worked A.2 1 time in height, repeat A.2 from row 1. Happy croccheting!
02.05.2017 - 11:48
![]() Elizabeth Baker skrev:
Elizabeth Baker skrev:
After I have finished row 8 do I start with row A1 or A2
01.05.2017 - 16:20DROPS Design svarede:
Dear Elizabeth, after row 8, you should continue and repeat pattern A.2. I hope this helps. Happy crocheting!
06.05.2017 - 11:06
![]() GB skrev:
GB skrev:
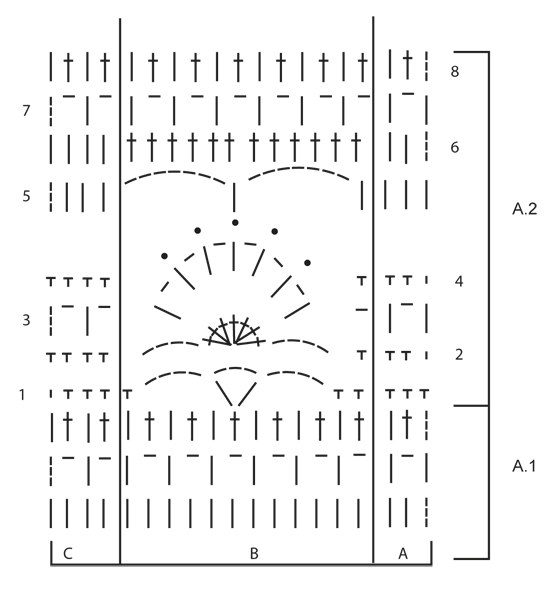
Hi, in the pattern directions it says the picot has a DC in the first of the chain 3s, but the video shows a sc instead. Could you clarify please? Thanks!
15.04.2017 - 17:14DROPS Design svarede:
Dear GB, you should work 1 dc in 1st of the 3 ch as explained in the pattern and not 1 sc as worked in the video, thanks for noticing. Happy crocheting!
19.04.2017 - 15:24
![]() Mary Ancira skrev:
Mary Ancira skrev:
The letter sizes, (example- S, M, L,) are not showing what size the bust is like it normally does. Should I assume the sizes are the same on all the patterns?
03.04.2017 - 10:24DROPS Design svarede:
Dear Mrs Ancira, you will find at the bottom of the pattern a measurement chart with measurements for each size in cm, taken flat from side to side. Compare these to a similar garment you have and like the shape to find out the matching size. Read more about sizing and convert into inches here. Happy crocheting!
03.04.2017 - 11:25
![]() Stephanie skrev:
Stephanie skrev:
Bonjour je ne comprends pas l'augmentation, au rang 6 avec l'ajout de maille en l'air que l'on crochete apres avec une bride un ml une bride et ensuite crochete le reste comment ? c'est la que je saisis pas , parce que logiquement on serait sur le rang 7 mais ensuite encore au rang 7 ,pouvez vous m'expliquer merci
14.02.2017 - 00:10DROPS Design svarede:
Bonjour Stéphanie, la 1ère augmentation sur le côté se fait à la fin du rang 5 (= le rang suivant sera le rang 6), on crochète 14 ml à la fin de ce rang, on tourne, on crochète 11B, puis le rang 6 de A.2 et on crochète 15 ml à la fin du rang 6, on tourne, on crochète 1B, 1 ml sur les nouvelles ml et on continue le rang 7 comme A.2. Puis on continue A.2 sur toutes les mailles. Bon crochet!
14.02.2017 - 09:32
![]() Jasmine skrev:
Jasmine skrev:
Dear Jasmine, "on row 1 in A.1 work 1 dc in each st," So since I have 92 stitches in A.1 I need to do 92 DC stitches all the way across?
21.01.2017 - 03:45DROPS Design svarede:
Dear Jasmine, you should have 92 dc on first row, then work: A.1A (= 4 sts), repeat A.1B a total of 7 times (= 7 x 12 sts), and finish with A.1C (= 4 sts), ie: 3 + (x12=84) + 4= 91 sts. Happy crocheting!
23.01.2017 - 09:29Leonore skrev:
This pattern doesnt make any sence. Row one is clear to work. From there on i dont understand anything! Please write out the pattern. I dont work with diagrams or whatever this confusuon is called. Please help!
17.12.2016 - 18:45DROPS Design svarede:
Dear Leonore, there is only diagram to this pattern, start reading diagram from the bottom corner on the right side and read towards the left from RS and from left to right from WS. Each symbol represents 1 st/group of sts. work A.1A (= 3 sts), then repeat A.1B (= 12 sts) and finish with A.1C (= 4 sts). You are welcome to contact your DROPS store for any further individual assistance. Happy crocheting!
19.12.2016 - 09:17
|
||||||||||||||||
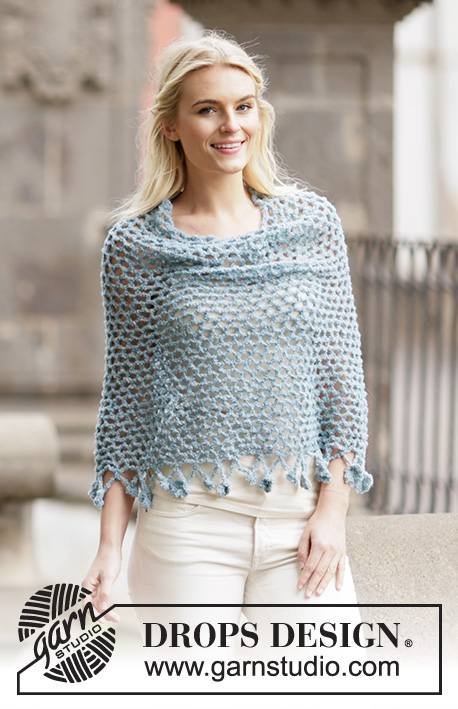
Blue Wonder#bluewondershoulderpiece |
||||||||||||||||
 |
 |
|||||||||||||||
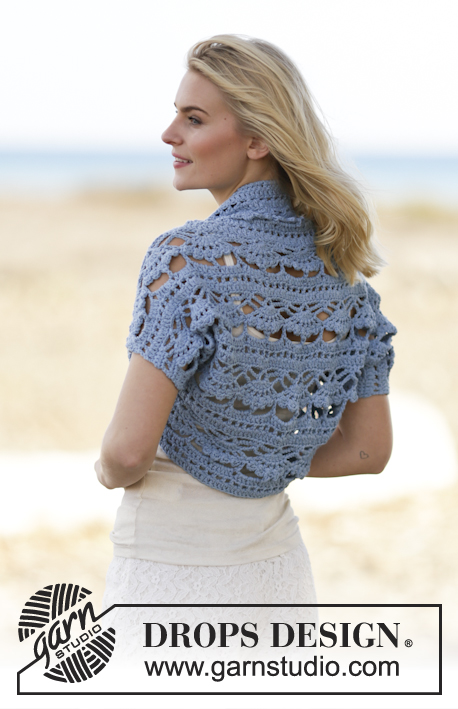
Hæklet DROPS skulderstykke i ”Paris”. Str S-XXXL
DROPS 162-34 |
||||||||||||||||
|
MØNSTER: Se diag A.1 og A.2. ---------------------------------------------------------- SKULDERSTYKKE: Hækl 110-125-139 lm på nål 5 med Paris. 1. RÆKKE: Vend og hækl 1 st i den fjerde lm fra nålen (= 2 st), hækl 1 st i hver af de 4-1-3 næste lm, * spring over 1 lm, 1 st i hver af de næste 5 lm, *, gentag fra *-* = 91-103-115 st. 2. RÆKKE: Videre hækles der efter diagram A.1 således: A.1 A, A.1 B totalt 7-8-9 gange, afslut med A.1 C. Når A.1 er hæklet 1 gang i højden gentages A.2 videre opover. SAMTIDIG når arb måler ca 11-12-13 cm (sørg for at næste række som skal hækles er 6. række i A.2) hækles der 14 lm i slutningen af rækken (= række 5). Vend og hækl 1 st i den fjerde lm fra nålen, derefter hækles der 1 st i hver af de næste 10 nye lm. Fortsæt med 6.række i A.2, i slutningen af rækken hækles der 15 nye lm. Vend og hækl 1 st i den sjette lm fra nålen, * hækl 1 lm, spring over 1 m, 1 st i næste m *, gentag fra *-* over de næste 9 nye lm, afslut med 1 lm. Hækl rækken ud efter A.2. På næste række hækles der som før frem til de nye m i slutningen af rækken, derefter hækles der 1 st om hver lm og 1 st i hver st. Der er nu taget 12 st ud i hver side = 115-127-139 st. Der fortsættes på række 8 således: A.2 A, A.2 B totalt 9-10-11 gange, afslut med A.2 C. Når arb måler ca 50-55-59 cm (sørg for at næste række som skal hækles er 7.række) hækles der ikke over de 12 st i hver side = 91-103-115 st. Videre hækles der således: A.2 A, A.2 B totalt 7-8-9 gange, afslut med A.2 C. Fortsæt til arb måler ca 61-67-72 cm, afpas efter en hel rapport af A.2. Klip og hæft tråden. MONTERING: Sy side- og underærmesømmene i et indenfor 1 kantm. |
||||||||||||||||
Diagram forklaring |
||||||||||||||||
|
||||||||||||||||
 |
||||||||||||||||
 |
||||||||||||||||
 |
||||||||||||||||
Har du lavet denne opskrift?Så tagger du dine billeder med #dropspattern #bluewondershoulderpiece eller send dem til #dropsfan galleriet. Behøver du hjælp med opskriften?Du finder 7 instruktionsvideoer, kommentarer/spørgsmål og mere i opskriften på www.garnstudio.com © 1982-2026 DROPS Design A/S. Alle rettigheder er reserveret. Dette dokument med tilhørende underdokumenter har copyright. Læs mere om hvad du kan gøre med vore opskrifter, nedert i alle vore opskrifter på hjemmesiden. |
||||||||||||||||


Med over 40 år i strikke- og hæklebranchen tilbyder DROPS Design en af de mest omfattende kollektioner med gratis opskrifter på internettet - oversat til 17 sprog. Dags dato har vi 324 kataloger og 12290 opskrifter på Dansk.
Vi arbejder hårdt for at kunne tilbyde Dig det bedste man kan få af strik og hækling, inspiration og gode råd men også kvalitetsgarn til fantastiske priser! Vil du bruge vore opskrifter til andet end for privat brug? Du kan læse om hvilke regler som gælder under teksten Copyright nederst på siden i alle vore opskrifter. God fornøjelse!
Kommentere opskrift DROPS 162-34
Vi vil gerne høre din mening om denne model!
Hvis du ønsker at stille et spørgsmål, så husk at vælge rigtig kategori i menuen under - det vil give dig hurtigere svar. Obligatoriske felter er markeret med *.