
Populære kategorier
Ser du etter et garn?


Kommentarer / Spørsmål (13)
![]() Cassina skrev:
Cassina skrev:
Hallo liebes Team, die Mütze habe ich fertiggestellt und es hat alles topp funktioniert- allerdings "steht" die Krempe bei mir nicht dauerhaft. Ich setze die Mütze auf, falte sie in Position und kurz danach "rollt" sich die Krempe nach vorn. Wäre Bügelsteif o.ä. eine Idee? Über einen Tipp würde ich mich sehr freuen. Lieben Grüße Cassina
02.03.2023 - 15:02DROPS Design answered:
Liebe Cassina, die Krempe rollt, wie auf dem Foto, aber wenn Sie möchten, daß es weniger rollt, können Sie vielleicht mehr Maschen zunehmen oder mehr Zunahmenrunden häkeln. Schauen Sie ähnliche Mütze mit einer Krempe, es kann Ihnen inspirieren.
15.03.2023 - 13:27
![]() Nora skrev:
Nora skrev:
Hi again! So I finished to project but the last 4 rows of the brim seems to tight. Should the increase number of row 4 not be the other way around? Happy holidays!
24.12.2022 - 17:37DROPS Design answered:
Dear Nora, the last 4 rows should be quite tight so that they can keep the shape of the brim instead of falling downwards. Happy knitting!
26.12.2022 - 00:16
![]() Nora skrev:
Nora skrev:
Again, thank you so much 🙏🏽✨
12.12.2022 - 10:46
![]() Nora skrev:
Nora skrev:
Thank you once again for your quick reply and for all the help! So just to make sure (because I’ve been doing it already 2 times wrong 😆) If I would like to make a hat in size S/M the first round should be 6 stitches and so one. Last round 51 stitches.
12.12.2022 - 09:56DROPS Design answered:
Dear Nora, correct, you start with 6 sts (dc UK-English/sc US-English) and ends the top of hat with 51 sts on 9th round, then work straight until piece measures 18 cm from the first round. Happy crocheting!
12.12.2022 - 10:15
![]() Nora skrev:
Nora skrev:
Hi, 1 more question :) What do you mean with: ROUND 9: increase 3-9 double crochets evenly on the round. Does it mean i need to choose between 3 or 9 or do I need to increase one side with 3 stitches and the other side with 9 stitches. Once again, thanks so much, can't wait to finish it!
10.12.2022 - 18:31DROPS Design answered:
Dear Nora, all of the number sequences (6-6, 12-12, 3-9) are used to be able to use the same instructions for several sizes. The first number in each sequence corresponds to the smallest size; the second one to the largest. So, if you are working size S/M, increase 3 double crochets; if you are working size M/L you need to increase 9 double crochets. Happy crocheting!
11.12.2022 - 22:50
![]() Nora skrev:
Nora skrev:
Hi, I have the feeling i'm doing something wrong. It's looks more like a pot holder then it becomes a hat. I just finished round 6. Any suggestions? Also, if i'm right every round starts with chain 3 which counts as a stitch. The first stitch is not into the slipstitch of previous round but the next one? You end the last stitch with a slipstitch into the 3rd of chain 3. Thanks so much for your help. I real love the hat and would be so happy to make it right :)
08.12.2022 - 16:36DROPS Design answered:
Dear Nora, you first work a circle for the crown of the hat until there are enough stitches for the circumference = 51-57sts, then work "straight" for the edge of the hat, and finally work the brim. This hat is worked with double crochets (UK-Terminology)/single crochets (US-terminology) - make sure you are reading the appropriate English terminology by clicking on the scroll down menu below the photos - so you replace the first stitch with 1 chain and end with 1 slip stitch in this chain. Happy crocheting!
08.12.2022 - 17:41
![]() Béatrice Gerodetti skrev:
Béatrice Gerodetti skrev:
Bonjour, les 18 cm sont mesurés depuis le début du travail ou depuis la fin des augmentations? Merci d’avance! Béatrice
29.09.2022 - 10:20DROPS Design answered:
Bonjour Béatrice, depuis le début du travail. Bon crochet!
29.09.2022 - 11:44
![]() Sigrid skrev:
Sigrid skrev:
Glockenblume!
13.09.2022 - 12:07
![]() Piera skrev:
Piera skrev:
Buongiorno. C'è forse qualcosa di errato nella parte relativa agli strumenti da utilizzare. Credo che sia un cappello da fare con l'uncinetto 7.00 mm e non ferri. Buona giornata. UNCINETTO: UNCINETTO DROPS CIRCOLARI n° 4,5 mm, lunghezza 40 e 80 cm per la parte a maglia rasata. FERRI DROPS CIRCOLARI n° 7 mm.
12.09.2022 - 15:34DROPS Design answered:
Buonasera Piera, grazie per la segnalazione: abbiamo corretto il testo. Buon lavoro!
12.09.2022 - 21:39
![]() Karin skrev:
Karin skrev:
Freue mich schon darauf.
07.08.2022 - 20:46
|
|
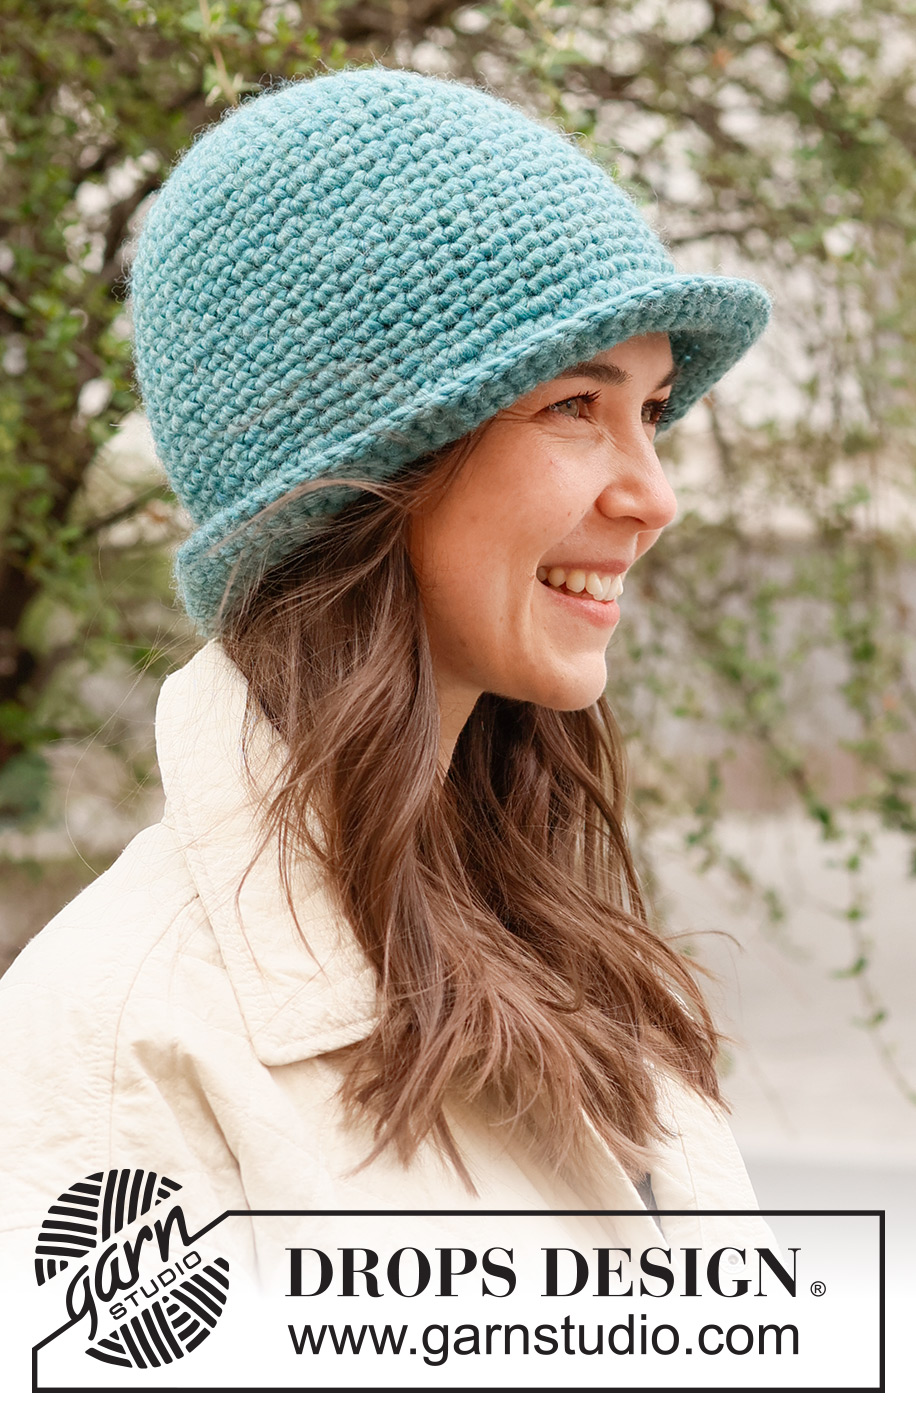
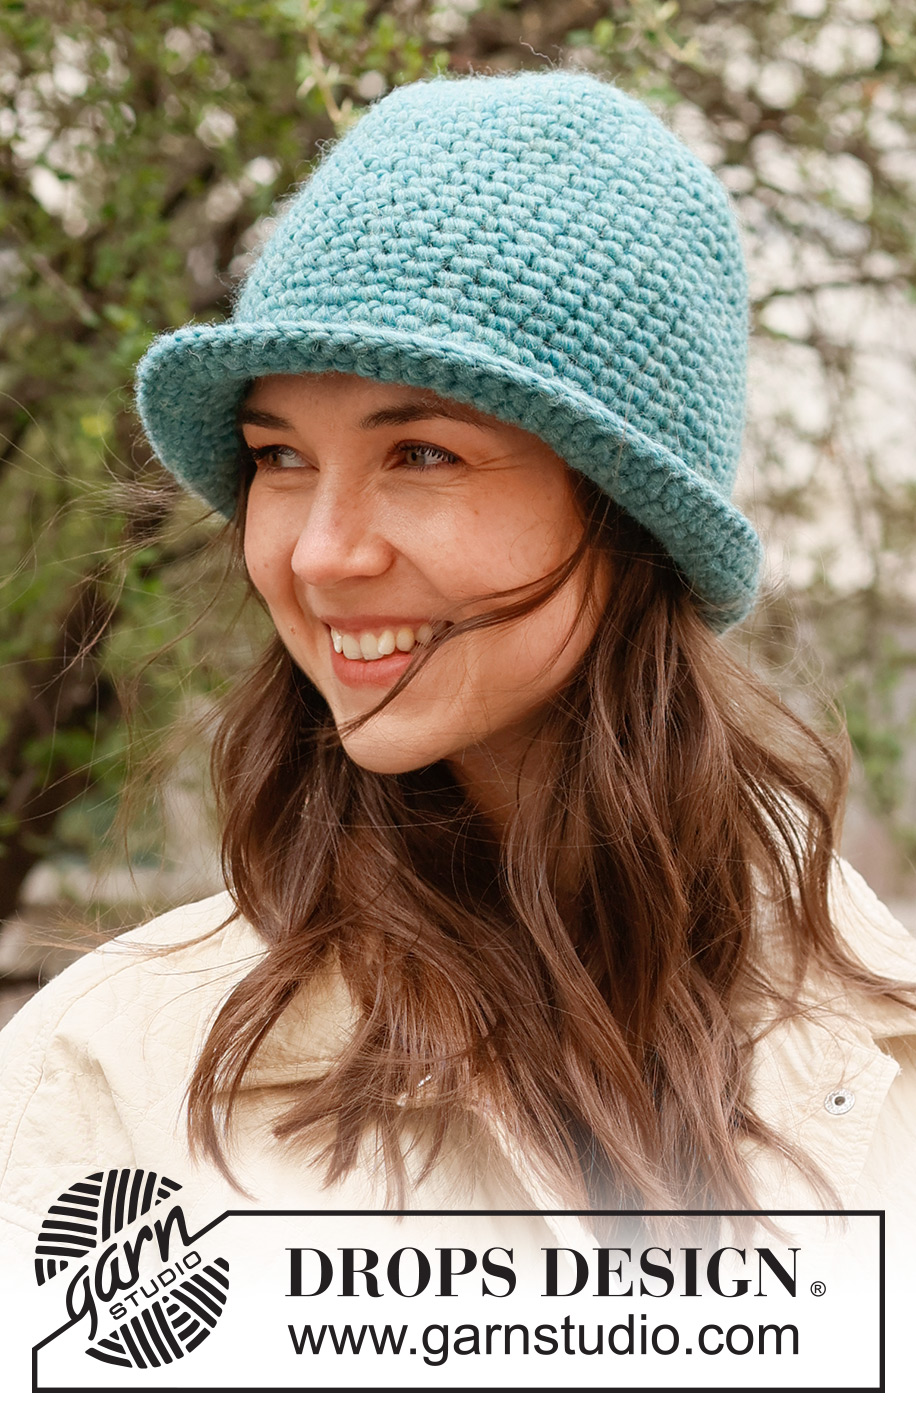
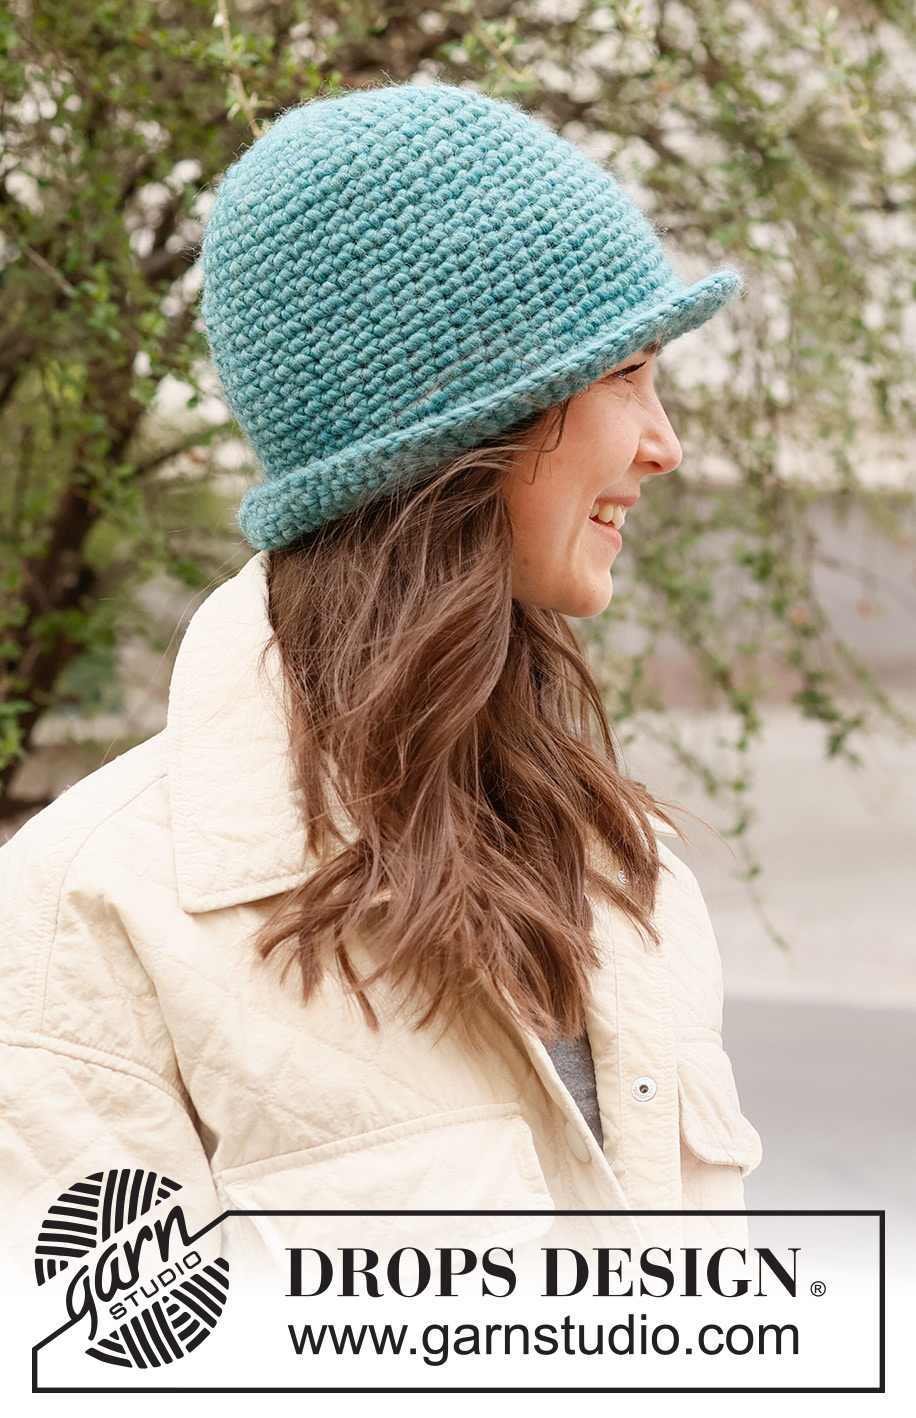
Forest Shade Hat#forestshadehat |
|
 |
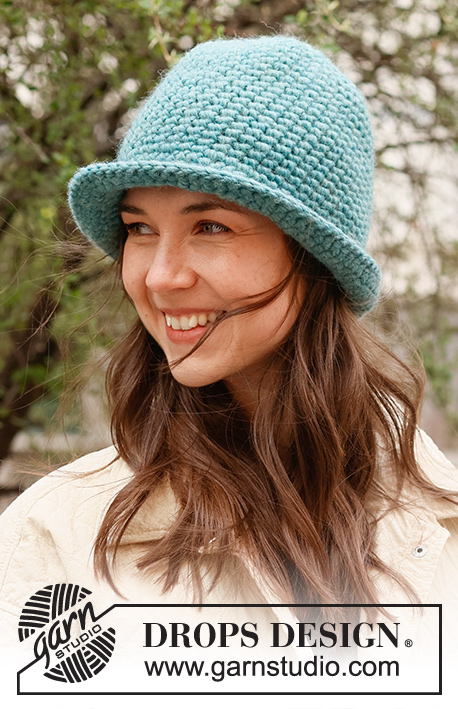 |
Heklet hatt i DROPS Snow. Arbeidet hekles ovenfra og ned i fastmasker. Størrelse S - L.
DROPS 234-16 |
|
|
------------------------------------------------------- FORKLARING TIL OPPSKRIFTEN: ------------------------------------------------------- HEKLEINFORMASJON: På begynnelsen av hver omgang erstattes første fastmaske med 1 luftmaske, hver omgang avsluttes med 1 kjedemaske i første luftmaske fra begynnelsen av omgangen. ØKETIPS: Det økes masker ved å hekle 2 fastmasker i samme fastmaske. LUFTMASKE: Dersom du hekler ytterst på heklenålen vil luftmasken ofte bli for stram. 1 luftmaske skal være like lang som 1 fastmaske er bred. ------------------------------------------------------- START ARBEIDET HER: ------------------------------------------------------- HATT - KORT OVERSIKT OVER ARBEIDET: Arbeidet hekles rundt ovenfra og ned. HATT: Hekle 4 luftmasker på nål 7 med DROPS Snow og sett dem sammen til en ring med 1 kjedemaske i første luftmaske. Les LUFTMASKE i forklaringen over. 1.OMGANG: Hekle 6-6 fastmasker om luftmaskeringen. Les HEKLEINFORMASJON. 2.OMGANG: Hekle 2 fastmasker i hver fastmaske omgangen rundt = 12-12 fastmasker. 3.OMGANG: Hekle * 1 fastmaske i første/neste fastmaske, 2 fastmasker i neste fastmaske *, hekle fra *-* omgangen rundt = 18-18 fastmasker. 4.OMGANG: Hekle * 1 fastmaske i hver av de 2 første/neste fastmaskene, 2 fastmasker i neste fastmaske *, hekle fra *-* omgangen rundt = 24-24 fastmasker. HUSK PÅ HEKLEFASTHETEN! 5.OMGANG: Hekle * 1 fastmaske i hver av de 3 første/neste fastmaskene, 2 fastmasker i neste fastmaske *, hekle fra *-* omgangen rundt = 30-30 fastmasker. 6.OMGANG: Hekle * 1 fastmaske i hver av de 4 første/neste fastmaskene, 2 fastmasker i neste fastmaske *, hekle fra *-* omgangen rundt = 36-36 fastmasker. 7.OMGANG: Hekle * 1 fastmaske i hver av de 5 første/neste fastmaskene, 2 fastmasker i neste fastmaske *, hekle fra *-* omgangen rundt = 42-42 fastmasker. 8.OMGANG: Hekle * 1 fastmaske i hver av de 6 første/neste fastmaskene, 2 fastmasker i neste fastmaske *, hekle fra *-* omgangen rundt = 48-48 fastmasker. 9.OMGANG: Hekle 1 fastmaske i hver fastmaske SAMTIDIG som det økes 3-9 fastmasker jevnt fordelt rundt på omgangen - les ØKETIPS = 51-57 fastmasker. Videre hekles det 1 fastmaske i hver fastmaske omgangen rundt til arbeidet måler ca 18-19 cm fra toppen. Nå hekles det brem slik: BREM: 1.OMGANG: Hekle * hekle 1 fastmaske i hver av de 2 første/neste fastmaskene, 2 fastmasker i neste fastmaske *, hekle fra *-* omgangen rundt = 68-76 fastmasker. 2.- 3.OMGANG: Hekle 1 fastmaske i hver fastmaske omgangen rundt. 4.OMGANG: Hekle 1 fastmaske i hver fastmaske SAMTIDIG som det økes 7-4 fastmasker jevnt fordelt omgangen rundt = 75-80 fastmasker. 5.OMGANG: Hekle 1 fastmaske i hver fastmaske omgangen rundt. 6.OMGANG: Hekle 1 fastmaske i hver fastmaske omgangen rundt. 7.OMGANG: Hekle 1 kjedemaske i bakre maskebue på hver fastmaske omgangen rundt. Klipp og fest tråden. |
|
Har du fullført dette mønsteret?Tagg bildene dine med #dropspattern #forestshadehat eller send dem til #dropsfan-galleriet. Trenger du hjelp med denne oppskriften?Du finner 8 instruksjonsvideoer, kommentarer/spørsmål og mer i oppskriften på www.garnstudio.com © 1982-2026 DROPS Design A/S. Alle rettigheter er reservert. Dette dokumentet med sine underdokumenter har copyright. Les mer om hva du er tillatt å gjøre med våre oppskrifter nederst i alle våre oppskrifter på vår nettside. |
|


Med over 40 år i strikke- og heklebransjen, tilbyr DROPS Design en av de mest omfattende samlingene av gratis oppskrifter på internett - oversatt til 17 språk. Per i dag har vi 324 kataloger og 12290 oppskrifter på Norsk.
Vi jobber hardt for å tilby det beste innen strikking og hekling, inspirasjon og gode råd, men også kvalitetsgarn til fantastiske priser! Vil du bruke våre oppskrifter til annet enn personlig bruk? Du kan lese om hvilke regler som gjelder i teksten Copyright nederst på siden i alle våre oppskrifter. God fornøyelse!
Kommenter oppskrift DROPS 234-16
Vi vil gjerne høre din mening om denne modellen!
Hvis du ønsker å stille et spørsmål, husk å velge riktig kategori i menyen under - det vil sørge for at du får svar raskere. Obligatoriske felt er markert med *.